Configuring Remote Access VPN
This section includes procedures and explanations for configuring Remote Access VPN.
Remote Access VPN Workflow
This section shows the Remote Access VPN Workflow.
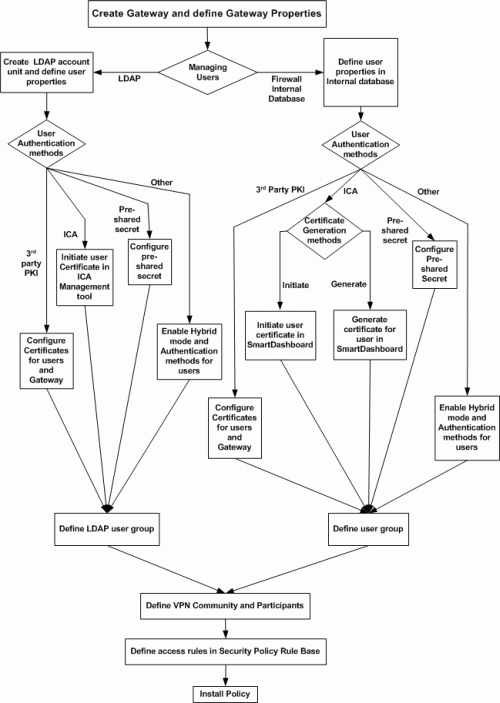
Start at the top, with Create Security Gateway and define Security Gateway properties, and trace a route down to Install policy. Sections following the chart detail step-by-step procedures for each phase.
Creating Remote Access VPN Certificates for Users
This section contains procedures for creating Remote VPN user certificates and sending them to end users.
There are two basic procedures for supplying remote access VPN certificates to users.
- Sending a P12 File:
- The administrator creates a p12 certificate file and sends it to users.
- The user saves the p12 file on the device and specifies the certificate using a remote VPN Client.
- Users authenticate by entering a certificate password when starting a remote access VPN connection.
- Using a Registration key:
- The administrator creates a registration key and sends it to the user.
- The user enrolls the certificate by entering the registration key in a Remote Access VPN client. The user can optionally save the p12 file to the device. The user must do this in an administrator-defined period of time.
- End users authenticate using this certificate. A password can also be required according to the security policy settings. If the user saves the p12 file to the device, a password is always necessary.
Enabling a User Certificate
To enable a user certificate:
- In SmartDashboard, click the tab.
- Go to the tab.
- Create a new user or double-click an existing user.
- In the window, click the tab.
- In the pane, click .
- In the window, click the tab and select .
- Click to close this window.
Creating a P12 Certificate File
After creating a user certificate, you must then make this certificate available to remote access users. Use this procedure to create a p12 certificate.
To create a p12 certificate file for remote access VPN users:
- Create the user certificate.
- In the window, click .
- In the pane, click .
- Select .
- In the window, enter and confirm the certificate password.
- Optionally, enter descriptive text in the field.
- Click and enter a path to save the p12 file.
The new certificate shows in the . The status is set to . - Send the .p12 file to the end user by secure email or other secure means.
Creating Certificate Registration Key
After creating a user certificate, you must then make this certificate available to remote access users. Use this procedure to create a certificate registration key that lets the user enroll the certificate for use with a device.
To create a certificate registration key:
- Create the user certificate.
- In the window, click .
- In the pane, click .
- Select .
- In the window, select the number of days before the certificate expires.
Click the email icon  to send the registration key to the user. to send the registration key to the user. - Optionally, enter descriptive text in the field.
Instructions for End Users
Remote Access VPN users can use many different clients to connect to network resources. It is the administrator's responsibility to give appropriate instructions to end users to make sure that they successfully enroll the certificate.
The Creating Certificates section gives some general procedural guidelines that apply to many VPN clients. For detailed instructions, refer to the VPN client documentation.
Creating and Configuring the Security Gateway
- In SmartDashboard, create a Security Gateway network object.
- On the page, select .
- Initialize a secure communication channel between the VPN module and the Security Management server by clicking
- On the page, define the interfaces and the VPN domain.
The ICA automatically creates a certificate for the Security Gateway.
Defining User and Authentication Methods in LDAP
- Obtain and install a license that enables the VPN module to retrieve information from an LDAP server.
- Create an LDAP account unit.
- Define users as LDAP users. A new network object for LDAP users is created on the Users tree. (The LDAP users also appear in the objects list window to the right.)
For more information see: LDAP and User Management in the R76 Security Management Server Administration Guide.
Enrolling User Certificates - ICA Management Tool
To use the ICA Management to enroll a user certificate:
- In SmartDashboard, click the tab.
- Go to the tab.
- Create a new user or double-click an existing user.
- Double-click a user to open the property window.
- On the tab, click .
- In the window tab, select .
- Enroll the user certificate using the. For more information, see the R76 Security Management Server Administration Guide.
Configuring Certificates Using Third Party PKI
Using third party PKI involves creating:
- A certificate for the user and
- A certificate for the Security Gateway
You can use a third-party OPSEC PKI certificate authority that supports the PKCS#12, CAPI or Entrust standards to issue certificates for Security Gateways and users. The Security Gateway must trust the CA and have a certificate issued by the CA.
For users managed on an LDAP server, the full distinguished name (DN) which appears on the certificate is the same as the user's name. But if the user is managed on the internal database, the user name and DN on the certificate will not match. For this reason, the user name in the internal database must be either the full DN which appears on the certificate or just the name which appears in the CN portion of the certificate. For example, if the DN which appears on the certificate is:
CN=John, OU=Finance, O=Widget Enterprises, C=US
The name of the user on the internal database must be either:
- John, or:
- CN=John, OU=Finance, O=Widget Enterprises, C=US

|
Note - The DN on the certificate must include the user's LDAP branch. Some PKI solutions do not include (by default) the whole branch information in the subject DN, for example the DN only includes the common name. This can be rectified in the CA configuration.
|
To use a third-party PKI solution:
- On the User properties window, Encryption tab, click Edit... The IKE phase 2 properties window opens. On the Authentication tab, select Public key.
- Define the third party Certificate Authority as an object in SmartDashboard. See Enrolling with a Certificate Authority.
- Generate a certificate for your Security Gateway from the third party CA. For more information, see: Enrolling with a Certificate Authority.
- Generate a certificate for the remote user from the third party CA. (Refer to relevant third party documentation for details.) Transfer the certificate to the user.
- In Global Properties, Authentication window, add or disable suffix matching.
For users with certificates, it is possible to specify that only certificates with a specified suffix in their DN are accepted. This feature is enabled by default, and is required only if:
- Users are defined in the internal database, and
- The user names are not the full DN.
All certificates DN's are checked against this suffix.
|
Note - If an hierarchy of Certificate Authorities is used, the chain certificate of the user must reach the same root CA that the Security Gateway trusts
|
Enabling Hybrid Mode and Methods of Authentication
Hybrid mode allows the Security Gateway and remote access client to use different methods of authentication. To enable Hybrid Mode:
From Policy > Global Properties > Remote Access >VPN - Basic select Hybrid Mode.
Defining User Authentication Methods in Hybrid Mode
- On the User Properties window, Authentication tab, select an appropriate authentication scheme.
- Enter authentication credentials for the user.
- Supply the user ("out-of-band") with these credentials.
Configuring Authentication for NT groups and RADIUS Classes
To enable this group authentication feature:
- Set the add_radius_groups property in objects.C to "true",
- Define a generic* profile, with RADIUS as the authentication method.
- Create a rule in the Policy rule base whose "source" is this group of remote users that authenticate using NT Server or RADIUS.
Office Mode IP assignment file
This method also works for Office Mode. The group listed in the ipassignment.conf file points to the group that authenticates using NT group authentication or RADIUS classes. See: Office Mode via ipassignment.conf File.
Using a Pre-Shared Secret
When using pre-shared secrets, the remote user and Security Gateway authenticate each other by verifying that the other party knows the shared secret: the user's password. To enable the use of pre-shared secrets:
- In Policy > Global Properties > Remote Access > VPN — Basic, select Pre-Shared Secret (For SecuRemote/SecureClient users)
- Deselect Hybrid Mode.
- For each user, go to the Encryption tab of the User Properties window, select IKE and click Edit... to display the IKE Phase 2 Properties window.
- In the Authentication tab, enable Password (Pre-Shared Secret) and enter the pre-shared secret into the Password (Pre-shared secret) and Confirm Password fields.
- Inform the user of the password "out-of-band".
Defining an LDAP User Group
See: LDAP and User Management in the R76 Security Management Server Administration Guide.
Defining a User Group
In SmartDashboard, create a group for remote access users. Add the appropriate users to this group.
Defining a VPN Community and its Participants
- On the VPN Communities tree, double-click Remote_Access_Community. The Remote Access Community Properties window opens.
- On the Participating Security Gateways page, Add... Security Gateways participating in the Remote Access Community.
- On the Participating User Groups page, Add... the group that contains the remote access users.
Defining Access Control Rules
Access control is a layer of security not connected with VPN. The existence of a remote access community does not mean that members of that community have free automatic access to the network. Appropriate rules need to be created in the Security Policy Rule Base blocking or allowing specific services.
- Create a rule in the Security Policy Rule Base that deals with remote access connections.
- Double-click the entry in the VPN column. The VPN Match Conditions window opens.
- Select Only connections encrypted in specific VPN Communities.
- Click Add... to include a specific community in this Security Policy Rule.
- Define services and actions. For example, to allow remote access users to access the organization's SMTP server, called SMTP_SRV, create the following rule:
Source
|
Destination
|
VPN
|
Service
|
Action
|
Track
|
Any
|
SMTP_SRV
|
Remote_Access_Community
|
SMTP
|
Accept
|
Log
|
Installing the Policy
Install the policy and instruct the users to create or update the site topology.
User Certificate Management
Managing user certificates involves:
- Tracing the status of the user's certificate
- Automatically renewing a certificate
- Revoking certificates
Tracing the Status of User's Certificate
The status of a user's certificate can be traced at any time in the Certificates tab of the user's Properties window. The status is shown in the Certificate state field. If the certificate has not been generated by the user by the date specified in the Pending until field, the registration key is deleted.
If the user is defined in LDAP, then tracing is performed by the ICA management tool.
Automatically Renewing a Users' Certificate
ICA certificates for users can be automatically renewed a number of days before they expire. The client initiates a certificate renewal operation with the CA before the expiration date is reached. If successful, the client receives an updated certificates.
To configure automatic certificate renewal:
- Select Policy > Global Properties > Remote Access > Certificates.
- Select Renew users internal CA certificates and specify a time period. The time period is the number of days before the user's certificate is about to expire in which the client will attempt to renew the certificate.
- Install the Security Policy.
- Instruct the user to update the site's topology.
Revoking Certificates
The way in which certificates are revoked depends on whether they are managed internally or externally, via LDAP.
For internally managed Users
When a user is deleted, their certificate is automatically revoked. Certificates can be disabled or revoked at any time.
If you initiated a certificate generation that was not completed by the user, you can disable the pending certificate by clicking Disable in the Certificates tab of the User Properties window.
If the certificate is already active, you can revoke it by clicking Revoke in the Certificates tab of the User Properties window.
For Users Managed in LDAP
If users are managed in LDAP, certificates are revoked using the ICA management tool.
Modifying Encryption Properties for Remote Access VPN
The encryption properties of the users participating in a Remote Access community are set by default. If you must modify the encryption algorithm, the data integrity method and/or the Diffie-Hellman group, you can either do this globally for all users or configure the properties per user.
To modify the user encryption properties globally:
- Select Policy > Global Properties > Remote Access > VPN - (IKE Phase 1).
- Configure the appropriate settings:
- Support encryption algorithms - Select the encryption algorithms that will be supported with remote hosts.
- Use encryption algorithms - Choose the encryption algorithm that will have the highest priority of the selected algorithms. If given a choice of more than one encryption algorithm to use, the algorithm selected in this field will be used.
- Support Data Integrity - Select the hash algorithms that will be supported with remote hosts to ensure data integrity.
- Use Data Integrity - The hash algorithm chosen here will be given the highest priority if more than one choice is offered.
- Support Diffie-Hellman groups - Select the Diffie-Hellman groups that will be supported with remote hosts.
- Use Diffie-Hellman group - SecureClient users utilize the Diffie-Hellman group selected in this field.
To enforce the global encryption properties for some users while being able to modify them for specific users go to Policy > Global Properties > Remote Access > VPN - (IPSEC Phase 2):
- Set the required properties in the window and disable Enforce Encryption Algorithm and Data Integrity on all users.
- In the Encryption tab of the User Properties window select IKE and click Edit.
The IKE Phase 2 Properties window is displayed.
- Select the Encryption tab.
- If you want the encryption and data integrity algorithms of the user to be taken from the Global Properties definitions, select Defined in the Remote Access VPN page of the Global Properties window. If you want to customize the algorithms for this user, select Defined below and select the appropriate encryption and data integrity algorithms.
Working with RSA Hard and Soft Tokens
If you use SecurID for authentication, you must manage the users on RSA's ACE management server. ACE manages the database of RSA users and their assigned hard or soft tokens. SecureClient contacts the site's Security Gateway. The Security Gateway contacts the ACE Server for user authentication information. This means:
- The remote users must be defined as RSA users on the ACE Server.
- On the Security Gateway, the SecurID users must be placed into a group with an external user profile account that specifies SecurID as the authentication method.
SecurID Authentication Devices
Several versions of SecurID devices are available. The older format is a small device that displays a numeric code, called a tokencode, and time bars. The token code changes every sixty seconds, and provides the basis for authentication. To authenticate, the user must add to the beginning of the tokencode a special password called a PIN number. The time bar indicates how much time is left before the next tokencode is generated. The remote user is requested to enter both the PIN number and tokencode into SecureClient's connection window.
The newer format resembles a credit card, and displays the tokencode, time bars and a numeric pad for typing in the PIN number. These type of device mixes the tokencode with the entered PIN number to create a Passcode. SecureClient requests only the passcode.
SoftID operates the same as the passcode device but consists only of software that sits on the desktop.
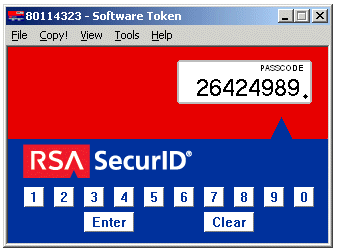
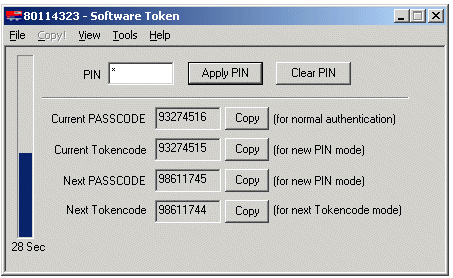
The Advanced view displays the tokencode and passcode with COPY buttons, allowing the user to cut and paste between softID and SecureClient:
SoftID and SecureClient
For remote users to successfully use RSA's softID:
- The administrator creates the remote users on the Ace Server
- "Out-of-band", the administrator distributes the SDTID token file (or several tokens) to the remote users.
- The remote user imports the tokens.
- The following userc.c property on SecureClient must be set in the OPTIONS section:
support_rsa_soft_tokens (true)
When users login, they must enter the Token Serial Number and PIN.
|
