Content Security
Introduction to Content Security
The firewall integrates Content Security capabilities with best-of-breed, OPSEC-certified applications. OPSEC applications enable organizations to select content screening applications that best meet their needs, while managing Content Security centrally. These applications:
- Protect against network viruses, by scanning data and URLs to prevent viruses, malicious Java and ActiveX components, and other malicious content from entering your organization.
- Prevent users from browsing to undesirable websites, by filtering URLs.
- Provide auditing capabilities and detailed reports.
For details, see the list of OPSEC Content Security solutions.
Content security applications, like virus scanners, inspect the content of individual packets for specific services.
The Content Vectoring Protocol (CVP) is an API specification developed by Check Point used for integration with Anti-Virus servers. This API defines an asynchronous interface to server applications that validate file content. An important feature of CVP is scanning files for viruses or harmful applets as they pass through firewalls. CVP defines a client/server relationship that enables different Security Gateways to share a common content validation server.
In Service Provider environments, it can be offered as an add-on to Internet services, where it may be used for parental restriction of child Web surfing or on behalf of businesses that have an inherent distrust of Internet content.
Security Servers
Security servers are Check Point processes that are integrated into the firewall. They are user mode processes that provide content security for:
There is also a generic TCP Security server. Security servers employ many ways of enforcing Content Security, including, checking whether the connections for these protocols are well formed, stripping script tags for HTTP, email address translation for SMTP, and file name matching for FTP.
In addition to Content Security, Security servers also perform authentication. For additional information on the authentication functions of the Security servers, refer to Authentication.
How a Server Mediates Connections
The HTTP Security server is used as an example, but the method is the same for all Security servers.
When a packet is matched to a rule that contains a resource, the Inspton Module on a Security Gateway diverts a connection to a Security server. The Security server performs the Application Security checks, and, if necessary, diverts the connection to a Content Vectoring Protocol (CVP) server application. The Security server then returns the connection to the Inspection Module, which opens a second connection that is sent on the destination HTTP server.
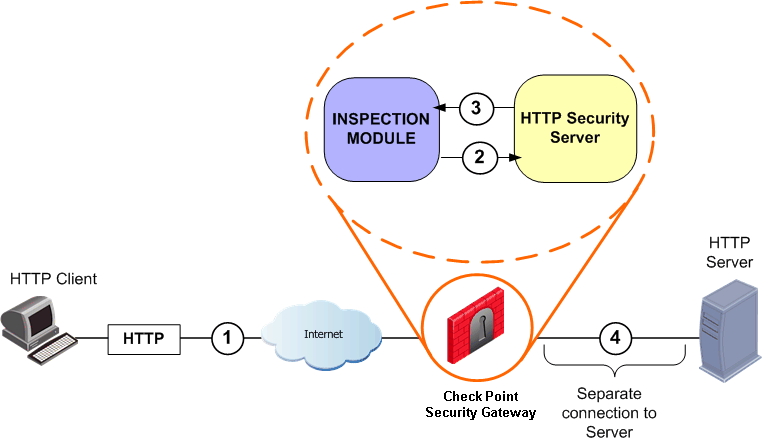
The source IP address that appears to the destination server is the IP address of the client that originally opened the connection. The connection leaves the Security server with the source IP address of the Security Gateway, and the outbound kernel performs NAT so that the source IP address is that of the original client.
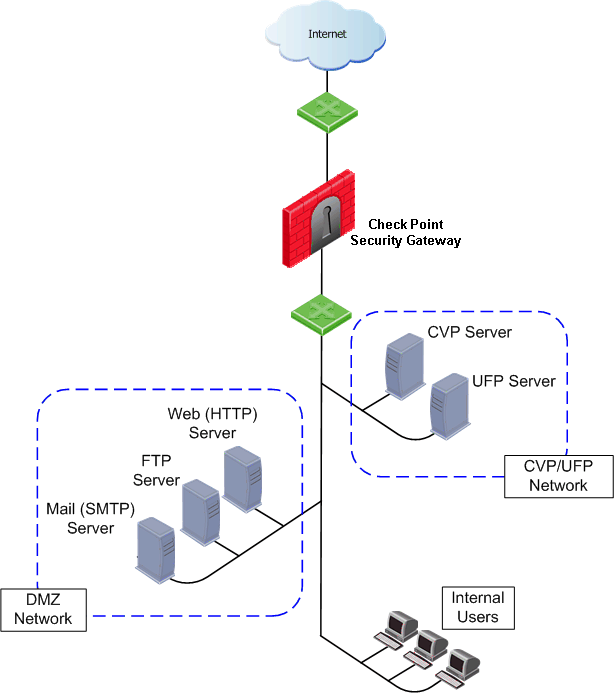
Deploying OPSEC Servers
OPSEC solutions, such as CVP and UFP servers, are deployed on dedicated servers. These servers are typically placed in the DMZ or on a private network segment. This allows fast secure connections between the CVP servers and the Security Gateway.
Performing scanning at the network perimeter is both safer and more efficient than performing the scanning at the desktop or on the application servers.
CVP Servers for Anti-Virus and Malicious Content Protection
CVP and Anti-Virus Protection for SMTP and HTTP Traffic
To perform virus scanning, the HTTP or SMTP security server transfers packets from the Security Gateway to another server running an OPSEC certified virus scanner. This method uses the Content Vectoring Protocol (CVP) to transfer packets to and from an OPSEC virus scanning server.
The virus scanning CVP server determines if there is a virus. If it finds a virus, it can:
- Return the file to the Security Gateway with the offending content removed (if the CVP server is configured to modify content), or
- Drop the file (if the CVP server is not allowed to modify content).
CVP uses TCP port 18181, by default.
How a Connection is Handled by the HTTP Security Server
This section describes how the HTTP Security server handles a connection where CVP checking is performed. The Security Gateway that runs the HTTP Security server acts as a proxy, and so is not an active participant in the connection.
The connection request/response process without a CVP server is:
- HTTP client to HTTP server (request)
- HTTP server to HTTP client (response)
The data that needs to be checked is carried in the response that comes from the Web server. Therefore, when a CVP server is used, the response is always checked. In that case, the connection request/response process is:
- HTTP client to HTTP server (request)
- HTTP server to CVP server (response)
- CVP server to HTTP client (response)
Normally, only HTTP responses, which come from the Web server, are sent to the CVP server for checking. However, you also may wish to protect against undesirable content in the HTTP request, for example, when inspecting peer-to-peer connections. In this case, the connection request/response process is:
- HTTP client to CVP server (request)
- CVP server to HTTP server (request)
- HTTP server to CVP server (response)
- CVP server to HTTP client (response)
The HTTP Security server can be configured to send HTTP headers to the CVP server, as well as the HTTP message data.
Improving CVP Performance for Web Traffic
HTTP Security server performance can be significantly improved by ensuring that safe traffic is not sent to the CVP server. This reduces the number of connections opened with the CVP server. Nonetheless, sending all content for CVP checking provides better protection.
The Security Gateway considers non-executable picture and video files to be safe because they do not normally contain viruses.
The HTTP Security server identifies safe content by actually examining the contents of a file. It does not rely on examining the URL (for file extensions such as *.GIF) nor does it rely on checking the MIME type (such as image/gif) in the server response.
For configuration details, refer to Configuring CVP for Web Traffic Performance.
Using CVP for Virus Scanning on FTP Connections
Virus scanning on FTP connections can be performed by transferring the file to a third-party Anti-Virus application using the CVP protocol.
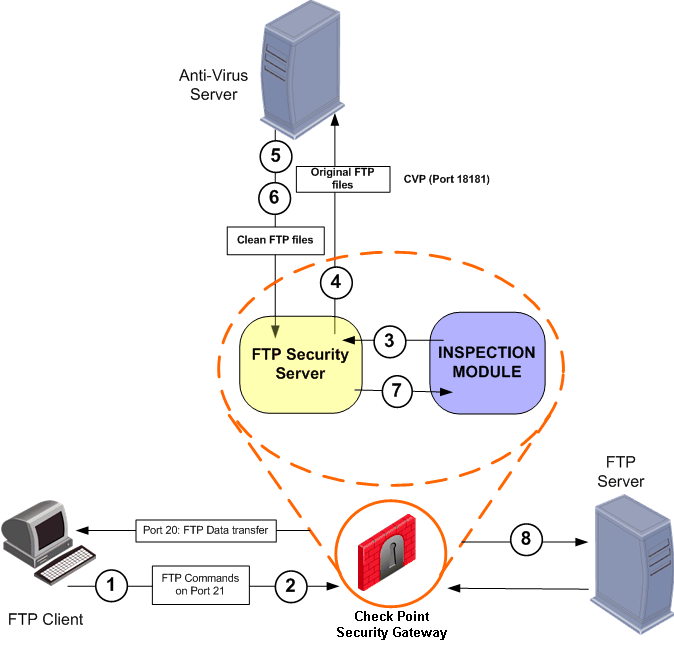
The relevant rule for the connection specifies a resource that includes Content Vectoring Protocol (CVP) for Anti-Virus checking.
- The FTP client establishes a connection via port 21 to the FTP server.
- The Inspection Module monitors port 21 for GET and PUT commands, and determines that the CVP server must be invoked.
- When the client initiates data transfer over port 20, the gateway diverts the connection into the FTP Security server.
- The FTP Security server sends the file to be inspected to the CVP server.
- The CVP server scans the FTP files and returns a Validation Result message, notifying the FTP Security server of the result of the scan.
- The CVP server returns a clean version of the file to the FTP Security server.
- Based on the Validation Result message, the FTP Security server determines whether to transfer the file, and takes the action defined for the resource, either allowing or disallowing the file transfer.
- If allowed, the FTP Security server relays the FTP file on to the FTP server.
TCP Security Server
Malicious content can potentially be carried in any TCP service, not only SMTP, HTTP and FTP.
The TCP Security server is used to perform CVP or UFP Content Security by a third-party, OPSEC-compliant application, on any TCP Service.
For configuration details, refer to Performing CVP/UFP Inspection on any TCP Service.
Configuring Content Security
Resources: What They Are and How to Use Them
To perform Content Security via the Security Rule Base, an object called a Resource is defined in SmartDashboard. Resources are used to match a specific kind of application layer content, (in other words, to specify what content you are looking for,) and to perform some action on the content.
Using a Resource turns on either kernel inspection or the Security servers, depending on what the resource is used for.
For instance, a rule can be created that will drop the connection and generate an alert if there are GETs or PUTs in an FTP transfer or if a specifically named file is part of the transfer. Another rule can drop email addresses or attachments while allowing the rest of the content through.
To specify the content you are looking for, regular expressions and wildcards can be used in the Resource.
The Resource is triggered when a rule includes the Resource, and a packet matching that rule is encountered. A Resource is applied per Service. If a connection matches the source and destination of the rule and the match parameters of the Resource, then both the action in the rule and the action in the Resource are applied.
Creating a Resource and Using it in the Rule Base
To create a resource:
- Select the Resources tab in the objects tree. Select the Resource Type, right-click, select a resource type, such as New URI or New SMTP.
- Define the resource parameters in the General tab, and in the other tabs as required.
- To use a service with a resource in a rule, right-click in the Service column of the rule, right-click, and select Add with Resource. In the Service with Resource window, select the service, and then select the Resource that will operate on the service. Click OK.
If a connection matches the source and destination of the rule and the match parameters of the Resource, then both the action in the rule and the action in the Resource are applied.
Configuring Anti-Virus Checking for Incoming Email
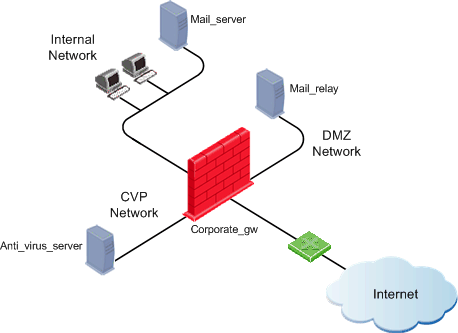
The goal is to check incoming mail for viruses, as illustrated below. SMTP mail arrives from the Internet to a mail relay server (Mail_relay) in a DMZ segment. Before the mail is forwarded to the internal mail server (Mail_server), it undergoes virus checking by the Anti-Virus server (Anti_virus_server). Outgoing mail is sent from the mail server to the Internet.
To configure Anti-Virus checking for incoming email:
- Create a host object for the machine on which the third-party, OPSEC server application is installed.
- Create an OPSEC Application object to represent the OPSEC Application server, and associate it with the host object created in step 1.
- Define an SMTP resource that uses the OPSEC Application object, and associate it with the OPSEC Application object created in step 2. Specify the matching, and the content checking to be performed.
- Define rules that use the resource.
To implement Anti-Virus checking for incoming email:
- Create a host object (e.g. Anti_virus_server) for the machine on which the third-party OPSEC Server application is installed.
- Create an OPSEC Application object to represent the OPSEC application server, and associate it with the host object created in step 1. Initialize Secure Internal Communication between the OPSEC Application and the Security Management server. In the CVP Options tab, verify that FW1_cvp is selected, and click OK.
- Define an SMTP resource that uses the OPSEC object, and associate it with the OPSEC Application object created in step 2. Specify the matching and the content checking to be performed.
- In the General Tab, give the Resource a Name (such as virus_check). Select both the Mail Delivery and the Error Mail Delivery options, as well as Exception Tracking.
- In the Match tab, for the Sender put *, and for the Recipient put *@your_domain, (for example *@company.com).
- In the Action1 tab, define the Rewriting Rules, if any.
- In the Action2 tab, define the Attachment handling, if any. Define the largest allowed email attachment.
- In the CVP tab, check Use CVP (Content Vectoring Protocol), select the CVP server defined in step 1, and define the CVP Server Options and Reply Order.
- Click OK. A message may appear regarding stripping MIME of type "message/partial'". Accepting the MIME strip of type "message/partial" changes configuration to the Action2 tab. The Strip MIME of Type field will contain message/partial. Stripping the Multipurpose Internet Mail Extension (MIME) type of message/partial will not allow multiple-part messages to be accepted for scanning.
- Define a pair of rules that will perform virus checking on incoming mail, and a rule to allow outbound email.
- Install the security policy: Policy > Install.
Source
|
Destination
|
Service
|
Action
|
Track
|
Install On
|
Comment
|
Any
|
mail_relay
|
smtp
|
Accept
|
Log
|
Corporate_gw
|
Incoming to mail relay
|
mail_relay
|
mail_server
|
smtp->
virus_check
|
Accept
|
Log
|
Corporate_gw
|
Incoming virus scan
|
mail_server
|
Any
|
smtp
|
Accept
|
Log
|
Corporate_gw
|
Outgoing email
|
Configuring CVP for Web Traffic Performance
The performance of the CVP server when inspecting HTTP connections can be enhanced by ensuring that only unsafe file types are sent to the CVP server for inspection. For background information, refer to Improving CVP Performance for Web Traffic.
To configure CVP checking for Web traffic:
- Create a host object for the machine on which the CVP Server application is installed.
- Create an OPSEC Application object to represent the CVP server, and associate it with the host object created in step 1.
- Define a URI resource that uses the OPSEC Application object, and associate it with the OPSEC Application object created in step 2. Give it a name (such as Internal.HTTP.CVP), specify the matching, and the content checking to be performed.
- In the CVP tab, select Send only unsafe file types to the CVP server, and the other required CVP options.
- Associate the Resource with the HTTP Service, and place it in a rule in the Security Rule Base. Refer to the sample rule shown below.
Sample URI Resource in a Rule Base
Source
|
Destination
|
Service
|
Action
|
Internal_LAN
|
Any
|
http->Internal.HTTP.CVP
|
Accept
|
Performing CVP/UFP Inspection on any TCP Service
In this procedure, you will create and configure a TCP service and a TCP resource. These steps are done with the Firewall tab open, by selecting different tabs in the left panel.
To configure CVP or UFP inspection on any TCP service:
- Open the Services tab.
- Right-click TCP and choose NewTCP. Fill in the general properties of the new TCP service.
- Click Advanced.
- In the Advanced TCP Service Properties window, check Enable for TCP Resource and then click OK.
- Open the Servers and OPSEC Applications tab, right-click OPSEC Applications, and choose New > OPSEC Applications.
- In the OPSEC Application Properties window, name the server and select Server Entities > CVP and UFP.
- Select a host to act as the CVP and UFP server.
- In the UFP Options and CVP Options tabs, select the TCP service configured in the Services tab.
- Click OK.
- Open the Resources tab, right-click Resources, and choose New > TCP.
- In the TCP Resource Properties window, provide a name for the resource and choose UFP or CVP.
- The tab that appears in this window depends on whether you chose UFP or CVP. In this tab, select the CVP/UFP server you configured in OPSEC Applications.
- Click OK.
- Add a rule to the Rule Base: in the Service column, select Add with Resource.
- In the Service with Resource window, select the configured TCP service.
- In the Resource drop-down list, select the configured TCP resource.
- Install the security policy: Policy > Install.
Advanced CVP Configuration: CVP Chaining and Load Sharing
Introduction to CVP Chaining and Load Sharing
Traffic that crosses the Security Gateway can be checked using CVP servers. CVP checking is available for Web, Mail, FTP and TCP traffic. For detailed explanations, see:
It is possible to chain CVP servers in order to combine functionality, and to perform load sharing between CVP servers, in order to speed up CVP checking.
CVP Chaining
CVP servers can be chained for the purpose of combining functionality. Chaining is useful when each of the CVP servers performs a different task, such as scanning for viruses, or blocking large email attachments. In the configuration shown below, the Security Gateway server invokes the first, second, and third CVP servers in turn.
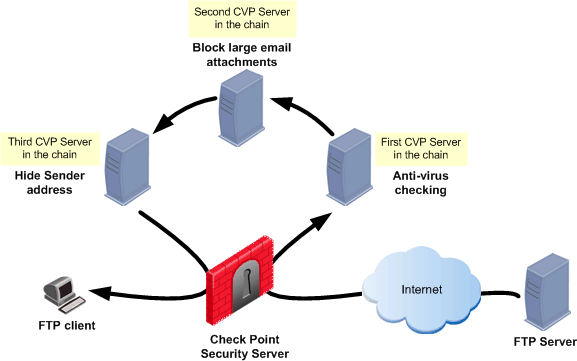
Chained CVP servers are invoked in the order set by the administrator in the CVP Group object. When choosing a chaining order, consider whether there are any security or connectivity issues.
The order in which the chained servers are called is relative to the response of the server. This is the case whether the server is on the unprotected (external interface) side of the Security Gateway or on the protected (internal interface) side.
Consider a user at an internal FTP client who is downloading a file from an external FTP server. CVP checking is performed on the response from the FTP server (that is, on the downloaded file) in the order defined in the CVP Group object.
There is one exception to this order. The HTTP Security server allows CVP checking to be performed on the HTTP request. CVP checking of HTTP requests is performed by the CVP servers in the reverse of the order specified in the CVP Group object.
CVP chaining works only if all servers in the chain are available. If one or more of the servers is unavailable, the whole CVP session is dropped. This is because skipping one of the servers may contradict the Security Policy. For example, the Security Policy may specify that both virus scanning and blocking of large attachments are mandatory.
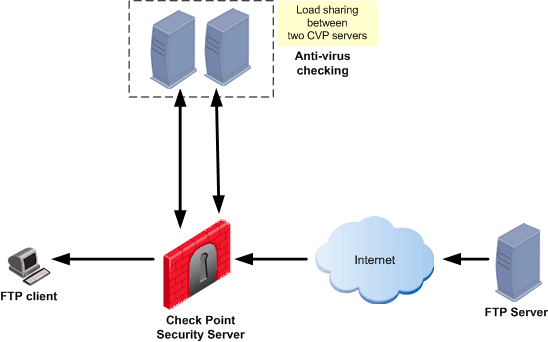
CVP Load Sharing
Identical CVP servers can be configured to share the load among themselves. Load sharing can speed up CVP checking by allowing many CVP sessions to run simultaneously on more than one CVP server.
Two load-sharing methods are available:
- Round robin: The Security server sends each new CVP session to a different CVP server in turn.
- Random: The Security server sends each new CVP session to a randomly chosen CVP server.
It is possible to configure a load-sharing suspension period for a CVP server that does not respond. During that period of time, that CVP server does not take part in the load-sharing group.
CVP load sharing is implemented by defining a Resource that invokes a group of CVP servers. The order in round robin mode is configured in the CVP Group object.
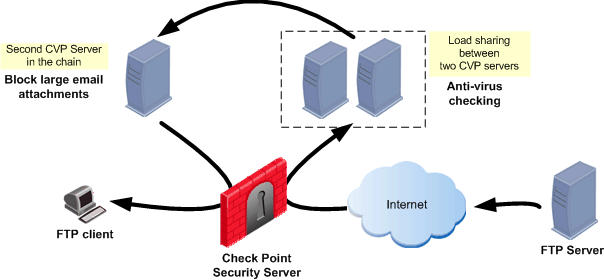
Combining CVP Chaining and Load Sharing
It is possible to combine CVP chaining and load sharing. The following diagram shows three CVP servers. Two perform load sharing between themselves, and the load-sharing group is chained with another CVP server.
It is possible to put a load-sharing group into a CVP chain, but it is not possible to perform load sharing between chained CVP groups.
Configuring CVP Chaining and Load Sharing
- For each CVP server, define a CVP server object.
To define a CVP server object, right-click in the Servers and OPSEC Application tree, and select New > OPSEC Application. In the OPSEC Application Properties window, General tab, make sure that the selected Server Entities include CVP.
- Define a CVP Group object. A CVP Group object contains CVP server objects, and is used in the same way as an OPSEC Application object for a CVP server. To define a CVP Group object, right-click the Servers and OPSEC Application tree, and select New > CVP Group.
- In the CVP Group Properties window, add the CVP servers to the group.
- Select the Work distribution method: Either Load sharing or Chaining.
- If you select Load sharing, define the Load sharing method, and the Load sharing suspend timeout, if any.
- Create a Resource object. In the Resources tree, right-click and select one of the following: New > URI, New > SMTP, New > FTP, or New > TCP. Define the content security capabilities.
- In the CVP Server field in the CVP tab of the Resource object, select the CVP Group defined in step 2.
- In the Security Rule Base, define a rule that uses the Resource.
- Save and install the security policy: Policy > Install.
|
|
