Adding Users to the Security Policy
Using Identity Awareness
The Identity Awareness Software Blade lets you configure the Firewall to enforce access control for individual users and groups. You can use Identity Sources to get information about users and groups to create flexibility and additional security for the Rule Base. Identity Awareness lets you create rules that are for the specified users for these Rule Bases:
- Firewall
- URL Filtering and Application Control
- DLP
- Anti-Bot
For more about using Identity Awareness, see the R76 Identity Awareness Administration Guide.
Identity Sources
After the Security Gateway acquires the identity of a user, user-based rules can be enforced on the network traffic. Identity Awareness can use these sources to identify users:
- - Seamlessly queries the AD (Active Directory) servers to get user information.
- - Uses a Captive Portal to authenticate users.
- - Client that is installed on endpoint computers connects to a Security Gateway and authenticates users.
- - An agent on a Terminal or Citrix server connects to a Security Gateway to get user information.
- - Use Identity Awareness with the Mobile Access and VPN Software Blades (Office Mode only) to authenticate users that connect from a remote device.
AD Query
The Security Gateway registers to receive security event logs from the AD domain controllers when the security policy is installed. When a user authenticates with AD credentials, these event logs are generated and are sent to the Security Gateway. The Firewall identifies the user based on the AD security event log. The user sends traffic that matches an Identity Awareness rule in the security policy. The Firewall can enforce the user-based rule on the traffic.
Browser-Based Authentication
Browser-Based Authentication uses the Internet browser to identify users. You can use these Browser-Based Authentication solutions:
- Captive Portal
- Transparent Kerberos Authentication
Captive Portal uses a web interface to authenticate users before they can access network resources. When users try to access a protected resource, they must log in to a web page to continue.
When Transparent Kerberos Authentication is enabled, the Transparent Authentication page tries to authenticate users before the Captive Portal web page opens. The Transparent Authentication page communicates with the AD to use the Kerberos protocol to authenticate the users. If the users are successfully authenticated, then they can access the network resources. If they are not authenticated, then they are redirected to the Captive Portal.
Enabling Identity Awareness
There is an Identity Awareness configuration wizard in SmartDashboard that helps you enable and configure the Identity Awareness Software Blade. You can use the configuration wizard on these identity sources:
- AD Query
- Browser-Based Authentication
- Terminal Servers
Using the Identity Awareness Wizard
The Identity Awareness Configuration wizard configures how the Security Gateway gets information about users and computers.
This section gives an example of how to configure the AD query and browser-based methods for Identity Awareness.
To use the configuration wizard:
- From the tree, double-click the Security Gateway.
The window opens.
- From the navigation tree, click .
- From the tab, select .
The wizard opens.
- Select and and then click .
The window opens.
- Select the AD domain and enter the and .
Make sure that the AD account has domain administrator privileges.
- Click .
The message is shown.
- Click .
The window opens.
- Enter the URL for the Captive Portal and then click .
The window opens.
- Click and then install the policy.
Identity Awareness and Remote Access
Identity Awareness for Mobile Access and IPSec VPN clients works in Office Mode for Security Gateways. The Remote Access option is included as an identity source when you enable Identity Awareness.
To enable or disable Remote Access for Identity Awareness:
- From the tree, double-click the Security Gateway.
The window opens.
- From the navigation tree, click .
- Select or clear .
- Click and then install the policy.
Creating a New AD Object
The Identity Awareness configuration wizard helps you create a new AD (Active Directory) LDAP Account Unit object in SmartDashboard. Enter the AD settings in the window.
To create new AD Account Unit with the Identity Awareness wizard:
- From the window, select .
- Enter the settings for the AD domain controller.
- Click .
SmartDashboard connects to the AD server.
- Click and then follow the instructions and finish the wizard.
SmartDashboard creates the new AD Account Unit.
Creating Access Roles
After you enable Identity Awareness, you can create access role objects.
Access role objects define users, machines and network locations as one object. The access role can be for one or more users, networks and machines. You can select specified users, user groups or user branches.
To create an access role:
- Select in the Objects Tree.
- Right-click > .
The window opens.
- Enter a and (optional) for the access role.
- In the tab, select one of these:
- In the tab, select one of these:
- In the tab, select one of these:
- For computers that use Full Identity Agents, from the tab select .
- Click .
The access role is added to the tree.
Using Identity Awareness in the Firewall Rule Base
The Identity Awareness Software Blade lets you customize the Firewall for users regardless of what computer they are using. Use Access Role objects in a rule and Identity Awareness identifies users that match the rule. You can also enable an action to redirect traffic from an unidentified user to a Captive Portal.
Sample Firewall Workflow with Identity Awareness
The Firewall inspects traffic that starts from a source that matches the Access Role object. The Identity Awareness source tries to identify the user.
- If the user is identified, the traffic is allowed.
- If the user is not identified, the traffic is only allowed when the user authenticates to the Captive Portal. If Captive Portal is not enabled, or the user does not authenticate, then the traffic is dropped.
Redirecting to a Captive Portal
You can configure rules that use an Access Role object and an action, to redirect HTTP traffic to a Captive Portal. The rule allows traffic when the users for the Access Role are identified. If the Captive Portal action is enabled, these are the procedures for the Firewall to identify a user:
- The Identity Awareness source identifies the user
- The user authenticates at the Captive Portal
Rules can redirect HTTP traffic according to these parameters:
- - Includes an Access Role object
- - Uses
To enable Captive Portal for a rule:
- Right-click the cell and select .
The window opens.
- Select the .
- Click .
The column shows .
- Install the policy.
Sample Identity Awareness Rules
This table shows sample Identity Awareness rules for a Firewall Rule Base. (The , and columns are not shown. is set to , and and are set to .)
No.
|
Name
|
Source
|
Destination
|
Service
|
Action
|
1
|
CEO allow
|
John_Smith_
CEO
|
Any
|
Any
|
Accept
Display Captive Portal
|
2
|
HR server allow
|
HR_Partners
|
HR_Server
|
Any
|
Accept
Display Captive Portal
|
3
|
Drop non-identified HR traffic
|
Any
|
HR_Server
|
Any
|
Drop
|
4
|
Internet access
|
Guests
All_Domain_
Users
|
Internet_proxy
|
HTTP and HTTPS proxy
|
Accept
Display Captive Portal
|
- - Allows the CEO, John Smith, to access all the network resources. The CEO is identified by Identity Awareness AD Query or he authenticates to the Captive Portal.
- - Allows users that are defined in the HR_Partners Access Role object to access the HR_Server subnet. The HR users are identified by Identity Awareness AD Query or they authenticate to the Captive Portal.
- - Drops all traffic to the HR_Server subnet. All authenticated users were allowed by the earlier rules.
- - Allows HTTP and HTTPS traffic from the Guests and All_Domain_Users Access Role objects to the Internet. Domain users are identified by Identity Awareness or they authenticate to the Captive Portal. Guests authenticate to the Captive Portal.
Using User Directory
User Directory lets you integrate LDAP and other external user management servers with Check Point products and security solutions. These are some of the Software Blades that work with User Directory:
- Mobile Access
- Identity Awareness
- Data Loss Prevention
User Directory Features
- Use LDAP servers to manage user information for the network
- Security Gateways can retrieve CRLs (Certificate Revocation Lists)
- Security Management server can use LDAP information to authenticate users
- High Availability can duplicate and backup user information across multiple LDAP servers
- Create multiple Account Units to work with distributed databases
- Use profiles to support multiple LDAP vendors
- Encrypt User Directory connections
Deploying User Directory
User Directory integrates the Security Management server and an LDAP server and lets the Security Gateways use the LDAP information.
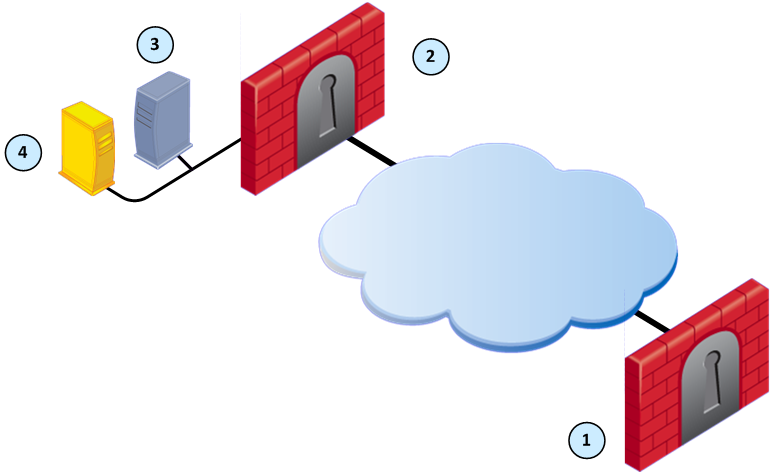
Item
|
Description
|
1
|
Security Gateway - Retrieves LDAP user information and CRLs
|
2
|
Security Gateway - Queries LDAP user information, retrieves CRLs, and does bind operations for authentication
|
3
|
Security Management server - Uses User Directory to manage user information
|
4
|
LDAP server - Server that holds one or more Account Units
|
Creating an Account Unit
An Account Unit represents branches of user information on one or more LDAP servers. The Account Unit is the interface between the LDAP servers and the Security Management server and Security Gateways.
When you enable the Identity Awareness and Mobile Access Software Blades, SmartDashboard opens a configuration wizard. The window of this wizard can create a new AD Account Unit. After you complete the wizard, SmartDashboard creates the AD object and Account Unit.
Editing an Account Unit
Use the window to edit an Account Unit or to create one manually.
To open the LDAP Account Unit Properties window:
- In SmartDashboard, select > .
The window opens.
- To create a new Account Unit, click > .
- To edit an Account Unit, double-click the Account Unit object.
The window opens.
- Configure the settings in the applicable tabs.

- Click and then click .
General Tab
The tab lets you configure how the Security Management server uses the Account Unit. You can select one or more of these options:
- - The Security Management server manages how the CA sends information about revoked licenses to the Security Gateways.
- - The Security Management server uses the user information from this LDAP server. Make sure that User Directory is enabled on the Security Management Server.
- - This AD (Active Directory) server is used as an Identity Awareness source. This option is only available if the is set to .
LDAP SSO (Single Sign On) is only supported for Account Unit Objects that use .
To configure the General tab:
- Enter the for the Account Unit.
- From , select the LDAP vendor.
- Enter the prefix or domain for the Account Unit. This value is used when the same user name is used in multiple Account Units.
- - For servers that do NOT use AD.
- - For AD servers. This value is also necessary for AD Query and SSO.
- Select one or more of the Account Unit usage options.
- For LDAP user information that uses non-English languages, select support.
- To configure and enable Kerberos SSO for Identity Awareness:
- Click .
- Configure the settings.
- Click .
- Configure the other tabs or click .
Servers Tab
The Servers tab lets you create and manage the LDAP servers that are used by this Account Unit. You can add LDAP server objects or create new ones.
Use the window to configure the login parameters for all the servers for this Account Unit. If the servers use different login information, edit the parameters for each server.
To configure the login parameters for all the servers:
- Click .
The window opens.
- Enter the login parameters.
- Click .
To remove a server from the Account Unit:
Select the server and click .
To manage the servers for the Account Unit:
- Do one of these actions for the server:
- To add a server, click .
- To edit a server, select the server and click .
The window opens.
- If necessary, create a new SmartDashboard server object:
- Click .
The window opens.
- Enter the settings for the LDAP server.
- Click .
- From , select the server object.
- Configure the settings for the LDAP server.
- Click the tab and configure the SSL encryption settings.
- Click .
- Configure the other tabs or click .
Objects Management Tab
The tab lets you select which LDAP server object SmartDashboard queries for the applicable connections and users. You can also enable password protection for this object.
To configure the Objects Management tab:
- From , select the LDAP server object.
- Click .
The Security Management server queries and shows the LDAP branches.
- Click , and to manage the LDAP branches.
- Select .
- From , configure the number of entries that are stored in the LDAP database.
- Configure the other tabs or click .
Authentication Tab
The tab lets you configure the authentication scheme for the Account Unit. You can use a to optimize group membership queries. One path for all the LDAP group objects is created and only one query is necessary for the group objects.
To configure the Authentication tab:
- Select .
- Select one or more that are used to authenticate users in this Account Unit.
- Select the default settings for new LDAP users:
- - Template that you created
-
- Select and configure the settings.
- For IKE users in this Account Unit, enter the pre-shared secret key.
- Configure the other tabs or click .
Enabling User Directory
Configure SmartDashboard to enable the Security Management server to manage users in the Account Unit. You cannot use the SmartDashboard User Database when the User Directory LDAP server is enabled.
For more about using the SmartDashboard User Database, see the R76 Security Management Administration Guide.
To enable User Directory on the Security Management server:
- Select > > .
The page opens.
- Select .
- Configure other login and password settings.
- Click .
- Make sure that the User Directory Software Blade is enabled.
- From the Network Objects tree, double-click the Security Management server object.
- Click Management and make sure that and are selected.
- Click and install the policy.
Managing LDAP Information
User Directory lets you use SmartDashboard to manage information about users and OUs (Organizational Units) that are stored on the LDAP server.
To manage LDAP information from SmartDashboard:
- From the objects tree, select .
- Double-click the Account Unit.
The LDAP domain is shown.
- Double-click the LDAP branch.
The Security Management server queries the LDAP server and SmartDashboard shows the LDAP objects.
- Expand the pane.
- Double-click the LDAP object.
The pane shows the user information.
- Right-click a user and select .
The window opens.
- Edit the user information and settings and then click .
Adding Users to the Rule Base
Identity Awareness and User Directory let you create rules for specified users, groups or OUs. Identity Awareness uses Access Roles that can put together users, networks gateways and other objects into a single SmartDashboard object that you can add to a rule. User Directory integrates an LDAP server and you can easily update SmartDashboard with user information.
Adding an Access Role to a Rule
Security Gateways that use the Identity Awareness Software Blade can add an Access Role as the or of a rule. You can add SmartDashboard objects and LDAP information to the Access Role object and then use that object in the Firewall, URL Filtering, and Application Control Rule Base.

|
Note - Rules that use Access Role objects are enforced only on Security Gateways that have Identity Awareness enabled.
|
To add an Access Role to a rule:
- From the page, click the plus sign in a or cell.
The SmartDashboard window opens.
- From the drop-down menu, select .
- Click the Access Role and it is added to the cell.
- Install the policy.
|
