Data Loss Prevention
Overview
Data Loss Prevention (DLP) helps prevent data leakage and detect sensitive data exposure by performing automated file scanning across SaaS services using Check Point DLP engines. The system supports detection of over 200 sensitive data types and allows organizations to define custom policies applied to specific users or groups. It ensure compliance, protects customer and company data, and allows granular control over what information can be shared and with whom, minimizing the risk of accidental or intentional data exposure.
File scanning is performed in near real-time and is triggered by:
-
Adding a new file
-
Editing an existing file
-
Changing file sharing permissions
Supported Integrations:
-
Box
-
Dropbox
-
Google Drive
-
Microsoft SharePoint
-
Microsoft OneDrive
-
Jira
-
Salesforce
-
Slack
Prerequisites
Before creating Malware or DLP policies, ensure the following configurations are completed:
-
 Integration Manager
Connect the relevant SaaS service through the Integration
Entity (SaaS application, plug-in, API key, and so on) that facilitate the integration of the host service with the linked service. Manager.To access Integration Manager:
-
Click Integration Manager on the top right.
-
Connect to the required integration (Box, Dropbox, Google Drive, etc.).
-
Integrations with an active connection display a green checkmark.

-
-
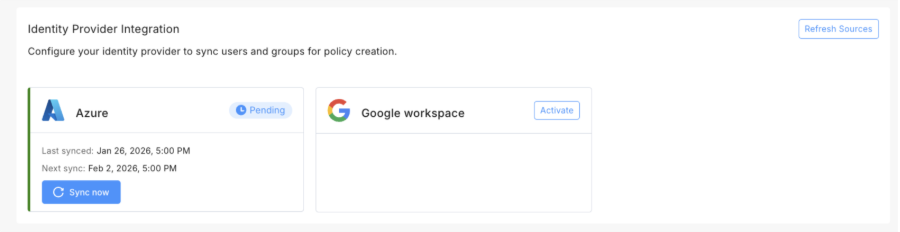
Identity Provider (IdP) Configuration
Attach your IdP configuration to sync users and groups for policy creation.

Note - The IdP connection is established through Check Point's Identity and Trust. The initial configuration must be completed in Identity and Trust. For more information, see the Identity and Trust Administration Guide.
The Settings page displays the existing IdP connection.
To configure IdP:
-
From the left menu, navigate to Settings.
-
In the Identity Provider Integration section, select your IdP configuration.
-
Click Refresh Sources to synchronize the IdP hierarchy.
-
Click Sync now to synchronize users and groups.
-
-
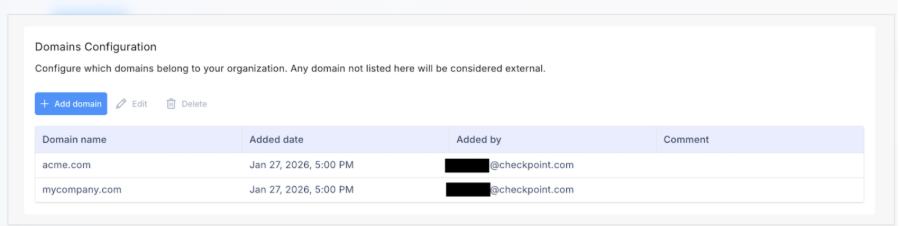
Domains Configuration
Add your organization's domains so SaaS can distinguish internal users from external ones for sharing purposes. Any domain you do not add to this list is automatically treated as external.
Define organizational domains to identify external sharing.
To configure domains:
-
From the left menu, navigate to Settings.
-
In the Domains Configuration section, click Add domain.
-
Enter the domain names you want to define as internal.
-
|
|
Note - These prerequisites apply to both DLP and Malware detection features and need to be configured only once. |
DLP Policy Management
This page displays all configured services with their associated policy rules.
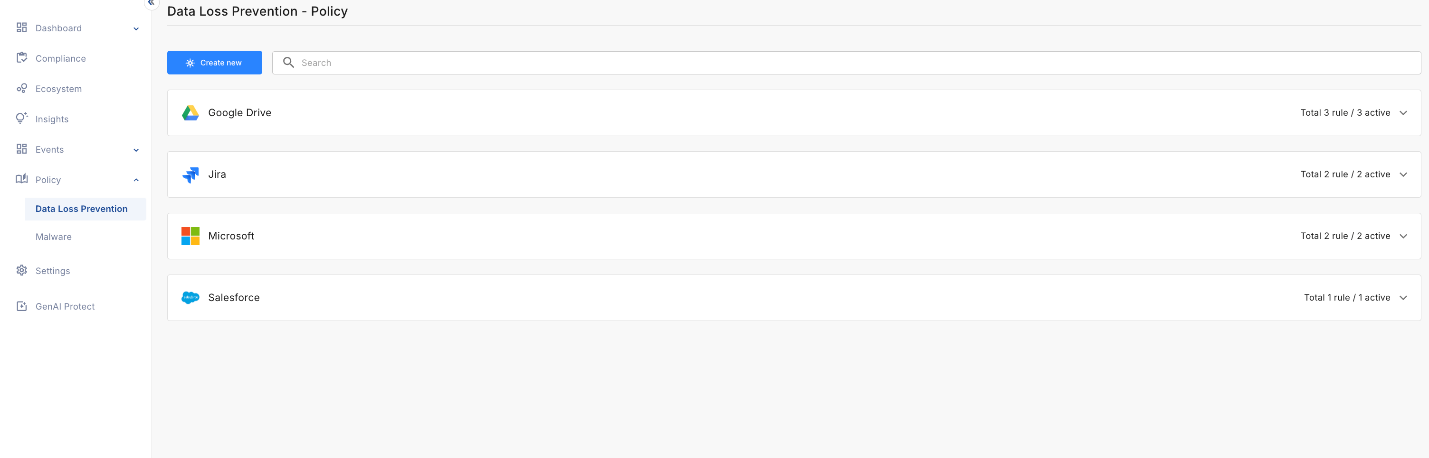
Policy Table
The DLP Policy page is organized by service (Google Drive, Jira, Microsoft, Salesforce, etc.). Each service displays:
-
Total number of rules.
-
Number of active rules.
-
A collapsed/expandable view of all rules.

When expanded, each service shows a detailed table of existing rules:
|
Column |
Description |
|---|---|
|
# |
Indicates the rule’s position in the evaluation order. |
|
Rule name |
Name of the DLP policy rule. |
|
Data types |
Sensitive data types the rule monitors (for example, PII, PHI, Credit Card Numbers). Displays primary data type with a "+N" indicator if multiple types are selected. |
|
Applied to |
Users or groups the policy applies to. |
|
Actions |
Action taken when a violation occurs (Detect, Revoke Access, Delete) |
|
Monitor external sharing |
Status indicator (Enabled/Disabled) showing whether the rule monitors files shared outside the organization |
|
Last modified |
Date and time of the last rule modification. |
|
Status |
Toggle switch of the rule status (Active/Inactive). |
Policy Execution Logic:
-
Policies follow a first match rule - when a file matches multiple policies, only the first matching policy is executed.
-
Policy order is critical and can be adjusted using drag and drop.
Available Actions:
-
Create new - Create a new policy rule
-
Edit - Modify an existing rule
-
Delete - Remove a rule permanently
-
Clone - Duplicate a rule (only within the same service)
-
Export - Export policy configurations
-
Drag and drop - Reorder policies to change execution priority
Creating a DLP Policy
To create a new DLP policy:
-
From the left menu, navigate to Policy > Data Loss Prevention.
-
Click Create new.
-
In the Create new Data Loss Prevention policy rule window that opens, select the service you want to monitor from:
-
All Integrations - Shows all available services.
-
Connected - Shows services with active integrations.
-
Not Connected - Shows supported services not yet integrated. To connect such service, click it and start the Integration Manager.

The page for creating a new rule opens.
-
-
Configure the rule settings:
-
Rule name - Enter a descriptive name for the rule.
-
Description (optional) - Add additional context about the rule's purpose.
-
Status - Set rule status (Default: Active).
-
Data Types - Select the types of sensitive data this policy should monitor:
-
Search or browse through 200+ data types.
-
Data types are organized into categories.
-
Click a data type to view its details.
-
Multiple data types can be selected for a single policy.
-
-
Monitor External Sharing - Detects files containing sensitive data. The policy identifies files shared with users from external domains as configured in Domains Configuration. Select one of these policies:
-
Detect - Identify externally shared files with violations.
-
Remediate + Delete - Delete files with violations (removes sharing automatically).
-
Remediate + Revoke Access - Remove external access while keeping the file within the organization.
Note - Revoke Access and Delete actions are currently available only for Microsoft and Google services.
-
-
Scope - Specify which organizational areas this policy applies to:
-
Search and select specific user groups from your IdP
-
Entire organization
-
-
Action - Choose what happens when a violation occurs:
-
Detect only - Identify and report files with violations without taking an action.
-
Remediate + Delete - Automatically delete files containing sensitive data.
-
Remediate + Revoke Access - Remove access permissions for files with violations (requires Monitor external sharing to be enabled).

-
-
-
Optionally, you can copy settings from an existing rule.
-
Click Import settings.
-
Select an existing rule to copy its settings. This action imports only relevant settings and you have to configure manually the rule name, description, and action.
-
-
Click Create Rule to save and activate the policy. The new rule appears in the service's policy table.
Managing Policies
Select any rule or click the info icon (i) to open a side panel with the rule details:
-
General information (Status, Created date, Last modified, Service
Host service (platform, application, interface) that provides certain services to other services.) -
Description
-
Data types monitored
-
Applied to (users/groups)
-
Monitor external sharing status
-
Action configuration

Editing a Policy:
-
From the policy table, click Edit or open the side panel and click Edit.
-
This opens the policy configuration screen in edit mode.
Activating/Deactivating a Policy:
-
Toggle the Active/Inactive switch in the Status column or use the toggle in the side panel.
-
Inactive policies are not enforced but remain configured.
Cloning a Policy:
-
Click Clone to duplicate an existing rule.
-
Cloning is only available within the same service (cannot clone across different services).
-
Modify the cloned rule as needed.
Deleting a Policy:
-
Click Delete to permanently remove a rule.
-
Deleted policies cannot be recovered.
Reordering Policies:
-
Use drag and drop to change the order of policies.
|
|
Important - Policies follow first match logic, so the order matters. |

For information on DLP events, see File Protection Events.
For information on DLP dashboard, see File Protection Dashboard.