User Configuration Profiles
User Configuration Profiles allows you to create profiles with custom settings and apply them to member groups and devices.
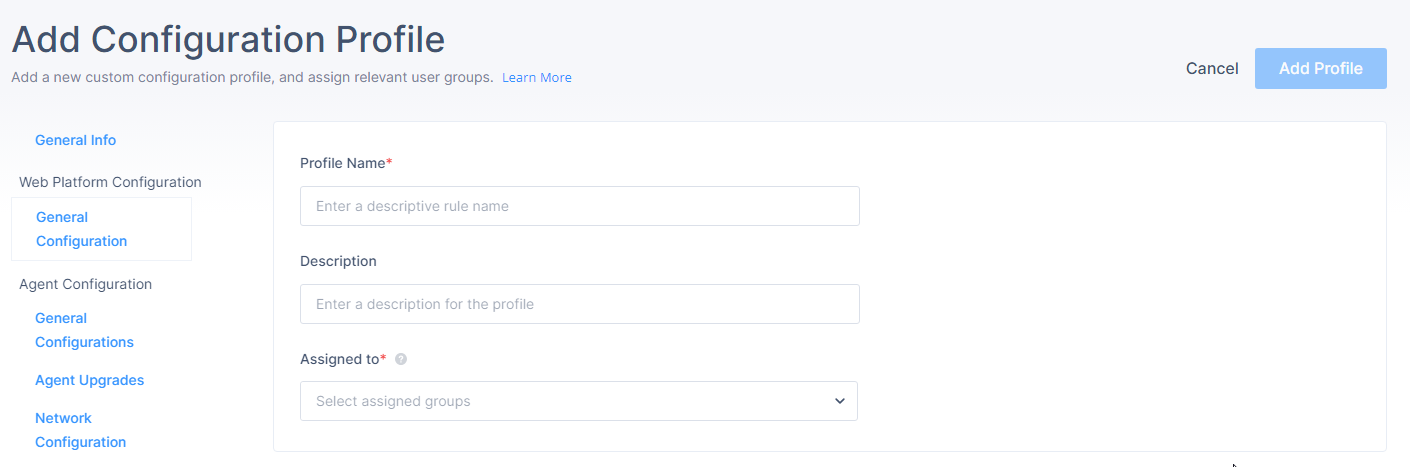
Adding a Configuration Profile
-
Access the SASE Administrator Portal and click Team > User Profiles.
-
Click Add Configuration Profile.
-
In the Profile Name field, enter a name for the profile.
-
(Optional) In the Description field, enter a description for the profile.
-
In the Assigned to field, select the member groups.
-
Configure Web Platform Configuration and Agent Configuration.
-
Click Add Profile.
The order of the profile indicates its priority. For example, Profile #1 has higher priority than Profile #2.
Web Platform Configuration
The Web Platform Configuration settings allows the administrators to configure settings for the Check Point SASE Administrator Portal.
General Configuration
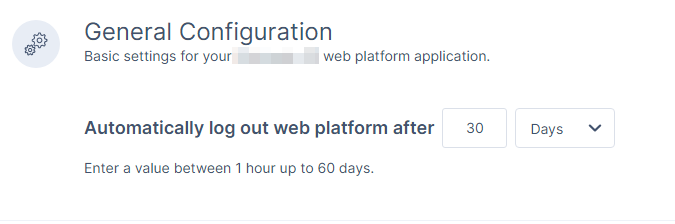
In the Automatically log out web platform after field, enter the duration after which the system automatically logs out the member from the SASE Administrator Portal. The supported duration is one hour to 60 days.
Agent Configuration
The Agent Configuration settings allows the administrators to configure settings for the Check Point SASE Agent.
General Configuration
From the General Configuration section of the Agent Configuration, you can configure the basic settings for your Check Point SASE Agent.
|
Setting |
Description |
||
|---|---|---|---|
|
Prevents members from signing out of the SASE Agent without the sign-out code. The administrator must generate the sign-out code and share it with the member to successfully sign-out from the SASE Agent. See Generating Sign-Out and Uninstall Code. |
|||
|
Automatically Log Out Agent After |
Logs out the member from the SASE Agent automatically after the specified duration. The supported duration is one hour to 180 days. |
||
|
Automatically sign out non-active user after |
Automatically signs out a member from the Check Point SASE Agent if their device remains unattended for the specified duration. The supported duration is 20 min to 60 min.
When the Automatically sign out non-active user after toggle is enabled, the Always-On VPN is bypassed by default.
|
||
|
Allows members to connect to shared Check Point SASE gateways. This enhances speed and performance if the member's physical location is far from your private gateway location. For more information about shared networks, see [DEPRECATED] Shared Gateways . |
|||
|
Connect on Launch |
Automatically starts the Check Point SASE Agent when the device starts and connects to the most recent network location.
|
||
|
Connect / Disconnect Notification |
Shows a pop-up notification on the device when the SASE Agent connection status changes.
|
||
|
Snowplow Report |
Allows you to send the Snowplow (user tracking) data to SASE. |

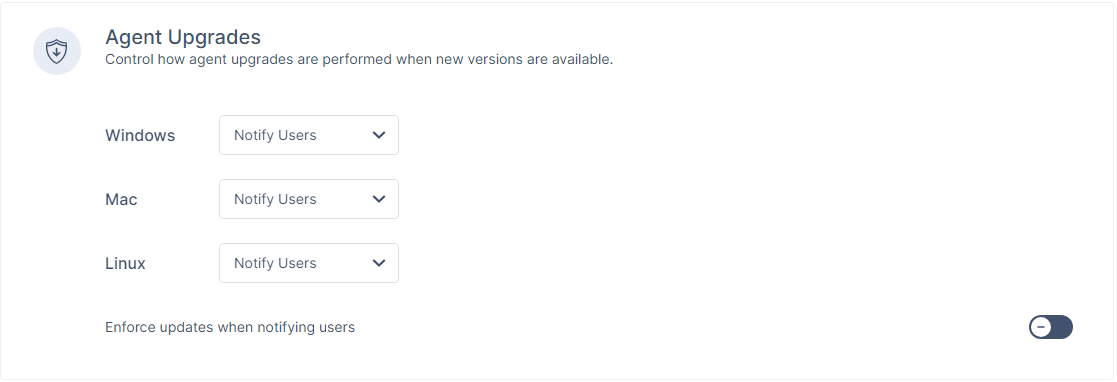
Agent Upgrades
Agent Upgrades allows you to control how to perform Check Point SASE Agent upgrades when new versions are released.
To control how to perform Check Point SASE Agent upgrade:
-
Go to Team > User Profiles.
-
Open a user profile with the required group of members or create a new user profile. See Adding a Configuration Profile.
-
Scroll-down to the Agent Upgrades section.
-
Select the option required for Windows, Mac, and Linux.
-
Automatic Silent: Automatically upgrades the Check Point SASE Agent when new version is available.
-
Notify Users: Notifies the user about the new version.
-
Disabled: Does not upgrade the Check Point SASE Agent.
-
-
To automatically upgrade the SASE Agent while notifying the member, turn on the Enforce updates when notifying users toggle button.
-
Click Apply.
Network Configuration
Network Configuration allows you to configure the network settings for your Check Point SASE Agent.
|
Feature |
Description |
|---|---|
|
Block LAN traffic while connected to a Private network ² |
Prevents a device from accessing or being accessed by other devices on the local network while connected to the VPN, enhancing security against lateral threats. See Device Isolation. |
|
Automatic VPN Connection ¹ |
Automatically connects to the VPN when an internet connection is available.
|
|
Automatically connects to the VPN when an internet connection is available. |
|
|
Kill Switch ¹ |
Automatically disconnects internet connection when the VPN disconnects. |
|
Trusted Environments (Always-On Exceptions) ¹ |
Bypasses SASE VPN if you have a trusted router and connects directly to your network.
To configure a Trusted Environment, use the router’s LAN MAC address. You can use the scripts available under Add Trusted Router to assist with setup. You can also run the command |
|
Agent Security in Trusted Network ¹ |
System administrators can enable or disable security engines in trusted environments. This feature is designed for scenarios where network inspection is already implemented, minimizing redundancy while ensuring control over security posture.
Requires Agent version 11.6 or higher. |
|
Trusted Web Server ¹ |
Specify a list of one or more HTTPS web servers that are available only in your internal trusted network. A trusted web server can be defined by FQDN or IP Address.
Requires Agents of version 11.1 or higher. To add trusted web server:
|
|
Specify a list of one or more MAC addresses of a router you own or trust. Connecting to the internet through these routers do not trigger the Always on VPN feature, and manually connects and disconnects from the network. To add trusted routers:
|
|
|
Automatic Wi-Fi Security ¹ |
The SASE Agent automatically connects to SASE VPN if the device connects to an unsecured Wi-Fi. |
|
Trusted Wireless Networks (Automatic Wi-Fi Security Exceptions) ² |
SASE Agent does not enable Automatic Wi-Fi Security if the device connects to a trusted Wi-Fi network. To add trusted Wi-Fi network:
|
¹ The member can modify this setting on their device.
² This setting applies only to Windows and macOS devices.
Windows
Allows you to define the settings for Windows devices running the SASE Agent.
To configure the default protocol:
-
Click the drop down next to Default Protocol.
-
Select the protocol:
-
WireGuard
-
OpenVPN
-
-
Click Apply.
Use VPN Interface DNS
Sets the device DNS server as the SASE server. The agent uses this DNS server for DNS requests specified on the VPN network interface.
If this is disabled, then the DNS resolver is set to the DNS used by your local adapter. This is useful if you use other DNS providers.
|
|
Note - The member can modify this setting on their device. |
Notify Reconnect
The SASE Agent automatically notifies upon reconnecting with the network.
|
|
Note - The member can modify this setting on their device. |
Android / Chromebook
From the Android / Chromebook settings, the administrators can control the settings for the Check Point SASE Agent running on Android or Chromebook devices.
Default Protocol
To configure the default protocol:
-
Click the drop down next to Default Protocol.
-
Select the protocol:
-
WireGuard
-
OpenVPN
-
-
Click Apply.
Mac
From the Mac settings, the administrators can control the settings for the Check Point SASE Agent running on macOS.
To configure the default protocol:
-
Click the drop down next to Default Protocol.
-
Select the protocol:
-
WireGuard
-
OpenVPN
-
-
Click Apply.
Use VPN Interface DNS
Sets the device DNS server as the SASE server. The agent uses this DNS server for DNS requests specified on the VPN network interface.
If this is disabled, then the DNS resolver is set to the DNS used by your local adapter. This is useful if you use other DNS providers.
|
|
Note - The member can modify this setting on their device. |
iOS
From the iOS settings, the administrators can control the settings for the Check Point SASE Agent running on iOS devices.
Auto Reconnect
Automatically reconnects all the iOS agents to the VPN if the session disconnects or the device connects to Wi-Fi or 3G networks that do not require login credentials.
|
|
Note - The member can modify this setting on their device. |