
Configuring Zero Touch
Workflow
-
Select a Plan and select or create an object.
-
Enable and configure the Zero Touch section within a Plan.
-
Make sure your account is connected with your User Center accounts.
-
Assign one or more Unassigned Gateways to the desired account and to a Plan in which Zero Touch is enabled.
-
Connect the Gateways to a power source and to the Internet.
Configuration Procedures
Step 1: Configure Zero Touch
-
In Spark Management, go to Plans or Gateways.
-
Select or create an object.
-
Go to Zero Touch > Configuration.
-
Click Enable.
-
Configure Administrator credentials. Select one of these options:
-
Manage administrators from Spark Management (Default). Configure administrators in the Administrators section of the same Plan or Gateway object. This enables you to manage multiple administrators from a single location. For more information, see Configuring Device Settings.
-
Local management. Supports a single administrator. After activation, changes are possible only through the device WebUI or CLI.
-
-
Select the Wireless country from the pull-down menu.
-
(Optional) Configure a Clish script to execute Gaia Clish commands during provisioning.

Important - Use this only when your required configurations are not supported in the Spark Management Plan capabilities.
-
In Spark Management, go to Zero Touch > CLISH Script.
-
Enter the applicable commands.
-
Click Save.

Notes:
-
The Clish script runs only during the first provisioning (activation).
-
Spark Management does not validate script syntax and output.
-
The script can override other configurations.
-
-
Click Save.
Step 2: Assign Gateways
This allows the Gateways to be part of the Zero Touch workflow.
-
Go to Gateways > Undeployed Gateways.
-
Verify that User Center accounts are connected.
Note - If you connect several accounts or accounts with multiple Spark Firewall appliances, first time sync may take several minutes to complete.
-
Select one or more Gateways.
-
Click Assign.
-
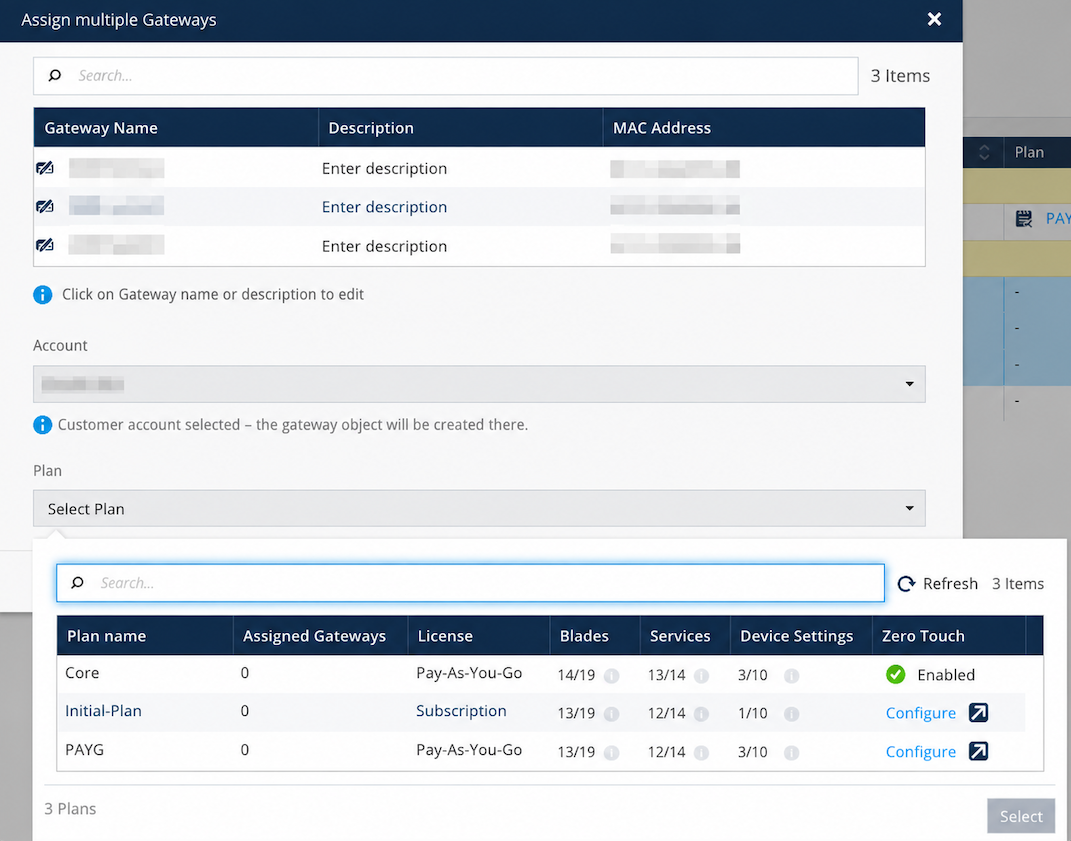
Configure:
-
Account
-
Plan (make sure Zero Touch is enabled first)
-
Gateway name (optional)
-
Description (optional)
-
-
Click Assign.
Notes:
-
Assigning many Gateways may take several minutes.
-
It is not possible to assign more than 1,000 Gateways at a time.
-
-
Make sure the status of the applicable Gateways changed to Pending Activation.
-
Connect the appliance to a power supply and to the Internet, or perform a factory reset. The Gateway automatically starts onboarding.
-
Verify Gateway activation:
Wait several minutes. When activated, the Gateway appears in the Gateways table. If it does not, you can monitor the status of the Gateways in Undeployed Gateways (see Pending Activator Indicator).
Step 3: Unassign Gateways (as needed)
When you unassign a Gateway, you move it from Pending to Unassigned status. Scenarios for this include if a customer cancels the contract or the administrator transfers the appliance to another customer or back to the stock supply.
-
Go to Gateways > Undeployed Gateways.
-
Select Gateways with the status Pending Activation.
-
Click Unassign.
-
Make sure the status of the applicable Gateways changed to Unassigned.
Note - To unassign a Gateway that is already deployed, remove its object from the Gateways list.