
Adding a New Gateway
|
|
Important - Before you start, make sure you configured a Plan (see Plans). |
|
|
Note - When you onboard a new Gateway with PAYG licensing, make sure you perform all steps (see Managing Licenses > Workflow for PAYG). |
Procedure:
-
From an MSP / MSSP account:
In the Spark Management Dashboards > Overview page upper right corner, click New Gateway.
-
From all accounts (including Customer account):
From the left panel, go to Gateways > New Gateway.

Note - In a Customer account, there is no account selection.
-
There are two options:

-
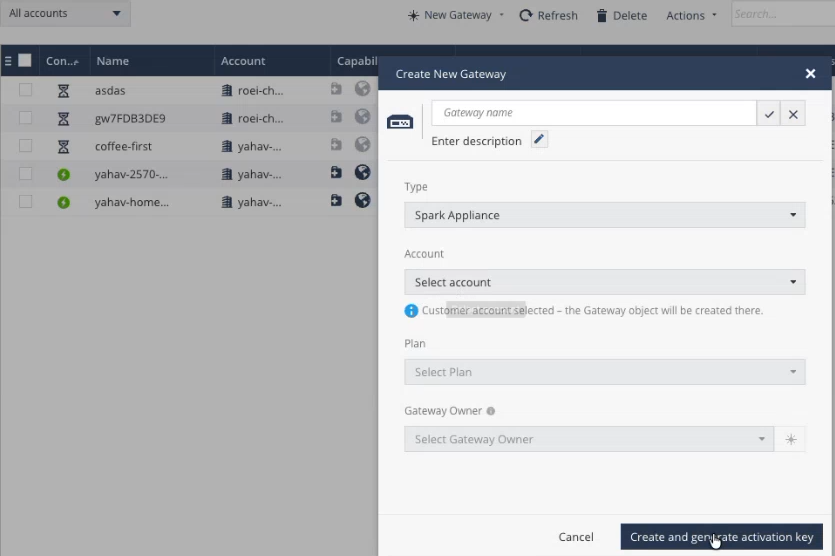
Click Create manual object.
Enter the information in the fields.
-
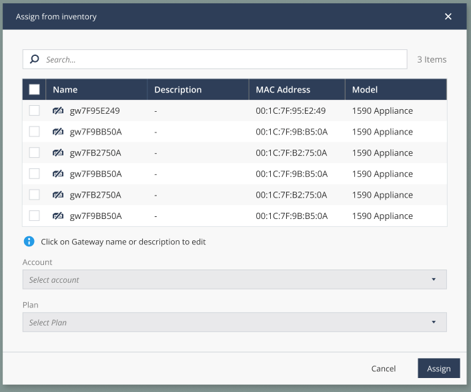
Click Assign from inventory - Opens modal in which you must find and select your MACs from your inventory. You then select the desired account and select the Plan. For more information, see Configuring Zero Touch.
If there are no undeployed Gateways to display:
Click the link and follow the instructions (make sure your User Center account is connected).
When there are inventory MACs available, select the requested MAC address.
-
-
Enter and select the applicable information in these fields:
Field Name
Field Type
Description
Gateway Name
Mandatory
Enter a name, or click Generate.
-
Minimum of 2 characters
-
Maximum of 20 characters
-
Must begin with a letter
-
Can contain only these characters:
-
a-z -
A-Z -
0-9 -
_(underscore) -
-(dash)
-
-
This name cannot be modified later.
Note - When selecting Assign from inventory, the modal provides a default name that consists of "gw" followed by the last 8 digits of the MAC address. For example: "gw12ac12vv"
Description
Optional
Enter a desired text (a maximum of 1000 characters).
Type
Mandatory only when selecting Create manual object. If you select Assign from inventory, the type is always Spark Appliance.
Select the Spark Firewall configuration:
-
Spark Appliance (Default)
Select this option if you connect a single Spark Firewall Appliance.
-
Spark Cluster
Select this option if you connect a cluster of Spark Firewall Appliances.

Important:
If you select Spark Cluster, these two options appear:
-
Generate new Member Objects automatically (default)
-
Select from existing Gateways
-
Create in
Mandatory when creating a Gateway for a customer account (MSP / MSSP)
-
Click Select an account to select an existing account.
-
Clicking Create in displays the full hierarchy, including child accounts that have not yet registered to Spark Management.
Note - When selecting an account that is not yet registered with Spark Management, the Create and generate activation key button may take a few additional seconds to respond compared to accounts that are already registered.
Important - When selecting an account that is still not PAYG-eligible, with a Plan that has PAYG configured, the administrator must add a contract for this account as explained on the Managing Licenses page.
Plan
Mandatory
Select the required plan.
Note - The selected Plan will be shared from the MSP / MSSP to the child account if it is not already shared. If a Plan with the same name already exists in the target account, that plan will be disabled and cannot be selected.
Gateway Owner
Optional (only for Create manual object. If you select Assign from inventory, this option is provided later in edit object.
Do one of these:
-
Click Select Gateway Owner to select an existing Gateway Owner object.
-
Click * to create a new Gateway Owner object.
Note - In MSP / MSSP, when creating the Gateway in the child account, the Gateway Owner is created in the child account
-
-
For Create manual object only: Click Create and generate activation key.
Note - Assign from inventory uses Zero Touch so the appliance only needs to connect to a power source and to the internet. For more information, see the Zero Touch Administration Guide.
-
In the confirmation window, in the what's next? section, select one of the following:
-
I will activate now (default)- click on the copy icon to copy your activation key.
-
I will activate later - Perform this action only if you do not have access to the Gateway WebUI.
-
-
Click Close.
Notes:
-
You must copy the activation key or select I will activate later before closing this window.
-
We recommend that you do not close the window without activating the Gateway.
-
-
-
For Create manual object only: In the Spark Firewall Appliance WebUI:
Note - Assign from inventory uses Zero Touch so the appliance only needs to connect to a power source and to the internet. For more information, see the Zero Touch Administration Guide.
-
From the left navigation panel, click Home.
-
In the Overview section, click > Cloud Services.
-
Click Manage with Spark Management.
-
Paste the Activation Key you copied in step 5.
-
Click Save.
Notes:
-
See the R81.10.X Spark Firewall Locally Managed Administration Guide for 1500, 1600, 1800, 1900, 2000 Appliances Section "Configuring Cloud Services" or R82.00.X Spark Firewall Appliances Locally Managed Administration Guide Section "Configuring Cloud Services."
-
You can also perform this step in Gaia Clish.
See the R82.00.X Spark Firewall Appliances CLI Reference Guide Chapter "Working with Cloud Services."
-