Okta
Configure settings in the Infinity Portal IDP Integration wizard and in the Okta Workforce Identity Cloud portal to configure the SSO![]() Single Sign-On (SSO) - A session/user authentication process that permits a user to enter one name and password in order to access multiple applications. authentication with Okta.
Single Sign-On (SSO) - A session/user authentication process that permits a user to enter one name and password in order to access multiple applications. authentication with Okta.
-
In the Infinity Portal, go to
 > Identity & Access and click the plus (+) icon.
 -
Enter a name for the Integration Title and select Okta.
-
To continue, click Next.
In this step of the IdP Integration Wizard, you can configure SSO authentication for Infinity Portal administrators and for end users of Check Point services.
-
Select Enable Administrators to log in to the portal using this IdP.
-
Select one of these options:
-
Login based on domain verification - Infinity Portal Administrators can log in to this Infinity Portal account with SSO from the Identity Provider
 A system entity that creates, maintains, and manages identity information for principals and also provides authentication services to relying applications within a federation or distributed network. Acronym: IdP or IDP.. Administrators log in through the Infinity Portal login page.
 -
Login with a unique URL - Infinity Portal Administrators can log in to multiple Infinity Portal accounts with SSO from the Identity Provider. Administrators log in using the URL that appears at the bottom of the Login with a unique URL button. Copy this URL and keep it in a safe place.
-
-
In the Service(s) Integration section, select one of these options:
-
No Services - End users of Infinity Portal services cannot authenticate with SSO from the Identity Provider. This is the default configuration.
-
All Services - End users can log in with SSO from the Identity Provider to all Check Point services that support SSO.
-
Specific Service(s) - From the list of services, select service(s) to allow end users to log into with SSO from the Identity Provider. Available services:
-
Harmony Connect
-
Quantum Gateways
-
-
-
Click Next (or, if you are editing a configuration, Apply) to complete the Integration Type configuration.
|
|
Note - If for Integration Type you selected "Login with a Unique URL", the Verify Domain step is not necessary. |
-
Connect to your DNS server.
-
Copy the DNS Value from the Infinity Portal IdP Integration wizard > Verify Domain step.
-
On your DNS server, enter the Value as a
TXTrecord. -
In the Infinity Portal > Domain(s) section, enter a public DNS domain server name and click the plus icon.
Check Point makes a DNS query to verify your domain's configuration.
-
Optional - add more DNS domain servers.
-
Click Next.

Note - Wait until the DNS record is propagated and can be resolved.
This video shows you how to complete the Allow Connectivity step in the IdP Configuration Wizard and create an Okta application for the Infinity Portal. To finish the integration of Okta with the Infinity Portal, you must complete the IdP configuration wizard in the Infinity Portal.
Watch the Video
| Important - Keep the Infinity Portal Okta integration wizard and the Okta portal open during this whole procedure. Make sure they do not time out. |
Log in to your Okta Portal.
Click Admin.
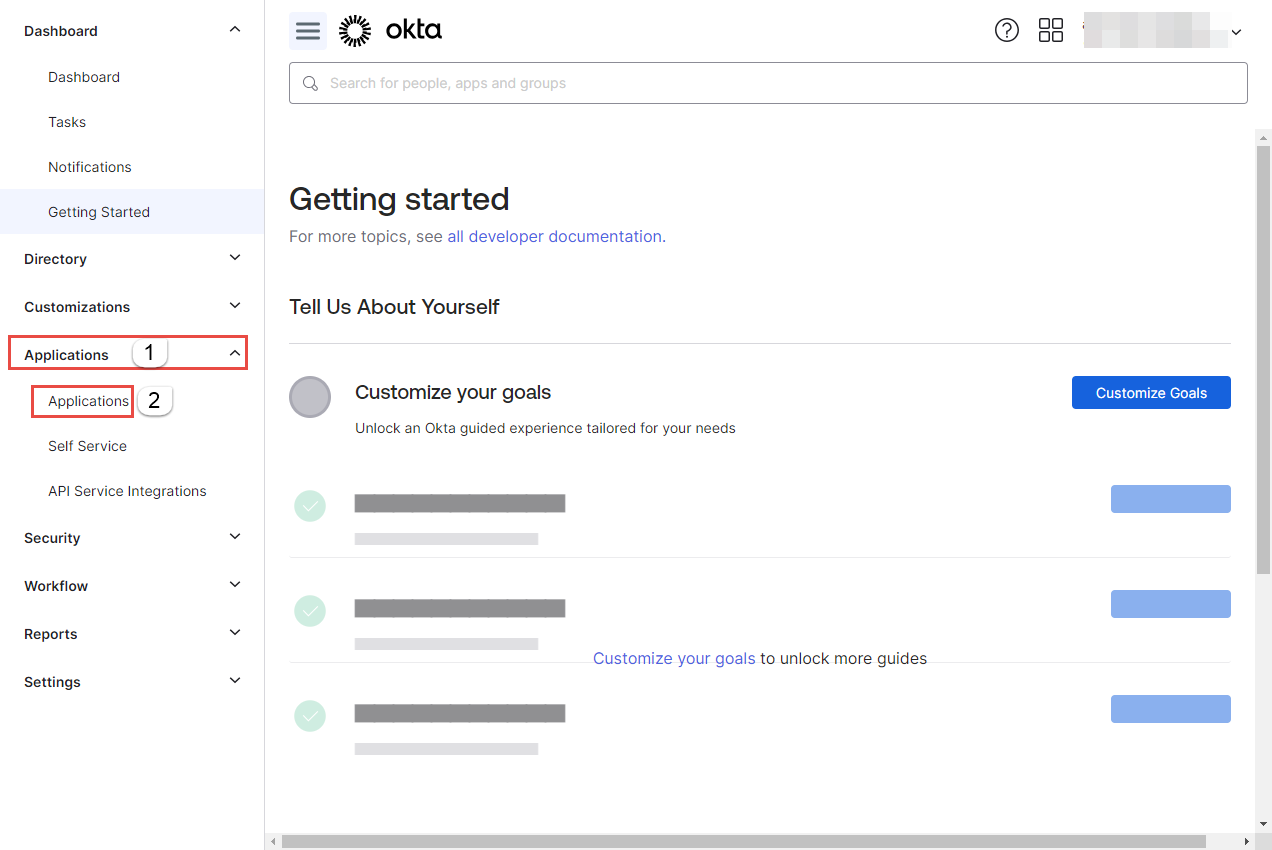
From the left taskbar, click Applications > Applications.

The Applications screen opens.
Click Create App Integration.

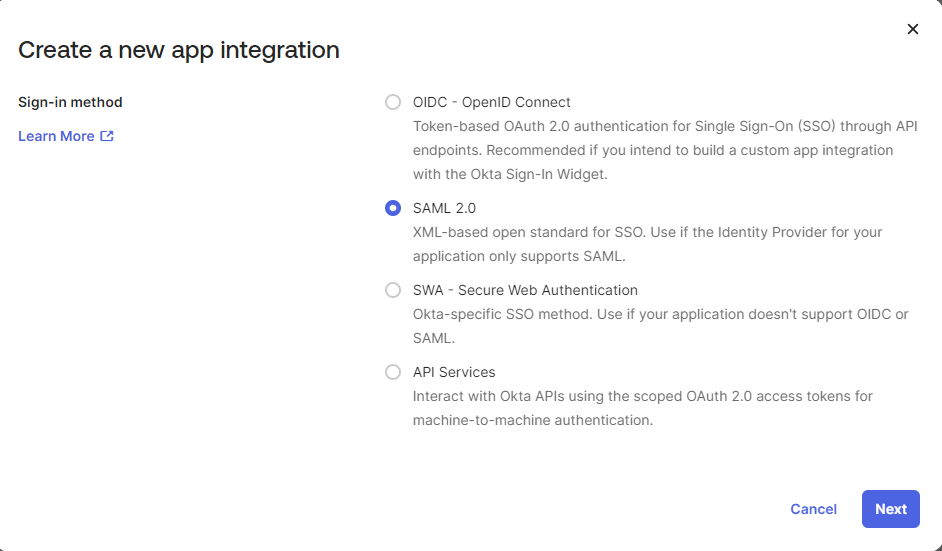
The Create a new app integration window opens.
Select SAML 2.0 and click Next.

The Create SAML Integration window opens.
In the General Settings tab > App name field, set the application name to Check Point Infinity Portal and click Next.
The Configure SAML tab opens.


In the Okta Portal > Configure SAML tab > SAML Settings menu > General section, configure SAML
Security Assertion Markup Language. An XML-based, open-standard data format for exchanging authentication and authorization data between parties, in particular, between an identity provider and a service provider. settings.Copy the Single sign-on (Destination URL) from the Infinity Portal to the Single sign-on URL field in the Okta Portal.
In the Okta Portal, make sure that Use this for Recipient URL and Destination URL is selected. This option is selected by default.
Copy the Audience URL (SP Entity ID) from the Infinity Portal to the Audience URI (SP Entity ID) field in the Okta Portal.
In the Okta Portal > Name ID format field, select EmailAddress.
In the Okta Portal > Application username field, make sure that Okta username is selected.
IdP Initiated flow lets you connect directly to Infinity Portal from the Okta portal. To do this, you must create an Infinity Portal app card in the Okta portal. See the Okta documentation for App integrations.
To configure IdP Initiated flow, copy the Default Relay State from the Infinity Portal to the Default Relay State field in the Okta Portal.
| Important - Before you can test the connectivity between Okta and Infinity Portal, you must complete all of the IdP integration steps in the Infinity Portal. |
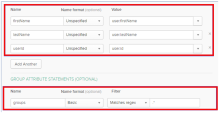
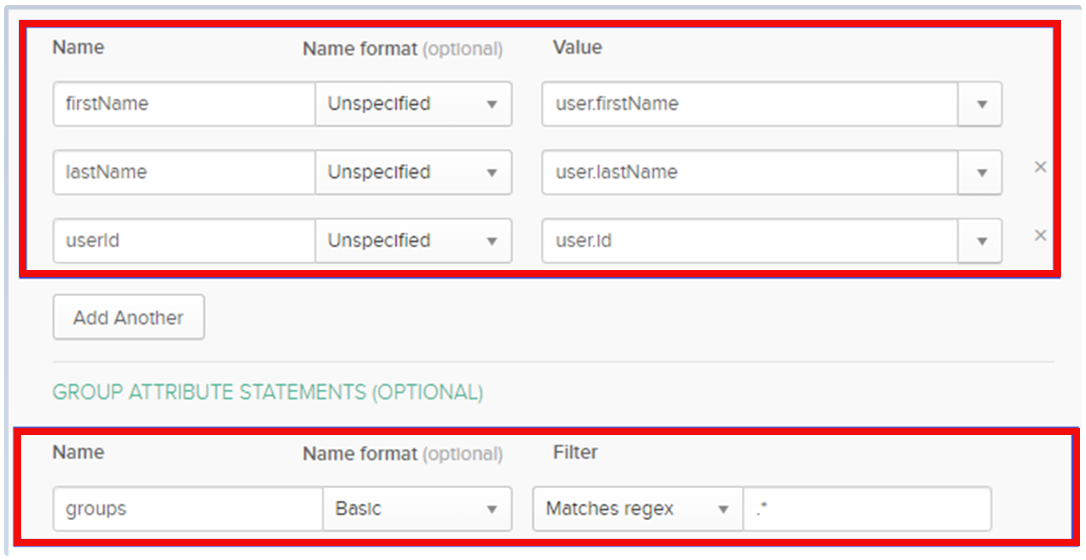
In the SAML Settings menu > Attribute Statements section, create these attribute statements:
Name - firstName
Name format - unspecified
Value - user.firstName
Name - lastName
Name format - unspecified
Value - user.lastName
Name - userId
Name format - unspecified
Value - user.id
In the SAML Settings menu > Group Attribute Statements section, create this group attribute statement:
Name - groups
Name format - Basic
Filter - Matches regex
Value (this field does not have a name) - .*

Important - Copy the name of the assigned group for use with the Check Point Infinity Portal User Group IdP ID field.
- Select This is an internal app that we have created and then click Finish.
On the Configure page, upload metadata from Okta to the Infinity Portal.
-
In the Okta Portal, open the application you created for the Infinity Portal:
-
From the left taskbar, click Applications > Applications.
The Applications screen opens.
-
Open the application you created for the Infinity Portal.
-
-
Open the Sign On tab.
-
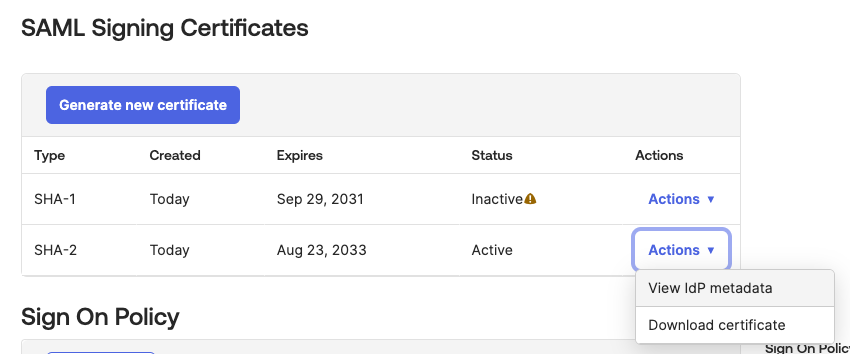
In the SAML Signing Certificates section > table row of the active SAML certificate, click Actions > View IdP Metadata.

A new window opens with the metadata.
-
Save the metadata in a new file named
InfinityPortalOktaMetaData.XML.
-
In the Infinity Portal, click Select File and upload the metadata XML file.
Note - Check Point uses the service URL and the name of your Certificate to identify your users behind the sites.
-
Click Next / Apply.
Check Point verifies the metadata for Okta.
-
In the Okta Portal, open the application you created for Infinity Portal.
-
From the left taskbar, click Applications > Applications.
The Applications screen opens.
-
Open the application you created for the Infinity Portal
-
-
In the Assignments tab, click Assign > Assign to groups.
-
Select the relevant group from the list.
To use Okta for SSO authentication only, select the checkbox I want to skip this step and use this IdP for SSO authentication only.
Directory Integration gets information about users and groups for the services you selected in the Integration Type step > Service(s) Integration section.
Directory Integration does not apply to Users and User Groups in the Infinity Portal.
|
|
Important - After you create a Directory Integration, you cannot change it. To create a different Directory Integration, you must create a new Identity Provider (IdP) Integration. |
Select one of these ways to manage user identity data include Manual API Sync and System for Cross-Domain Identity Management (SCIM) with Okta:
|
Directory Integration Method |
How it Works |
Which Users and Groups are Synced |
|---|---|---|
|
Manual Sync |
Allows Check Point services to query for any change in Okta users and groups. The Infinity Portal pulls users and groups from Okta. |
All users and groups in Okta. |
|
SCIM |
Allows Okta to push any change in the user and group directory to Check Point services. |
Only users and groups in Okta that are assigned to the SAML application for the Infinity Portal. |
Set up permissions to allow a selection of users and user groups from your Okta directory in the Infinity Portal Policy.
-
In the Set Directory Integration step, select Manual API Sync and enter the details from your Okta account.
-
In the Okta Portal, check your Okta domain. Usually, this name appears in the address bar and in your account name.
-
Click the icon to the right of the Okta domain name to copy it.
-
Paste the Okta domain name in the Okta Domain field on the Set Directory Integration page of the Identity Provider wizard.
-
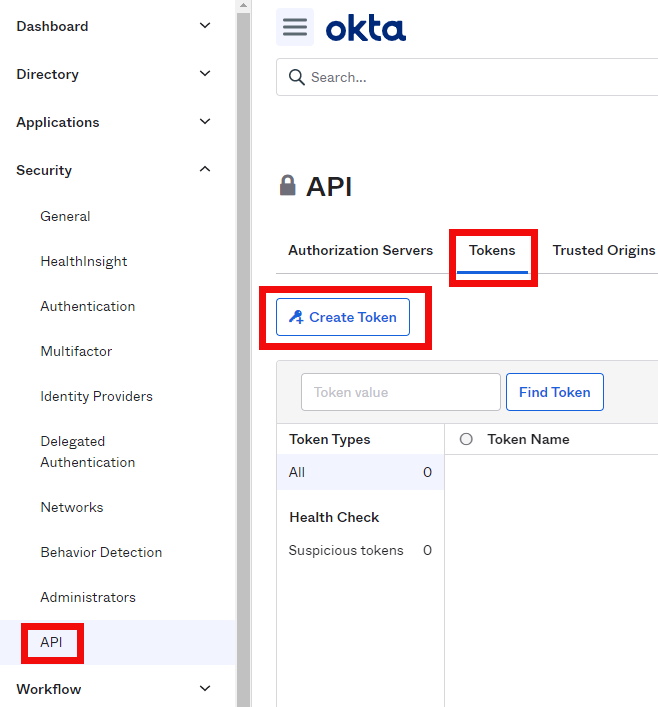
In the Okta Portal, navigate to Security > API > Tokens > click Create Token.

-
In the window that opens, enter the token name and click Create Token.
-
Copy the Token Value.

Best Practice - Check Point recommends that you save the Token Value in a separate, secured file to retrieve when required.
-
In the Infinity Portal Identity Provider wizard, on the Set Directory Integration page, paste the Token Value into the API Token Value field.
-
To test the users and group synchronization between the Infinity Portal and the IdP, click Test Connectivity.
If the test is unsuccessful, repeat the Set Directory Integration step to configure the user and group synchronization parameters.
-
Click Next.
-
Prerequisites:
You must have An Okta account with administrator permissions and a SCIM provisioning subscription.
Step 1 - Configure the Directory Integration in the Infinity Portal:
-
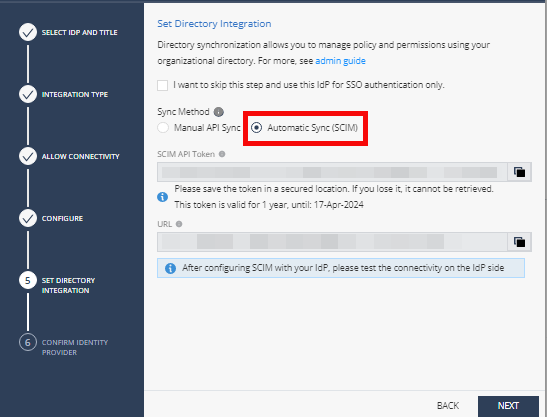
In the Set Directory Integration step, select Automatic Sync SCIM.
-
Copy and save the SCIM API Token and URL.
-
Click Next.
-
Click Submit.
Step 2 - Configure the Application Integration in the Okta Admin Console:
-
Navigate to your Okta account and go to Applications.
-
Open the application you created for the Infinity Portal.
-
Enable SCIM provisioning:
-
Click Edit.
-
Select Enable SCIM provisioning.
-
Click Save.
-
-
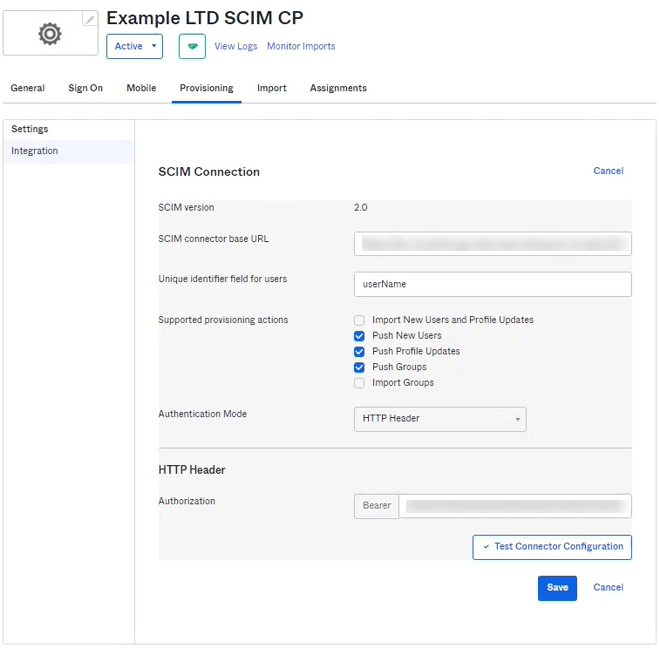
Create the SCIM connection:

-
Click Edit.
-
For SCIM connector base URL, enter the URL from the Set Directory Integration step in the Infinity Portal.
-
For Unique identifier field for users, enter userName.
-
For Supported provisioning actions, enable these settings:
-
Push New Users
-
Push Profile Updates
-
Push Groups
-
-
For Authentication Mode, from the down arrow, select HTTP Header and paste the API token.
-
Click Save.
-
-
Click Test Connector Configuration.
Important - To test connectivity, you must first complete Step 1 - Configure the Directory Integration in the Infinity Portal: in its entirety.
If the integration is configured correctly, then the Test Connector Configuration window shows Connector configured successfully.
-
From the top toolbar, select Provisioning, and below Settings select To app.
-
Enable these settings:
-
Create Users
-
Update User Attributes
-
Deactivate Users
-
-
Click Save.

|
|
Note - This step is not necessary if you selected to use SCIM. |
-
Review the details of the SSO configuration and click Submit.
The IDP Configuration Wizard closes.
-
In the Infinity Portal, create a user group with the applicable roles and assign it to the related IdP group name or ID. This depends on the applicable identity provider before you log out. For more information, see User Groups.