
Microsoft Intune and Microsoft Defender
Identity and Trust can query Microsoft Entra ID to get identity information based on sign-in events from Microsoft Intune or Microsoft Defender on endpoint computers. When you export sign-in events to Azure Event Hubs, Identity and Trust retrieves identities in a way that minimizes resource usage, reduces time delays, and ensures reliable access to the necessary data.
Prerequisites:
-
An Identity Provider (IdP) of Microsoft Entra ID with Identity and Trust. See Microsoft Entra ID.
-
An Azure Event Hubs Namespace. See the Quickstart guide to create an Event Hub using the Azure portal.
-
An active Storage Account in Azure. Refer to Microsoft documentation to create a storage account and disable the soft delete for blobs and containers.
-
An administrator account in Azure that has sufficient privileges to create the integration.
Workflow
-
An Azure administrator adds Azure API permissions to the Entra ID application that is integrated with Identity and Trust.
-
An Azure administrator configures Intune or Defender to export logs to the dedicate EventHub in Entra ID.
-
An administrator of a Security Gateway that is integrated with Identity and Trust makes access control rules based on information from Intune and Defender. Data flow:
Intune/Defender on the user endpoint computer => Entra ID sign-in logs (from Intune) and/or Entra ID advanced hunting (from Defender) => Azure EventHub => Identity and Trust => Security Gateway.
Comparison of Automatic and Manual Configuration of Intune and Defender
You can integrate Identity and Trust with Intune/Defender manually or automatically. The functionality of an automatic integration and a manual integration is the same.
In an Automatic Integration, an Azure administrator temporarily grants Azure privileges to Check Point. Check Point then makes the necessary configurations on the Azure side (the first two steps in the Workflow above).
In a Manual Integration, an Azure administrator makes the necessary configurations on the Azure side (the first two steps in the Workflow above). In a Manual Integration, you do not need to grant Azure privileges to Check Point.
|
|
Note - In an automatic integration, the Azure Event Hub Namespace and the associated Azure Storage Account are created with public network access enabled for all networks by default. To limit access to specific IPs, contact Check Point Support and reference sk185014. |

Automatic Integration of Identity and Trust with Microsoft Intune and Microsoft Defender
-
In Identity and Trust, from the left toolbar, click Integrations.
-
In the Integrations section, click the + (plus sign) button.
-
Select Identity Integrations.
-
Select Microsoft Intune or Microsoft Defender. If you want to integrate both of them, it does not matter which one you select.
The Microsoft Intune or Microsoft Defender integration window opens.
-
Select Automatic.
-
In Identity and Trust, click the link "First login to your Microsoft Entra ID Account".
An Entra ID login window opens. The window contains a list of permissions that Check Point requires to perform automatic integration.
-
Click Accept.
The Entra ID login window closes. If Entra ID successfully granted permissions to Check Point, a confirmation message appears in the Check Point Portal.
-
For the Integration Title, enter a title. After you create the integration, this title appears in the Identity and Trust Integrations section.
-
Select an Entra ID Integration.
-
Select a Subscription Name.
-
Select a Resource Group Name.
-
Optional - If you want to integrate both Intune and Defender, select the relevant checkbox:.
-
In a Microsoft Intune window, select Use this configuration to create Microsoft Defender integration as well.
-
In a Microsoft Defender window, select Use this configuration to create Microsoft Intune integration as well.
-
-
Click Test permissions. If the test fails, follow the instructions in the failure message.
-
Click Save.
The Microsoft Intune and/or Microsoft Defender integration appears in the gallery.
Manual Integration of Identity and Trust with Microsoft Intune and Microsoft Defender
Keep Identity and Trust and Microsoft Entra ID open throughout this procedure.
 Step 1: In Identity and Trust,open an Identity Integrations window for Microsoft Intune or for Microsoft Defender
-
In Identity and Trust, from the left toolbar, click Integrations.
-
In the Integrations section, click the + (plus sign) button.
-
Select Identity Integrations.
-
Select Microsoft Intune or Microsoft Defender. If you want to integrate both of them, it does not matter which one you select.
The Microsoft Intune or Microsoft Defender integration window opens.
-
Select Manual.
-
For the Integration Title, enter a title. After you create the integration, this title appears in the Identity and Trust Integrations section.
-
If there is more than one integration between Microsoft Entra ID and Identity and Trust, select an Entra ID Integration. If there is only one integration, this field is automatically filled and cannot be changed.
-
Optional - If you want to integrate both Intune and Defender, select the relevant checkbox at the bottom of the window.
-
In a Microsoft Intune window, select Use this configuration to create Microsoft Defender integration as well.
-
In a Microsoft Defender window, select Use this configuration to create Microsoft Intune integration as well.
-
-
Keep Identity and Trust open.
Step 2: In Azure, add API permission to the integrated Microsoft Entra ID application
Watch the Video
-
Open the Microsoft Entra ID application that you integrated with the Check Point Portal.
-
In the left menu, expand Manage and click API permissions.
-
In the Configured permissions section, click Add a permission.
The Request API permissions window opens.
-
Select Application permissions.
-
Add a permission to the application:
-
In the search bar below Select permissions, search for
deviceManage. -
Expand DeviceManagementManagedDevices.
-
Select DeviceManagementManagedDevices.Read.All.
-
-
If you use Defender to send login events from endpoint computers, add another permission to the application:
-
In the search bar below Select permissions, search for
threat. -
Expand ThreatHunting.
-
Select ThreatHunting.Read.All.
-
-
Click Add permissions.
-
In the Configured permissions section, click Grant admin consent for Check Point Software Technologies.
-
In the confirmation window, click Yes.
Step 3: In Azure, create an Event Hubs Instance with a consumer group and the required role assignments
Watch the Video
-
In the Azure portal, on the homepage, in the Azure services section, open Event Hubs.
-
In the table, open the Namespace that you want to use for the application.
-
On the vertical toolbar, make sure the Overview tab is selected.
-
From the horizontal toolbar, click Event Hub to create a new Event Hub.
The Create Event Hub wizard open.
-
In the Create Event Hub wizard:
-
Set the value of the Partition count to 2 or greater.
-
Complete the rest of the wizard according to your organization's requirements.
The new Event Hub appears in the Event Hubs section at the bottom of the Azure portal.
-
-
Copy the name of the Event Hubs Namespace from the top left of the Azure portal. Paste this value into the Namespace Name field in Identity and Trust.
-
Copy the name of the relevant Event Hub from the Event Hubs table at the bottom of the Azure portal. Paste this value into the Eventhub Name field in Identity and Trust.
-
At the bottom of the Azure portal, in the Event Hubs section, click the name of the Event Hub that you created.
The Event Hubs Instance screen opens.
-
From the horizontal toolbar, click Consumer group.
The Create consumer group window opens.
-
In the Create consumer group window:
-
Enter a name for the consumer group.
-
Click Create.
The new consumer group appears in the Consumer groups section at the bottom the Azure portal.
-
-
Copy the name of the new consumer group from the Azure portal. Paste it into the Consumer Group Name field in Identity and Trust.
-
In the Azure portal, from the left toolbar, click Access control (IAM).
-
From the top toolbar click Add, and then click Add role assignment
The Add role assignment window opens.
-
In the Add role assignment window:
-
In the Roles tab:
-
In the Job function roles section, search for
receiver. -
Select Azure Event Hubs Data Receiver.
-
-
In the Add role assignment window, in the Members tab:
-
For Assign access to, select User, group, or service principal.
-
Click Select members.
The Select members window opens.
-
In the Select members window, search for the Microsoft Entra ID application you created for Identity and Trust.
-
In the search results, select the application.
-
At the bottom of the Select members window, click Select.
-
-
In the Add role assignment window, in the Conditions tab, do not change the default configurations.
-
In the Add role assignment window, in the Review + assign tab, make sure the configuration is correct and then click the Review + assign button at the bottom of the window.
-
For more information, see Authorize access to Event Hubs with Azure Active Directory in Microsoft documentation.
Step 4: In the Microsoft Entra ID Storage Account resource, assign the "Storage Blob Data Owner" role to the integrated Microsoft Entra ID application
Watch the Video
-
On the Microsoft Entra ID homepage, in the search bar, search for
Storage Account. -
In the Services section of the search results, click Storage accounts.
-
Open the storage account that you want to use for Identity and Trust.
-
In Identity and Trust, enter the name of the storage account into the Storage Account Name field.
-
In Entra ID, in the storage account window, from the left toolbar, open the Access Control (IAM) tab.
-
In the storage account window, from the top toolbar, click Add and then click Add role assignment.
The Add role assignment window opens.
-
In the Add role assignment window:
-
In the Roles tab:
-
Select Job function roles.
-
In the search bar, search for
owner. -
Click Storage Blob Data Owner.
-
-
In the Members tab:
-
Click + Select members.
The Select members window opens.
-
In the Select members window, in the search bar, enter the name of the Microsoft Entra ID application you created for Identity and Trust.
-
In the search results, select the application.
-
Click Select.
The Select members window closes. The application appears in the Members tab in theAdd role assignment window.
-
-
In the Conditions tab, do not change default settings.
-
In the Review + assign tab, make sure the configuration is correct and then click the Review + assign button at the bottom of the window.
-
Step 5: In Microsoft Entra ID, integrate Intune or Microsoft Defender with Event Hubs
You can integrate Intune and/or Microsoft Defender.
To integrate Intune with Event Hubs
Watch the Video
-
In the Azure portal, in the search bar, search for "
sign-in". -
Click Sign-in logs.
The Sign-in events window opens.
-
From the top toolbar, click Export Data Settings.
-
Click Add diagnostic setting.
-
Enter a name in the Diagnostic setting name field.
-
In the Logs section, select SigninLogs.
-
In the Destination details section, select Stream to an event hub.
-
For Event hub namespace, select the Namespace that you use for the Identity and Trust application.
-
In the Diagnostic setting window, from the top toolbar, click Save.
For more information, see How to stream activity logs to an Event Hub in Microsoft documentation.
To integrate Microsoft Defender with Event Hubs:
Watch the Video
-
In a web browser, go tosecurity.microsoft.com and log in to your account.
-
From the left toolbar, click Settings.
-
In the table, click Microsoft Defender XDR.
-
In the General section, click Streaming API.
-
In the Streaming API section, click + Add.
The Add new Streaming API settings window opens.
-
In theName field, enter a name.
-
Select Forward events to Event Hub.
-
In a separate browser tab, open the Azure portal and do these steps:
-
In the search bar, search for "
event hubs". -
Open the Event Hub that you use for the Microsoft Entra ID application that you created for Identity and Trust.
-
In the Event Hub window, in the left toolbar, expand Settings and click Properties.
-
In the Essentials section, copy the ID string.
-
Keep the Azure portal open.
-
-
At security.microsoft.com, in the Add new Streaming API settings window, paste the ID string you copied from the Azure portal into the Event Hub Resource ID field.
-
In the Azure portal Event Hub window:
-
From the left toolbar, click Overview.
-
At the bottom of the screen, in the Event Hubs table, copy the name of the Event Hub that you use for the Microsoft Entra ID application that you created for Identity and Trust.
-
-
At security.microsoft.com, in the Add new Streaming API settings window:
-
Paste the name that you copied from the Azure portal into the Event-Hub name field.
-
In the Event Types section, expand Devices.
-
Select DeviceNetworkInfo.
-
Select DeviceLogonEvents.
-
Click Submit.
-
Step 6: In Identity and Trust finish the configuration and test the connectivity
-
In Identity and Trust, click Test connectivity to verify the connection between your Identity and Trust account and your Microsoft Entra ID account.
-
If the test passes, then Connectivity test successful shows.
-
If the test fails, a warning message appears that highlights the problematic field in red.
-
-
Click Save.
The Microsoft Intune and/or Microsoft Defender integration appears in the gallery. After a few hours, Intune/Defender starts sending events to the Azure EventHub, which then sends them to Identity and Trust.
Replacing an Invalid or Expired Client Secret
|
|
Note - This procedure applies only to Microsoft Intune and Microsoft Defender integrations that use SCIM Automatic Sync. |
When you integrate Microsoft Intune or Microsoft Defender with a directory that uses SCIM (Automatic Sync), Identity and Trust creates a dedicated application in Microsoft Entra ID for the integration. This application uses a client secret to authenticate.
If the client secret becomes invalid or expires, the integration stops working and Identity and Trust cannot collect sign-in data from Intune or Defender. When this occurs, the integration card on the Integrations page shows the warning:
“Your client secret is invalid or expired.”
To restore the integration, generate a new client secret in Microsoft Entra ID and update the integration with the new value.
To replace an invalid or expired client secret:
-
In Identity and Trust, from the left toolbar, click Integrations.
-
On the Microsoft Intune or Microsoft Defender integration card that shows the error, click Update Credentials. Alternatively, click the three dots and then click Edit.
The Edit Microsoft Intune or Edit Microsoft Defender window opens.
-
Copy the value from the Application (client) ID field.
-
Keep the Edit window open.
-
In a web browser, go to entra.microsoft.com.
-
Paste the Application (client) ID into the Search field and select the application under App registrations.
-
On the application's page, select Manage > Certificates & secrets.
-
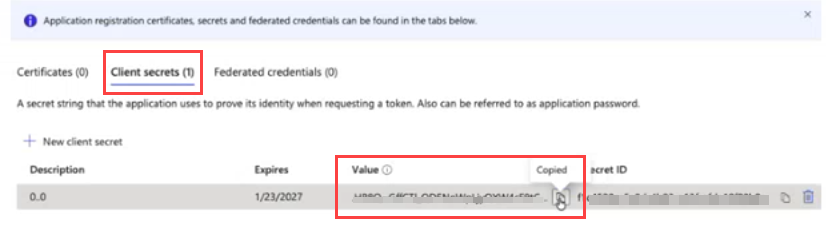
On the Client secrets tab, click New client secret.
-
In the Add a client secret pane:
-
Enter a description.
-
Select an expiration period.
-
Click Add.
The new secret appears on the Client secrets tab.
-
-
Copy the secret from the Value column.
Important - You cannot retrieve this secret value after you leave the page or close the pane.
-
In the Identity and Trust portal, return to the open Edit Microsoft Intune or Edit Microsoft Defender window.
-
Paste the secret value into the Client Secret field.
-
Click Test connectivity.
-
When the success message appears, click Save.
Identity and Trust updates the integration card with the new client secret, removes the error message, and changes the integration status to Active.