Deploying the Harmony Mobile Protect app automatically (Zero Touch Deployment)
Zero Touch deployment is optional, if the organization does not want to force Mobile Security to activate itself automatically on employees' devices, you can skip this chapter.
UEM![]() Unified Endpoint Management. An architecture and approach that controls different types of devices such as computers, smartphones and IoT devices from a centralized command point. solutions traditionally prompt the mobile device user to install the application once it is registered. In addition, to get full protection, the user needs to approve the required permissions and profiles. Many users are vigilant about installing new mobile applications or granting different permissions, and as a security company, Check Point even encourages that. Most of them don't know that the Harmony Mobile Protect app is focused on device characteristics and behaviors and not the content stored on or flowing through the device. Furthermore, some users are in compliance with the company's security policy
Unified Endpoint Management. An architecture and approach that controls different types of devices such as computers, smartphones and IoT devices from a centralized command point. solutions traditionally prompt the mobile device user to install the application once it is registered. In addition, to get full protection, the user needs to approve the required permissions and profiles. Many users are vigilant about installing new mobile applications or granting different permissions, and as a security company, Check Point even encourages that. Most of them don't know that the Harmony Mobile Protect app is focused on device characteristics and behaviors and not the content stored on or flowing through the device. Furthermore, some users are in compliance with the company's security policy![]() Collection of rules that control network traffic and enforce organization guidelines for data protection and access to resources with packet inspection., especially when they use their own devices. Therefore, users often decide not to install the app or approve the required configuration. In addition, users who do agree to install and accept the configuration will not often do it immediately and it will take time until the application is activated. As a result, many devices remain exposed to potential cyber-attacks.
Collection of rules that control network traffic and enforce organization guidelines for data protection and access to resources with packet inspection., especially when they use their own devices. Therefore, users often decide not to install the app or approve the required configuration. In addition, users who do agree to install and accept the configuration will not often do it immediately and it will take time until the application is activated. As a result, many devices remain exposed to potential cyber-attacks.
Mobile Security's innovative zero-touch technology allows the Protect app to be installed and activated automatically without any user interaction.
The solution uses a VPN profile that is pushed automatically by the UEM to the device and used by the Harmony Mobile Protect app. When deployed, it runs the activation flow automatically, and the device becomes active and is displayed in the Mobile Security Administrator Portal without any user intervention on the device.
Zero Touch Deployment in Android Enterprise Devices
Devices That Do Not Use an Additional VPN App and Want To Use ONP
To enable zero touch on devices that do not use an additional VPN app and want to use the On-device Network Protection (ONP), you need to create a VPN profile that enables the automatic activation of Mobile Security. This VPN also serves as the ONP VPN.
|
|
Note - This procedure also applies to users who want to use Mobile Security without ONP. |
To create a VPN profile to allow automatic activation of the Mobile Security application:
-
Create a new custom profile.
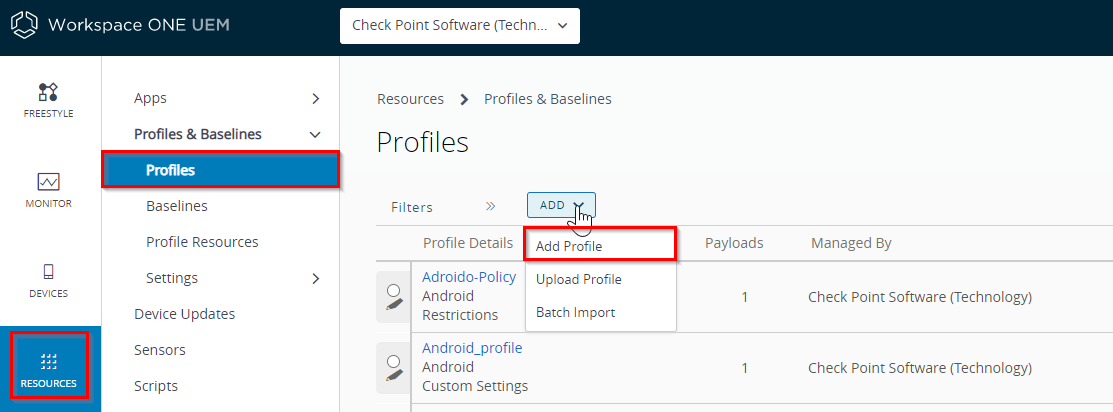
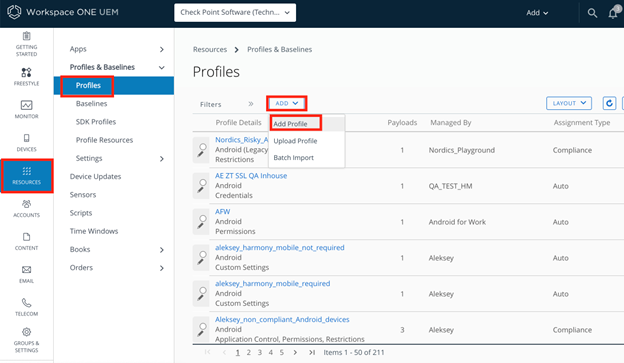
Go to Resources > Profiles & Baselines > Profiles > Add > Add Profile.
-
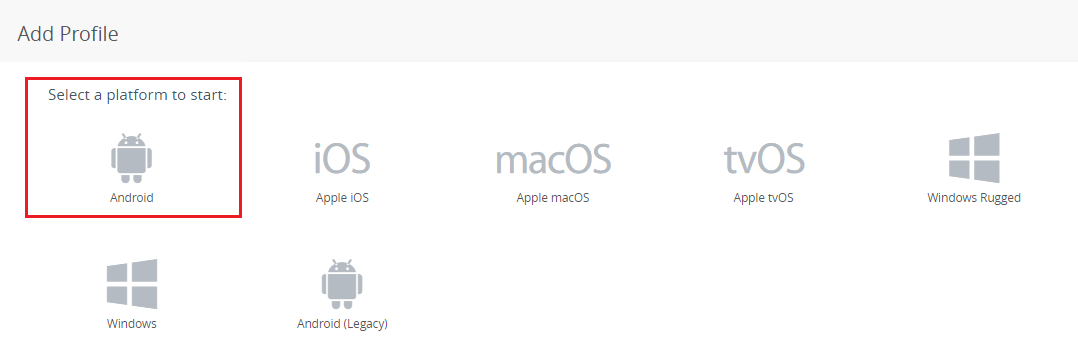
In the Add Profile window, select the Android platform.
In General section, select a profile name.
-
Under Custom Settings, click Add and paste the following text.
Make sure to replace the tenant token.
<characteristic uuid="9310785f-25a5-423e-b5e5-675100546e6e"
type="com.airwatch.android.androidwork.app:com.lacoon.security.fox">
<parm name="EnableAlwaysOnVPN" value="True" type="boolean" />
<parm name="LockDown" value="False" type="boolean" />
<parm name="token" value="your_tenant_token" type="string" />
<parm name="mdm_uuid" value="{DeviceUid}" type="string" />
<parm name="gwAddress" value="Harmony Mobile GW address according to below list" type="string" />
<parm name="portalAccountId" value="Infinity portal account ID" type="string" /></characteristic>
Use the token configured in the Deployment section in the Mobile Security dashboard. For more information, see Deployment.
For
portalAccountID, use the Account ID from Check Point Portal > Global Settings > Account Settings.For
gwAddress, select the relevant GW address from the below table in the above settings:Enter the Security Gateway
 Dedicated Check Point server that runs Check Point software to inspect traffic and enforce Security Policies for connected network resources. server for your region:
Region
Server
US
gw.locsec.net
Ireland (EU region)
eu-gw.locsec.net
Australia (Asia region)
au-gw.locsec.net
Canada (Canada)
ca-gw.locsec.net
UK region (UK)
uk-gw.locsec.net
India
in-gw.locsec.net

-
Click Next.
-
Set the relevant Smart Group to deploy Mobile Security.
-
Click Save and Publish.
The profile is pushed to the devices in the Mobile Security deployed group and activates Mobile Security on these devices. ONP is enabled through this profile.
Devices That Use an Additional VPN App and Want To Use ONP
To enable zero touch on devices that use an additional VPN app and want to use the ONP, you must create two Smart Groups. One group includes the devices that perform automatic activation, and the second group includes the devices that are already activated automatically.
After creating the two Smart Groups, you need to create a VPN profile to allow automatic activation of Mobile Security.
To create a group that represents the Mobile Security registered devices:
-
Go to Groups & Settings > Groups > Assignment Groups.
-
Click +Add Smart Group.
-
In the Name field, enter HM_Registered.
-
Under the Tags section, select these tags:
-
CHKP_Status_Active
-
CHKP_Status_Inactive

-
-
Click Save.
To create a group that represents the devices not registered to Mobile Security:
|
|
Note - This procedure applies only for devices with Android version 11 and lower. |
-
Go to Groups & Settings > Groups > Assignment Groups.
-
Click +Add Smart Group.
-
In the Name field, enter HM_Not_Registered.
-
Under the Tags section, select these tags:
-
CHKP_Status_Provisioned
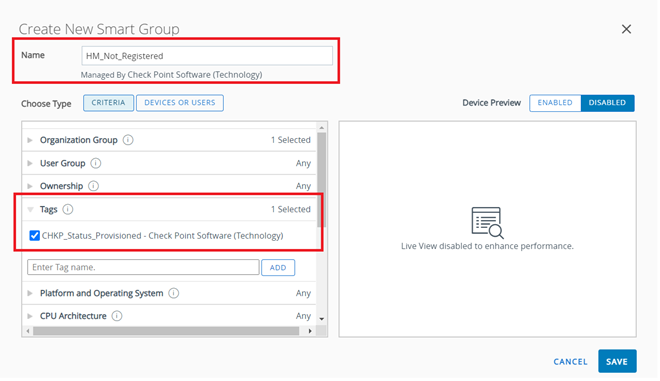
-
- Click Save.
To create a VPN profile to allow automatic activation of the Mobile Security application:
-
Create a new custom profile.
Go to Resources > Profiles & Baselines > Profiles > Add > Add Profile.
-
In the Add Profile window, select the Android platform.
In General section, select a profile name.
-
In Custom Settings, click Add and paste the following text.
Make sure to replace the tenant token.
<characteristic uuid="9310785f-25a5-423e-b5e5-675100546e6e"
type="com.airwatch.android.androidwork.app:com.lacoon.security.fox">
<parm name="EnableAlwaysOnVPN" value="True" type="boolean" />
<parm name="LockDown" value="False" type="boolean" />
<parm name="token" value="your_tenant_token" type="string" />
<parm name="mdm_uuid" value="{DeviceUid}" type="string" />
<parm name="gwAddress" value="Harmony Mobile GW address according to below list" type="string" />
<parm name="portalAccountId"value="Infinity portal account ID" type="string" /></characteristic>
Use the token configured in the Deployment section in the Mobile Security dashboard. For more information, see Deployment.
For
portalAccountID, use the Account ID from the Check Point Portal > Global Settings > Account Settings.For
gwAddress, select the relevant GW address from the below table in the above settings:Enter the Security Gateway server for your region:
Region
Server
US
gw.locsec.net
Ireland (EU region)
eu-gw.locsec.net
Australia (Asia region)
au-gw.locsec.net
Canada (Canada)
ca-gw.locsec.net
UK region (UK)
uk-gw.locsec.net
India
in-gw.locsec.net
-
Click Next.
-
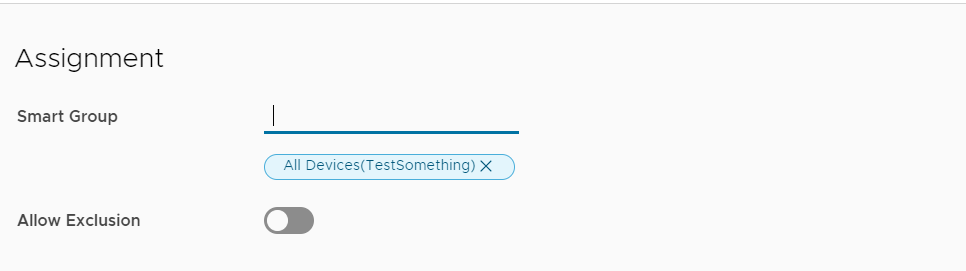
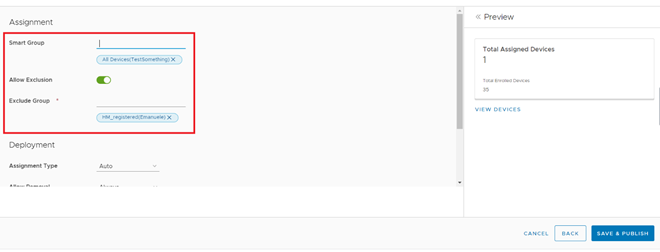
Set the relevant Smart Group to deploy Mobile Security.
-
Turn on Allow Exclusion.
-
In the Excluded Group field, exclude the HM_Registered group.
-
Click Save and Publish.
The profile is pushed to the devices which are not registered to the Mobile Security service (devices in Provisioned status) and activates Mobile Security on these devices.
To activate the On-device Network Protection (ONP):
-
For devices with Android version 12 and higher:
User needs to manually activate the VPN for the ONP.
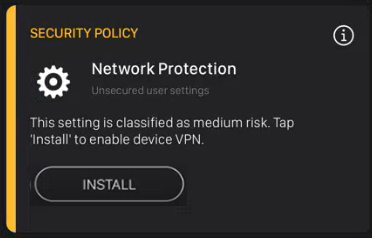
After Mobile Security gets automatically activated on the device, the end-user gets an alert (see below) to enable the On-device Network Protection.
-
For devices with Android version 11 and lower:
The VPN profile used for the zero touch activation is also used for the ONP VPN.
The administrator needs to set the
EnableAlwaysOnVPNattribute in the profile toFalse. To do that:-
Create a custom profile. Follow steps 1-8 above.
-
In the new custom profile, under Custom Settings, paste the following:
<characteristic uuid="9310785f-25a5-423e-b5e5-675100546e6e"
type="com.airwatch.android.androidwork.app:com.lacoon.security.fox">
<parm name="EnableAlwaysOnVPN" value="False" type="boolean" />
<parm name="LockDown" value="False" type="boolean" /></characteristic>
-
In the Excluded Group field, exclude the HM_not_registered group.
-
Click Save and Publish.
-
For Fully Managed Android Enterprise Devices
Prerequisites
-
Configure the environment for Android Enterprise and enroll an Android device to that environment.
-
Add the Harmony Mobile Protect app to Workspace ONE as normal and add the App configuration parameters. See Adding the Harmony Mobile Protect app to your App Catalog.
-
When you assign the Harmony Mobile Protect in the Workspace ONE console, ensure it is set to be auto deployed:
-
Go to Apps & Books > Native > Public.
-
Select the Android Harmony Mobile Protect App configured in your environment and then click Assign.
-
Edit the assigned smartgroup and ensure that the entry for App Delivery Method is set to AUTO.
-
Click Add, Save & Publish and then Publish.
-
Provisioning Setup
-
Log in to the Workspace ONE UEM console.
-
Go to Devices > Provisioning > Components > Files/Actions.
-
Click Add Files/Actions.

-
Select Android.

-
In the General tab, enter a name and description.

-
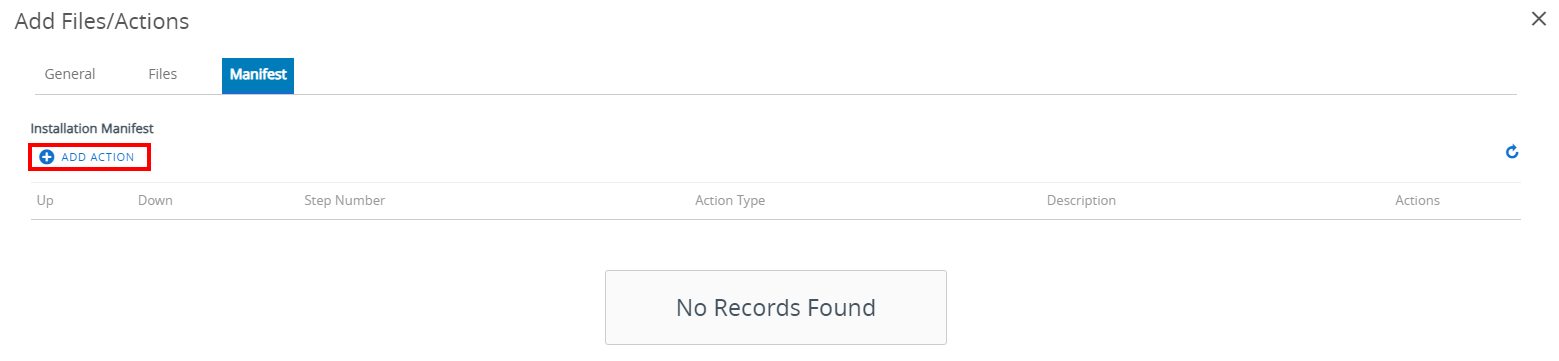
Go to the Manifest tab and under Installation Manifest, click Add Action.
-
In the Add Manifest window:
-
From the Action(s) To Perform list, select Run Intent.

-
In the Command Line and Arguments to run field:
-
If you want to start Harmony Mobile Protect app in the background, enter:
mode=explicit,broadcast=true,action=com.checkpoint.harmonysecurity.action.WAKEUP,package=com.lacoon.security.fox,class=com.lacoon.components.receivers.AppWakeReceiver
-
If you want to start Zebra Integrated Protection Service (zIPS) in the foreground, enter:
mode=explicit,broadcast=false,action=android.intent.action.MAIN,package=com.lacoon.security.fox,class=com.lacoon.components.activities.LauncherActivity
-
-
From the TimeOut list, select -1.
-
Click Save.
The Add Files/Actions page appears.
-
Click Save.
The action you added is displayed in the list.

-
-
Go to Devices > Provisioning > Product List View.
-
Click Add Product.
-
Select Android.
-
In the Add Product window:

-
In the Name field, enter a name.
-
In the Smart Groups field, select the same associated Smart Group as above.

-
-
Go to Manifest tab and click Add.
-
In the Add Manifest window:
-
From the Action(s) To Perform list, select File/Action - Install.

-
In the Files/Actions field, select the action created above.
-
Click Save.
The Add Product page appears.
-
-
Click Activate and then Save.
The Product List View displays the current status of the device with Harmony Mobile Protect MTD actions.

Removing Permission Prompt Requests during App Installation
Workspace ONE can push a profile that configured the default behavior for app permissions, determining whether they are automatically granted or denied. In this case, we are automatically granting access to all permissions:
-
In the Workspace ONE UEM console, go to Resources > Profiles & Baselines > Profiles.

-
Click Add > Add Profile and then select Android.
The Profile page appears.

-
Enter a name for your profile.
-
Expand the Permissions drop-down:

-
From the Permission Policy list, select Prompt User for Permission.
-
In the Select App field, add the MTD Mobile app and grant all the permissions.

-
Click Next.
-
-
In the Assignment page, make sure that the correct Smart Groups are selected and the Assignment Type is Auto.

-
Click Save & Publish.
When this profile is pushed to the device, it allows the Harmony Mobile Protect app to start silently.
Deployment Options
Option 1 - When MTD/Harmony Mobile Protect app is already installed on the device
-
In the Workspace ONE UEM console, go to Devices > Provisioning.
-
Click Product List View.
-
For the product you created above, click the radio button and then click More Actions.

-
From the list, select Force Reprocess and click OK.

Note - This action does not impact devices where MTD/Harmony Mobile Protect app is already running.
Option 2 - New Workspace ONE UEM enrollment for device
Perform these steps when MTD/Harmony Mobile Protect app is new to Workspace ONE UEM:
-
An optional profile and provisioning will be automatically deployed to the device.
-
The installation of MTD/Harmony Mobile Protect app can be delayed due to MDM
Mobile Device Manager. A security software that enable organizations to implement policies that secure, monitor, and manage end-user mobile devices. scheduling and the installation may not happen before the provisioning process.If this occurs, perform the steps in Option 1 - When MTD/Harmony Mobile Protect app is already installed on the device.
Zero Touch Deployment in iOS Devices
-
Create a new device profile.
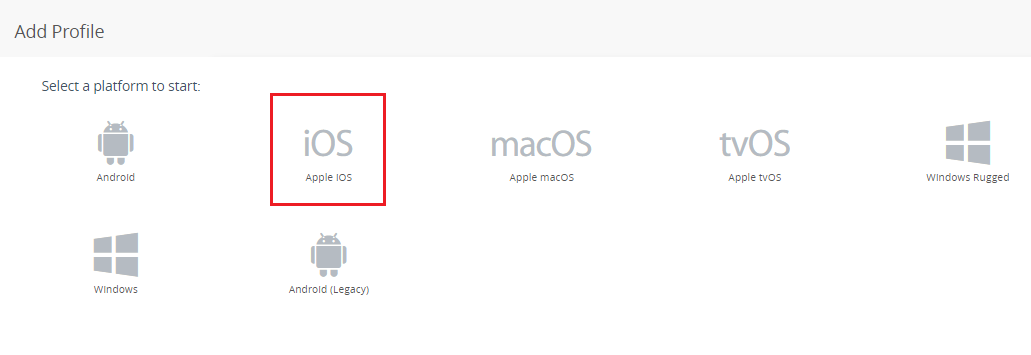
Go to Resources > Profiles & Baselines > Profiles > Add > Add Profile.

-
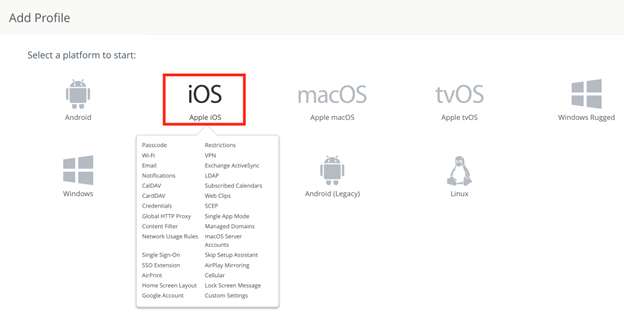
In the Add Profile window, select the iOS platform.
-
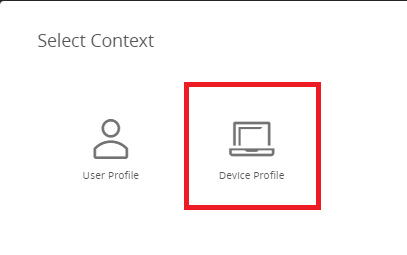
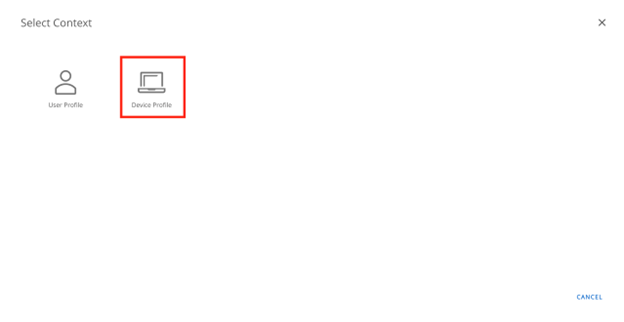
Select Device Profile in Context.
-
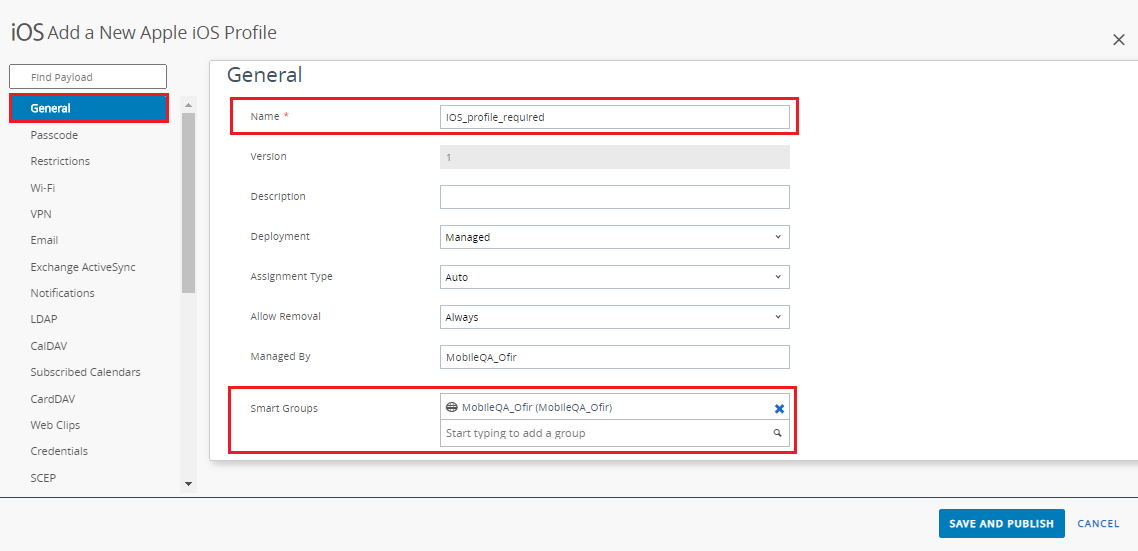
In the General tab, name the profile and assign it to your Workspace ONE Smart Group.
-
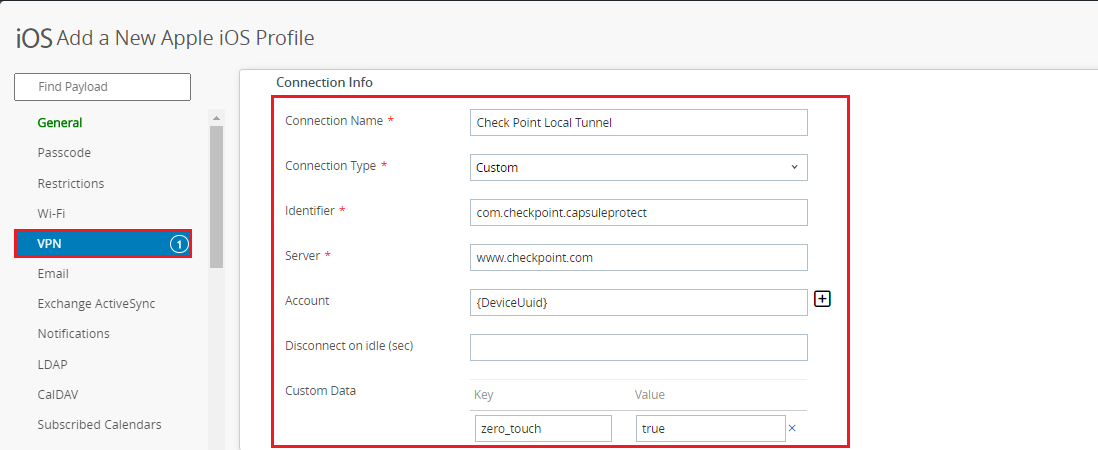
In the VPN tab:
-
Connection Name: Check Point Local Tunnel
-
Connection Type: Custom
-
Identifier: com.checkpoint.capsuleprotect
-
Server: www.checkpoint.com
-
Account: {DeviceUuid}
-
Custom Data: zero_touch=true
-
User Authentication: Certificate
-
Identity Certificate: None

-
-
Select these checkboxes:
-
Enable VPN On Demand
-
Use new on-demand keys

-
-
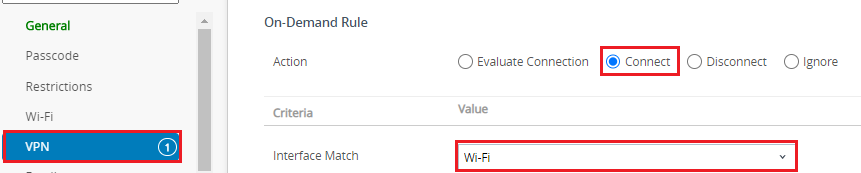
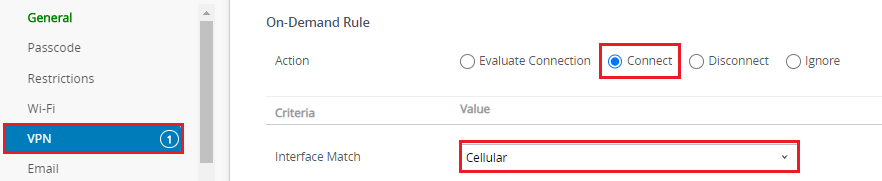
Add these On-Demand Rules:
-
Connect > Interface Match > Wi-Fi
-
Connect > Interface Match > Cellular
-
If you want to use the on-device network protection (ONP) configuration with https inspection, it is necessary to set the SSL![]() Secure Sockets Layer. The standard security technology for establishing an encrypted link between a web server and a browser. certificate deployment used by ONP for the SSL inspection.
Secure Sockets Layer. The standard security technology for establishing an encrypted link between a web server and a browser. certificate deployment used by ONP for the SSL inspection.
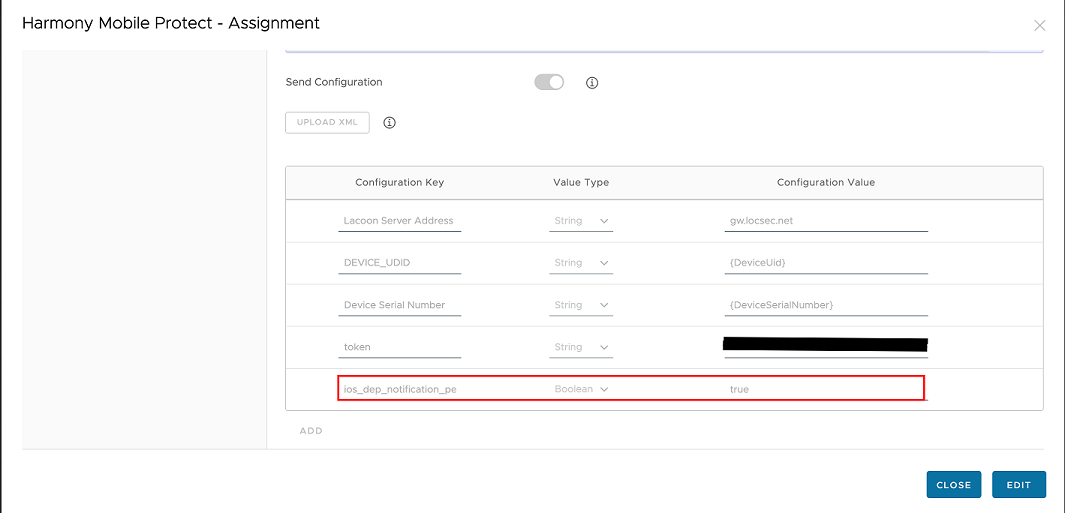
Zero Touch Notification Permissions for iOS
This feature automatically grants notification permission to Harmony Mobile Protect app when you install the app through UEM, without user interaction.
|
|
Important:
|

To enable Zero Touch notification permissions for iOS devices:
-
Go to Resources > Profiles & Baselines > Profiles and click Add > Add Profile.
-
Select platform as iOS.
-
Select context as Device Profile.
-
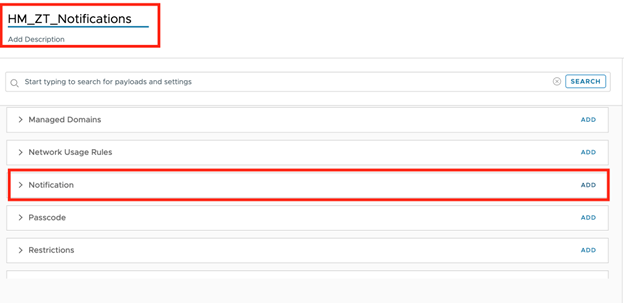
Enter a name for your profile. Scroll down to Notification and then click Add.
-
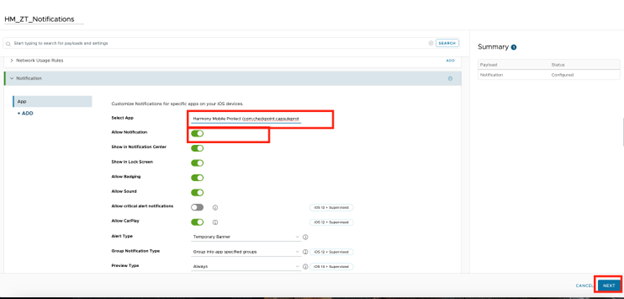
In the Select App field, enter Mobile Security. From the list, select Harmony Mobile Protect (com.checkpoint.capsuleprotect).
Make sure that Allow Notification is enabled (enabled by default) and do not disable other permissions.
-
Click Next.
-
Select your relevant groups for deployment then click Save & Publish.

CA Certificate Deployment Using the UEM
This section is relevant if you use the On device Network Protection (ONP) feature with the https inspection option turned on.
First, you need to create a certificate in the Mobile Security dashboard and then set the configuration on the UEM to push it to the devices. This certificate is used for the ONP SSL inspection.
You can use the same profiles that were created for Zero-Touch deployment but for this example we will create a new profile.
Creating the Certificate in the Mobile Security Dashboard
-
In the Mobile Security dashboard, go to Policy > Network Protection.
-
Under the HTTPs Settings, select the HTTPS Inspection checkbox.
Under Inspection CA, select Central CA for UEM Deployment.
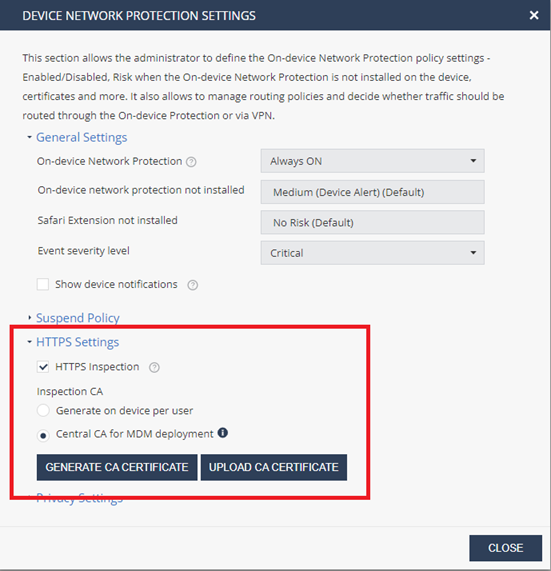
- Click Generate CA Certificate and download it to your computer.
Deploying the CA certificate on Android Enterprise Devices
To generate certificate in Mobile Security dashboard that is dedicated to your policy:
-
In Workspace ONE Portal, go to Resources > Profiles & Baselines > Profiles > ADD > Add Profile > Android.
-
In the General tab, enter a profile name and assign it to your Smart Group:
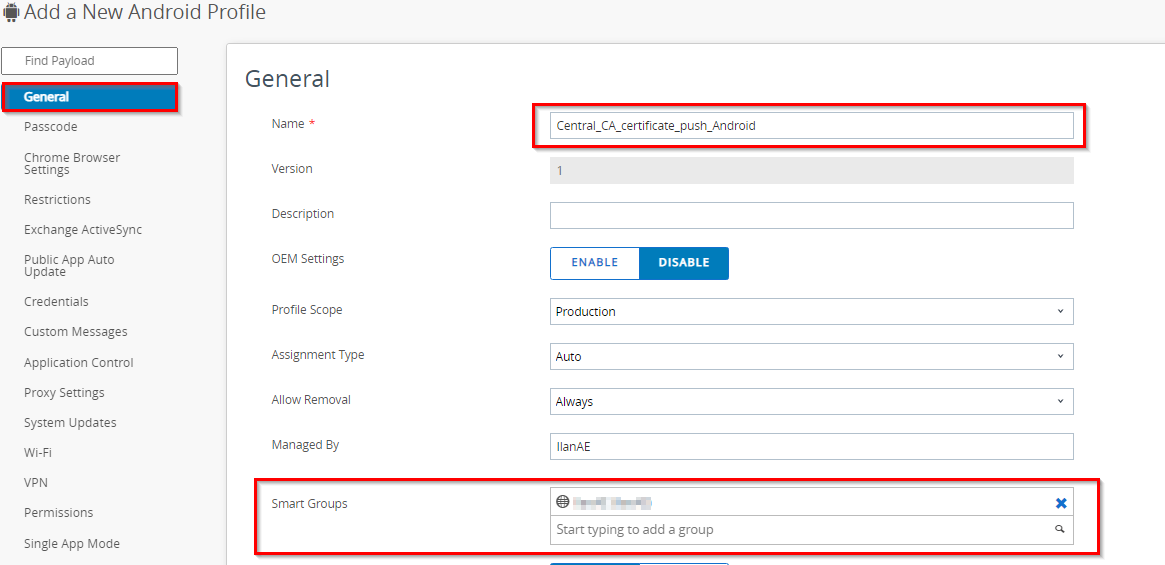
-
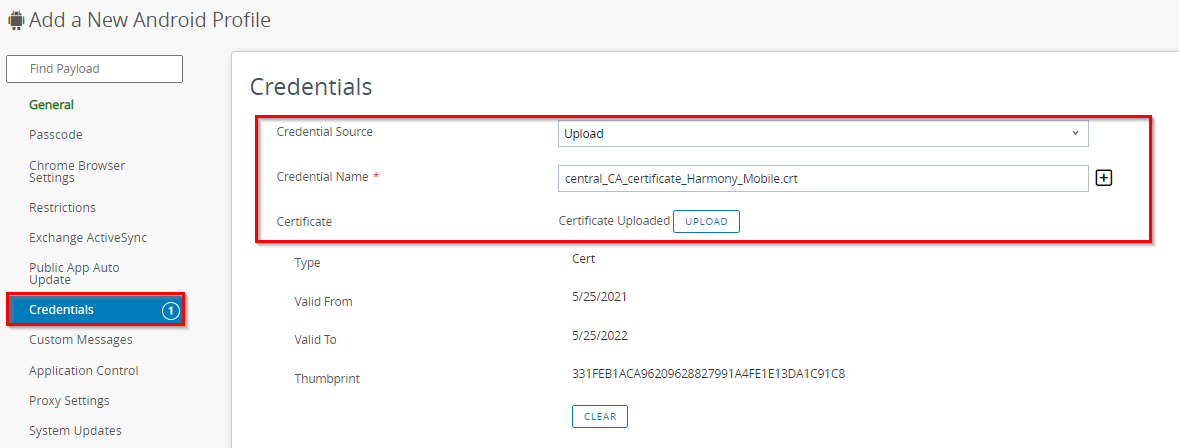
Go to credentials tab and enter the following configuration:
- Credential Source: Upload
- Choose Credential Name
- Upload the certificate file and click on Save and Publish
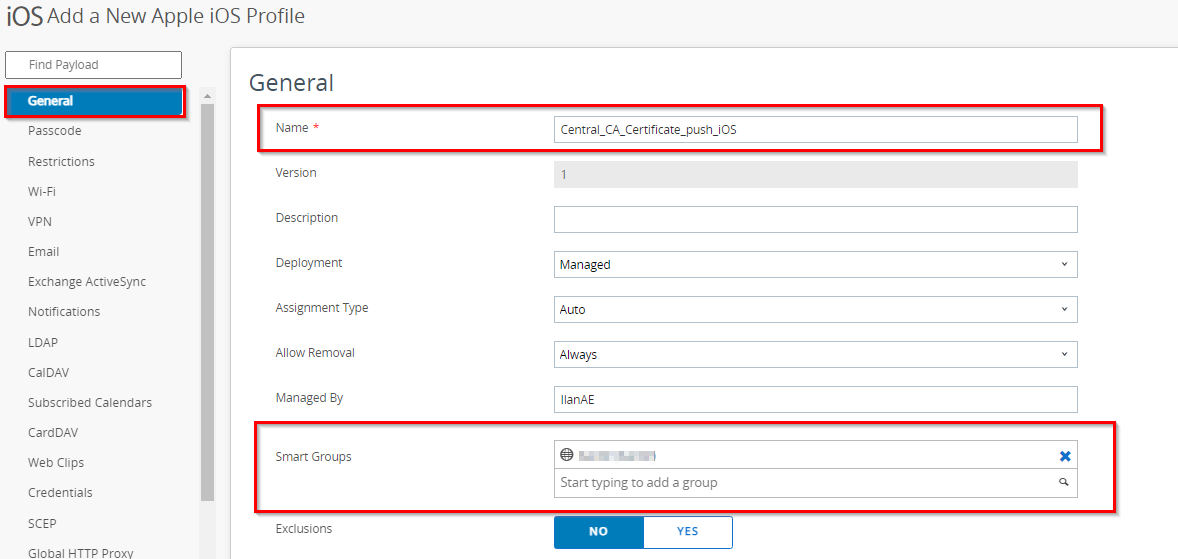
Deploying the CA certificate on iOS Devices
To generate certificate in Mobile Security dashboard that is dedicated to your policy:
-
In Workspace ONE Portal go to Resources > Profiles & Baselines > Profiles > ADD > Add Profile > iOS > Device Profile.
-
In the General tab give the profile a name and assign it to your Smart Group:
-
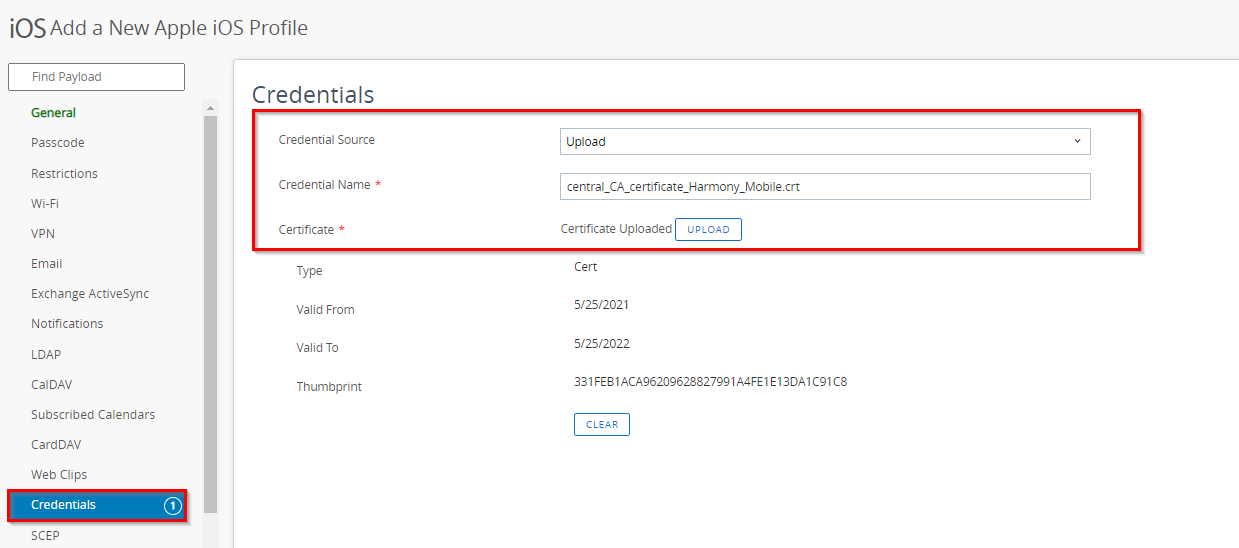
Go to credentials tab and enter the following configuration:
-
Credential Source: Upload
-
Choose Credential Name.
-
Upload the certificate file and click Save and Publish.
-