Integration with MobileIron Core
Preparing UEM Platform for Integration
Mobile Security service integrates with MobileIron Core (on-premise) through the existing API.
The MobileIron Core is connected to MobileIron cloud (version 8.0 or later) through API access. Mobile Security uses the API to synchronize the device records, to retrieve device apps list, and to report the device risk level to MobileIron Core.
To enable integration, you must first create a MobileIron Core API account.
|
|
Note - For more information about MobileIron Cloud, see the MobileIron online guide. |

You need to also configure your MobileIron UEM![]() Unified Endpoint Management. An architecture and approach that controls different types of devices such as computers, smartphones and IoT devices from a centralized command point. to collect the app list from the devices enrolled to Mobile Security. See Configuring Application Collection.
Unified Endpoint Management. An architecture and approach that controls different types of devices such as computers, smartphones and IoT devices from a centralized command point. to collect the app list from the devices enrolled to Mobile Security. See Configuring Application Collection.
General Workflow
-
Enable the Check Point Harmony Mobile Protect app on your MobileIron Core devices. See Enabling the Harmony Mobile Protect app on the MobileIron Core Devices.
-
Create a Security Group to manage the devices with the Harmony Mobile Protect app. See Creating a Device Provisioning Group for Mobile Security.
-
Configure your MobileIron UEM to collect the app list from the devices enrolled with Mobile Security. See Configuring Application Collection.
-
Create an API account for the integration of Mobile Security service and MobileIron. See Creating API Account for Integration with the Mobile Security.
-
Set Mobile Security parameters for the device protection. See Setting Parameters for the Device Protection.
Enabling the Harmony Mobile Protect app on the MobileIron Core Devices
To deliver content to devices, MobileIron Core identifies users and establishes permissions through Device Provisioning![]() Check Point Software Blade on a Management Server that manages large-scale deployments of Check Point Security Gateways using configuration profiles. Synonyms: SmartProvisioning, SmartLSM, Large-Scale Management, LSM. Groups.
Check Point Software Blade on a Management Server that manages large-scale deployments of Check Point Security Gateways using configuration profiles. Synonyms: SmartProvisioning, SmartLSM, Large-Scale Management, LSM. Groups.
Through your MobileIron Core console, you can:
-
Build groups for entities within your organization.
-
Customize hierarchies with group levels.
-
Integrate with multiple internal infrastructures at the tier level.
-
Delegate role-based access and management based on multi-tenant structure.
|
|
Best Practice - For integration with the Check Point Harmony Mobile Protect app, use groups to set up the same UEM hierarchy as in your organization's internal hierarchy, or set up groups based on MobileIron Core features and content. |

Creating API Account for Integration with the Mobile Security
For the interaction with Mobile Security and the MobileIron Core system, you must create a dedicated API account user in your MobileIron Core. This API account limits the capability of the admin credentials between the Mobile Security dashboard and the MobileIron Core system.
|
|
Best Practice - For the interaction at the API only, the MobileIron Core Console provides an API Only Admin role. You can use this Administrator account between the Mobile Security dashboard and the MobileIron Core system. See Configuring the Check Point Mobile Security Dashboard Integration Settings. |
To create an API Only Administrator account, create a dedicated Local User and assign it the Administrator role.
Creating a Local User Account
-
Navigate to Devices & Users > Users.
From the Add drop-down menu, select Add Local User.

-
In the Add New User pop-up window, fill in all the required fields.
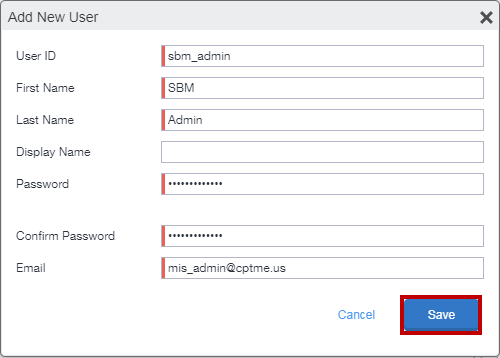
-
Click Save.
Assigning the Mobile Security API Administrator to the Local User Account
-
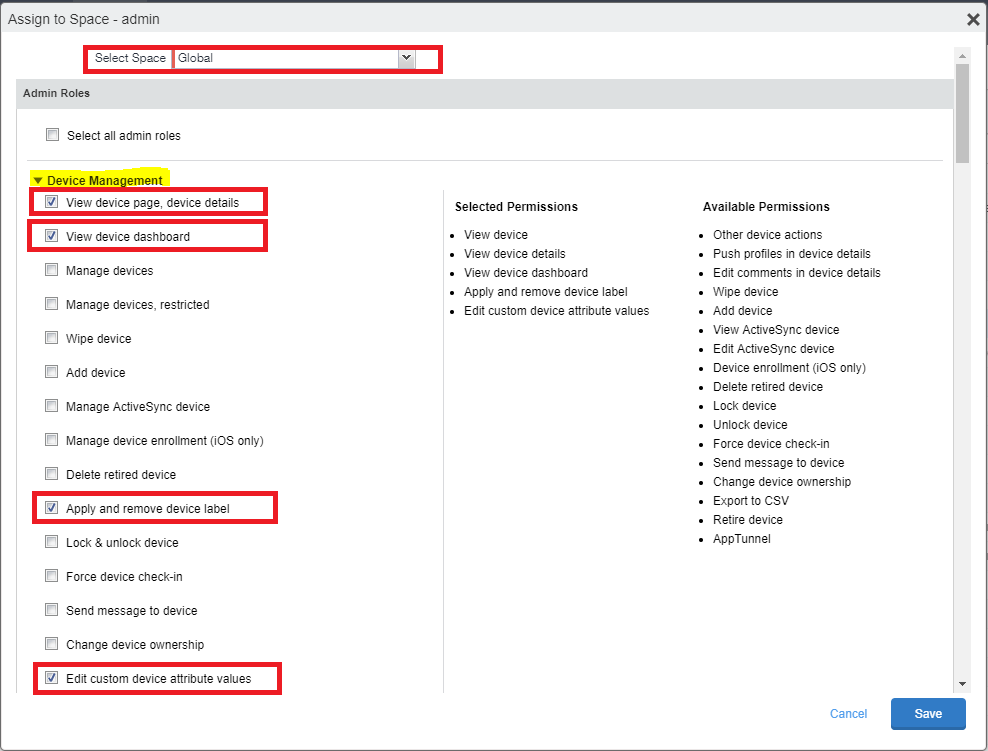
Navigate to Admin > Admins and select the created user (For example, sbm_admin).
From the Actions drop-down menu, select Assign to Space.

-
From the Select Space drop-down menu, select Global .
-
Under Device Management, select these roles:
-
View device page, device details
-
View device dashboard
-
Apply and remove device label
-
Edit custom device attribute values
-
-
Scroll down to the Privacy Control section, and select View apps and ibooks in device details.
-
Under the Label Management section, select View label.

-
Scroll down to the Settings and Services Management section, and select Manage custom attributes.

-
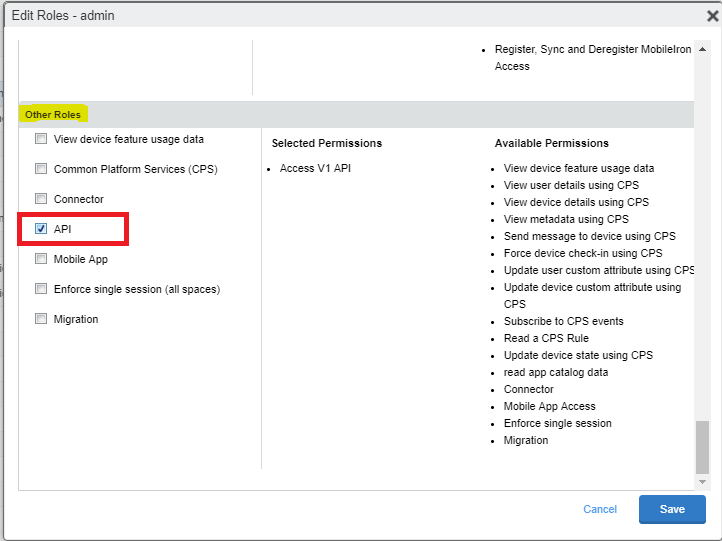
Scroll down to Other Roles section, and select API. This setting allows Mobile Security service to interact with MobileIron Core.
-
Click Save.
-
To complete the creation of the new admin account, log out from the MobileIron Core Admin Portal, and then log in back using the credentials you created in Creating a Local User Account.
|
|
Note - Log out and log in back into the MobileIron Core Admin Portal with your Service Administrator credentials to continue with the configuration. |
Creating a Device Provisioning Group for Mobile Security
A device provisioning group is used to tie devices, apps, and app configurations together for deployment. MobileIron Core calls a device provisioning group a device label. This label is also used in the Mobile SecurityHarmony Mobile Protect deployment process discussed in Configuring UEM to Deploy the Harmony Mobile Protect app.
There are two types of labels, manual (static) and LDAP (dynamic).
For a manual label, select the devices that you want to add and apply to label manually.
For a filter label, you define a criteria, and if the device was created according to this criteria, then this device gets added to the label automatically.
Creating a Static Device Provisioning Group
-
Navigate to Devices & Users > Labels.
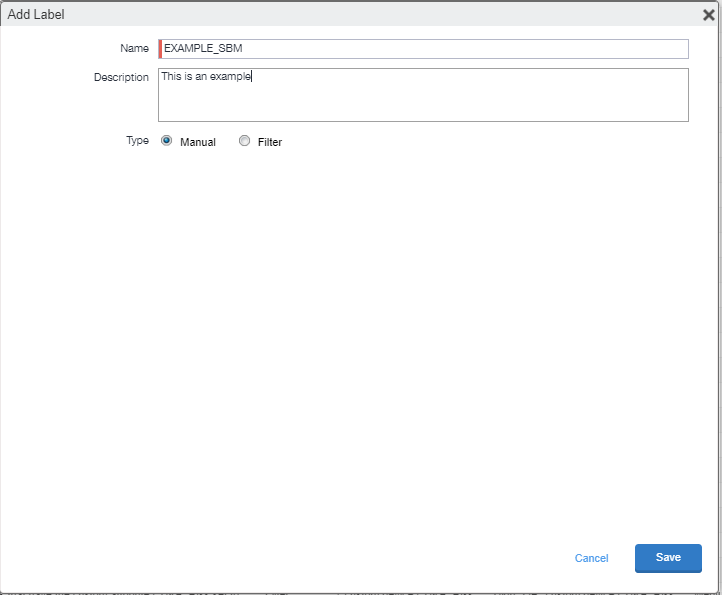
Click Add Label.

-
Enter a Name and Description.
Set the Type to Manual.
-
Click Save.
Creating a Dynamic Device Provisioning Group (LDAP)
-
Navigate to Devices & Users > Labels.
Click Add Label.

-
Enter a Name and Description.
Set the Type to Filter.
-
Under Criteria, select All of the following rules are true.
Select User Fields > LDAP > Groups > Name.
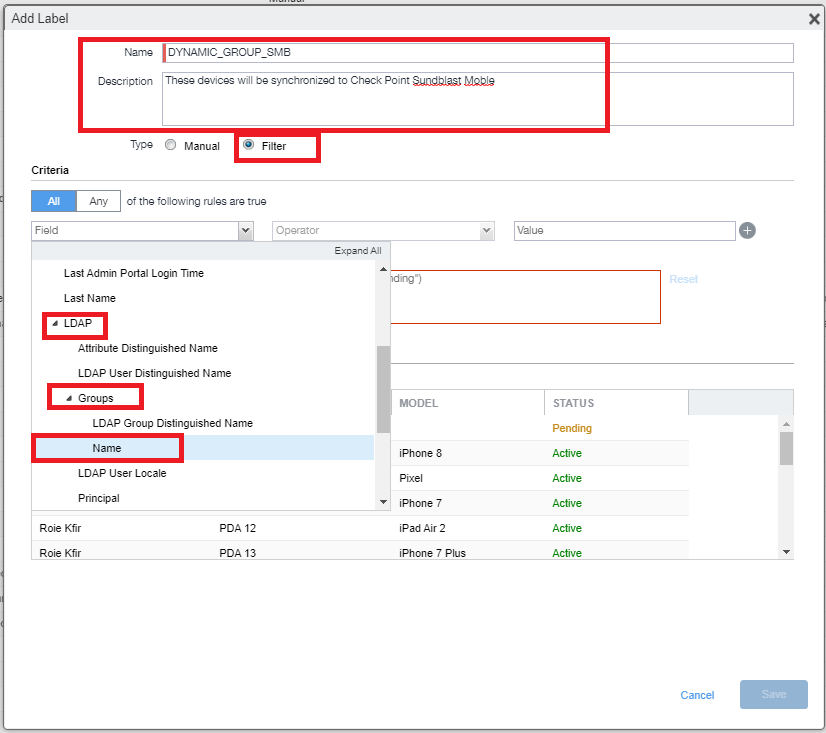
-
In the second drop-down list, select Equals, and enter the AD Group Name (In this example Equals Agents).
-
Select the Exclude retired devices from search results checkbox, if required.

-
Click Save.
Creating a Secondary Device Provisioning Group (Optional)
|
|
Note - If all the Android and iOS devices within your MobileIron Core environment are registered to Mobile Security, then it is recommended to create a second device provisioning group (label). Only devices in this group are forced to install Mobile Security Protect once their device has been synchronized with the Mobile Security dashboard. This improves the user experience and avoid users to install Harmony Mobile Protect app and register with Mobile Security prior to their device being provisioned within Mobile Security dashboard. |
A secondary group is essentially a filtered group or a sub-group of devices you can create only after connecting your UEM to Mobile Security dashboard. If you wish to create such group, prior to creating it, follow the steps of Configuring the Check Point Mobile Security Dashboard Integration Settings.
-
Navigate to Devices & Users > Labels, click Add Label.
-
Enter a Name, a Description, and set the Type to Filter.
-
Under Criteria select Any of the following rules are true, and select:
-
Custom Attributes > Device Attributes > CHKP_Status Equals Provisioned
-
Click + icon at the end of the first rule
 Set of traffic parameters and other conditions in a Rule Base (Security Policy) that cause specified actions to be taken for a communication session..
 -
Custom Attributes > Device Attributes > CHKP_Status Equals Active
-
Click + icon at the end of the second rule.
-
Custom Attributes > Device Attributes > CHKP_Status Equals Inactive
-
Check the Exclude retired devices from search results checkbox.
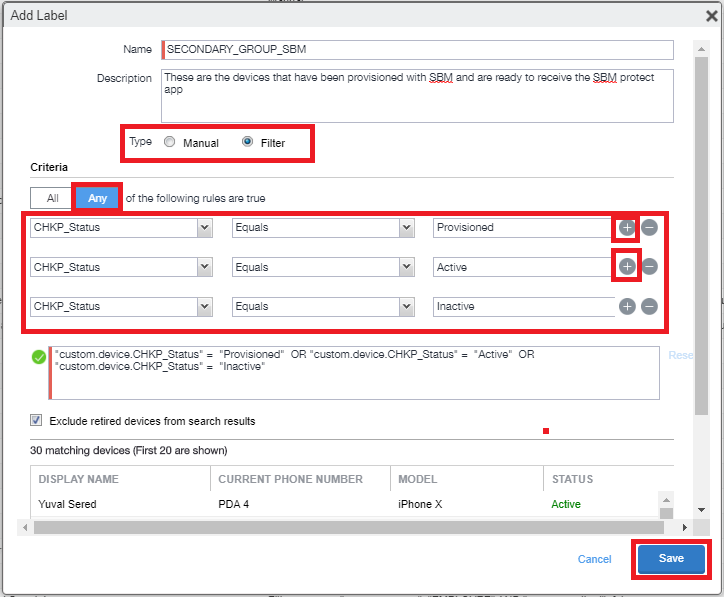
-
-
Click Save.
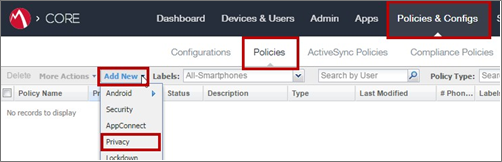
Configuring Application Collection
You need to configure the MobileIron to collect the list of applications installed on the devices enrolled with Mobile Security service.
To configure the MobileIron to collect the applications list:
-
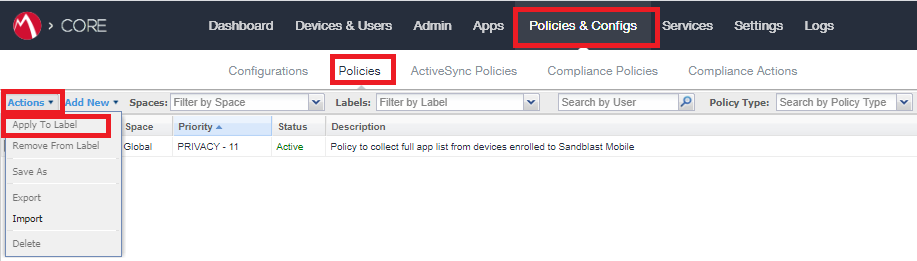
On the MobileIron Core portal, go to Policies & Configs > Policies.
From the Add New drop-down menu, select Privacy.
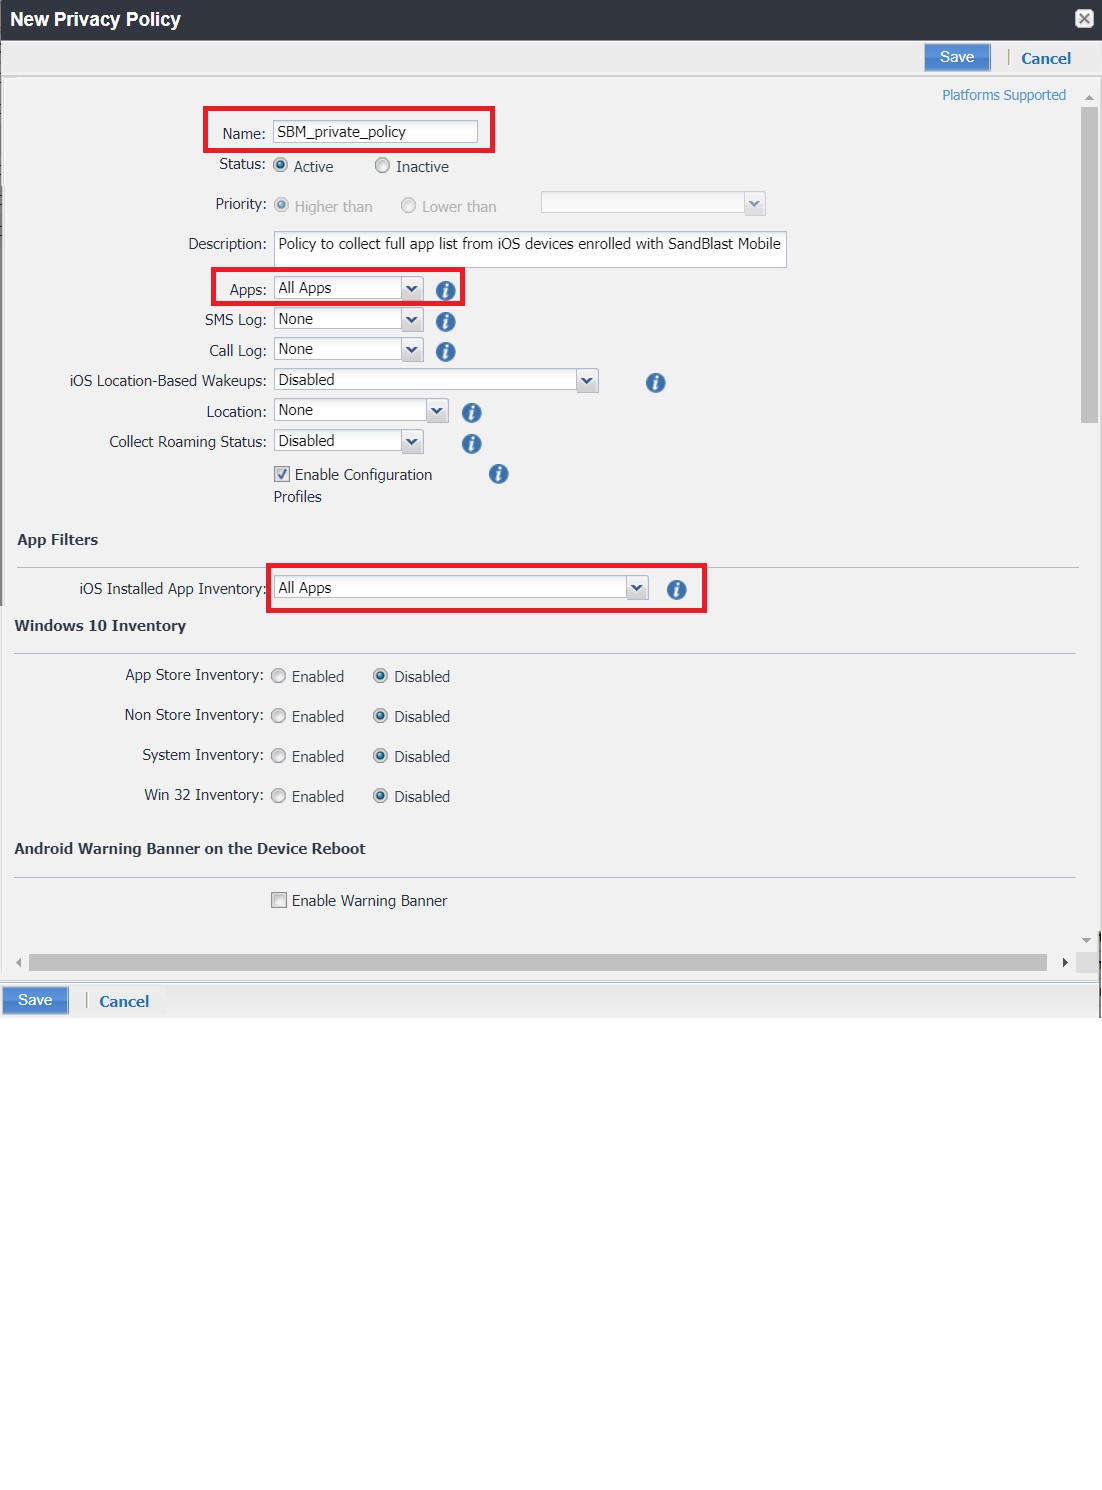
-
In the New Privacy Policy window, enter a name and description.
-
Set these parameters:
-
Apps to All Apps.
-
iOS Installed App Inventory to All Apps.
-
-
Click Save.
Applying the Application Collection Policy to the Device Provisioning Group
-
On the MobileIron Core portal, go to Policies & Configs > Policies and select the application collection policy.
-
From the Actions drop-down menu, select Apply To Label.

-
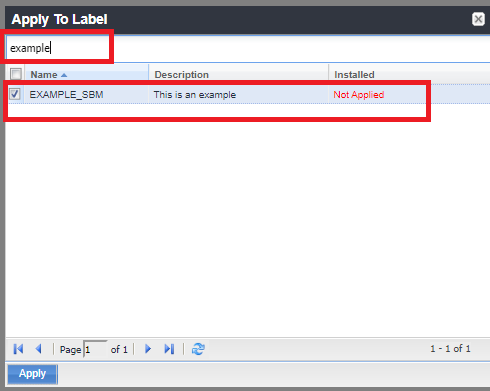
In the Apply to Label pop-up window, select the Device Provisioning Group name.
-
Click Apply.
Setting Parameters for the Device Protection
To protect your users, you must configure Harmony Mobile Protect app to work on your user devices. Add users to the organization group for Mobile Security protection. See Creating a Static Device Provisioning Group.
Repeat these steps to add more users and more devices.
Adding Local Users to the Harmony Mobile Protect App
There are two ways to add a user to MobileIron:
-
Add Local User
or
-
Resync With LDAP
To add a local user:
-
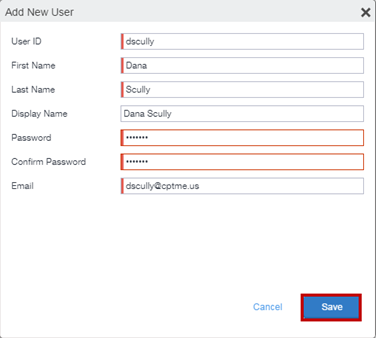
Navigate to Devices & Users > Users, click Add drop-down menu, and select Add Local User.

-
On the Add New User pop-up window, fill in all the required fields.
-
Click Save.
Adding a Device to a User
-
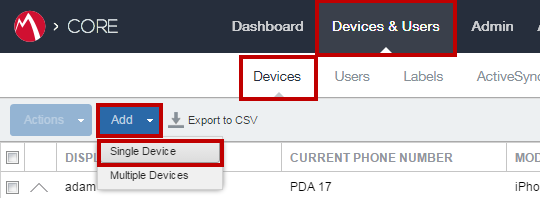
Go to Devices & Users > Devices.
From the Add drop-down menu, select Single Device.
-
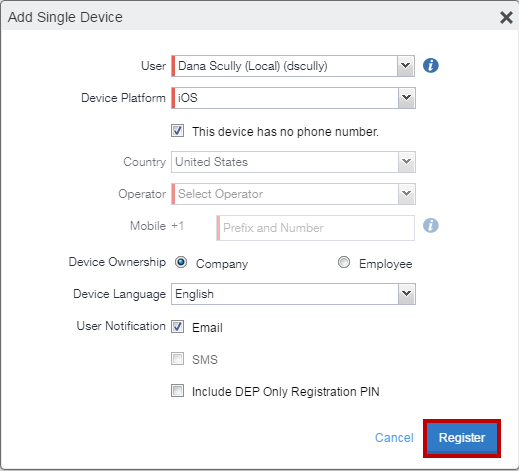
On the Add Single Device window, fill these fields:
-
User - Add the user you want to add a device to.
-
Device Platform - Select Android or iOS.
-
Select the This device has no phone number checkbox if the device doesn’t have a phone number. Otherwise, fill in the Country, Operator, and Mobile number.
-
Device Ownership - Select whether the device is owned by Company or Employee.
-
Select the Device Language and the User Notification method.
-
-
Click Register.
The MobileIron registration instructions are sent to the user.
|
|
Note - Repeat these steps to add another user and/or device. |
Adding Devices to the Device Provisioning Group
|
|
Note - This step is only required if you created a manual device provisioning group as in Creating a Device Provisioning Group for Mobile Security. |
-
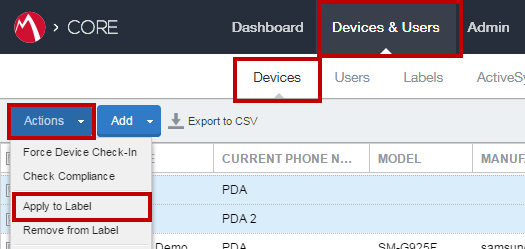
Go to Devices & Users > Devices.
-
Select the devices added in Adding a Device to a User .
From the Actions drop-down menu, select Apply to Label.
-
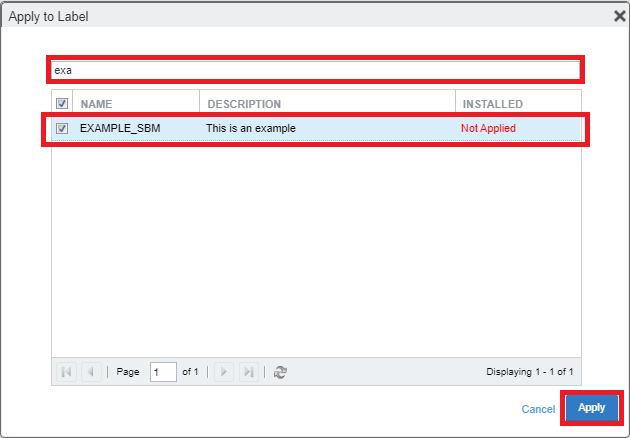
In the Apply to Labels window, select the provisioning label you created in Creating a Device Provisioning Group for Mobile Security.
-
Click Apply.
Enrolling a Device to MobileIron Core
To manage your devices and apps and their access to your company data, you need to enroll them in the MobileIron Core service. For more information, see the MobileIron Core online guide.
-
On the MobileIron Core portal, go to the Admin Profile > Help.

-
Use your Support Account at the MobileIron Core site.
|
|
Note - At this point, you have all the information needed to configure the Device Management Settings in the Mobile Security dashboard. We are going to do that and then return to the MobileIron Core Admin Portal to configure the Mobile SecurityHarmony Mobile Protect deployment settings and the mitigation policies.
From the examples: Server = https://mobileiron.net API Admin Username/Password = sbm_admin/<******> Device Provisioning Label(s) = EXAMPLE_SBM |