Configuring UEM to Deploy the Harmony Mobile Protect app
Prerequisites
Mobile Security Security Gateway![]() Dedicated Check Point server that runs Check Point software to inspect traffic and enforce Security Policies for connected network resources. (Choose the server for your region):
Dedicated Check Point server that runs Check Point software to inspect traffic and enforce Security Policies for connected network resources. (Choose the server for your region):
Enter the Security Gateway server for your region:
|
Region |
Server |
|---|---|
|
US |
gw.locsec.net |
|
Ireland (EU region) |
eu-gw.locsec.net |
|
Australia (Asia region) |
au-gw.locsec.net |
|
Canada (Canada) |
ca-gw.locsec.net |
|
UK region (UK) |
uk-gw.locsec.net |
|
India |
in-gw.locsec.net |
General Workflow:
-
Add the Harmony Mobile Protect app to your App Catalog. See Adding the Harmony Mobile Protect app to your App Catalog.
-
Prompt the Harmony Mobile Protect app installation on your devices. See Automatic Activation of Mobile Security.
-
Connect the app to your devices. See Connecting the Harmony Mobile Protect app to your Device.
-
Create the Mitigation Process for the app. See Creating a Mitigation Process.
Adding the Harmony Mobile Protect app to your App Catalog
The Harmony Mobile Protect app can be automatically configured and deployed. The user only needs to accept the installation and then launch the app to finish activation and registration. You assign configuration parameters for configuring the app per user.
|
|
Note - The data fields are similar for both iOS and Android users. The examples below are applicable for both platforms. |
Use the CHKP Status Tags to deploy the Harmony Mobile Protect app from the public stores to the devices that are protected by Check Point Mobile Security. See Creating a Device Provisioning Group.
You must add the Protect app for both iOS and Android operating systems.
To add the Harmony Mobile Protect app to MobileIron Cloud:
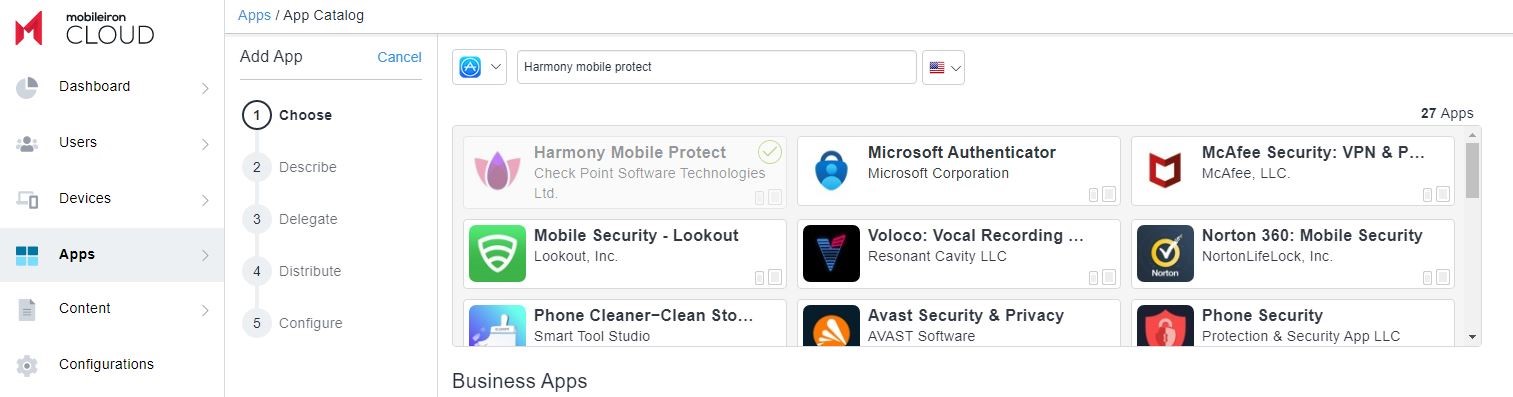
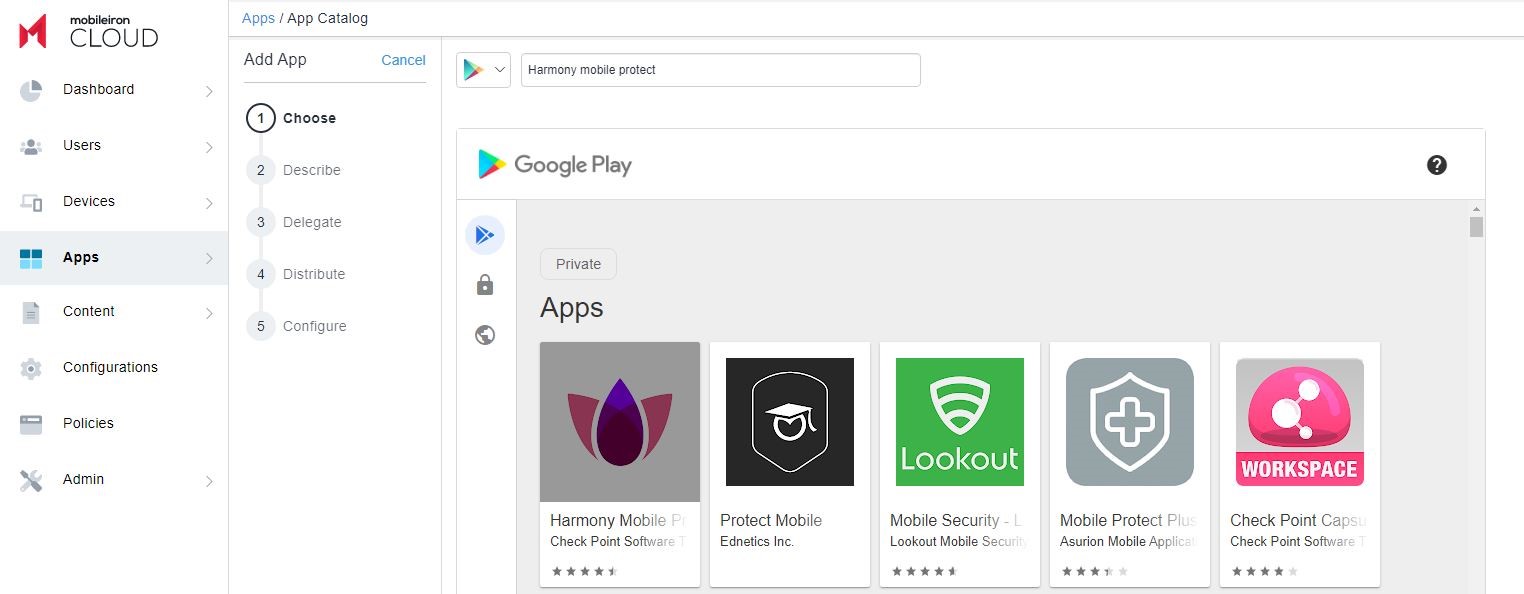
-
Go to Apps > App Catalog > +Add and select the applicable App Store.
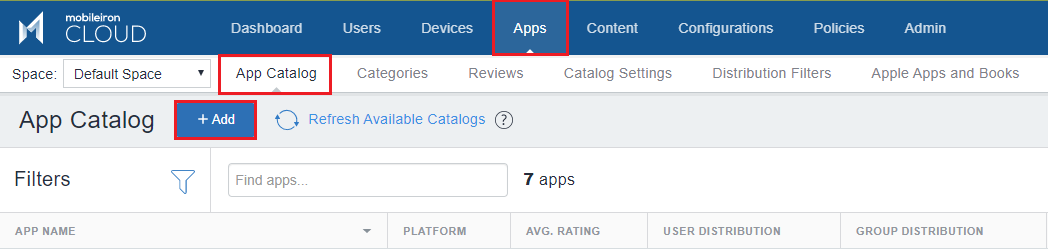
-
Enter Mobile Security Protect to start searching the store.

Note - As you add the Harmony Mobile Protect app to your catalog, rename this New Mobile Device App to Harmony Mobile Protect app.
-
From the Store List select the applicable App Store.
-
For iOS App
Select the Apple App Store.
-
For Android Enterprise App
Select Google Play Store.
-
-
In the Application Name field enter Mobile Security Protect.
-
From the app list, select Harmony Mobile Protect app.
-
Click Next.
-
On the Describe pane click Next.
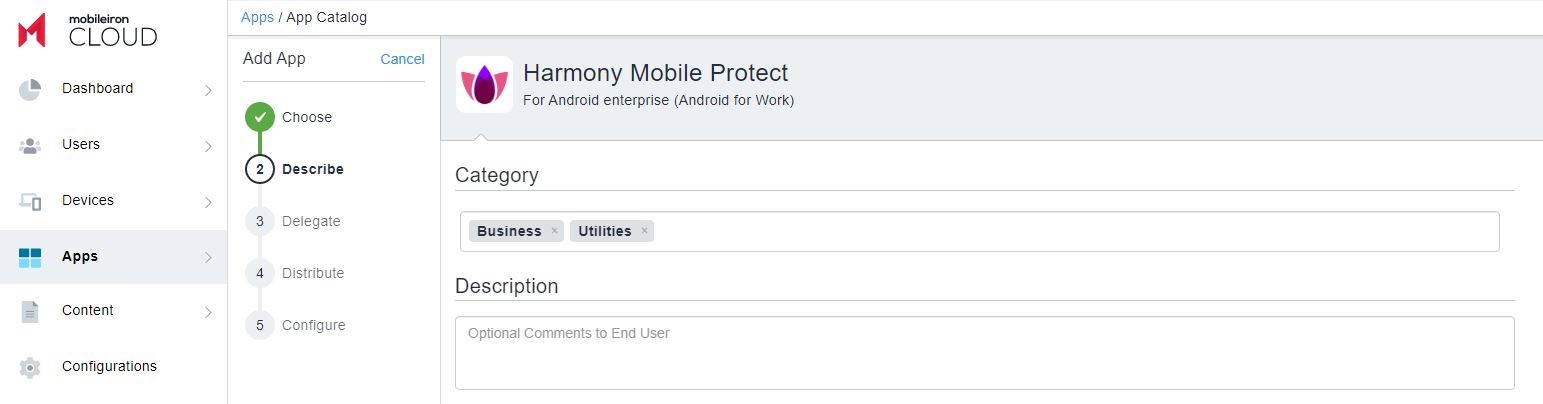
-
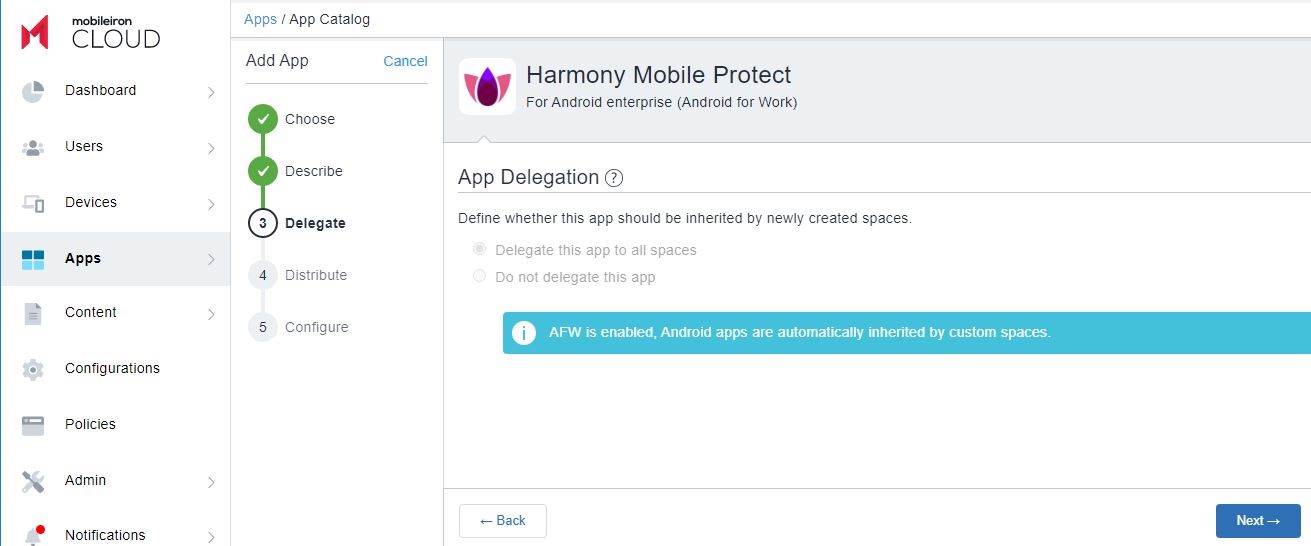
On the Delegate pane click Next.
-
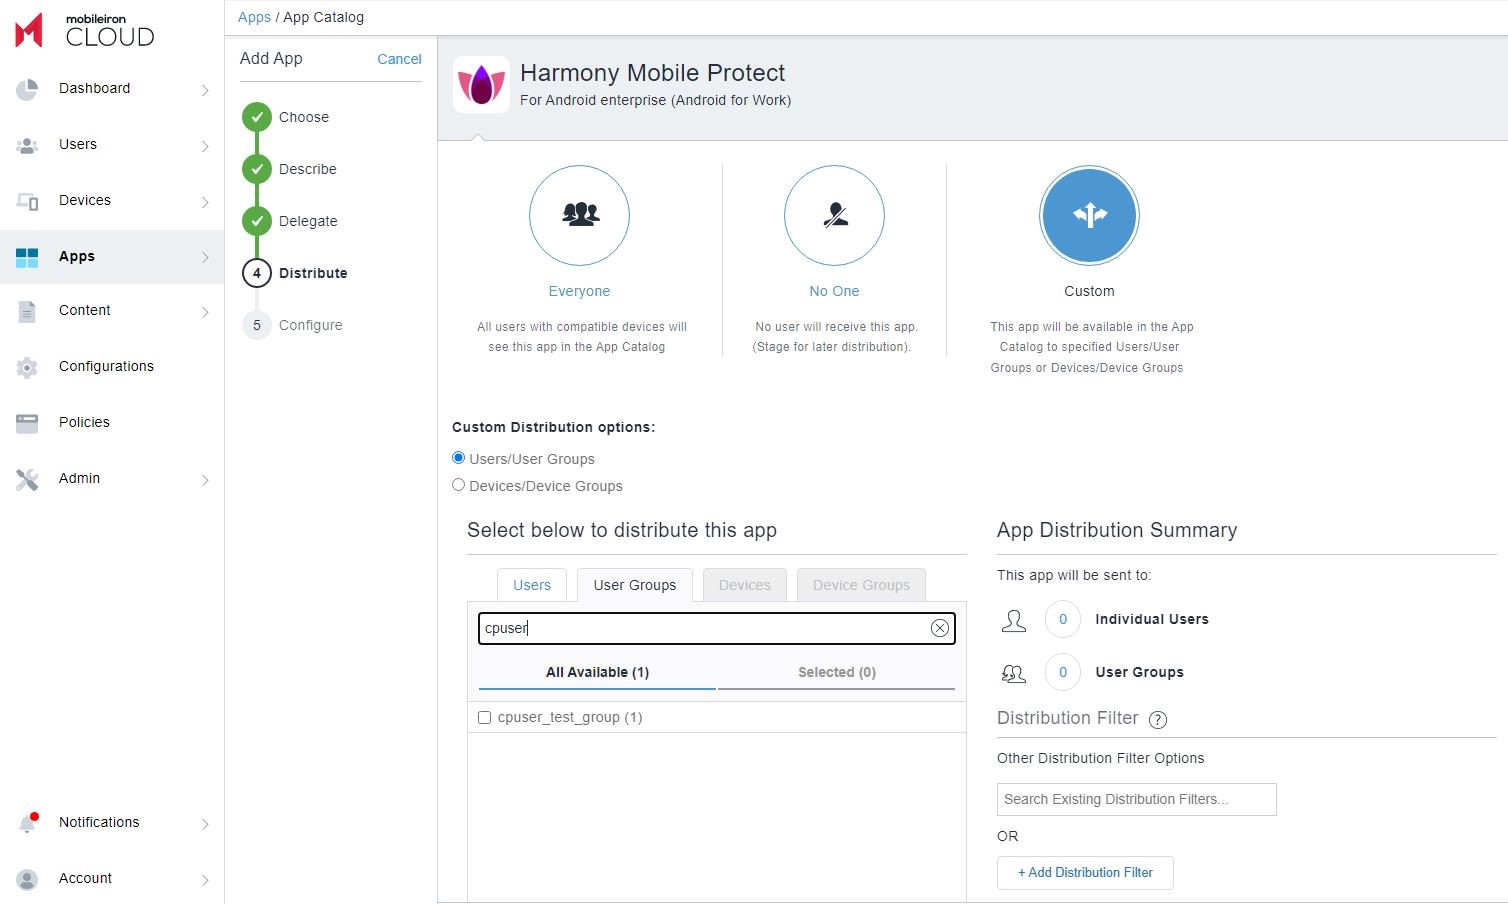
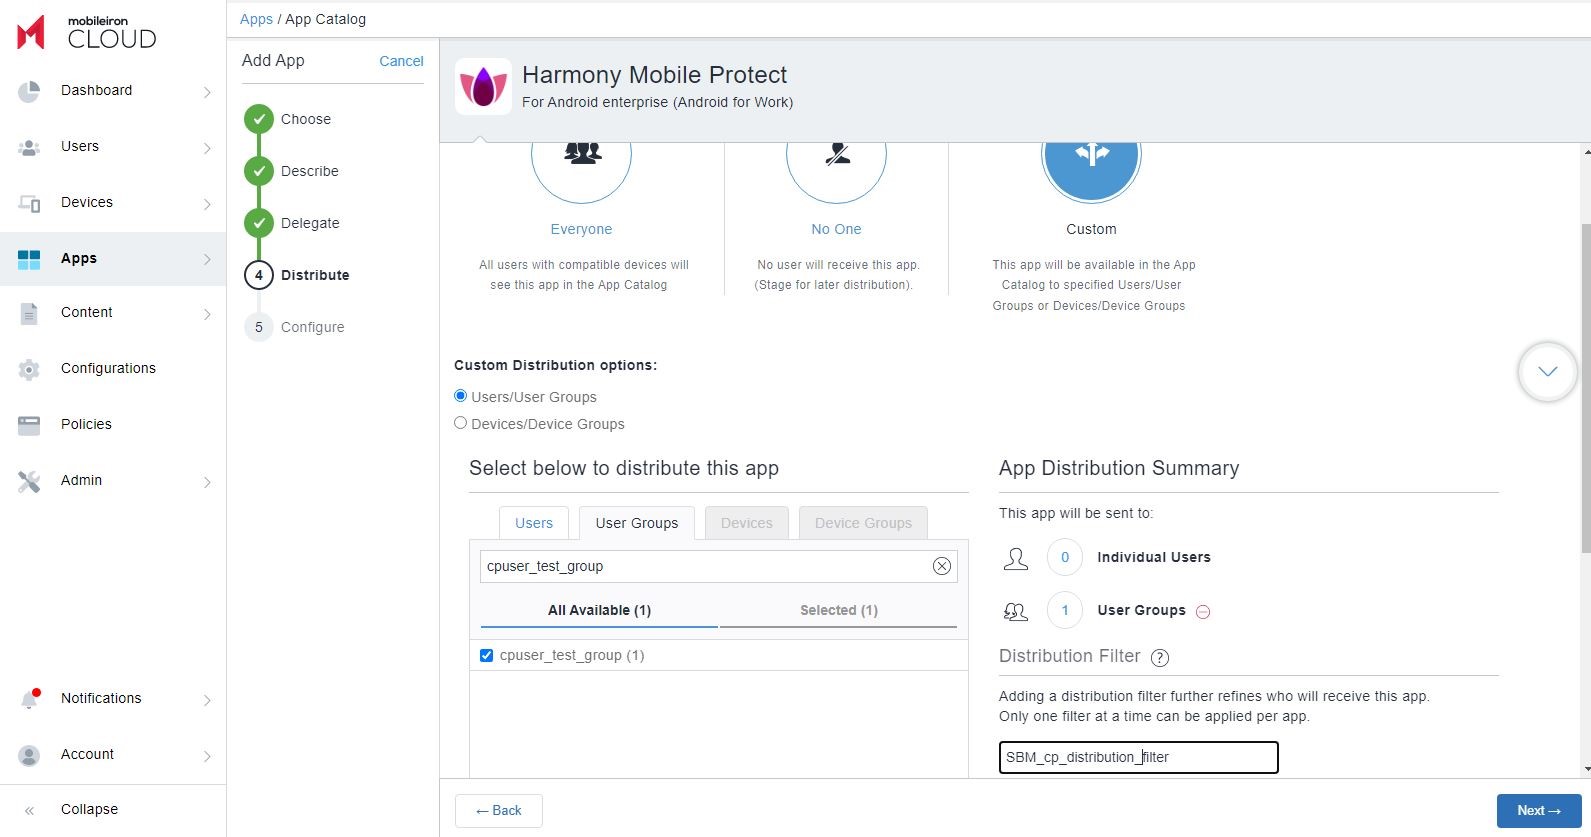
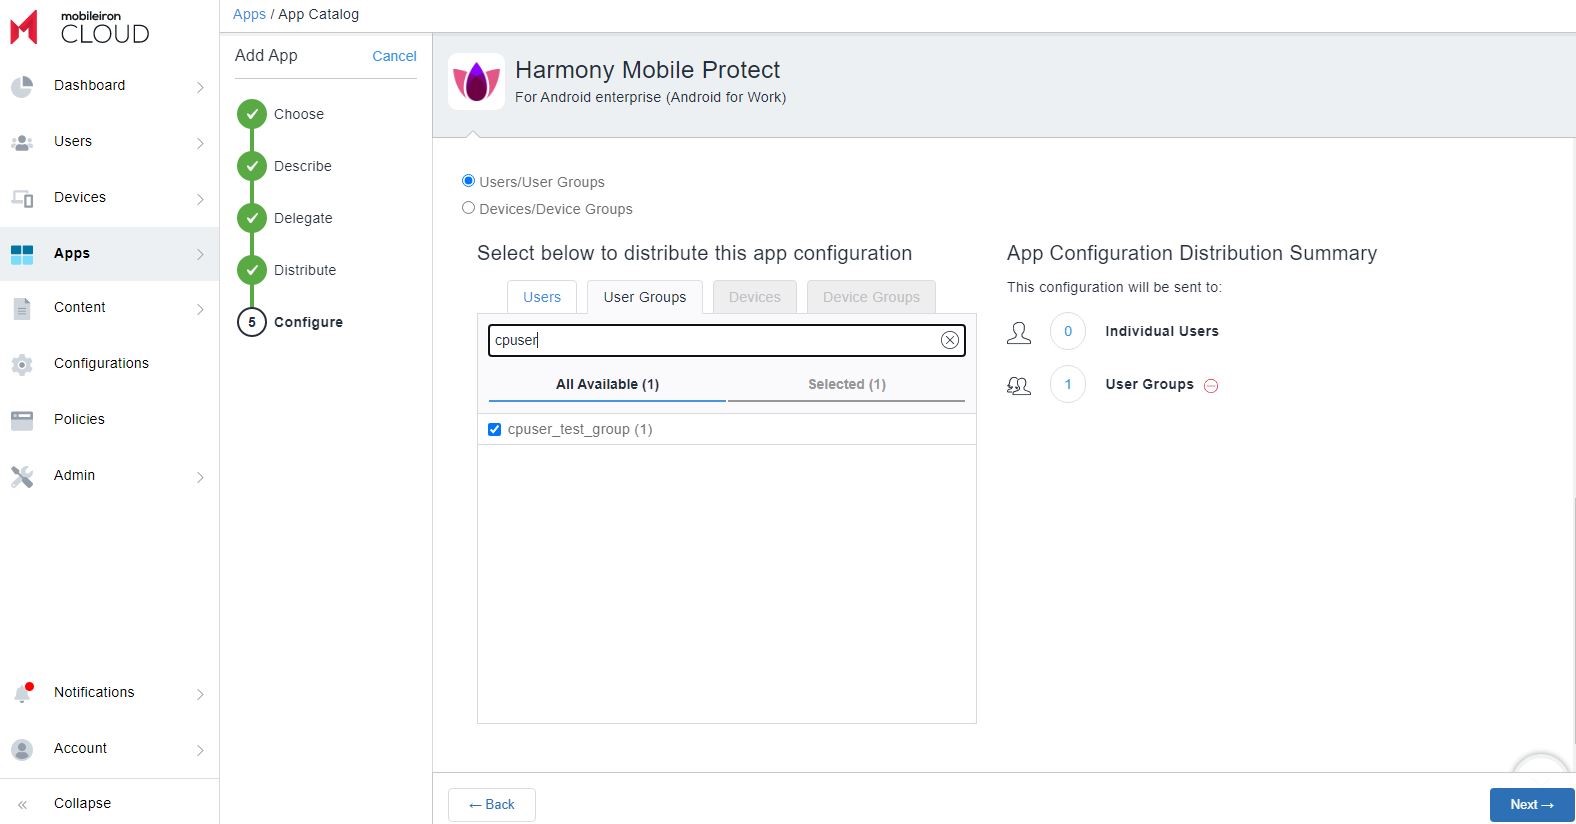
On the Distribute pane select Custom.
-
Select the User Provisioning
 Check Point Software Blade on a Management Server that manages large-scale deployments of Check Point Security Gateways using configuration profiles. Synonyms: SmartProvisioning, SmartLSM, Large-Scale Management, LSM. Group: cpuser_test_group.
 -
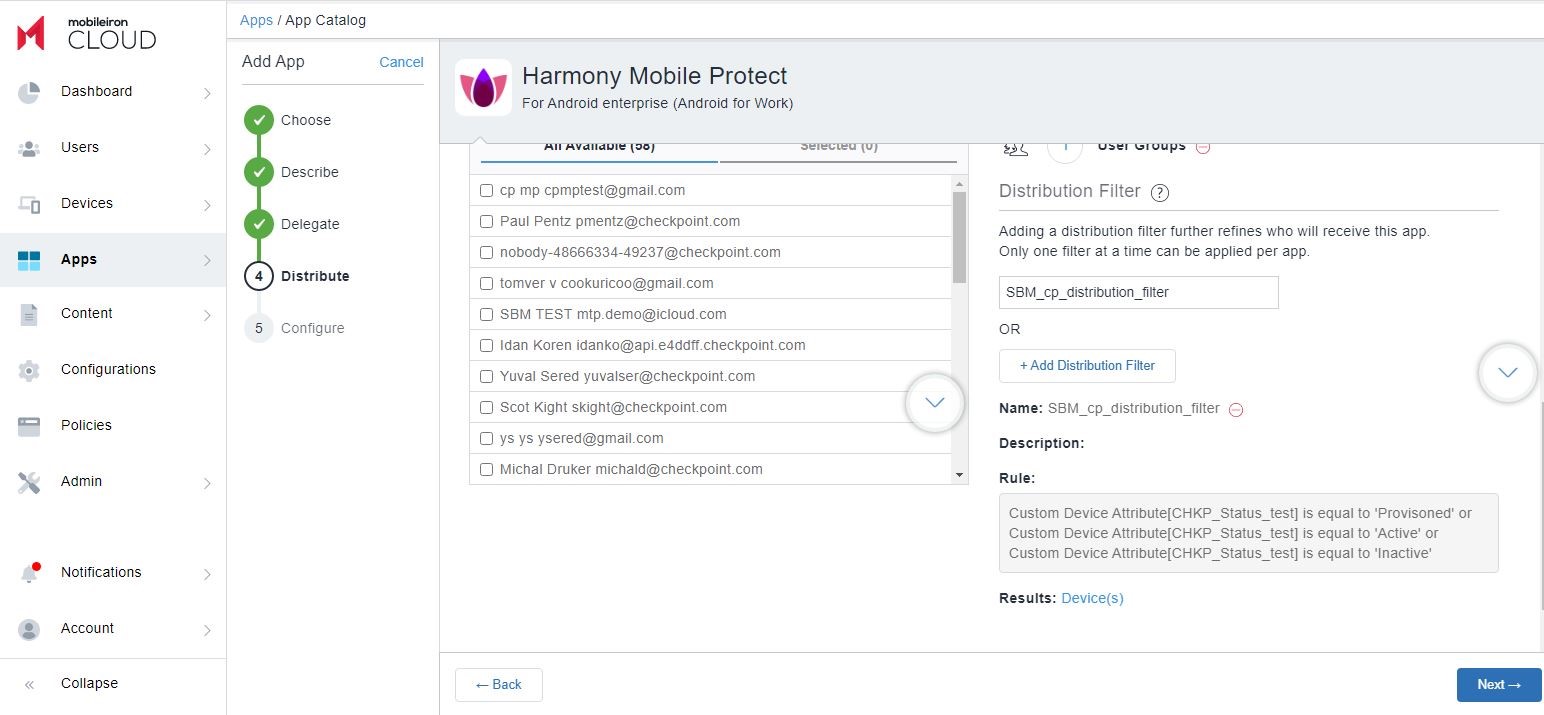
Click Add Distribution Filter.
-
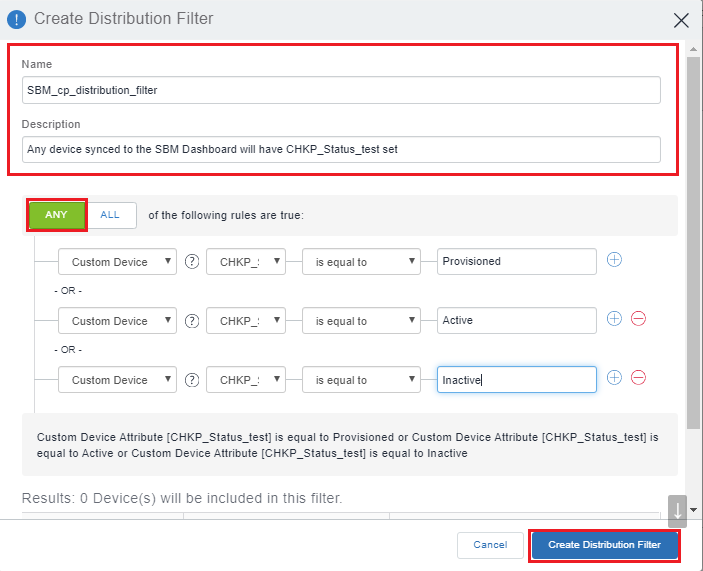
Create a Distribution Filter.
Only the devices that are synchronized to the Mobile Security Dashboard can install the application.
Note - For future reference, enter the name for this filter: cpuser_test_group.
-
In the Create Distribution Filter window, enter a name and a description.
-
Select ANY and enter these parameters:
-
Custom Device Attribute > CHKP_Status is equal to Provisioned
-
Custom Device Attribute > CHKP_Status is equal to Active
-
Custom Device Attribute > CHKP_Status is equal to Inactive
-
-
Click Create Distribution Filter.
-
Click Next.
Note:
To select and apply an existing Distribution Filter:
-
Go to Distribution Filter > Select below to distribute this app.
-
Select the cpuser_test_group option.
-
Click Next.
Example:
-
-
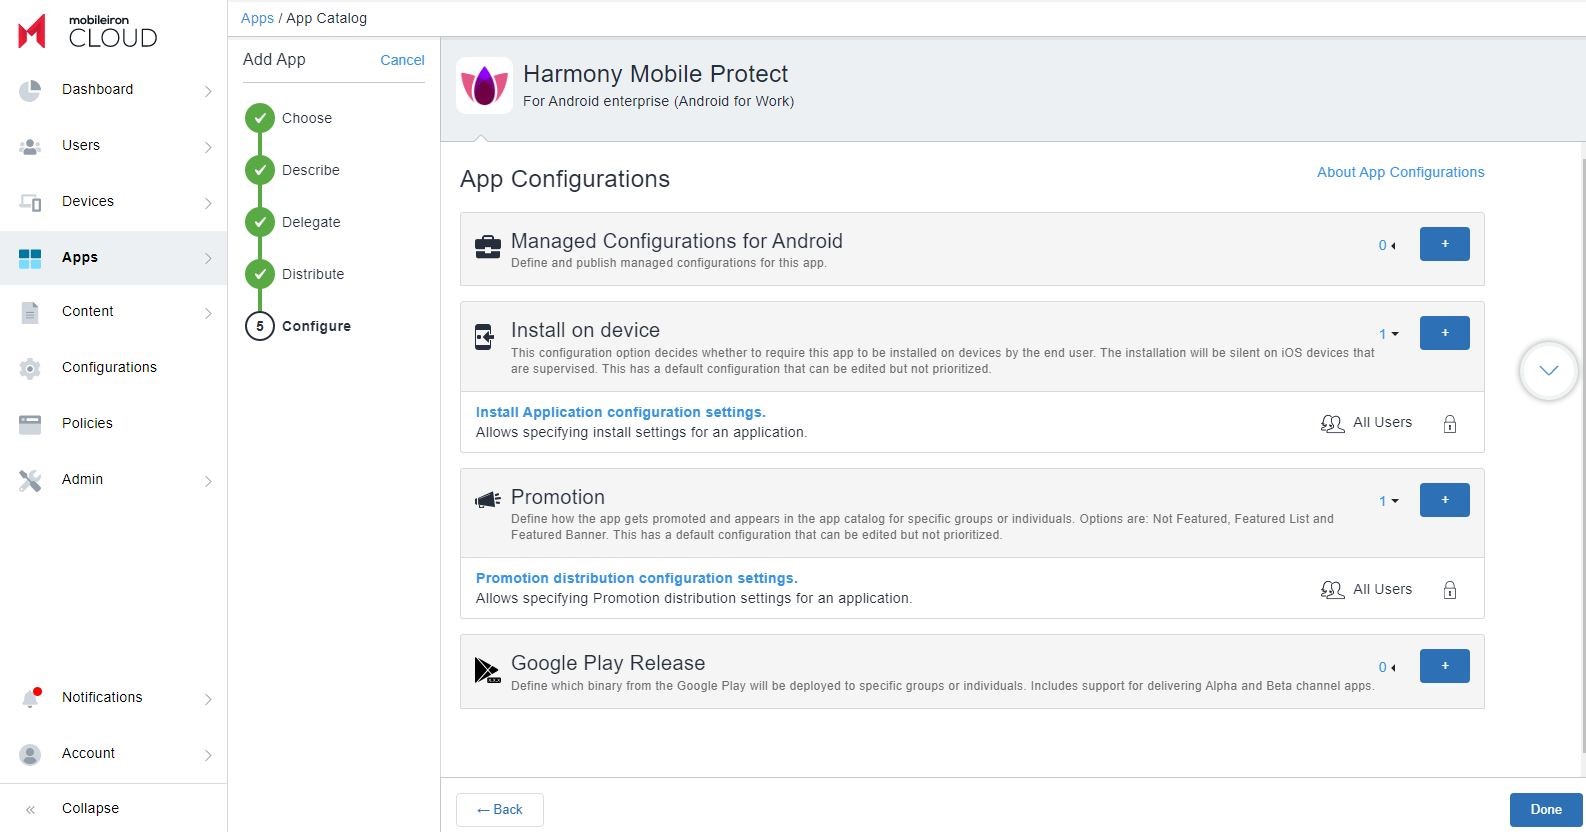
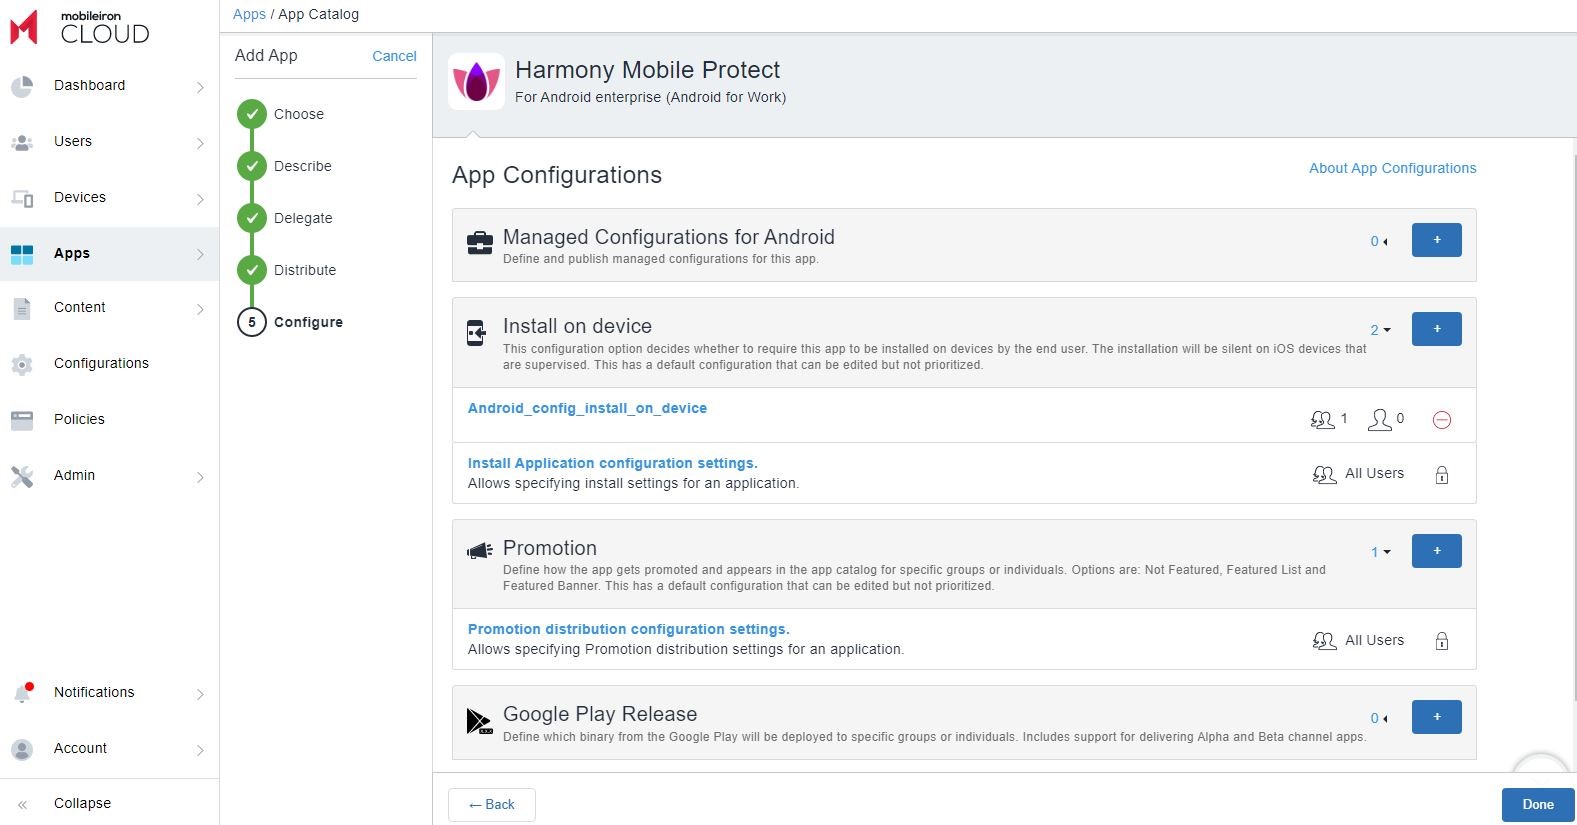
Go to Configure pane and select the applicable option.
-
For iOS App
Select Apple Managed App Configuration.
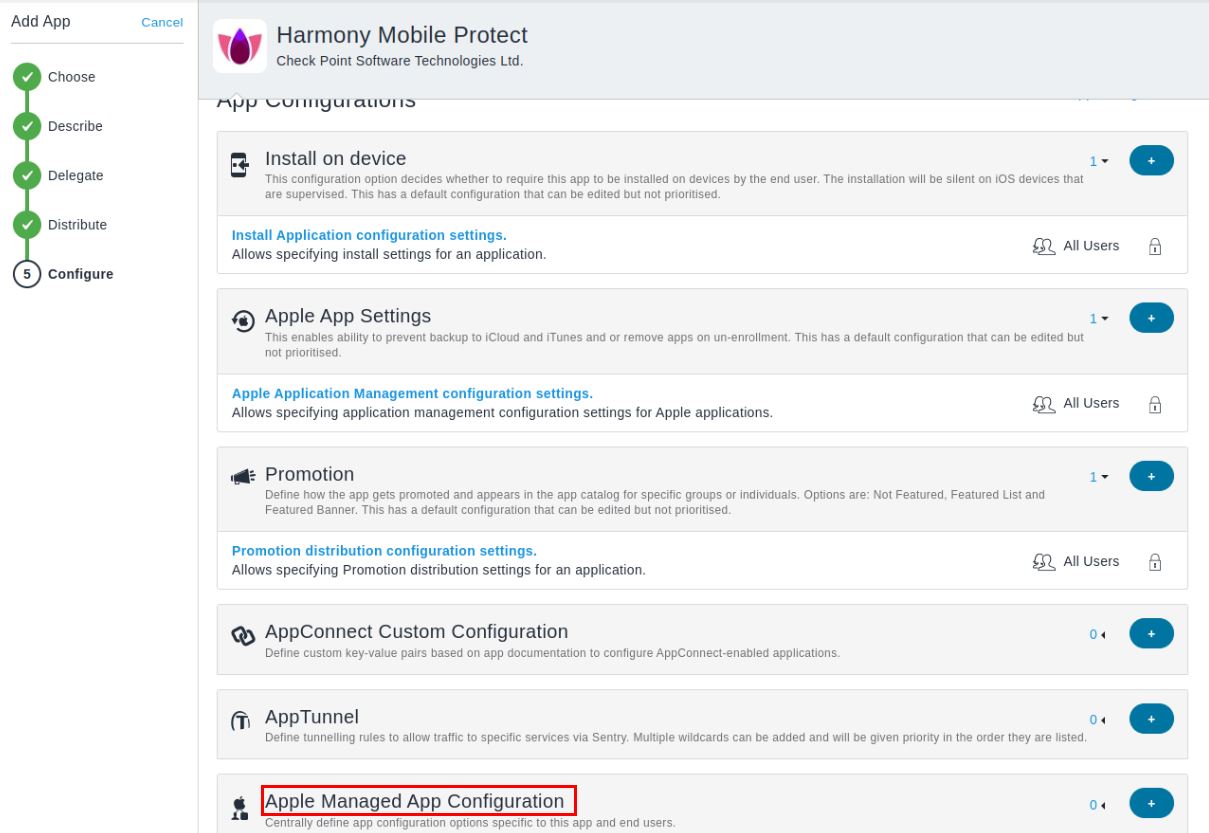
-
For Android Enterprise App
In Managed Configurations for Android, click +.
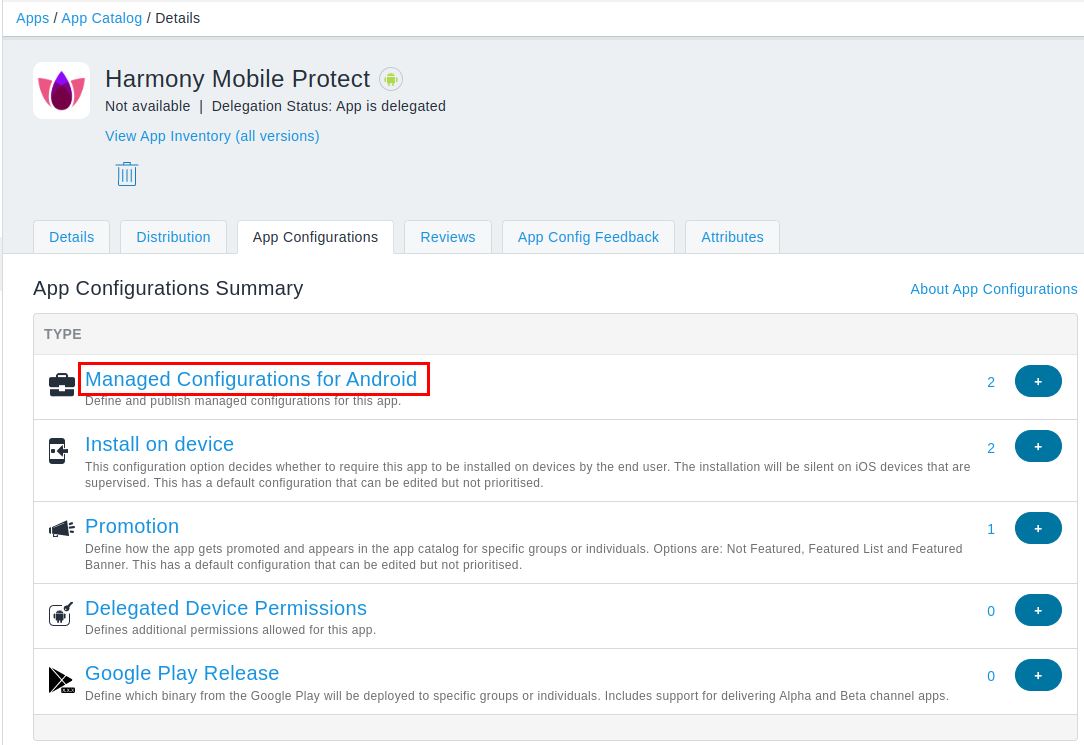
-
-
-
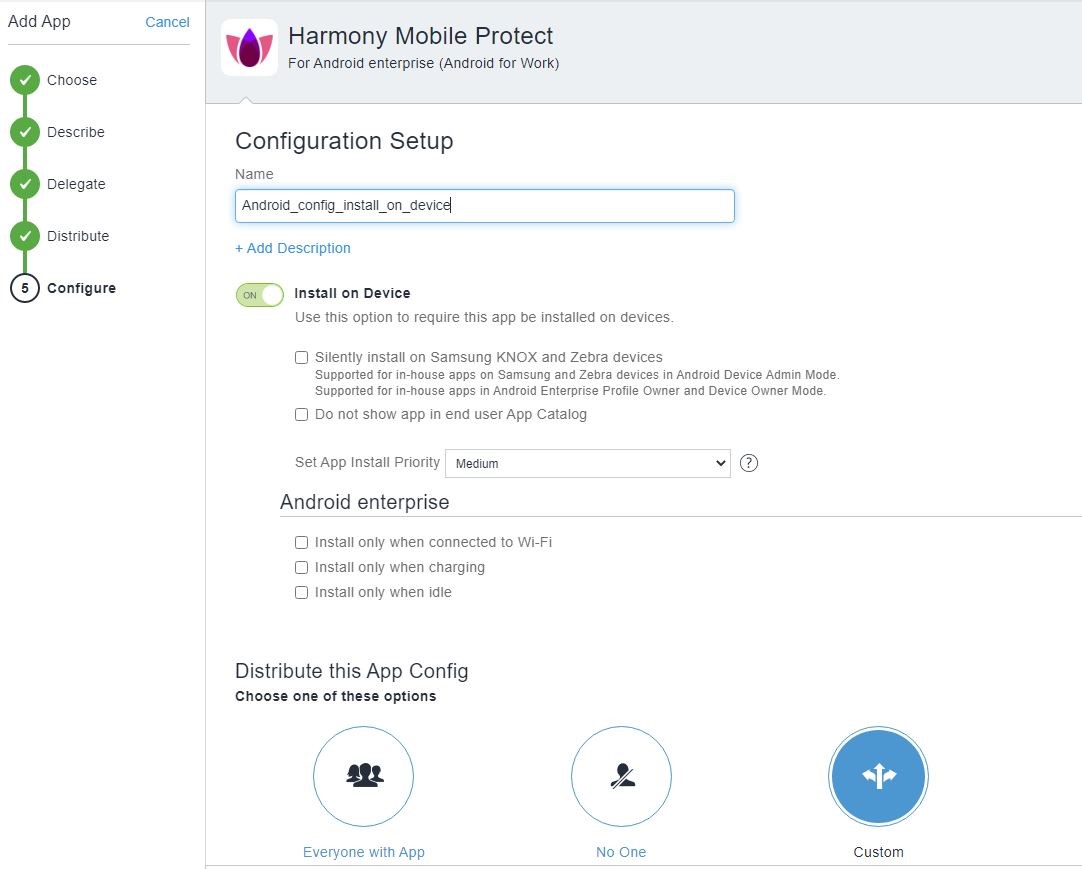
On the Configuration Setup pane enter a name for this configuration.
-
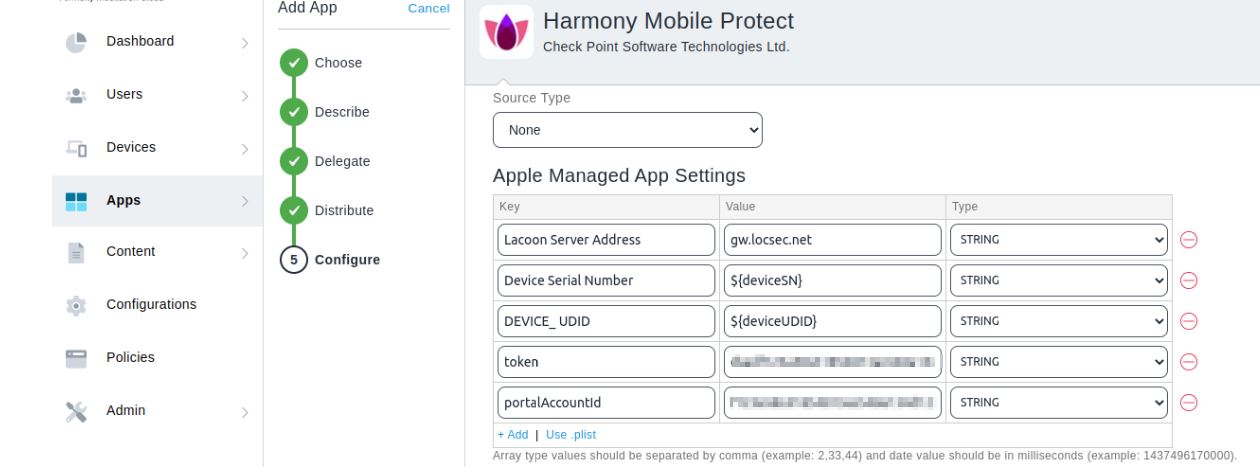
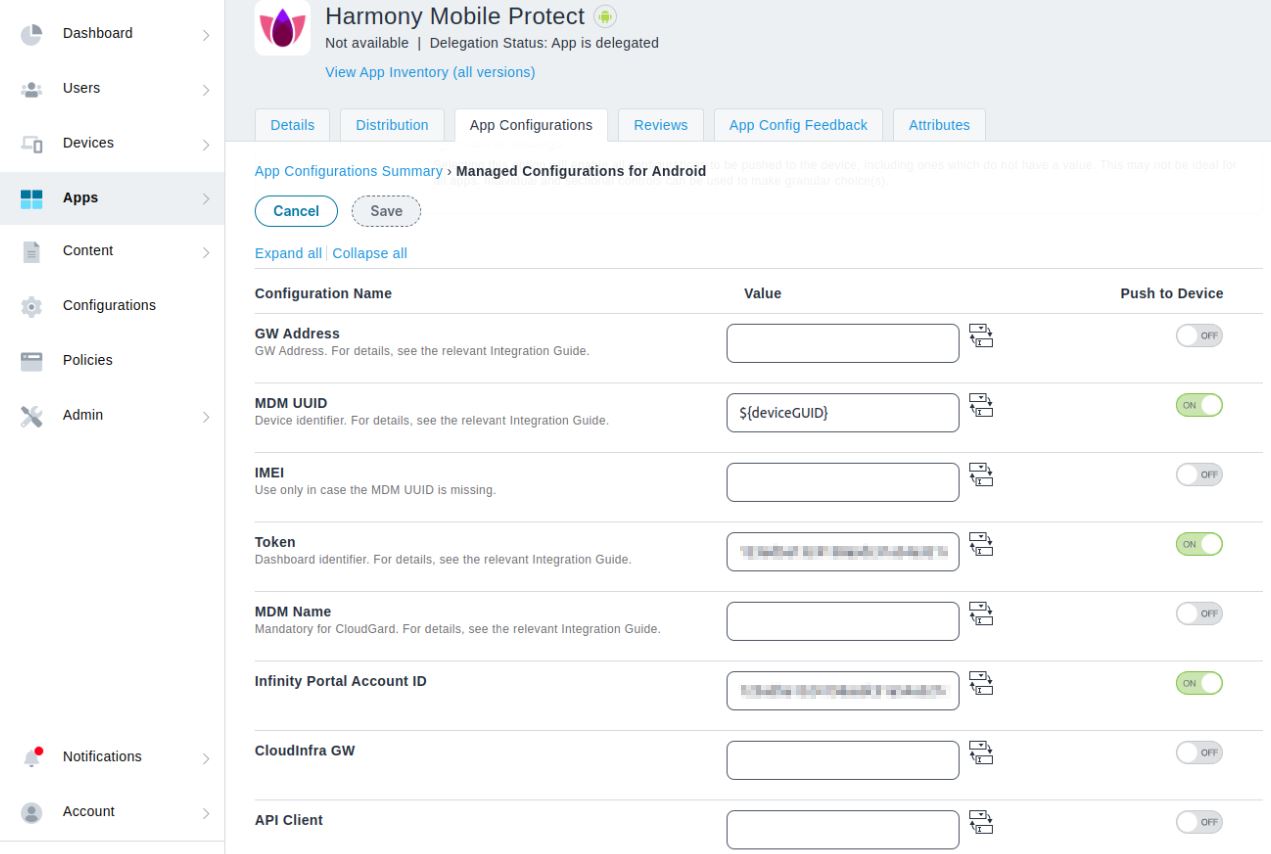
Enter the configuration settings (a key/value pair and the key type).
-
Click Next.
-
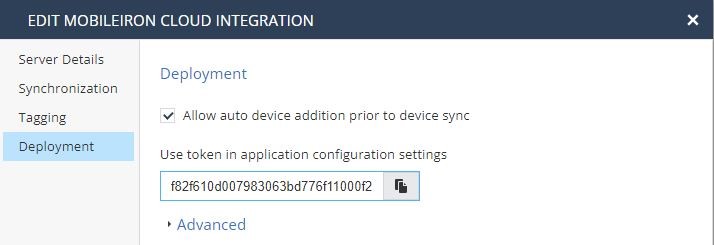
Get dashboard’s token:
Go to your Mobile Security dashboard > Settings > Integrations > Edit > Deployment.
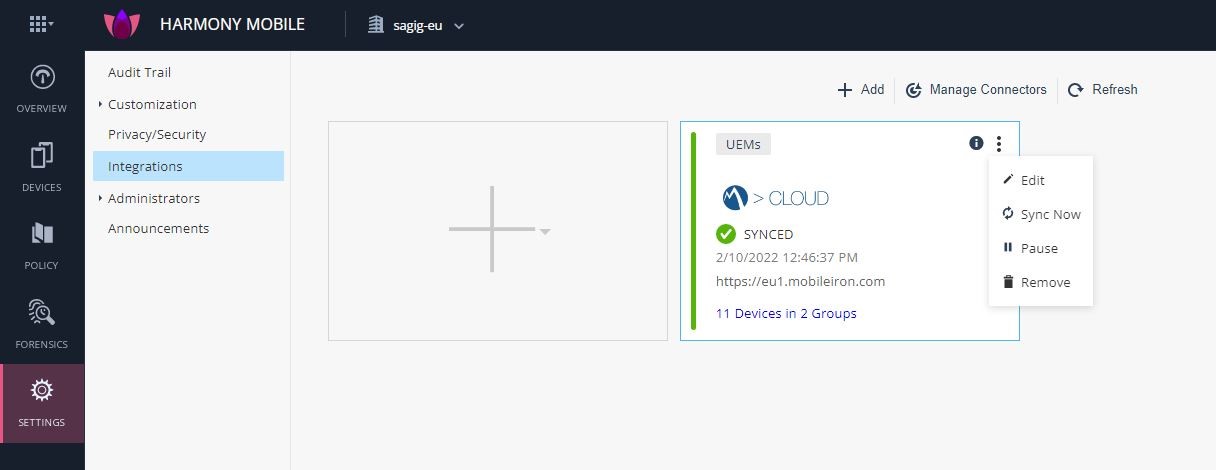
Copy the token of your dashboard.
-
In the UEM
Unified Endpoint Management. An architecture and approach that controls different types of devices such as computers, smartphones and IoT devices from a centralized command point., enter the configuration settings (a key/value pair and the key type).-
For iOS Devices:
Item
Description
Configuration Value
Lacoon Server Address
String
Enter the Security Gateway server for your region:
Region
Server
US
gw.locsec.net
Ireland (EU region)
eu-gw.locsec.net
Australia (Asia region)
au-gw.locsec.net
Canada (Canada)
ca-gw.locsec.net
UK region (UK)
uk-gw.locsec.net
India
in-gw.locsec.net
Device Serial Number
String
${deviceSN}
DEVICE_UDID
String
${deviceUDID}
token
String
Take the copied value from the previous section.
portalAccountId
String
Account ID of the application in the Check Point Portal.
-
For Android Enterprise Devices:
Item
Description
Configuration Value
mdm_uuid
String
${deviceGUID}
GW Address
String
Enter the Security Gateway server for your region:
Region
Server
US
gw.locsec.net
Ireland (EU region)
eu-gw.locsec.net
Australia (Asia region)
au-gw.locsec.net
Canada (Canada)
ca-gw.locsec.net
UK region (UK)
uk-gw.locsec.net
India
in-gw.locsec.net
Token
String
Take the copied value from the previous section.
Infinity Portal Account ID
String
Account ID of the application in the Check Point Portal.
-
-
Go to Configure pane and select the option Install on Device by clicking on the "+" button to the right.
Example (this example is for an Android Device but applicable for both iOS and Android):
-
In the Configuration Setup enter a name and a description.
-
Toggle the button Install on Device – to be ON.
-
In the Distribute this App Config Configuration Setup section select Custom.
-
Select the User Group cpuser_test_group option and click Next.
-
Click Done.
Automatic Activation of Mobile Security
If Harmony Mobile Protect app is not installed or removed from device, then the device is marked as not protected. You must create a compliance policy that prompts the Harmony Mobile Protect app installation on the device.
To prompt the Harmony Mobile Protect app installation on your devices:
-
Create a compliance policy that uninstalls and, or removes all corporate apps from the device until the user installs the Harmony Mobile Protect app on the device.
-
Connect the Harmony Mobile Protect app to your organization.
|
|
Note - The policy is similar for both iOS and Android users. The examples below are applicable for both platforms. |
Creating an App Control Policy
Procedure:
-
On the MobileIron Cloud portal go to Policies and click Add.
Example:

-
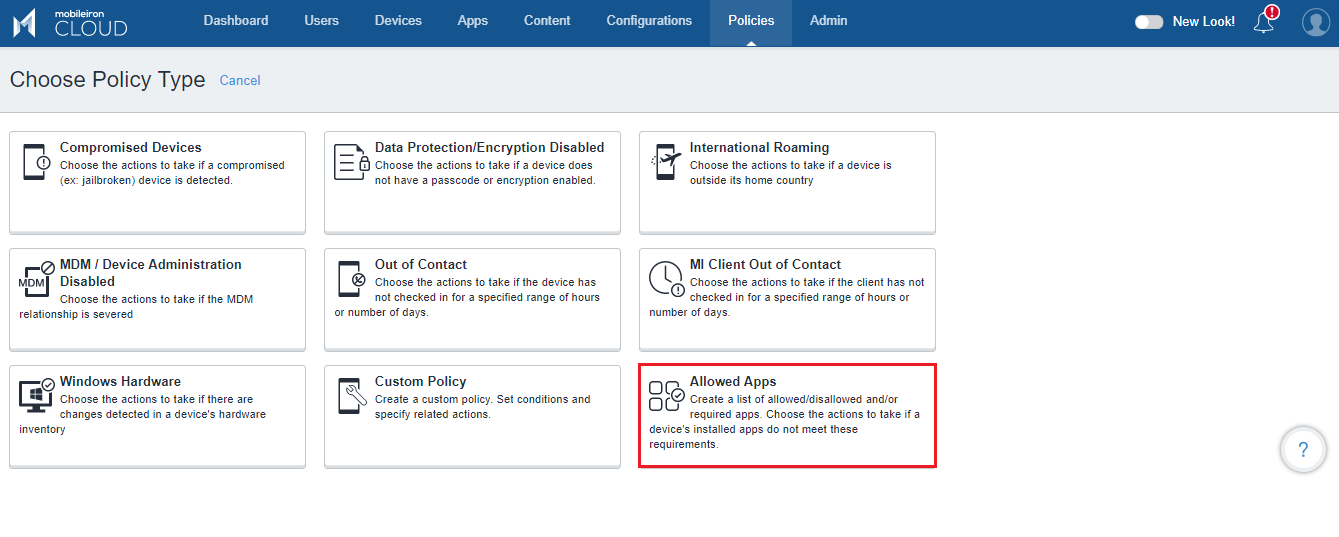
On the Choose Policy Type pane click on Allowed Apps section.
-
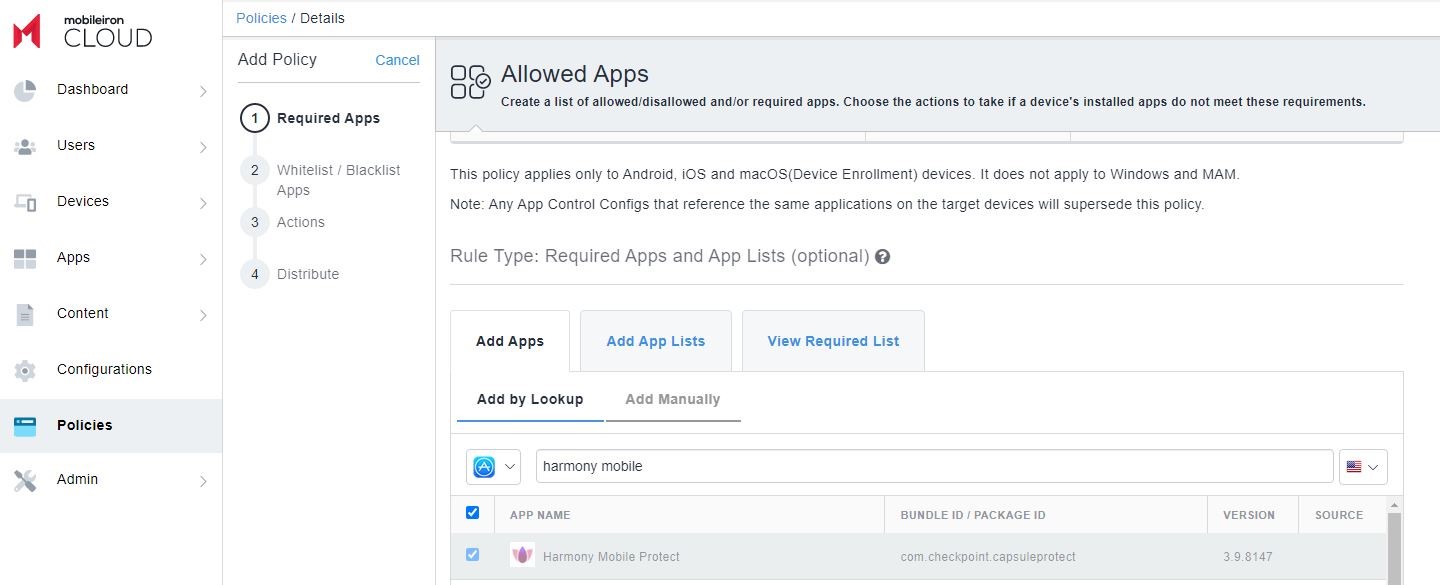
In the Add Policy window go to Required Apps > Policy and Compliance Setup and enter a name and a description.
-
Under the Add Apps tab from the pull-down menu select an applicable Harmony Mobile Protect app.
Note - The data fields are similar for both iOS and Android users. The examples below are applicable for both platforms.
-
For iOS Apps:
Select Apple App Store> Mobile Security.
-
For Android Enterprise Devices:
Select Google Play > Mobile Security

-
-
Click Next.
-
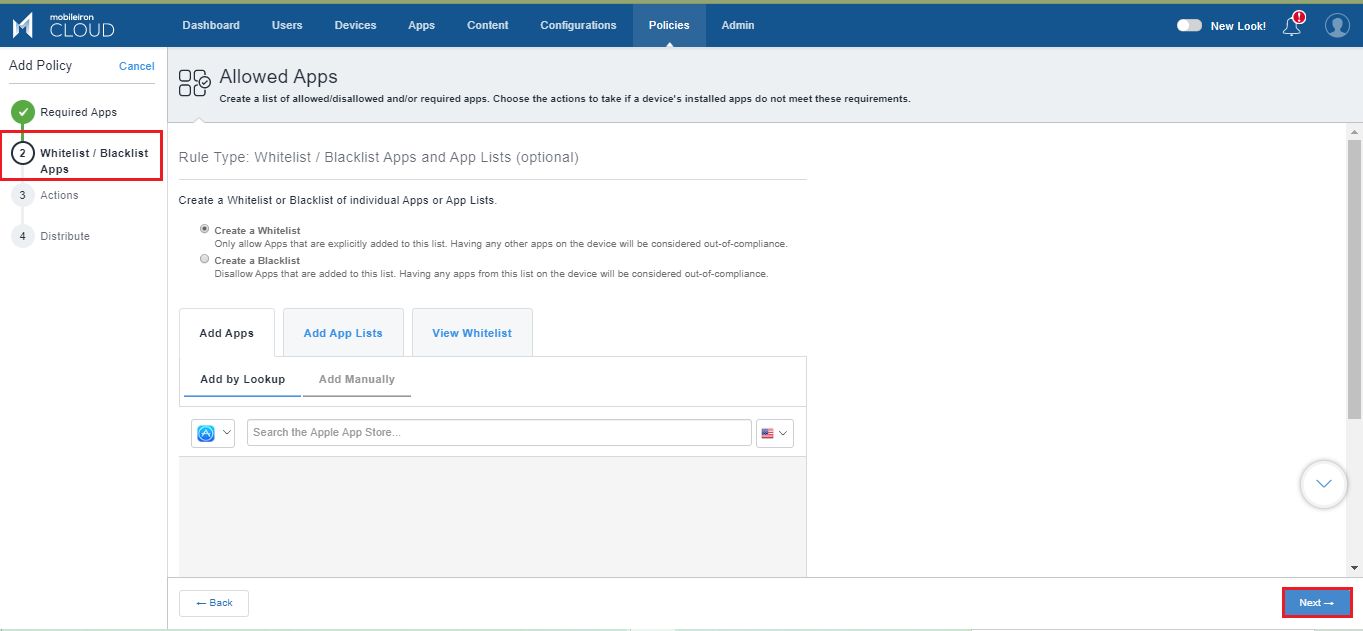
On the Whitelist / Blacklist Apps pane click Next.
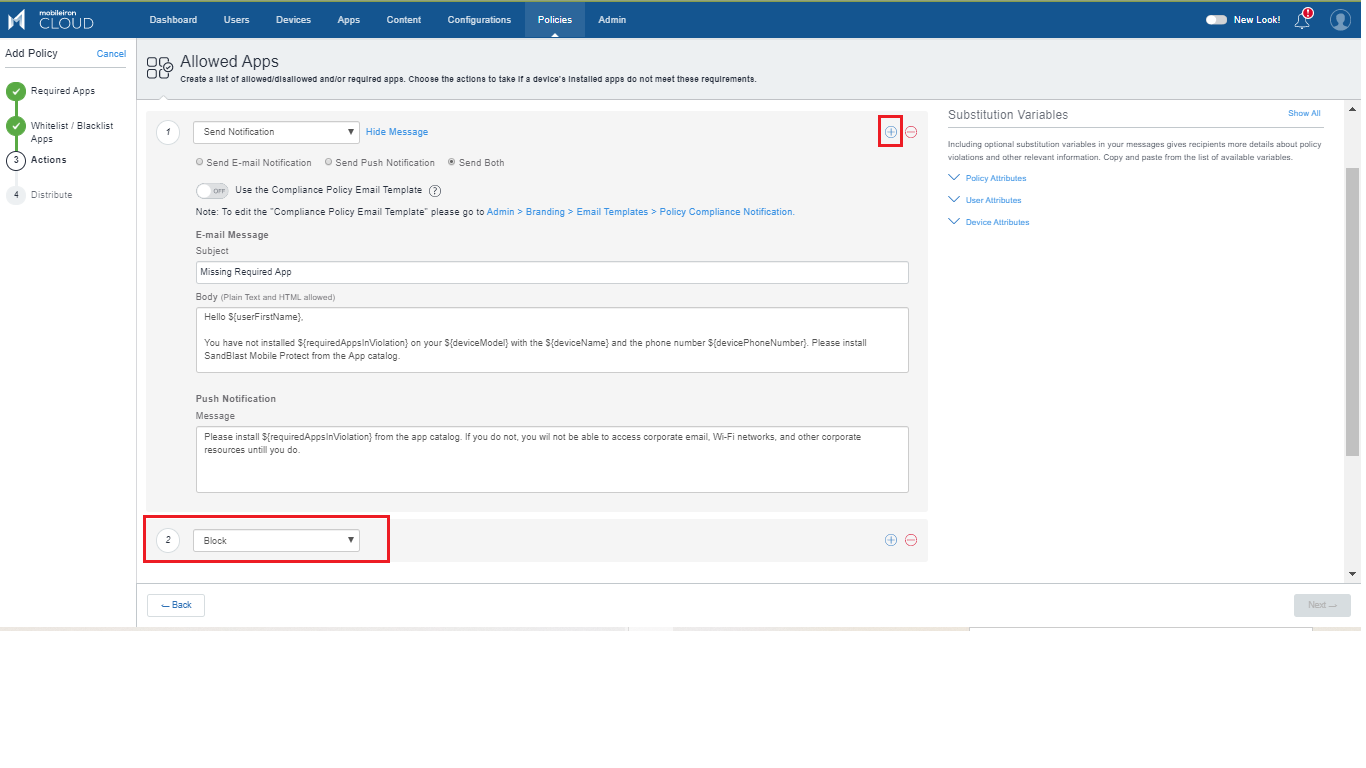
Configuring Email Notifications
-
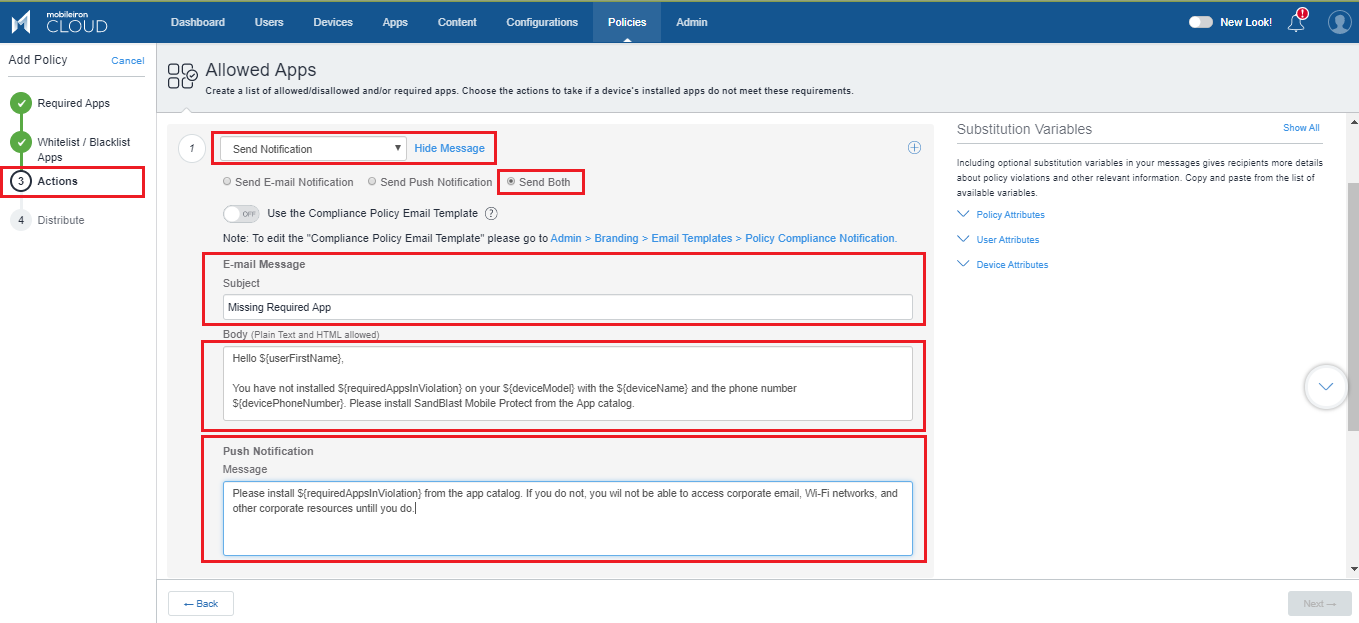
On the Actions pane go to Allowed Apps and select Send Notification option from the menu.
-
Select Send Both (Email and Push notifications).
-
Enter a subject and message body for the email message.
-
Enter a message for the push notification.
-
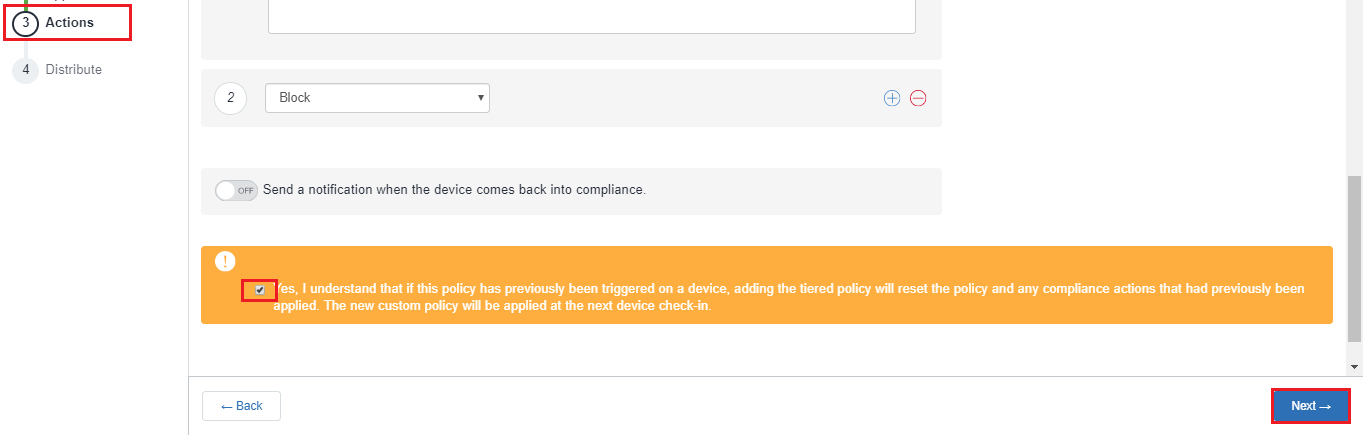
Click [+] to add more actions.
-
Select Block from the menu.
-
Select the checkbox to agree with statement and click Next.
Connecting the Harmony Mobile Protect app to your Device
To install the Harmony Mobile Protect app on your devices in your organization, you must add them to the Harmony Mobile Protect app group. This is a dynamic group assignment according to the associated tag.
Add all the devices marked with the Status tags to a group that indicates that the devices are registered in Mobile Security Dashboard.
Create a mitigation process. See Creating a Mitigation Process.
Creating a Protect app Group
Add the Harmony Mobile Protect app group to your devices in the Provisioning group.
|
|
Note - The data fields are similar for both iOS and Android users. The examples below are applicable for both platforms. |
To add Harmony Mobile Protect apps to the Device Provisioning Group:
-
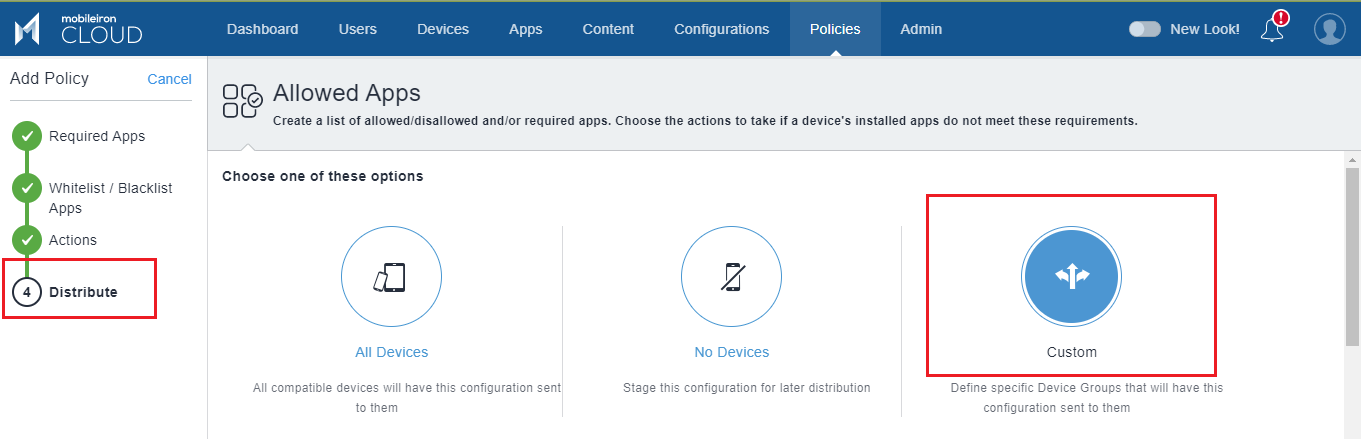
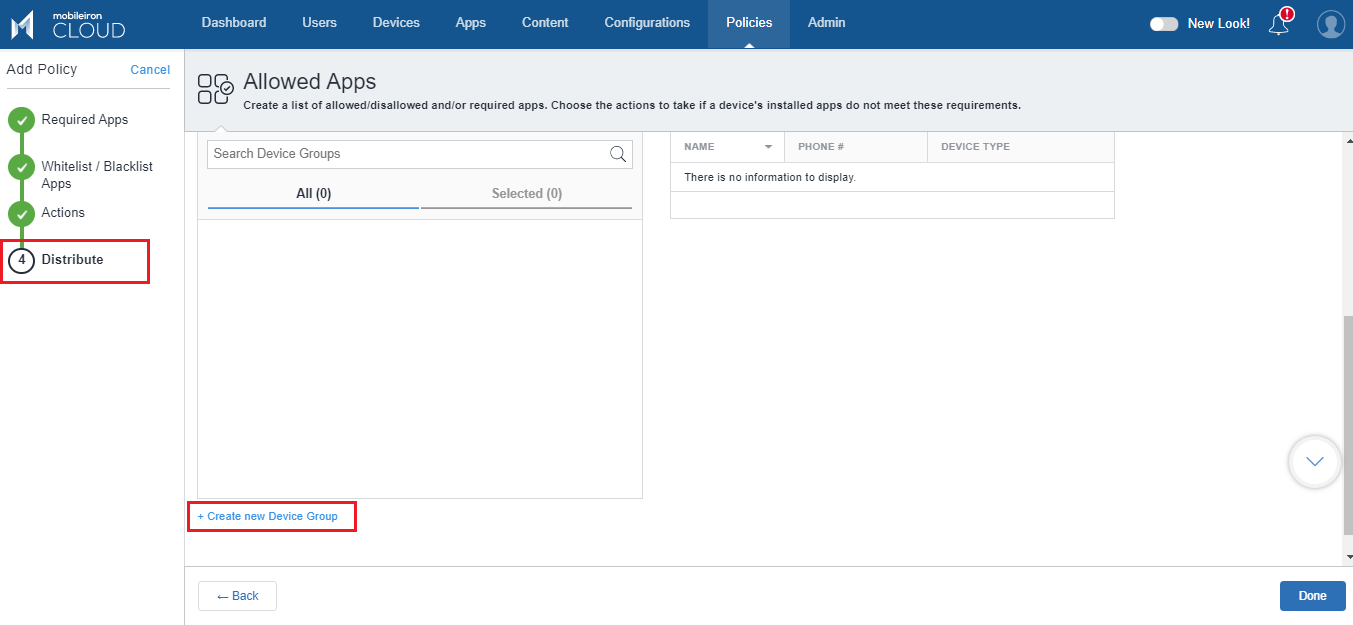
On the MobileIron Cloud portal, on App Policy > Distribute pane > select Custom.
-
Click Create new Device Group.
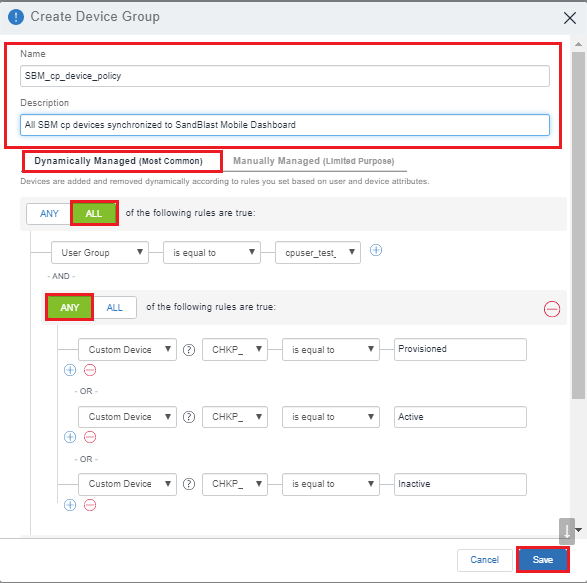
Assigning the Protect app Group to your Organization
-
In the Create Device Group window enter a name and description.
-
Select Dynamically Managed.
-
Enter a name and a description.
Configure Criteria 1 Section:
-
Select ALL of the following rules are true.
-
Set User Group is equal to cpuser_test_group.
-
Click the Group icon.
The Group is added to your organization.
Configure Criteria 2 Section:
-
Select ANY of the following rules are true.
-
Set Criteria 1: Custom Device Attribute CHKP_Status is equal to Provisioned.
-
Set Criteria 2: Custom Device Attribute CHKP_Status is equal to Active.
-
Set Criteria 3: Custom Device Attribute CHKP_Status is equal to Inactive.
-
Click Save.
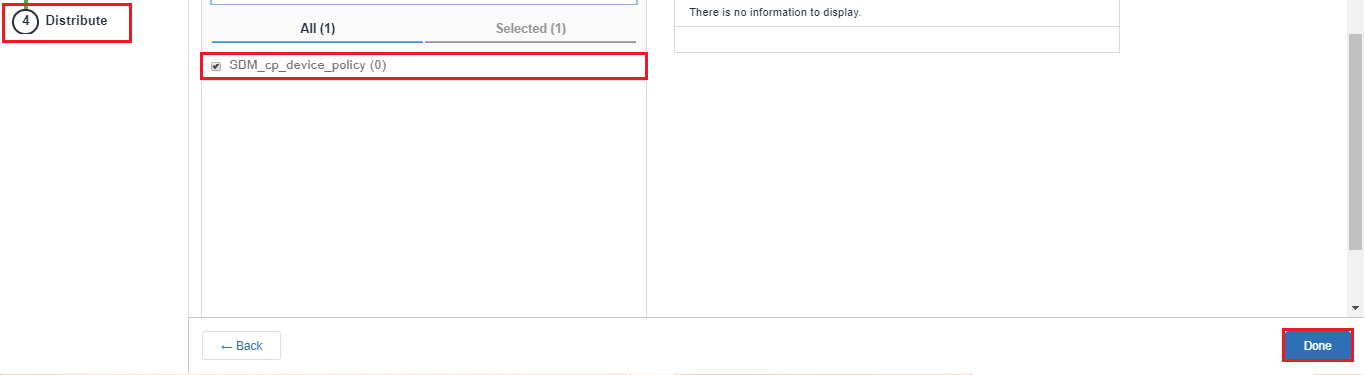
-
Make sure the Protect App Group you created in the previous section is checked and click Done.
Creating a Mitigation Process
To let the MobileIron Cloud system identify the devices-at-risk and to enforce the configured compliance policies according to the risk level, you must apply the built-in Risk tags. The Mobile Security Dashboard uses these tags (CHKP_Risk) to identify any device with the risk level that the Mobile Security analysis determines.
For more information about tags see Configuring Integration Settings.
To accomplish the policy enforcement on the devices, you must create Device Profiles and the Compliance![]() Check Point Software Blade on a Management Server to view and apply the Security Best Practices to the managed Security Gateways. This Software Blade includes a library of Check Point-defined Security Best Practices to use as a baseline for good Security Gateway and Policy configuration. Policy to apply these profiles to the devices. Create a Compliance Policy Rule
Check Point Software Blade on a Management Server to view and apply the Security Best Practices to the managed Security Gateways. This Software Blade includes a library of Check Point-defined Security Best Practices to use as a baseline for good Security Gateway and Policy configuration. Policy to apply these profiles to the devices. Create a Compliance Policy Rule![]() Set of traffic parameters and other conditions in a Rule Base (Security Policy) that cause specified actions to be taken for a communication session., Compliance Policy Group and apply the Compliance Policy Group to the User and Device Provisioning group.
Set of traffic parameters and other conditions in a Rule Base (Security Policy) that cause specified actions to be taken for a communication session., Compliance Policy Group and apply the Compliance Policy Group to the User and Device Provisioning group.
Check Point recommends these names for the Harmony Mobile Protect app attributes:
-
Device Provisioning Group – cpuser_test_group.
-
Custom Attribute - CHKP_ Risk (set to High or Medium)
-
Compliance Policy Group – SBM_cp_at_risk
The SBM_cp_at_risk Compliance policy applies to every device in the cpuser_test_group Provisioning Group has these parameters:
-
CHKP_ Risk custom attribute set to High or Medium
Or
-
CHKP_Status custom attribute set to Inactive
Creating a Compliance Policy for the Devices at Risk
The Compliance Policies are activated on the devices that are at high risk.
You must create separate compliance policies for specific OS types, such as iOS and Android.
|
|
Note - In every organization, the customer configures the compliance policies according to the production environment, needs, and the internal security policy |
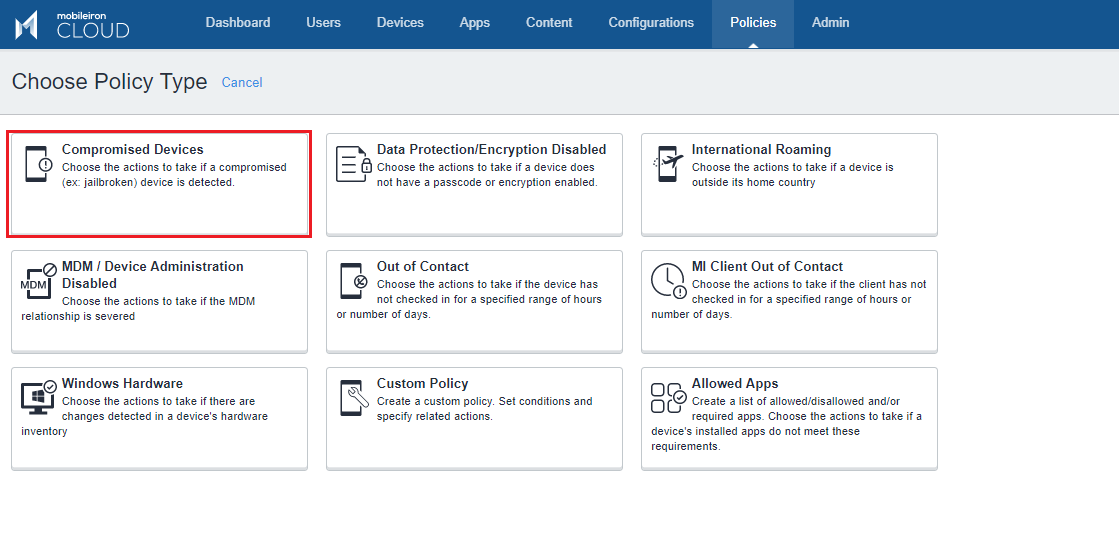
To create a Compliance Policy for the Devices at Risk:
-
On the MobileIron Cloud Portal go to Policies and click Add.
-
On the Choose Policy Type pane click on Compromised Devices section.
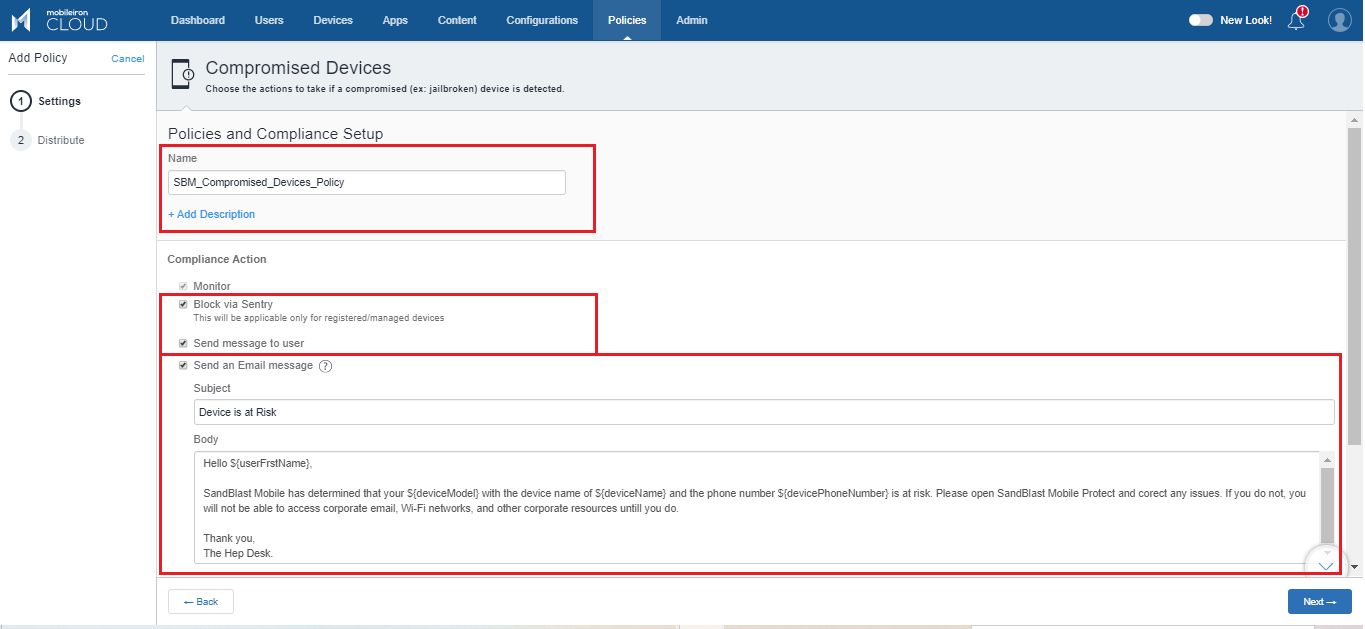
-
In the Settings window enter a name and a description.
-
Select the applicable compliance actions and quarantine the device.
-
Select Block via Sentry
-
Select Send message to user (both email and push notification)
-
-
Click Next.

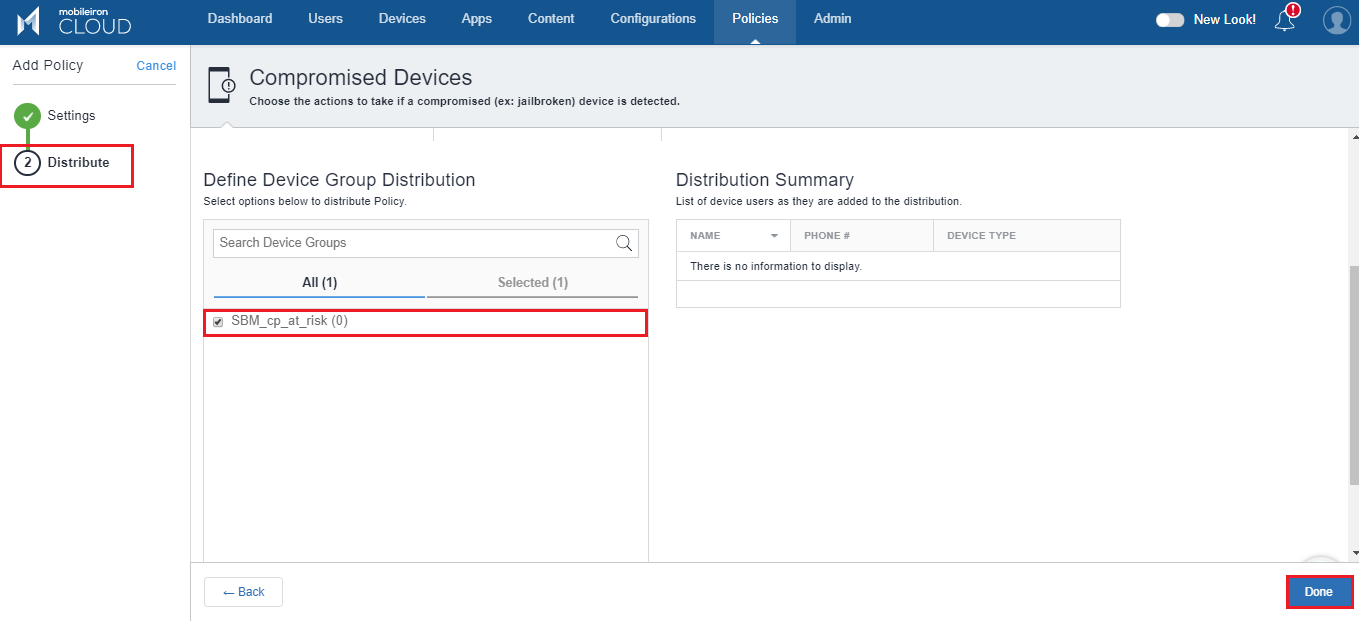
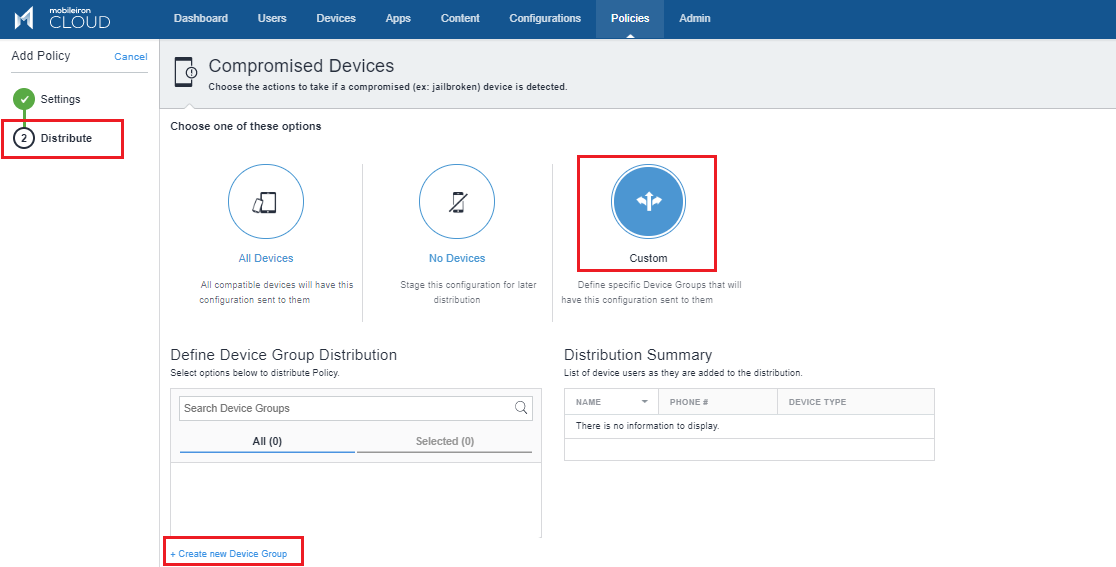
Creating a Compliance Policy Group
Compliance Policy Group uses the Compliance Policy Rules and applies to the Device Provisioning Group to enforce on devices that are at High or Medium Risk.
Procedure:
-
On the Distribute pane select Custom.
-
Click Create new Device Group.
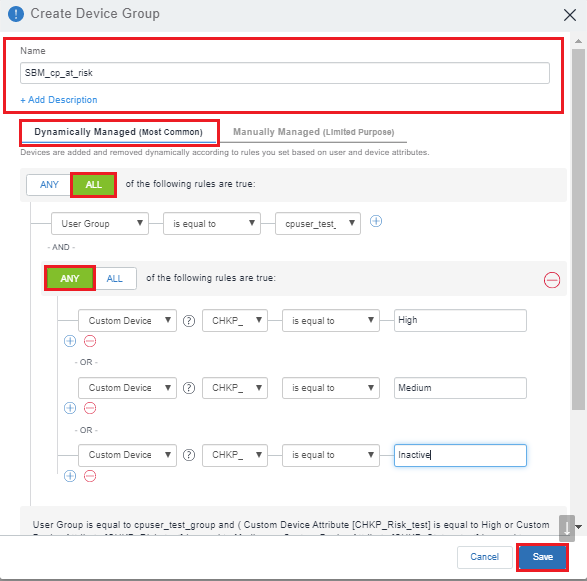
Applying the Compliance Policy Group to the Device Provisioning Group
The Compliance Policy applies to the Device Provisioning Group (see Creating a Device Provisioning Group).
Procedure:
-
In the Create Device Group window enter a name and a description.
-
Select Dynamically Managed option.
-
For Criteria 1 set Select ALL of the following rules are true and set User Group is equal to cpuser_test_group.
-
For Criteria 2 select ANY and enter these parameters:
-
Custom Device Attribute > CHKP_Risk is equal to High
-
Custom Device Attribute > CHKP_Risk is equal to Medium
-
Custom Device Attribute > CHKP_Status is equal to Inactive
-
-
Click Save.
-
Make sure the Compliance Policy Group you created in the previous section is checked and click Done.