Creating User Provisioning Groups
To create a group of users whose devices will be registered to the Check Point Mobile Security solution, follow this procedure.
Information about Device Risk & Status tags and BlackBerry UEM![]() Unified Endpoint Management. An architecture and approach that controls different types of devices such as computers, smartphones and IoT devices from a centralized command point. user groups
Unified Endpoint Management. An architecture and approach that controls different types of devices such as computers, smartphones and IoT devices from a centralized command point. user groups
User groups are how BlackBerry UEM applies policies and assigns/deploys apps.
For more or updated information about adding user groups see Creating and managing user groups_guide.
Mobile Security utilizes these groups to move devices in and out of 7 pre-defined groups, and one freeform mitigation group.
There are 3 pre-defined status groups:
-
CHKP_Status_Provisioned
-
CHKP_Status_Active
-
CHKP_Status_Inactive
When a device is provisioned in Mobile Security Dashboard, this device is placed in the CHKP_Status_Provisioned group.
After the user has installed and registered to Mobile Security, this device is moved from the CHKP_Status_Provisioned group to the CHKP_Status_Active group.
If the device hasn't checked-in with Mobile Security for X number of days (configured by the Mobile Security Admin), then the device is moved from CHKP_Status_Active to CHKP_Status_Inactive.
There are 4 pre-defined risk groups:
-
CHKP_Risk_None
-
CHKP_Risk_Low
-
CHKP_Risk_Medium
-
CHKP_Risk_High
If a device is determined to be at High, Medium, or Low risk, the device is placed in the respective group. If the device has no risks, then it is placed in the CHKP_Risk_None group.
For example, if the device has a Low risk app and a High risk device setting is enabled for example "unknown sources", then the device will appear in both the CHKP_Risk_Low and CHKP_Risk_High groups.
The freeform mitigation group is any unique name, such as "Users_At_High_Risk", that Mobile Security will place only devices determined to be at High Risk. It does not provided the granularity of the different risk levels of the device, just high risk state. This method was the original way to group devices at high risk, and it is strongly recommended that you implement the CHKP Risk and Status groups instead of using the freeform group.
In Creating Local User Group(s), we will create these pre-defined Mobile Security groups and nest them according to how we want our corporate policies to be applied.
In our example, devices that are members of CHKP_Risk_High, CHKP_Risk_Medium, or CHKP_Status_ Inactive will be considered to be "Users_At_Risk", and have the appropriate Mitigation Policies applied as defined later in Device Out of Compliance - Missing Harmony Mobile Protect App. Devices that are members of CHKP_Risk_None or CHKP_Risk_Low, will not have the mitigation policies applied.
Creating a User Group based on Corporate User Directory
To create a user group that is tied to active directory:
-
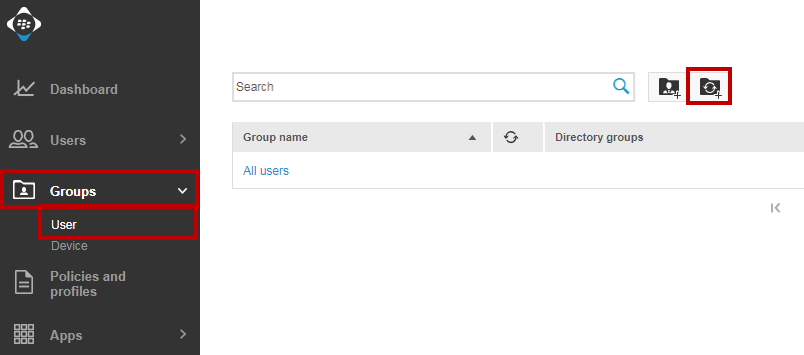
On the BlackBerry UEM Console, go to Groups > User, click Add a directory-linked group icon.
Example:
-
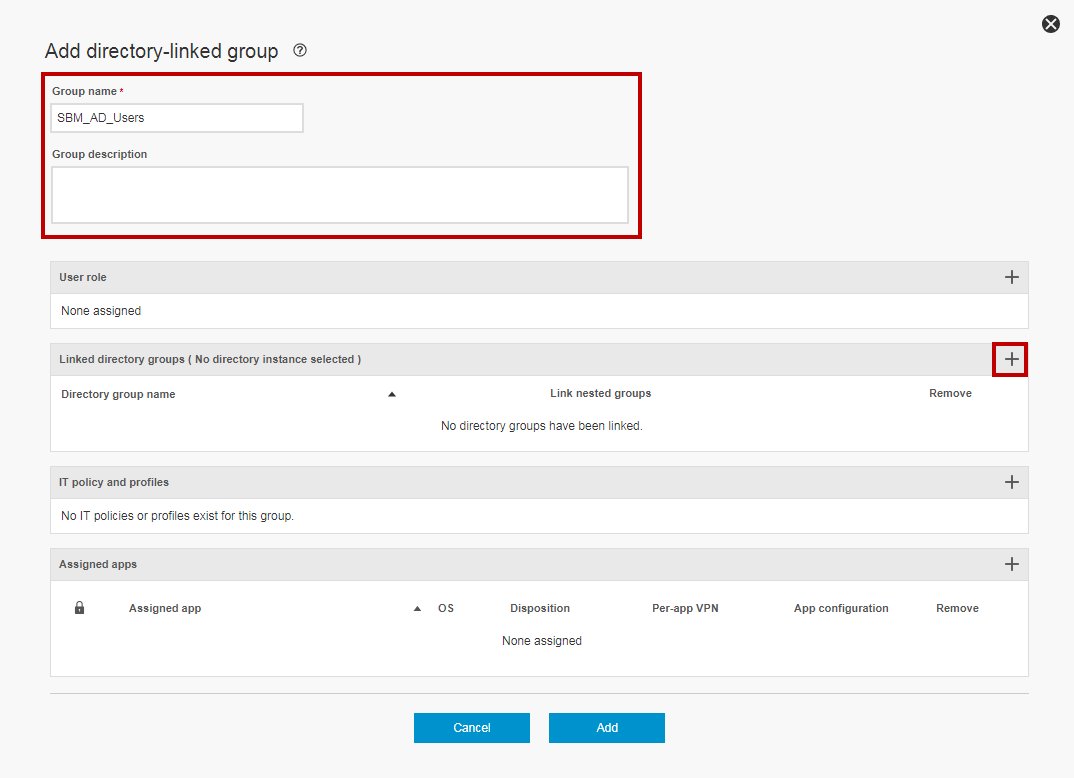
On the Add a directory-linked group window, configure these settings:
-
In the Group name field - Enter a group name.
-
In the Group Description field - Enter the group's description (optional).
Example:
-
-
Click + sign to add a Linked directory group.
-
On the Search company directory window, enter in the first few letters of the corporate directory group you want to link, and hit enter.
Example:
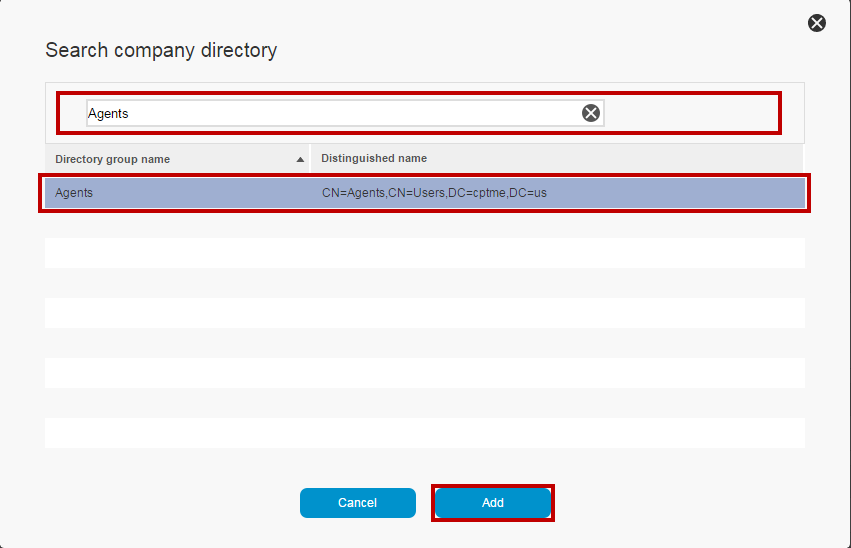
-
Click Add.
-
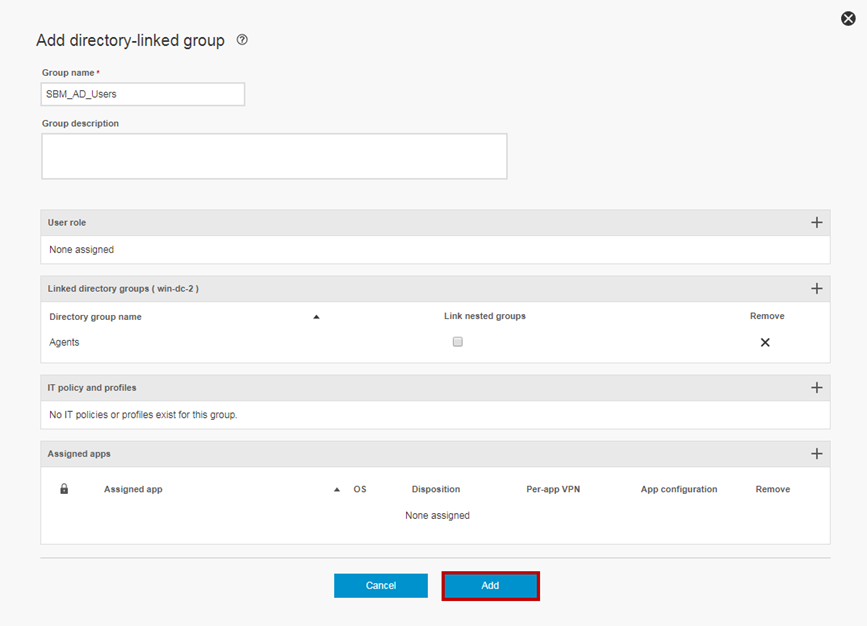
We haven't created any IT policies and profiles or added Apps to our App Catalog as of yet, so we will add those in subsequent sections.
Example:
-
Click Add.
Creating Local User Group(s)
In this section, we will create all of the User Groups we need for Provisioning![]() Check Point Software Blade on a Management Server that manages large-scale deployments of Check Point Security Gateways using configuration profiles. Synonyms: SmartProvisioning, SmartLSM, Large-Scale Management, LSM., Monitoring, and Mitigation. These groups are:
Check Point Software Blade on a Management Server that manages large-scale deployments of Check Point Security Gateways using configuration profiles. Synonyms: SmartProvisioning, SmartLSM, Large-Scale Management, LSM., Monitoring, and Mitigation. These groups are:
-
Optional User Groups, but recommended in order to simplify applying policies, deploying apps, and mitigating risks. Some of the required user groups will be nested under these groups as discussed further in Information about Device Risk & Status tags and BlackBerry UEM user groups and in Nesting User Groups (optional).
-
SBM_Syncd_Users
-
Users_At_Risk
-
-
Required User Group if not using AD User Group
-
SBM_Local_Users
-
-
Required User Groups for Integration if using Tag Device Status and Tag Device Risk
-
CHKP_Status_Provisioned
-
CHKP_Status_Active
-
CHKP_Status_Inactive
-
CHKP_Risk_None
-
CHKP_Risk_Low
-
CHKP_Risk_Medium
-
CHKP_Risk_High
-
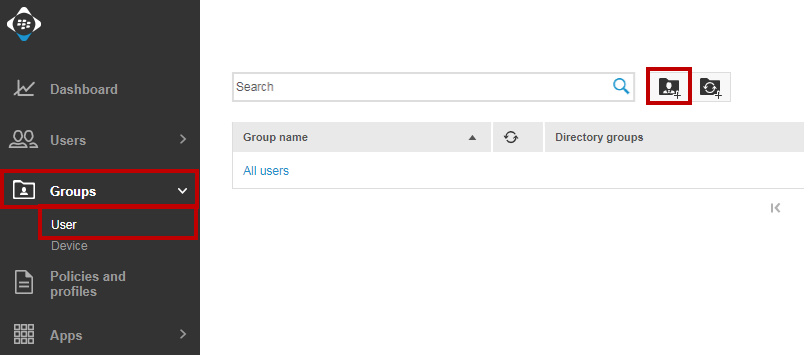
To add a user group:
-
On the BlackBerry UEM Console, go to Groups > User, click Add a user group icon.
Example:
-
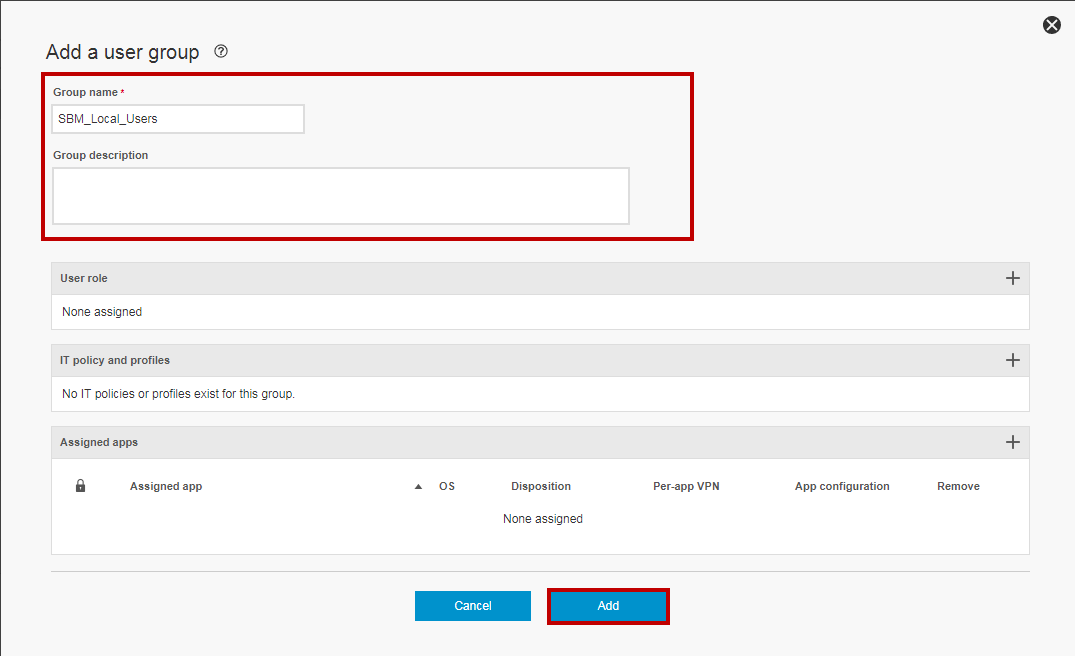
On the Add a user group window, configure these settings:
-
In the Group name field - Enter a group name.
-
In the Group Description field - Enter the group's description (optional).
Example:
-
-
We haven't created any IT policies and profiles or added Apps to our App Catalog as of yet, so we will add those in subsequent sections.
-
Click Add.

|
Note - Repeat these steps to add all the user groups listed above |
Adding an Existing User to the Local User Group
To add an existing user to the User Group (see Creating a User Group based on Corporate User Directory or Creating Local User Group(s)), follow this procedure. Our example will be using the Local User group ("SBM_Local_Users").
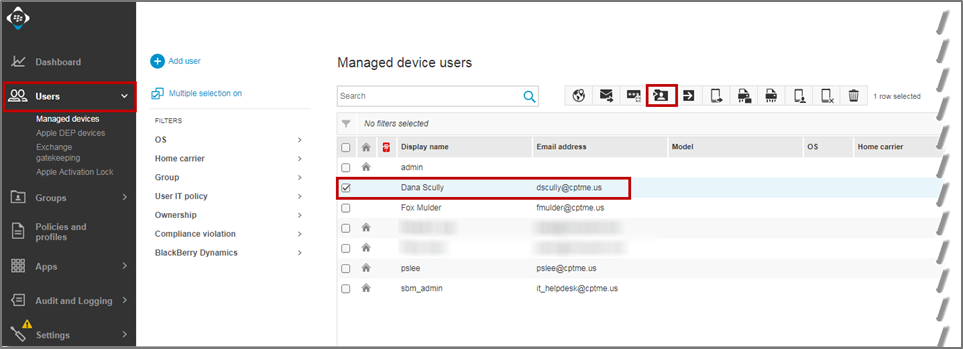
To add an existing user to the local user group:
-
On the BlackBerry UEM Console, go to Users > Managed devices, scroll and select the user you want to add to the user group, and click the Add to user groups icon.
Example:
-
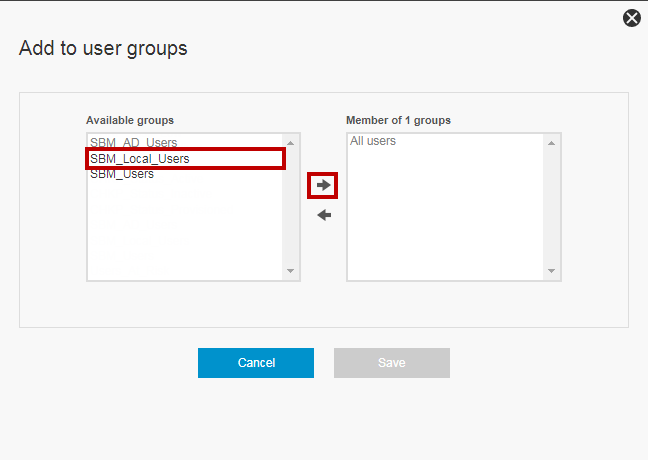
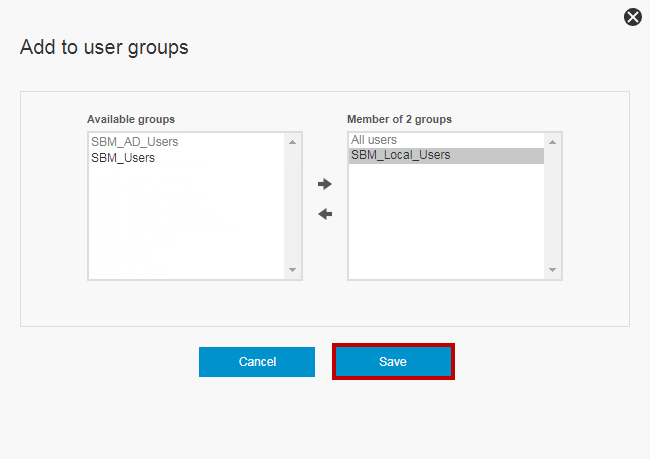
On the Add to user groups window, select the SBM_Local_Users from the Available groups list, can click Right arrow.
Example:
-
Click Save.
Example:
-
The user is now part of the User Group SBM_Local_Users.
Adding a New User to an Existing Local User Group
To add a new user to an existing local user group:
-
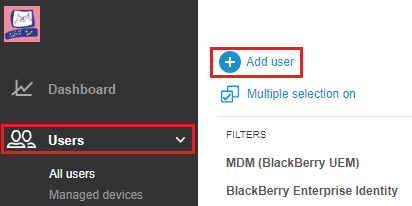
On the BlackBerry UEM Console, go to Users, click Add user.
Example:
-
On the Add a user window, On the Local tab, configure these settings:
-
In the First name field - Enter the user's first name.
-
In the Last name field - Enter the user's last name.
-
In the Display name field - Enter a display name.
-
In the Username field - Enter a username.
-
In the Email address field - Enter the user's email address.
-
-
Select the User Group SBM_Local_Users from the Available groups list and click Right arrow.
Example:

-
Scroll down to the bottom on the pop-up window, and enter in a temporary console password for this user and select Send Password to user.
-
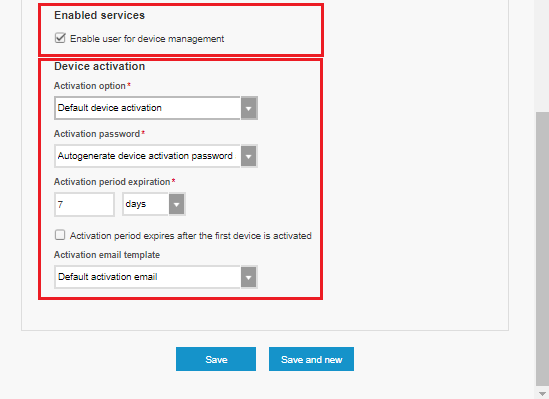
Set the Device activation settings as required for your company.
Example:
-
Click Save.
|
|
Note - The user is already notified with device enrollment procedures upon the creation of the user. |
Nesting User Groups (optional)
We will be nesting the user groups that we created in Creating Local User Group(s) Creating Local User Group(s) and as discussed in Information about Device Risk & Status tags and BlackBerry UEM user groups.
This will simplify the policy enforcement.
|
|
Note - If you do not want to create nested user groups, then you must apply the appropriate policies, apps, etc. to each group individually as inheritance only occurs from parent group to child group. |
In our example, we will nest our groups as follows:
-
SBM_Syncd_Users
-
CHKP_Status_Provisioned
-
CHKP_Status_Active
-
CHKP_Status_Inactive
-
-
Users_At_Risk
-
CHKP_Risk_High
-
CHKP_Risk_Medium
-
CHKP_Status_Inactive
-
Also, if you want devices at Low Risk to be subject to the same Non-Compliant policies as those at High Risk, simply nest CHKP_Risk_Low under Users_At_Risk.
For more or updated information about nested groups see Add nested groups to a user group_guide.
To add a nested group:
-
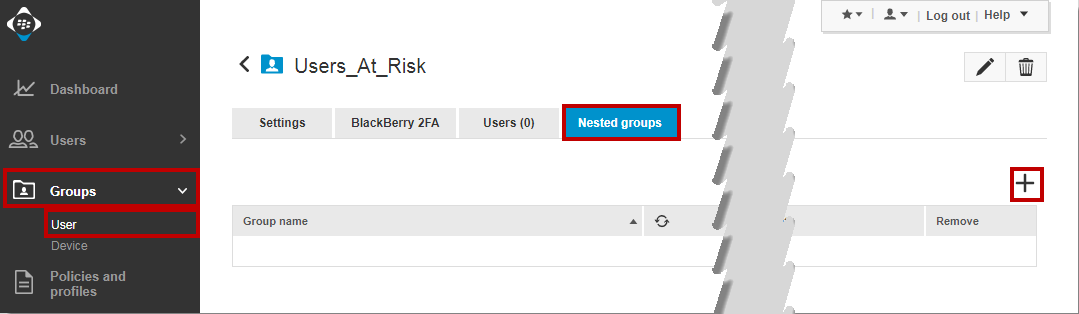
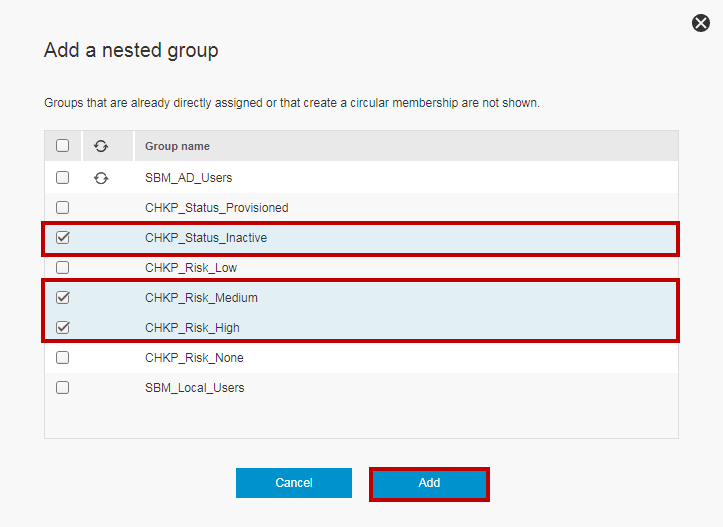
On the BlackBerry UEM Console, go to Groups > User, and select Users_At_Risk to edit it.
-
Select Nested groups tab, and click +.
Example:
-
On the Add a nested group window, select CHKP_Status_Inactive, CHKP_Risk_Medium, and CHKP_Risk_High.
Example:
-
Click Add.
|
|
Note - Repeat these steps for adding the appropriate nested groups for SBM_Syncd_Users. |