Network Policies
Content Inspection
For Content Inspection configuration to work on the device, you must enable On-device Network Protection.
Set these parameters on the Content Inspection tab:
Block Connections to Phishing & Malicious Sites
-
Go to Policy and select a policy profile.
-
Click Network > Content Inspection > Block Connections to Phishing & Malicious Sites and set these parameters:
Item
Description
Phishing
Indicates whether to block connections to phishing URLs.
Spyware / Malicious Sites
Indicates whether to block connections to spyware or malicious sites.
Botnets
Indicates whether to block connections to sites that use bots.
Zero-Phishing
Indicates whether to enable zero-phishing (identify unknown phishing sites).
For an optimal browsing experience on the mobile device, Zero-Phishing technology is tuned, by default, not to scan all SSL
 Secure Sockets Layer. The standard security technology for establishing an encrypted link between a web server and a browser. locations but only domains not marked as safe (i.e. high confidence of no-risk).
 -
To save the policy changes, click Save.
Conditional Access
The Conditional Access feature allows an organization to automatically control access to corporate resources from compromised devices (marked as High Risk).
This policy enforcement is independent of Unified Endpoint Management (UEM![]() Unified Endpoint Management. An architecture and approach that controls different types of devices such as computers, smartphones and IoT devices from a centralized command point.) solutions.
Unified Endpoint Management. An architecture and approach that controls different types of devices such as computers, smartphones and IoT devices from a centralized command point.) solutions.
This category is a list of corporate IP addresses and/or FQDN hostnames that a device at high risk cannot access.
To add conditional access to a specific network:
-
Go to Policy and select a policy profile.
-
Click Network > Content Inspection > Conditional Access.
-
Click Add.
A pop-up window appears.
-
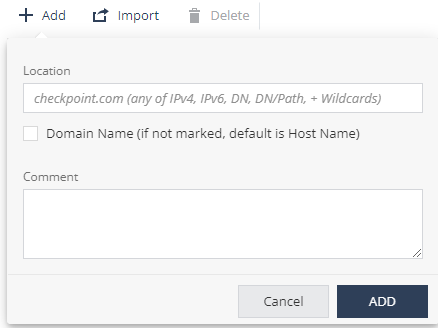
In the Location field, enter the network location in one of these formats: IPv4
Internet Protocol Version 4 IP address. A 32-bit number - 4 sets of numbers, each set can be from 0 - 255., IPv6 Internet Protocol Version 6 IP address. 128-bit number - 8 sets of hexadecimal numbers, each set can be from 0 - ffff., Domain Name (DN), DN/URL, + Wildcards. -
Select the Domain Name checkbox to enter location as domain name.
For example, if you enter Location as google.com, and select this checkbox, it is interpreted as domain name and includes all URLs in *.google.com. If not set, location value is interpreted as host name (www.google.com). -
(Optional) Add comments.
-
Click Add.
-
To import conditional access for a list of URLs, click Import and upload the .CSV file with URL names list and comments.
-
To delete a network location from the list, select it and click Delete.
-
To save the policy changes, click Save.
URL Filter Categories
The URL filtering feature prevents access to websites as per the organization’s corporate policies. You can prohibit device access for URLs in a specific content category (for example, Gambling and Violence). You can enforce policies across all browser apps and non-browser specific apps, such as Facebook Messenger, Slack and WhatsApp.
The URL Filtering![]() Check Point Software Blade on a Security Gateway that allows granular control over which web sites can be accessed by a given group of users, computers or networks. Acronym: URLF. technology also allows you to allow and block domains.
Check Point Software Blade on a Security Gateway that allows granular control over which web sites can be accessed by a given group of users, computers or networks. Acronym: URLF. technology also allows you to allow and block domains.
|
|
Note - When URL Filtering is coupled with On-device Network Protection > Always ON > Allow user to suspend On-device Network Protection, users can disable ONP for a specific amount of time (5 minutes, 30 minutes, or 2 hours), to access blocked websites or categories. This provides flexibility in a BYOD environment. However, the user cannot suspend ONP if the device is at High risk. If the device moves to at High risk while in suspension, Conditional Access is enabled. |
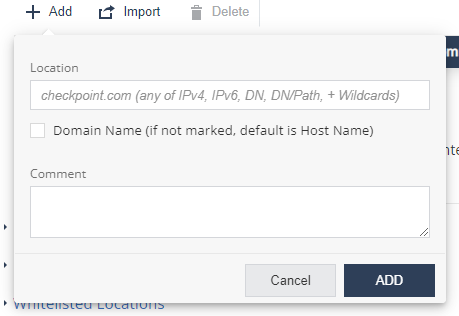
To edit URL filtering categories:
- Go to Policy and select a policy profile.
-
Click Network > Content Inspection > URL Filter Categories.
-
Click Edit.
A pop-up windows appears.
-
In the left column, select the categories that you want to block access to, and click >.
-
To undo a selection, in the right column, select the category and click <.
-
Click OK.
-
To save the policy changes, click Save.
The organization may decide not to track such events due to user privacy concerns. In that case, administrator can block these categories, but not track the events per category.
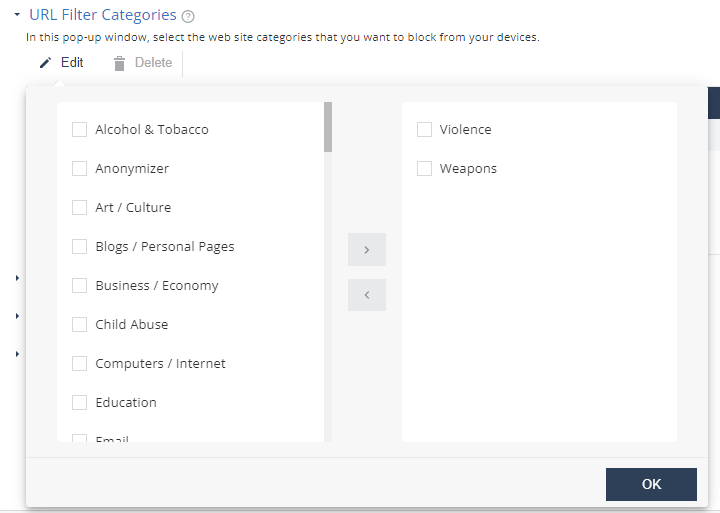
Networks - Blocked Locations
You can block the device access to specific network locations, regardless of the subject category or risk level of the device. In addition, you can also set the severity level for the events generated when Mobile Security blocks access to these network locations and configure whether to show the event notification in the Harmony Mobile Protect app.
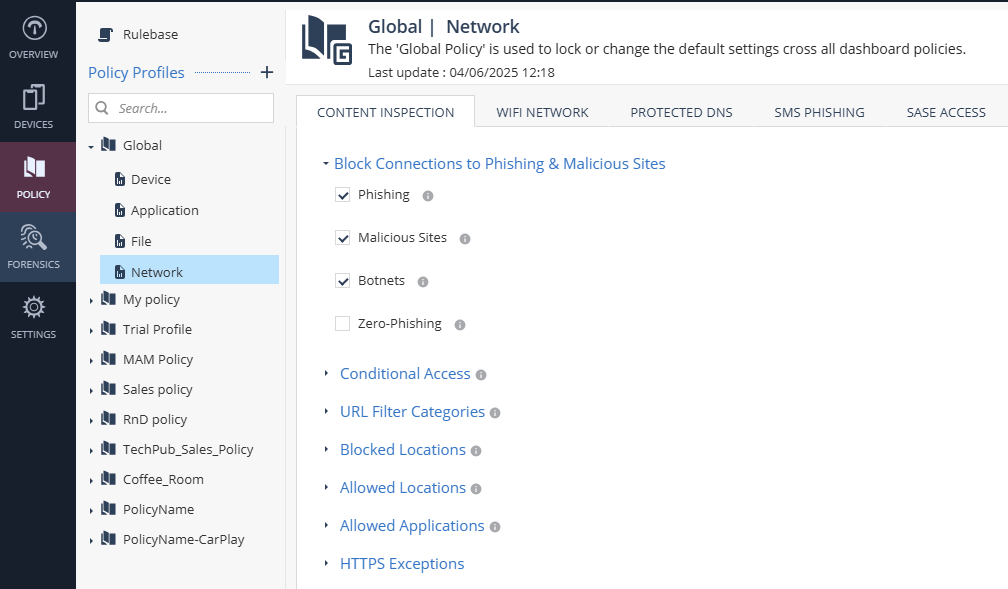
To add a network location to the Blocked Locations list:
- Go to Policy and select a policy profile.
-
Click Network > Content Inspection > Blocked Locations.
-
Click Add.
A pop-up window appears.
-
In the Location field, enter the network location in one of these formats (IPv4, IPv6, Domain Name (DN), DN/URL, + Wildcards).
-
(Optional) Add your comments.
-
Click Add.
-
To import a list of network locations, click Import and upload the .CSV file with the locations list.
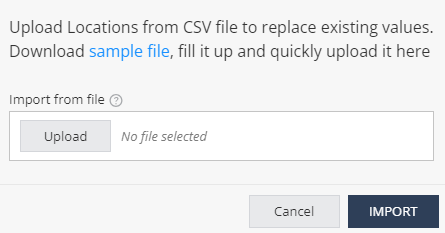

Note - The uploaded list replaces the existing list. This allows you to import a list of locations from other systems, such as Firewall and Gateway, into Mobile Security On-device Network Protection policy settings.
-
From the Severity Level for Blocked URL events drop-down list, select the severity level.
-
From the Show Events in Clients drop-down list, select one of these:
-
Off (Default) - The end-user does not receive the event notification in the Harmony Mobile Protect app, when Mobile Security blocks access to the network location.
-
On - The end-user receives an event notification in the Harmony Mobile Protect app, when Mobile Security blocks access to the network location.
-
-
To remove a network location from the list, select it and click Delete.
-
To save the policy changes, click Save.
|
|
Notes:
|
Networks - Allowed Locations
You can allow access to specific network locations or domains from the user device, regardless of the subject category or risk level of the device. For example, a self-service help desk site.
To add a network location to the allowed list:
- Go to Policy and select a policy profile.
-
Click Network > Content Inspection > Allowed Locations.
-
Click Add.
A pop-up window appears.

-
In the Location field, enter a network location in one of these formats (IPv4, IPv6, Domain Name, DN/URL, +wildcards).
-
(Optional) In the Comment field, add your comments.
-
Click Add.
-
To import a list of locations, click Import and upload a .CSV file with a list of locations and comments.
Note - The uploaded list replaces the existing list. This allows administrators to import a list of locations from other systems such as Firewall/Gateway into Mobile Security On-device Network Protection (ONP) policy settings.
-
To remove a network location from the list, select it and click Delete.
-
To save the policy changes, click Save.
|
|
Note - You can add up to 100 entries to the Allowed Locations list. |
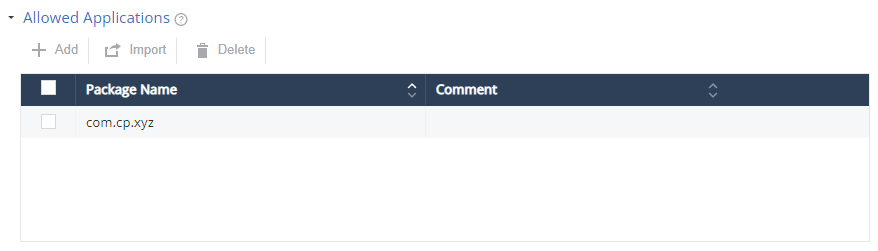
Allowed Applications
You can allow authorized Android applications to access the internet on the mobile device. You can configure the application list to ensure that a specific Android application can always access the internet from a user device, regardless of the device risk level.
|
|
Note - This setting impacts the traffic generated by the listed applications while the Policy > Application > Application Exceptions setting relates to the risk of the app. |
To add an application to allowed list:
- Go to Policy and select a policy profile.
-
Click Network > Content Inspection > Allowed Applications.
-
Click Add.
A pop-up window appears.
-
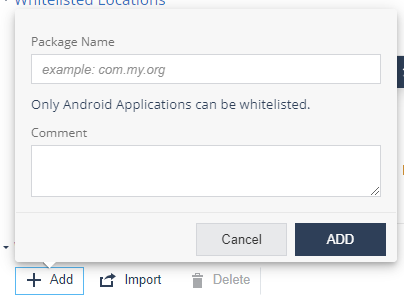
In the Package Name field, enter the Android application Package Name (For example, com.cp.xyz).
-
(Optional) Add your comments.
-
Click Add.
-
To import a list of applications, click Import and upload a .CSV file with a list of applications’ package names and comments.
Note - The uploaded list replaces the existing list. This allows administrators to import a list of applications from other systems such as Firewall/Gateway into Mobile Security On-device Network Protection (ONP) policy settings.
-
To remove an item from the list, select it and click Delete.
-
To save the policy changes, click Save.
To summarize, Mobile Security blocks:
-
Traffic from mobile apps flagged as malicious based on the BRE
Behavioral Risk Engine verdict. -
Traffic to malicious internet resources based on ThreatCloud reputation and risk score.
-
Traffic to destinations marked as blocked locations (in Mobile Security or in Infinity IOC Management solution).
-
Traffic which is not compliant with the corporate policy, such as URLs blocked in URL Filter Categories.
-
Traffic from mobile apps in blocked categories (Android only)
Traffic that is safe (safe domains or not posing a security risk) and compliant with the corporate policy is allowed.
|
|
Note - To manage long IoC lists and feeds, use the Infinity IOC Management solution. |
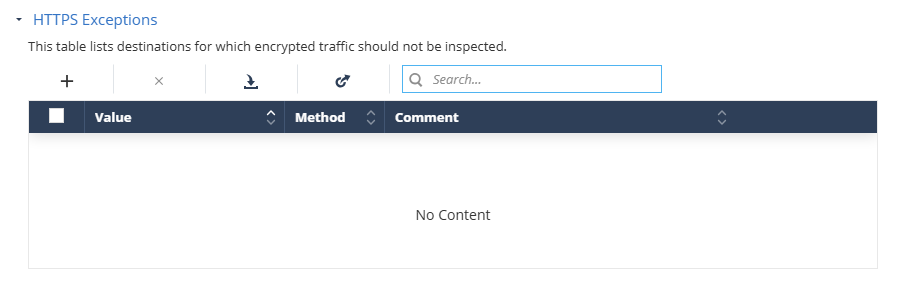
HTTPS Exceptions
You can create an exception list for network locations that you want to exclude from HTTPS inspection, for specific sites or web categories for end-users' privacy.
Prerequisite
Before you add network locations to HTTPS exceptions, make sure that SSL inspection is enabled. For more information, see HTTPS Settings.
To add a network location to the HTTPS exception list:
-
Go to Policy and select a policy profile.
-
Go to Network > Content Inspection and click HTTPS Exceptions.
-
Click the + icon.
A pop-up window appears.
-
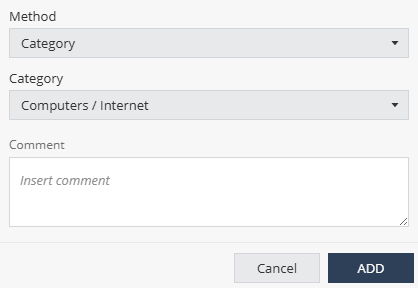
From the Method list:
-
To exclude by category, select Category and select the category from the Category list.
-
To exclude a subnet, select Subnet and enter the subnet value in the Subnet field.
-
To exclude a domain, select Domain and enter the domain name in the Domain field.
-
-
(Optional) Enter your comments.
-
Click Add.
-
To import a list of exceptions from a JSON file:
-
Click the
 icon.
icon. -
Click Upload and select the JSON file that contains the exception list.
-
Click Import.
The system appends the imported list to the existing list.
-
-
To export the HTTPS Exceptions list, click the
 icon and click Export.
The system exports the exception list as a JSON file and saves it on your computer. You can import this list to other policies.
-
To search for an exception, enter the value in the Search box.
-
To remove an item from the list, select it and click the
 icon.
icon. -
To save the policy changes, click Save.
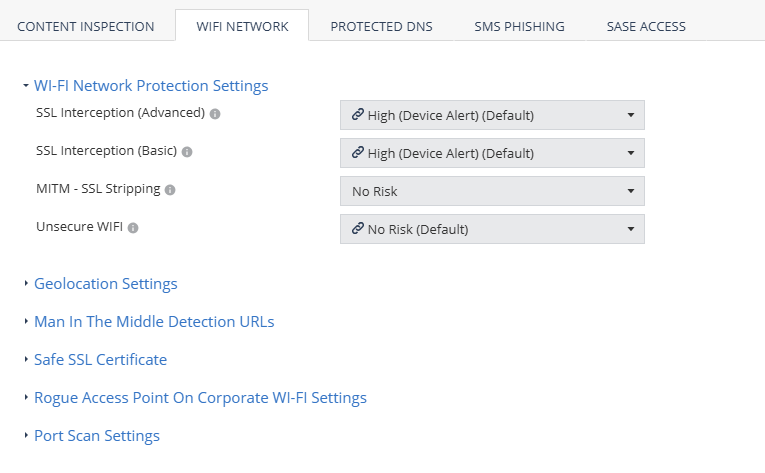
WiFi Network Protection Settings
To set the device protection for different MITM attacks:
- Go to Policy and select a policy profile.
-
Click Network > WiFi Network and select the device risk level (from High to No Risk):
Setting
Description
SSL Interception (Advanced)
Set the risk level when MITM attack
Man-in-the-Middle attack. A general term for when a perpetrator positions himself in a conversation between a user and an application (either to eavesdrop or to impersonate one of the parties), making it appear as if a normal exchange of information is underway. intercepts HTTP traffic by using a valid certificate that does not match the certificate of the server.SSL Interception (Basic)
Set the risk level when MITM attack intercepts HTTP traffic by using an invalid certificate that does not exist on the device trusted certificates, or is not trusted by a root CA.
MITM - SSL Stripping
Set the risk level when MITM attack intercepts all network traffic redirection from HTTP to HTTPS and strips the HTTP calls leaving the traffic as HTTP.
Unsecure WiFi
Set the risk level when the device connects to an unsecure WiFi network that is open or has no data encryption. For example, a public WiFi hotspot.
-
To save the policy changes, click Save.
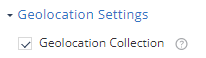
Geolocation Settings
This setting enables collection of the device GPS location when a network attack is detected.
This information is used to provide map detail on the Network tab.
To enable geo location capability:
- Go to Policy and select a policy profile.
-
Click Network > WiFi Network.
-
Select the Geolocation Collection checkbox.
This enables it from the Dashboard side. The user must allow the Harmony Mobile Protect app to use the location on their device to collect geo location information.
-
To save the policy changes, click Save.
Man In The Middle Detection URLs
You can monitor suspicious URLs for Man-in-the-Middle (MITM) attacks. If Mobile Security detects any change in the SSL certificate used by the URL, it is categorized as a MITM attack and assigns a risk level for the device.
The risk level is the value set in WiFi Network Protection Settings > MITM - SSL Stripping.
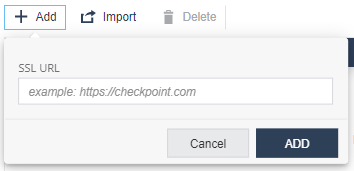
To add the URLs for the MITM detection:
- Go to Policy and select a policy profile.
-
Click Network > WiFi Network > Man In The Middle Detection URLs.
-
Click Add.
A pop-up window appears.
-
In the SSL URL field, enter the URL.
-
Click Add.
-
To import a list of URLs, click Import and upload a .CSV file with URL names list and comments.
-
To remove a URL from the list, select it and click Delete.
-
To save the policy changes, click Save.
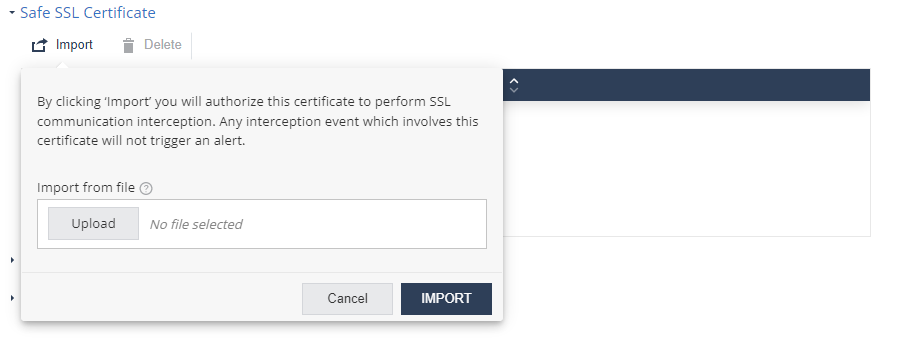
Safe SSL Certificate
You can import trusted SSL certificates and authorize them to intercept SSL traffic so that any change in the certificate is not interpreted as a MITM attack.
To import a SSL certificate:
- Go to Policy and select a policy profile.
-
Click Network > WiFi Network > Safe SSL Certificate.
-
Click Import and upload the certificate in
.pemformat.Click Import.
-
To delete a certificate, select it and click Delete.
-
To save the policy changes, click Save.
Rogue Access Point On Corporate Wi-Fi Settings
Mobile Security detects and sends alerts about rogue Wi-Fi access points. These access points attempt to manipulate corporate end-users on their mobile devices and connect them to a fake access point disguised as a workplace SSID![]() Service Set Identifier. The technical term for a wireless network name that you see when you connect your device to your wireless home network.. The hacker can also perform a man-in-the-middle attack, reveal corporate credentials or steal sensitive data. You can set the risk level and policy related to this attack technique in this section.
Service Set Identifier. The technical term for a wireless network name that you see when you connect your device to your wireless home network.. The hacker can also perform a man-in-the-middle attack, reveal corporate credentials or steal sensitive data. You can set the risk level and policy related to this attack technique in this section.
To detect rogue access point, you must add the corporate used SSIDs and the external IPs. Any access point that uses the corporate SSID but does not go to the internet through one of the corporate’s external (public) IPs is not a corporate-owned access point and is therefore a suspected rogue access point.
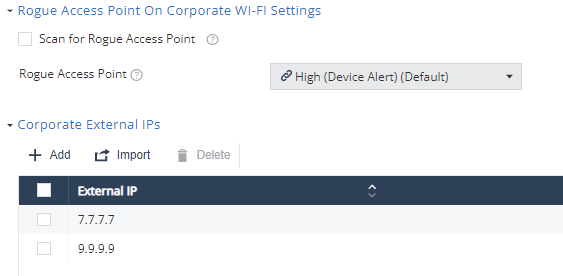
To detect rogue access point using your corporate Wi-Fi identity:
- Go to Policy and select a policy profile.
-
Click Network > WiFi Network > Rogue Access Point On Corporate Wi-Fi Settings.
-
Select the Scan for Rogue Access Point checkbox.
-
From the Rogue Access Point drop-down list, select the device risk level (default is High (Device Alert)).
-
Configure the Corporate External IPs.
-
Configure the Corporate SSIDs.
-
To save the policy changes, click Save.
When Mobile Security detects a rogue corporate WiFi on a mobile device, the device risk level changes to the one set in this policy. If the risk level is High and Conditional Access is configured with locations to block, then the access to those corporate resources is blocked immediately.
You can monitor the events and device risk level to manage this threat.
Port Scan Settings
Mobile Security detects scan attempts for open ports on a mobile device. Set the risk level and the policy associated with this attack technique in this section.
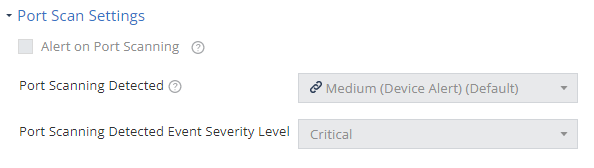
To detect port scan on your corporate mobile devices:
- Go to Policy and select a policy profile.
-
Click Network > WiFi Network > Port Scan Settings.
-
Select the Alert on Port Scanning checkbox.
-
From the Port Scanning Detected drop-down list, select the device risk level (default is Medium (Device Alert)).
-
From the Port Scanning Detected Event Severity Level drop-down list, select the event severity level (default is Critical).
-
To save the policy changes, click Save.
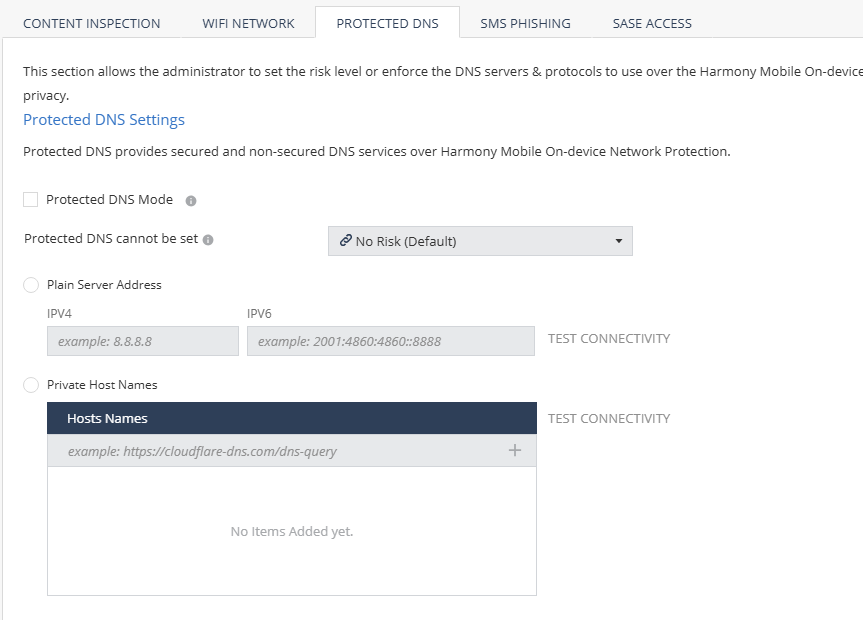
Protected DNS
Protected DNS![]() Domain Name System. A hierarchical distributed naming system for computers, services, or resources connected to the internet or a private network. Used to translate names into IP addresses. provides secured DNS services over Mobile Security On-device Network Protection.
Domain Name System. A hierarchical distributed naming system for computers, services, or resources connected to the internet or a private network. Used to translate names into IP addresses. provides secured DNS services over Mobile Security On-device Network Protection.
A protected DNS service:
-
Enhances user privacy and security.
-
Ensures that users use their corporate DNS servers instead of the Internet Service Provider (ISP) servers, thereby preventing DNS-spoofing attacks.
-
Enforces safe DNS protocols such as DNS over HTTPS (DoH) instead of the plain DNS requests (UDP/53) for end-user privacy.
To configure protected DNS policy settings:
- Go to Policy and select a policy profile.
-
Go to Network > Protected DNS and set these parameters:
Item
Description
Protected DNS Mode
Indicates whether to enable the protected DNS feature. When it is enabled, Mobile Security on-device Protected DNS becomes the default DNS service for the mobile device.
Protected DNS cannot be set
Set the risk level if the protected DNS feature cannot be set on the device due to one of these reasons:
-
Device is already configured with Private DNS (Android).
-
DNS server is inactive.
-
DNS server does not support secure DNS (DoH/DoT).
Plain Server Address
Add the plain DNS service. Set the IPv4 and IPv6 server addresses for the plain DNS service.
Private Host Names
Add the HTTPS host name to add private (third-party) protected DNS service.
-
-
To save the policy changes, click Save.
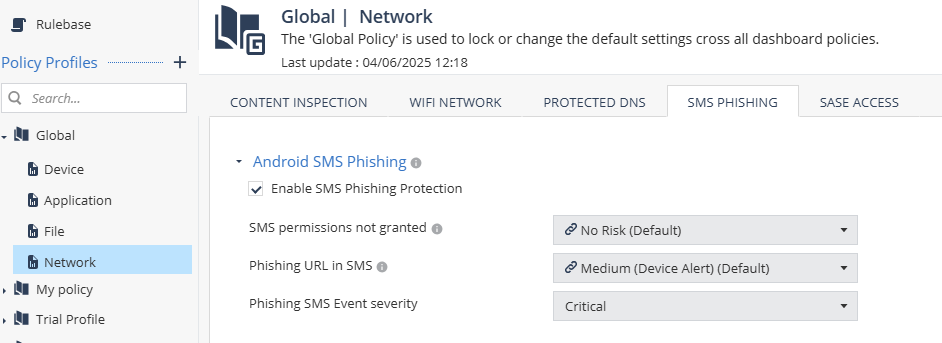
SMS Phishing
Android SMS Phishing
The Android SMS Phishing setting allows you to enable SMS phishing protection on Android devices. Mobile Security blocks only the URLs categorized as phishing by ThreatCloud.
|
|
Important - For SMS phishing protection to work, the end-user must grant Mobile Security the permission to read SMS messages on the device. To enable the SMS permission on the device, see Preventing SMS Phishing in Harmony Mobile Protect app for Android User Guide. |

To enable SMS phishing protection:
-
Go to Policy and select a policy profile.
-
Go to Network > SMS Phishing.
-
Select the Enable SMS Phishing Protection checkbox.
-
From the SMS permissions not granted list, select the risk level if the user does not grant Mobile Security the SMS permission on the device.
-
From the Phishing URL in SMS list, select the risk level if Mobile Security detects a SMS with phishing URL.
Mobile Security notifies the user to manually delete the message from the device. The device is set to No Risk after the user deletes the message.
-
Click Save.
|
|
Note - For iOS devices, the SMS phishing feature is enabled on the device. It blocks the URLs categorized as malicious by ThreatCloud. To enable this feature on the device, see Preventing SMS Phishing in Harmony Mobile Protect app for iOS User Guide. |
Blocking Malicious URLs in SMS - ONP v/s SMS Phishing Protection
The table below compares how the SMS Phishing Protection and ONP features block malicious URLs in SMS on iOS and Android platforms.
|
Feature |
iOS |
Android |
|---|---|---|
|
SMS Phishing Protection
|
|
|
|
No user action is required to detect malicious links with SMS Phishing Protection (users do not need to open the SMS and tap the link). |
||
|
ONP |
ONP protects users from malicious URLs from different sources (SMS, Email, WhatsApp). However, to detect the malicious link with ONP, the user need to open the SMS/message source and tap the link. |
|
To ensure complete protection from malicious URLs in SMS, Check Point recommends to enable both ONP and SMS Phishing Protection.