Policy
In the Policy tab, you can configure Granular Policies.
With Granular Policies, you can configure different polices for different groups of devices, for example, enable more security controls for your VIPs.
|
|
Note - To verify whether the latest policy is enforced on the mobile device, check the time stamp of the last policy update on the Harmony Mobile Protect App:
|
See Adding a Device Group to create the groups listed in the rulebase table. You can also apply policies to the devices individually, but using groups allows better scale.

|
|
Note - To enforce the policy features on the end-user device, the end-user or the UEM |
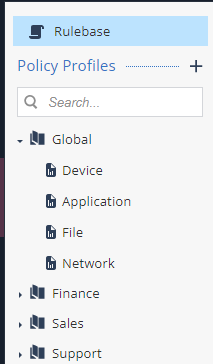
Policy Profiles
Every policy profile that you create includes a pre-configured set of items to which the profiles apply:
-
Device. See Device Policies.
-
Application. See Application Policies.
-
File. See File Policies.
-
Network Policies. See Network Policies.
Global Policy profile is the default policy for all devices.
Creating a New Policy Profile
-
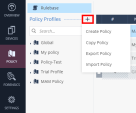
Go to Policy and click the + icon next to Policy Profiles.
-
Click Create Policy.
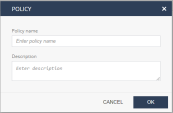
The Policy window appears.
-
Enter a unique name and a description for the new policy.
-
Click OK.
The new policy is listed under Policy Profiles.
Copying an Existing Policy
-
Go to Policy and click the + icon next to Policy Profiles.
-
Click Copy Policy. Optionally, you can hover over the policy name and click the
 icon.
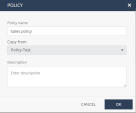
icon.The Policy window appears.
-
Enter a name for the new policy.
-
From the Copy from list, select the policy that you want to copy.
-
Enter a description.
-
Click OK.
You can edit the policy in the profile editing view, or edit it at any time on the Policy Profiles list.
To activate the policy, see Rulebase.
Exporting and Importing a Policy
You can export a policy from one tenant and import it to another tenant, regardless of their data residency regions.
Use Cases
-
You are a Managed Security Service Provider (MSSP) with multiple customers/tenants and want to use the same policy for all of them. You can configure the policy in one tenant, export it, customize (if required) and then import it to other tenants.
-
Your organization has tenants in different data residency regions and wants to use the same policy for all of them.
Exporting a Policy
-
Go to Policy and click the + icon next to Policy Profiles.
-
Click Export Policy.
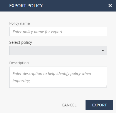
The Export Policy window appears.
-
In the Policy name field, enter a name to save the exported policy.

Note - This is the name of the policy when it is imported to another tenant.
-
From the Select policy list, select the policy that you want to export.
-
In the Description field, enter a description to identify the policy.
-
Click Export.
The system exports the policy and saves it as a JSON file on your computer.
Importing a Policy
-
Go to Policy and click the + icon next to Policy Profiles.
-
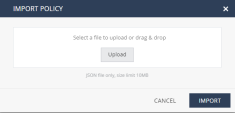
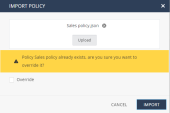
Click Import Policy.
The Import Policy window appears.
-
Click Upload and select the policy file. Optionally, you can drag and drop the file from its location.

Notes:
-
Click Import.
The system imports the policy to your tenant and lists it in the Policy Profiles section.
Rulebase
When you first navigate to the Policy tab, you see a rulebase list with the default Global policy profile already listed.
When you add new policy profiles, they are added to the rulebase to apply them on the appropriate device groups.
The rules are processed in order from top to bottom (aka first-match). Once a match for the device is made, that policy is applied to the device. For example, if you create two policies and the device would match both policies, the top-most matched policy will be applied to this device, and the rest of the rules will be ignored for this device.
|
|
Best Practice - place the most specific policies higher in the list with the Global policy being at the bottom of the list. To move a rule |
To activate a policy and apply it to a group of devices:
-
Click
 button.
A new line is added to the top of the rulebase list.

-
Enter a Rule Name, select the devices or groups from the drop-down list, select the policy profile from the drop-down list, and enter a comment (if needed).
For more information see Policy Profiles.
-
Click the check-mark at the end of the rule to save that rule.
-
Click Save.
-
To move a rule, click the rule # up or down, drag and drop as appropriate.
-
Click Save, or click Discard to undo the changes.
-
To see all the changes before saving them click the
 button:
Policy Header

The policy header contains:
-
Policy Name
-
Policy Description
-
Network Protection: Allows to configure On device Network Protection configurations
-
Changes: Display unsaved changes
-
Save: Saves all the new configurations the admin made
Network Protection
You can define the On-device Network Protection (ONP) policy settings to manage traffic routing policies and decide whether to route traffic through the On-device Protection or through a configured VPN.
Network protection settings are configured on policy profile level. One policy profile may have ONP enabled and another one may be configured without ONP.
|
|
Note - ONP cannot work when a proxy server is configured on the mobile device. |
General Settings
To set general settings for network protection:
-
Go to Policy and expand a policy profile.
-
Click any one of these:
-
Device
-
Application
-
File
-
Network
-
-
Click Network Protection > General Settings and set these parameters:
Item
Description
Value
Network Protection
Enable or disable On-device Network Protection (ONP) through VPN.
-
OFF - Disables ONP.
-
Always ON - Enables ONP by default. To configure this behavior, go to Configure > Advanced Configuration.
-
Turn ON when a device is at High risk - Enables ONP automatically when the device's risk level changes to High. It is turned off automatically when the device's risk level is lowered to Medium or Low.
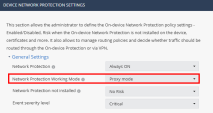
Network Protection Working Mode
Set the ONP working mode.
This setting is active only if the Network Protection is set to Always ON or Turn ON when a device is at High risk.
-
Full inspection (Default) - Enables ONP for the entire device network traffic.
-
Browser only - Enables ONP for specific browsers only.
To select the browsers, go to Browser Only Settings.
-
Detect mode - Evaluates ONP before you enable it on the user device. Monitors the device traffic and does not block malicious traffic. If malicious traffic is detected, it is logged in Forensics > Events & Alerts.
Detect Mode is not supported for Zero-day Phishing Detection and File Protection.
-
Proxy mode - ONP working mode when SASE access is enabled. The mode switches automatically when you enable SASE Access.
 Best Practice - We recommend to use Detect mode for a certain period to only monitor traffic and identify malicious content. After this period, you must use the Full inspection or Browser only mode to block malicious traffic automatically.
Network Protection not installed
Set the device risk status when ONP is not installed.
-
Medium (Device Alert) (Default)
-
High (Device Alert)
-
Medium (Device Alert)
-
Medium (No Device Alert)
-
Medium (Dismissive Device Alert)
-
Low
-
No Risk
Event severity level
Set the risk level for ONP generated events.
-
Information (Default)
-
Critical
-
Warning
-
Information
Show device notifications
Indicates whether to show device notification if a network resource is blocked.
N/A
Use next generation ONP
Enables the next generation ONP for iOS. For more information on the new ONP, see sk183634.
When you enable this option, the next generation ONP replaces the legacy ONP.

Note - Next generation ONP is required to enable SASE Access. Therefore, this option also appears on the SASE Access page. If SASE Access is already enabled, this checkbox is selected automatically.
-
-
To save the policy changes, click Save.
The table below lists the features available for the configured Network Protection Working Mode:
|
Feature
|
Network Protection Working Mode |
|
|---|---|---|
|
Full inspection |
Browser only |
|
|
Yes |
No |
|
|
Phishing |
Yes |
Yes |
|
Zero phishing |
Yes |
Yes |
|
File download prevention |
Yes |
Yes (except Safari extension) |
|
MiTM detection |
Yes |
Yes |
|
Safe DNS |
Yes |
No |
|
Block app traffic (on Android) |
Yes |
No |
|
Content filtering (aka URLF) |
Yes |
Yes |
|
Port scan detection |
Yes |
No |
|
Zero-Touch support |
Yes |
Yes (except Safari extension) |
|
Network Protection snooze by user |
Yes |
No |
|
Conditional access |
Yes |
Applicable only to web traffic. |
Suspend Policy
You can allow end-users to temporarily suspend ONP from the Harmony Mobile Protect App on their device for different periods of time. The options are 5 minutes, 30 minutes or 2 hours.
To allow users to suspend ONP:
-
Go to Policy and select a policy profile.
-
Click any one of these:
-
Device
-
Application
-
File
-
Network
-
-
Click Network Protection > Suspend Policy and set these parameters:
Item
Description
Value
Suspend severity level
Set the device risk level if the user suspends ONP on the device.

Note - You cannot set the risk level to High. When a device moves to High risk, Harmony Mobile automatically restores ONP to enforce conditional access policy. This creates a conflict as ONP is restored automatically after the end-user suspends it.
-
No Risk (Default)
-
Medium (Device Alert)
-
Medium (Dismissive Device Alert)
-
Medium (No Device Alert)
-
Low
-
No Risk
Allow user to suspend On-device Network Protection
Select the checkbox to allow a user to suspend ONP on the device and set the duration for which the user can suspend ONP.
When the user suspends ONP, the system reports an event in the Events & Alerts page.
-
5 minutes
-
24 hours
-
Unlimited
Automatically suspend when
Set when to automatically suspend ONP.
Select one of these:
-
Never - Enables ONP even if other VPNs are detected.
-
Any VPN is connected - Automatically suspends ONP when VPN is detected. ONP resumes after 2 hours, or earlier if the VPN is disconnected within that time.
-
Corporate resource is connected via VPN - Suspends ONP only if VPN that allows access to corporate URLs (from the corporate resources table) is detected.
ONP resumes when there is no traffic towards the corporate URL.
-
-
To save the policy changes, click Save.
HTTPS Settings
|
|
Note - SSL
|
To configure HTTPS settings:
-
Go to Policy and select a policy profile.
-
Click any one of these:
-
Device
-
Application
-
File
-
Network
-
-
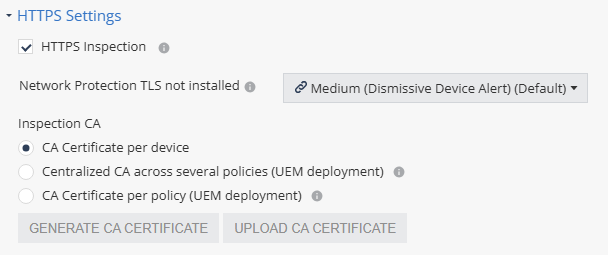
Click Network Protection > HTTPS Settings.
-
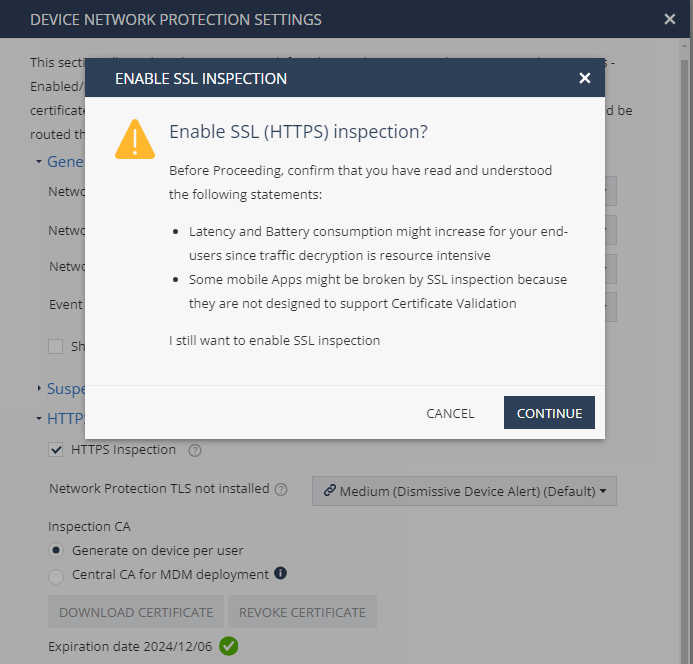
To enable SSL inspection, select the HTTPS Inspection checkbox.
The Enable SSL Inspection window appears.

Notes -
-
For Harmony Mobile/ONP to decrypt the HTTPS traffic, the mobile apps and browsers must support users’ CA certificate.
-
The browsers that support SSL inspection on Android are:
Browser Name
Package Name
Brave Browser
com.brave.browser
Bromite Browser
org.bromite.bromite
Chrome Beta
com.chrome.beta
Chrome Canary
com.chrome.canary
Chrome Dev
com.chrome.dev
Chromer
arun.com.chromer
Ecosia Browser
com.ecosia.android
Google Chrome
com.android.chrome
Huawei Browser
com.huawei.browser
Kiwi Browser
com.kiwibrowser.browser
Microsoft Edge
com.microsoft.emmx
Naked Browser
com.fevdev.nakedbrowser
Naked Browser LTS (Light)
com.fevdev.nakedbrowserlts
Opera Browser
com.opera.browser
Samsung Internet Browser
com.sec.android.app.sbrowser
Samsung Internet Browser Beta
com.sec.android.app.sbrowser.beta
Vivaldi Browser
com.vivaldi.browser
Yandex Browser
com.yandex.browser
-
-
Click Continue.
-
From the Network Protection TLS not installed list, select the risk level if CA certificate is not installed or not trusted on the device.
-
In the Inspection CA section, select the CA certificate that ONP will use to inspect HTTPS traffic on the end-user device.
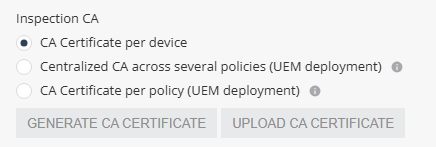
Select one of these:
-
CA Certificate per device - Allows you to generate a unique certificate for each device. The user must manually install the certificate on the device when installing the Harmony Mobile Protect App.
-
Centralized CA across several policies - Allows you to use the centralized CA certificate across several policies. To generate the centralized CA certificate, go to Settings > Central HTTPS Inspection Root CA.

Note - If you initially chose to use a centralized CA certificate but later changed to a different CA certificate option:
-
The current policy will no longer use the centralized certificate.
-
The centralized CA certificate remains active and continues to be associated with all other policies in your account.
-
-
CA Certificate per policy - If your organization uses a UEM, you can generate a new CA certificate for each policy, download and deploy it on the end-user device through UEM.
-
To generate a CA certificate issued by Check Point, click Generate CA Certificate. The new certificate is valid for one year from the current date, as shown in Expiration date.
-
To use a self-signed or a third-party CA certificate, click Upload CA Certificate.
For the Transport Layer Security (TLS
 Transport Layer Security. A security protocol designed to facilitate privacy and data security for communications over the Internet.) certificate to be valid:
-
The certificate must have a lifecycle of at least 30 days and not longer than 390 days.
-
The certificate must be valid for more than 30 days from the time it is uploaded to the Harmony Mobile Administrator Portal.
-

Note - Check Point recommends you renew the CA certificate at least two weeks before the expiration date. To renew the CA certificate, see sk181288.
-
-
-
To save the policy changes, click Save.
Advanced Network Protection Settings
You can configure a fallback DNS server for ONP when the device's DNS server is not available.
To configure a fallback DNS server for ONP:
-
Go to Policy and select a policy profile.
-
Click any one of these:
-
Device
-
Application
-
File
-
Network
-
-
Click Network Protection > Advanced Network Protection settings.

By default, the system uses a public DNS server IP address.
-
To use a private or a different public DNS server, modify the IP addresses in these fields:
-
Fallback ONP DNS IPv4 - Fallback DNS server IP address in IPv4
 Internet Protocol Version 4 IP address. A 32-bit number - 4 sets of numbers, each set can be from 0 - 255. format.
 -
Fallback ONP DNS IPv6 - Fallback DNS server IP address in IPv6
 Internet Protocol Version 6 IP address. 128-bit number - 8 sets of hexadecimal numbers, each set can be from 0 - ffff. format.
If the fallback DNS server address in IPv4 or IPv6 format is not available, the system uses the default public DNS server IP address.
-
- To save the policy changes, click Save.
Privacy Settings
-
Go to Policy and select a policy profile.
-
Click any one of these:
-
Device
-
Application
-
File
-
Network
-
-
Click Network Protection > Privacy Settings.
-
Select the Hide browsing details checkbox to hide device browsing details.
-
To save the policy changes, click Save.
Browser Only Settings
In this section, you can set the risk levels for iOS devices and enable or disable ONP for specific browsers. To enable these settings, you must set Network Protection Working Mode as Browser only. For more information, see General Settings.
For queries on operating your corporate VPN and Browser only VPN in tandem, contact Check Point support.
To set the risk level for iOS devices:
-
Go to Policy and select a policy profile.
-
Click any one of these:
-
Device
-
Application
-
File
-
Network
-
-
Go to Network Protection > Browser Only Settings and set these parameters:
Item
Description
Value
iOS browsers not protected
Set the risk level if the iOS browsers are not protected on the device.
-
No Risk (Default)
-
High (Device Alert)
-
Medium (Device Alert)
-
Medium (No Device Alert)
-
Medium (Dismissive Device Alert)
-
Low
-
No Risk
Safari Extension not installed
Set the risk level if the Safari browser extension is not installed on the device.
-
-
To save the policy changes, click Save.
Enabling ONP for browsers supported by Android devices
For Android devices, the supported browsers are listed in the Android Browser List table. You can enable or disable ONP for these browsers from the Harmony Mobile dashboard.
-
Go to Policy and select a policy profile.
-
Click any one of these:
-
Device
-
Application
-
File
-
Network
-
-
Go to Network Protection > Browser Only Settings.
By default, ONP is enabled for all the browsers.
-
To disable ONP for a browser, clear the checkbox. The system saves the changes automatically and applies them to the device immediately.
When you disable ONP for a browser installed on any of the active devices, a warning message appears.
|
|
Note - To request ONP for a browser that is not in the Android Browser List table, contact Check Point Support. |
Enabling ONP for browsers supported by iOS devices
For iOS devices, the supported browsers are listed in Policy > Network Protection > Browser Only Settings > iOS Browser List table.
Use the Per App VPN setting in the UEM to enable or disable ONP for a browser. After you enable ONP for a browser in the UEM, it takes up to two hours for the system to add it in the iOS Browser List table.
If the browser app configured for ONP in the UEM is not supported by Check Point, then it is not added in the iOS Browser List table. For assistance, contact Check Point Support.
For more information to configure the Per App VPN setting, see sk179387 or refer to your UEM documentation.
|
|
Note - To allow network protection for the traffic generated by Safari browser, the end-user need to enable Harmony Mobile Safari Extension in the mobile device. To enable the extension, see sk179966. |
Policy Configuration
You can set a risk level to the device for a security event.
The risk levels are:
-
Risk level (Default) - For example, No Risk (Default).
-
High (Device Alert)
-
Medium (Device Alert)
-
Medium (No Device Alert)
-
Medium (Dismissive Device Alert)
-
Low (No Device alert)
-
No Risk
|
|
Note -
|
Device Policies
Set the conditions and risk level for general, iOS and Android specific policies.
General Settings
To configure the general settings:
-
Go to Policy and select a policy profile.
-
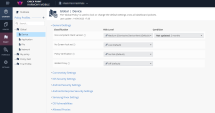
Click Device > General Settings and set the Risk Level for these classifications:
Classification
Description
Risk Level
Condition
Non-compliant Client version
Set a Risk Level for the device if a non-compliant client version specified by the Condition is installed.
-
No Risk (Default)
-
High (Device Alert)
-
Medium (Device Alert)
-
Medium (No Device Alert)
-
Medium (Dismissive Device Alert)
-
Low
-
No Risk
Specify the non-compliant client version condition.
No Screen lock set
Set a Risk Level if no screen lock is set on the device.
-
Low (Default)
-
High (Device Alert)
-
Medium (Device Alert)
-
Medium (No Device Alert)
-
Medium (Dismissive Device Alert)
-
Low
-
No Risk
N/A
Policy Verification
Set a Risk Level if the device fails the policy compliance test.
-
No Risk (Default)
-
High (Device Alert)
-
Medium (Device Alert)
-
Medium (No Device Alert)
-
Medium (Dismissive Device Alert)
-
Low
-
No Risk
N/A
Global Proxy
Set a Risk Level if the device is configured to work with a Global Proxy.
-
Off (Default)
-
High (Device Alert)
-
Medium (Device Alert)
-
Medium (No Device Alert)
-
Medium (Dismissive Device Alert)
-
Low
-
No Risk
N/A
-
-
To save the policy changes, click Save.
Connectivity Settings
If a user device does not communicate with the Harmony Mobile server for a specified number of days, you can change the device status to Inactive and set a risk level for the device.
|
|
Note - Harmony Mobile does not protect a device if its status is Inactive. |

To change the status of the device to inactive:
-
Go to Policy and select a policy profile.
-
Click Device > Connectivity Settings.
-
From the Change device status to 'Inactive' if device did not communicate with server for drop-down list, select the number of days after which the system automatically changes the device status to Inactive.
-
In the Connectivity status section, select a risk level for the device if the device does not communicate with the Harmony Mobile server for the specified number of days.
This must be less than the number of days you specify to change the device status to Inactive in step 3.
-
To save the policy changes, click Save.
iOS Security Settings
To configure the iOS security settings:
-
Go to Policy and select a policy profile.
-
Click Device > iOS Security Settings and set the Risk Level for these classifications:
Classification
Description
Risk Level
Jailbroken Device
Set a Risk Level if the device is identified as a jailbroken device.
-
No Risk (Default)
-
High (Device Alert)
-
Medium (Device Alert)
-
Medium (No Device Alert)
-
Medium (Dismissive Device Alert)
-
Low
-
No Risk
Notification Permission is set to OFF
Set a Risk Level if the user does not grant notification permission for the Harmony Mobile Protect App on the device.
 Note - Harmony Mobile triggers notifications in different scenarios. For example, when a new policy is set, or to announce detected risks for applications. We recommend that you allow notification permission for the Harmony Mobile application on the device.
-
Medium (Device Alert) (Default)
-
High (Device Alert)
-
Medium (Device Alert)
-
Medium (No Device Alert)
-
Medium (Dismissive Device Alert)
-
Low
-
No Risk
Enterprise Certificate Profile
Set a Risk Level if an enterprise certificate profile is installed on the device.
-
No Risk (Default)
-
High (Device Alert)
-
Medium (Device Alert)
-
Medium (No Device Alert)
-
Medium (Dismissive Device Alert)
-
Low
-
No Risk
Developer certificate profile
Set a Risk Level if a developer certificate profile is installed on the device.
-
No Risk (Default)
-
High (Device Alert)
-
Medium (Device Alert)
-
Medium (No Device Alert)
-
Medium (Dismissive Device Alert)
-
Low
-
No Risk
Location Permission is set to OFF
Set a Risk Level if the user does not grant location permission for the Harmony Mobile Protect App on the device.
 Note - If the location permission is turned on, Harmony Mobile application sends the device location if a Man-in-the-Middle attack occurs in the connected network. We recommend that you allow location permission for the Harmony Mobile application on the device.
-
Low (Default)
-
High (Device Alert)
-
Medium (Device Alert)
-
Medium (No Device Alert)
-
Medium (Dismissive Device Alert)
-
Low
-
No Risk
Local Network Permission
Set a Risk Level if the user does not grant local network permissions for Harmony MobileProtect App on the device. The system also sends an alert or notification to the user.
This permission is required when On-Device Network Protection is enabled to use the local DNS server.
-
Medium (Device Alert) (Default)
-
High (Device Alert)
-
Medium (Device Alert)
-
Medium (No Device Alert)
-
Medium (Dismissive Device Alert)
-
Low
-
No Risk
-
-
To save the policy changes, click Save.
Android Security Settings
To configure the Android security settings:
-
Go to Policy and select a policy profile.
-
Click Device > Android Security Settings and set the Risk Level for these classifications:
Classification
Description
Risk Level
Rooted Device Set a Risk level if the device is identified as a rooted device. -
No Risk (Default)
-
High (Device Alert)
-
Medium (Device Alert)
-
Medium (No Device Alert)
-
Medium (Dismissive Device Alert)
-
Low
-
No Risk
Verified boot is disabled
Set a Risk Level if the verified boot feature is disabled on the device.
-
Low (Default)
-
High (Device Alert)
-
Medium (Device Alert)
-
Medium (No Device Alert)
-
Medium (Dismissive Device Alert)
-
Low
-
No Risk
SELinux
 Security-Enhanced Linux Permissive mode
Set a Risk Level if SELinux policy is not enabled on the device.
-
Low (Default)
-
High (Device Alert)
-
Medium (Device Alert)
-
Medium (No Device Alert)
-
Medium (Dismissive Device Alert)
-
Low
-
No Risk
Device Encryption disabled
Set a Risk Level if device encryption is disabled.
-
Low (Default)
-
High (Device Alert)
-
Medium (Device Alert)
-
Medium (No Device Alert)
-
Medium (Dismissive Device Alert)
-
Low
-
No Risk
Unknown Sources Enabled
Set a Risk Level if the device allows app installations from sources other than the play store.
-
Medium (No Device Alert) (Default)
-
High (Device Alert)
-
Medium (Device Alert)
-
Medium (No Device Alert)
-
Medium (Dismissive Device Alert)
-
Low
-
No Risk
USB debugging enabled
Set a Risk Level if the device allows USB debugging.
-
Medium (No Device Alert) (Default)
-
High (Device Alert)
-
Medium (Device Alert)
-
Medium (No Device Alert)
-
Medium (Dismissive Device Alert)
-
Low
-
No Risk
Notification Permission is set to OFF
Set a Risk Level if notification permission is disabled for the Harmony Mobile application on the device.
-
Low (Default)
-
High (Device Alert)
-
Medium (Device Alert)
-
Medium (No Device Alert)
-
Medium (Dismissive Device Alert)
-
Low
-
No Risk
Location Permission is set to OFF
Set a Risk Level if device location permission is disabled for the Harmony Mobile application on the device.
-
Low (Default)
-
High (Device Alert)
-
Medium (Device Alert)
-
Medium (No Device Alert)
-
Medium (Dismissive Device Alert)
-
Low
-
No Risk
Qualcomm Hexagon Vulnerability *
Set a Risk Level based on Qualcomm Hexagon vulnerability.
-
High (Device Alert)
-
Medium (Device Alert)
-
Medium (No Device Alert)
-
Medium (Dismissive Device Alert)
-
Low
-
No Risk
VPN lock down
Set a Risk Level if the Block connections without VPN setting is disabled for the device.
-
Medium (Device Alert) (Default)
-
High (Device Alert)
-
Medium (Device Alert)
-
Medium (No Device Alert)
-
Medium (Dismissive Device Alert)
-
Low
-
No Risk
MediaTek Audio DSP Vulnerability *
Set a Risk Level for the CVE
 Common Vulnerabilities and Exposures. A list of publicly disclosed computer security flaws. When someone refers to a CVE, they mean a security flaw assigned with a CVE ID number.-2021-0673 vulnerability.
 The system diverts the CVE MediaTek debugging framework for audio drivers to escalate local process privileges.
-
No Risk (Default)
-
High (Device Alert)
-
Medium (Device Alert)
-
Medium (No Device Alert)
-
Medium (Dismissive Device Alert)
-
Low
-
No Risk
* To view the setting, contact Check Point Support.
-
-
To save the policy changes, click Save.
Android Enterprise Security Settings
Users may have both personal and work profile on an Android enterprise environment. The Harmony MobileProtect App manages and protects only the work profile on the user device.
To protect the device's personal profile, you must install and activate Harmony MobileProtect App manually. You can specify these settings to warn or enforce the user to install and activate Harmony MobileProtect App to manage and protect the personal profile.
To configure the Android enterprise security settings:
-
Go to Policy and select a policy profile.
-
Click Device > Android Enterprise Security Settings and set the Risk Level for these classifications:
Classification
Description
Risk Level
Personal Profile not Protected
Set a Risk Level when the Harmony MobileProtect App is not activated for the personal profile.
-
High (Device Alert) (Default)
-
High (Device Alert)
-
Medium (Device Alert)
-
Medium (No Device Alert)
-
Medium (Dismissive Device Alert)
-
Low
-
No Risk
Harmony Mobile not installed on personal profile
Set a Risk Level when the Harmony MobileProtect App is not installed for the personal profile.
-
Medium (Device Alert) (Default)
-
High (Device Alert)
-
Medium (Device Alert)
-
Medium (No Device Alert)
-
Medium (Dismissive Device Alert)
-
Low
-
No Risk
-
-
To save the policy changes, click Save.
Samsung Knox Settings
Harmony Mobile integrates with the Samsung Knox framework to allow advanced security capabilities on Samsung devices. The user must grant the Samsung Knox permissions to enable these capabilities.
To configure the Samsung Knox settings:
-
Go to Policy and select a policy profile.
-
Click Device > Samsung Knox Settings and set the Risk Level for these classifications:
Setting
Description
Knox permission not granted
Select the device risk level if the Samsung Knox permissions are not granted.
-
Medium (Device Alert) (Default)
-
High (Device Alert)
-
Medium (Device Alert)
-
Medium (No Device Alert)
-
Medium (Dismissive Device Alert)
-
Low
-
No Risk
Block application until scan ended
Select this checkbox so that the application does not run until the scan is completed and the application is confirmed as legitimate.
Block application at risk
Select this checkbox to prevent the application from running based on the risk level selected in the drop-down list. Recommended threshold is High.
-
- To save the policy changes, click Save.
OS Vulnerabilities
To configure the OS vulnerabilities settings:
-
Go to Policy and select a policy profile.
-
Click Device > OS Vulnerabilities and set the Risk Level for these classifications:
Classification
Description
Risk Level
Condition
iOS OS Version
Select a Risk Level if the iOS version is older than the one specified in the Condition.
-
No Risk (Default)
-
High (Device Alert)
-
Medium (Device Alert)
-
Medium (No Device Alert)
-
Medium (Dismissive Device Alert)
-
Low
-
No Risk
Specify the condition for the iOS version.
Android OS Version
Select a Risk Level if the Android OS version is older than the one specified in the Condition.
-
High (Device Alert)
-
Medium (Device Alert)
-
Medium (No Device Alert)
-
Medium (Dismissive Device Alert)
-
Low
-
No Risk
Specify the condition for the Android OS version.
New Security Patch Available
Select a Risk Level if a new security patch update is available for the Android device but it is not installed for the duration specified in the Condition, after its release.

Note - The availability of the patches depends on each Original Equipment Manufacturer (OEM). See https://source.android.com/docs/security/bulletin
-
No Risk (Default)
-
High (Device Alert)
-
Medium (Device Alert)
-
Medium (No Device Alert)
-
Medium (Dismissive Device Alert)
-
Low
-
No Risk
Specify the duration. Default is one week.
Security Patch Not Updated
Select a Risk Level if the manufacturer has discontinued security patch updates or no security patch information available for the Android device since the duration specified in the Condition.
-
No Risk (Default)
-
High (Device Alert)
-
Medium (Device Alert)
-
Medium (No Device Alert)
-
Medium (Dismissive Device Alert)
-
Low
-
No Risk
Specify the duration.
CVEs detected on device OS
Set a Risk Level for the highest Common Vulnerability Scoring System (CVSS
 Common Vulnerability Scoring System ) V3 score of the CVEs detected on the device OS version, as specified in the Condition.
 Note - CVSS is a severity score of the vulnerability from 0.1 (lowest) to 10.0 (highest). Check the CVEs scores at: https://nvd.nist.gov/Vulnerability-Metrics/.
For full visibility of the CVEs detected across your mobile device fleet, go to Forensics > OS CVE Assessment.
-
High
-
Medium
-
Low
-
No Risk
Specify the condition. For example, if the CVSS V3 score is above a certain range.
-
-
To save the policy changes, click Save.
To add CVEs that trigger a specific risk level on the user device:
-
In the OS Vulnerabilities section, click Add.
-
Enter the CVE and the Risk Level.
-
To save the policy changes, click Save.
Allowed Proxies
This table displays the allowed list of proxy server IP addresses that you can configure on the user’s iOS device.
To add a new proxy to the allowed proxy list:
-
Go to Policy and select a policy profile.
-
Click Device > Allowed Proxies.
-
Click Add.
The Proxy IP window appears. -
Enter the Proxy IP and click Add.
-
To import a list of proxy IP address, click Import and upload the .CSV file with a list of addresses and comments.
-
To remove a proxy IP address from the list, select it and click Delete.
-
To save the policy changes, click Save.
Application Policies
Malicious Applications
Applications that have both risky capabilities and have malicious intents are categorized as malicious applications by the Harmony Mobile Behavioral Risk Engine (BRE![]() Behavioral Risk Engine). Their risk level is always set to High and you cannot configure it.
Behavioral Risk Engine). Their risk level is always set to High and you cannot configure it.
Risky Applications
Applications that have bad reputation or that may pose a security risk to the organization are considered to be risky applications.
To set the risk level for these applications:
-
Go to Policy and select a policy profile.
-
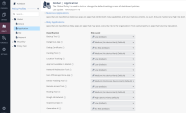
Click Application > Risky Applications and set the Risk Level for these classifications:
Classification
Description
Risk Level
Backup Tool
Set the Risk Level if an application backs up sensitive information from the device.
-
Low (Default)
-
High (Device Alert)
-
Medium (Device Alert)
-
Medium (No Device Alert)
-
Medium (Dismissive Device Alert)
-
Low
-
No Risk
Dangerous App
Set the Risk Level if a legitimate application can compromise the device, change configuration, or provide unauthorized access to corporate resources.
-
High (Device Alert) (Default)
-
High (Device Alert)
-
Medium (Device Alert)
-
Medium (No Device Alert)
-
Medium (Dismissive Device Alert)
-
Low
-
No Risk
Debug Certificate
Set the Risk Level if an application is signed by a debug certificate.
-
No Risk (Default)
-
High (Device Alert)
-
Medium (Device Alert)
-
Medium (No Device Alert)
-
Medium (Dismissive Device Alert)
-
Low
-
No Risk
Hacking Tool
Set the Risk Level if an application compromises local network data, device data or application data (on either device or server).
-
Medium (No Device Alert) (Default)
-
High (Device Alert)
-
Medium (Device Alert)
-
Medium (No Device Alert)
-
Medium (Dismissive Device Alert)
-
Low
-
No Risk
Location Tracking
Set the Risk Level if an application allows remote access to the device location without the user's consent.
-
Low (Default)
-
High (Device Alert)
-
Medium (Device Alert)
-
Medium (No Device Alert)
-
Medium (Dismissive Device Alert)
-
Low
-
No Risk
App Not Available in Market
Set the Risk Level if an application previously available in the app store is removed.
-
Low (Default)
-
High (Device Alert)
-
Medium (Device Alert)
-
Medium (No Device Alert)
-
Medium (Dismissive Device Alert)
-
Low
-
No Risk
Network Redirection Tool
Set the Risk Level if an application redirects network communication without the user's consent.
-
Low (Default)
-
High (Device Alert)
-
Medium (Device Alert)
-
Medium (No Device Alert)
-
Medium (Dismissive Device Alert)
-
Low
-
No Risk
Non Official App Store App
Set the Risk Level if an application is not verified by an official app store.
-
Medium (No Device Alert) (Default)
-
High (Device Alert)
-
Medium (Device Alert)
-
Medium (No Device Alert)
-
Medium (Dismissive Device Alert)
-
Low
-
No Risk
Device Tracking Tool
Set the Risk Level if an application allows remote access to the device location without the user's consent.
-
Medium (Dismissive Device Alert) (Default)
-
High (Device Alert)
-
Medium (Device Alert)
-
Medium (No Device Alert)
-
Medium (Dismissive Device Alert)
-
Low
-
No Risk
Remote Access Tool
Set the Risk Level if an application allows remote control of the device without the user's consent.
-
Low (Default)
-
High (Device Alert)
-
Medium (Device Alert)
-
Medium (No Device Alert)
-
Medium (Dismissive Device Alert)
-
Low
-
No Risk
Rooting Tool
Set the Risk Level if an application is identified as a rooting or jailbreak tool.
-
Low (Default)
-
High (Device Alert)
-
Medium (Device Alert)
-
Medium (No Device Alert)
-
Medium (Dismissive Device Alert)
-
Low
-
No Risk
Rough Ad-Network
Set the Risk Level if an application contains an ad-network and can leak sensitive data from the device and violates user privacy.
-
High (Device Alert) (Default)
-
High (Device Alert)
-
Medium (Device Alert)
-
Medium (No Device Alert)
-
Medium (Dismissive Device Alert)
-
Low
-
No Risk
Suspicious App
Set the Risk Level if an application has suspicious capabilities.
-
Medium (No Device Alert) (Default)
-
High (Device Alert)
-
Medium (Device Alert)
-
Medium (No Device Alert)
-
Medium (Dismissive Device Alert)
-
Low
-
No Risk
Generative-AI
Set the Risk Level if an application uses Artificial Intelligence (AI) services.
-
No Risk (Default)
-
Medium (Device Alert)
-
Medium (No Device Alert)
-
Medium (Dismissive Device Alert)
-
Low
-
No Risk
-
-
To save the policy changes, click Save.
Block Application Traffic
You can block the traffic generated by or intended to a risky application based on the specified risk level. For example, if you specify the risk level as Medium, then the system blocks the traffic for all applications whose risk level is Medium or higher.

To block the application traffic, you must:
-
Set On-device Network Protection to Always ON or Turn ON when device is at High risk.
-
Set Network Protection Working Mode to Full Inspection.
For more information, see Network Protection.
You can determine the risk level of an application from one of these:
-
The Severity column in the Application Risk table:
This table lists the risk level for each severity level. For more information, see Policy.
Severity Level
Risk Level
High
High
Medium
Medium
Low
Low
None
No risk
-
Applications allowed or blocked under Application Exceptions.
To block the application traffic:
-
Go to Policy and select a policy profile.
-
Click Application > Block Application Traffic.
-
Select the Block Application traffic when application is in the following risk level checkbox.
-
From the drop-down list, select the risk level.
 Notes :
-
This option is supported only for Android devices where ONP is set to Full Inspection.
-
Only the application's traffic is blocked, not the application.
Application Categories
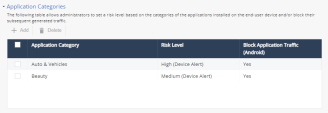
In this section, you can set risk level for the different application categories.
To add a new application category:
-
Go to Policy and select a policy profile.
-
Click Application > Application Categories.
-
In the table, click Add.
A window appears. -
Set these parameters:
Item
Description
Application Category
Select the application category (Category obtained from Google Play (Android) and Play Store (iOS)).
Risk Level
Set the Risk Level:
-
No Risk (Default)
-
High (Device Alert)
-
Medium (Device Alert)
-
Medium (No Device Alert)
-
Medium (Dismissive Device Alert)
-
Low
-
No Risk
Block Application Traffic on Android
Select this checkbox to block application traffic on Android devices.
The feature works only for Android devices that enable the On Device Network Protection feature.
-
-
To delete a category, select it and click Delete.
-
To save the policy changes, click Save.
Application Exceptions
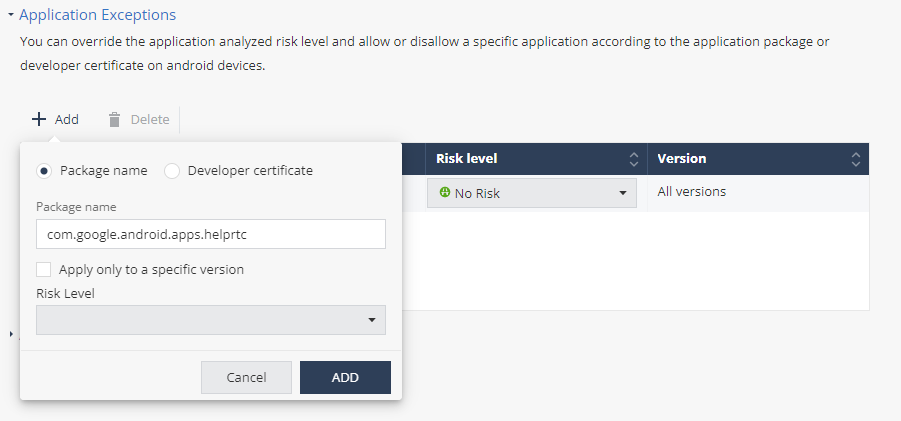
You can override the application's analyzed risk level according to the application package or developer certificate on Android devices. By default, it inherits the settings from the Global policy.
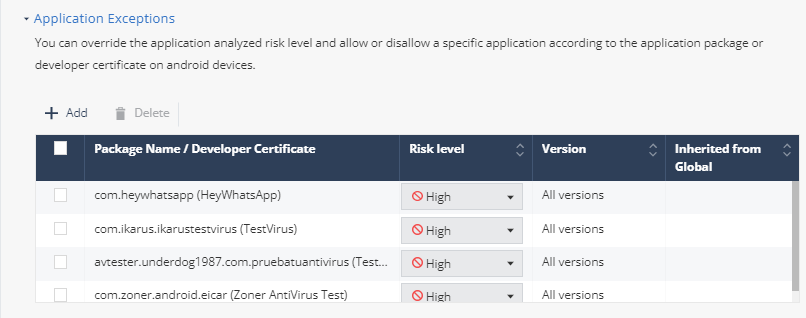
To add an exception to an application:
-
Go to Policy and select a policy profile.
-
Click Application > Application Exceptions.
-
In the table, click Add.
A window appears.
-
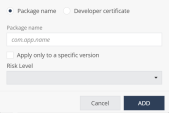
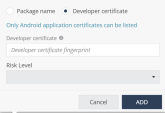
Select one of these:
-
Package name:
-
Enter the application Package name.
-
To apply the exception only to a specific version, select the Apply only to specific version checkbox.
-
In the Version field, enter the application package version number.
 Note - Version field appears only if you select Apply only to specific version checkbox.
 -
From the Risk Level drop-down list, select the risk level:
-
High – The system changes the application's risk level to High Risk. As a result, the actual application triggers on-device mitigation and a pop-up event. This app triggers an increase in the risk level of the device.
-
No risk – The system changes the application's risk level to No Risk. The application no longer triggers on-device mitigation or a pop-up event.
-
Ask for user approval – When the user installs an app, the user is prompted about the risk and can allow or disallow the application.
-
-
Click Add.
-
-
- To save the policy changes, click Save.
If you do not know the applications details:
-
Go to Forensics > Applications.
-
Find the relevant application and click the Global Policy value.
The Application Exceptions section appears with the chosen application details.
-
Select the Risk Level and click Add.
-
To save the policy changes, click Save.
File Policies
File policy settings:
Mobile Apps and iOS Profiles
Application Downloads
Prevents unauthorized download of applications on Android and iOS devices.
|
|
Important - To enable download protection, you must enable ONP. See Network Protection. |
To enable download protection for applications:
-
Go to Policy and select a policy profile.
-
Click File > Mobile Apps and iOS Profiles.
Under Application downloads, set these values:
Item
Description
Value
Android Application
Prevents download of unauthorized and malicious Android applications on Android devices based on domain reputation from ThreatCloud.
- Allow all
-
Block download from suspicious domains (Default)
-
Allow only from trusted domains
iOS Application
Prevents download of unauthorized and malicious iOS applications on iOS devices based on domain reputation from ThreatCloud.
iOS Configuration Profile
Prevents download of unauthorized and malicious profiles on iOS devices based on domain reputation from ThreatCloud.

Note - To view the full list of profiles installed on the mobile devices in your organization, go to Forensics > iOS Profiles.
-
To save the policy changes, click Save.
Files - Blocked / Allowed Locations
You can block or allow the network locations that the mobile device accesses to download mobile apps or iOS profiles. To block or allow access or downloads from these locations, configure your Network policy. For more information, see Networks - Blocked Locations and Networks - Allowed Locations.
To block a network location:
-
Go to Policy and select a policy profile.
-
Click File > Mobile Apps and iOS Profiles > Blocked Locations.
-
Click Add.
The Blocked Locations table appears.

Note - To allow a network location, select Policy Profile > File > Allowed Locations, and click Add.
-
In the Location field, enter the network location to block in one of these formats: IPv4, IPv6, Domain Name (DN), DN/URL, + Wildcards.
- Click Add.
-
To import a list of locations, click Import and upload the .CSV file with a list of locations and comments.
-
To remove a network location from the list, select it and click Delete.
-
To save the policy changes, click Save.
File Protection
File Downloads
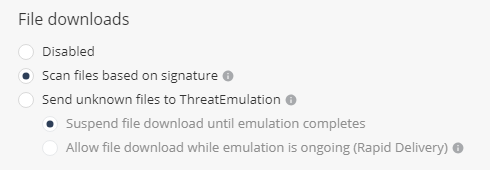
Prevents the download of malicious files on Android and iOS devices. It checks the file reputation against the ThreatCloud before it is downloaded on the mobile device. When the file emulation option is enabled, if the file is unknown, it is sent for file emulation to ThreatCloud that provides a verdict whether the file is safe or not.
To enable download protection for files:
-
Go to Policy and select a policy profile.
-
Click File > File Protection > File downloads.
-
Select the file download method:
-
Disabled - File download is disabled.
-
Scan files based on signature - ThreatCloud assesses the file reputation based on the signature of the file.
-
Send unknown files to ThreatEmulation - Files unknown to ThreatCloud are uploaded for file emulation.
-
Suspend file download until emulation completes - Suspends download of unknown files until a verdict is available after emulation.
-
Allow file download while emulation is ongoing (Rapid Delivery) - Allows download of unknown files even if the verdict is not available.
-
-
-
To save the policy changes, click Save.
Android Storage Scanning
To scan the files stored on an Android device:
-
Go to Policy and select a policy profile.
-
Click File > File Protection > Android Storage Scanning.
-
Select the Scan for malicious files checkbox.
-
Select the risk level if storage scanning permission is not granted.
-
To save the policy changes, click Save.
File Exceptions
You can create an exception to allow or block a hash or a file that was analyzed with a specific risk level.
|
|
Notes:
|
To add a file exception:
-
Go to Policy and select a policy profile.
-
Click File > File Protection > File Exceptions.
-
Click Add.
A pop-up window appears.
-
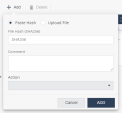
Do one of these:
-
To add a file hash exception:
-
Click Paste Hash.
-
In the File Hash field, enter the file hash name. For example, SHA256.
-
To add a file exception:
-
Click Upload File.
-
Click Upload to upload the file.
-
-
-
(Optional) In the Comment field, add your comments.
-
From the Action drop-down list, select one of these:
-
Block - To block the file or file hash.
-
Allow - To allow the file or file hash.
-
- To save the policy changes, click Save.
|
|
Note - You can also allow or block a file from the Forensics > Events & Alerts page.
Select any one of these:
|
Network Policies
Content Inspection
For Content Inspection configuration to work on the device, you must enable On-device Network Protection.
Set these parameters on the Content Inspection tab:
Block Connections to Phishing & Malicious Sites
-
Go to Policy and select a policy profile.
-
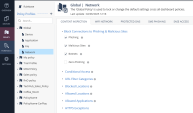
Click Network > Content Inspection > Block Connections to Phishing & Malicious Sites and set these parameters:
Item
Description
Phishing
Indicates whether to block connections to phishing URLs.
Spyware / Malicious Sites
Indicates whether to block connections to spyware or malicious sites.
Botnets
Indicates whether to block connections to sites that use bots.
Zero-Phishing
Indicates whether to enable zero-phishing (identify unknown phishing sites).
For an optimal browsing experience on the mobile device, Zero-Phishing technology is tuned, by default, not to scan all SSL locations but only domains not marked as safe (i.e. high confidence of no-risk).
-
To save the policy changes, click Save.
Conditional Access
The Conditional Access feature allows an organization to automatically control access to corporate resources from compromised devices (marked as High Risk).
This policy enforcement is independent of Unified Endpoint Management (UEM) solutions.
This category is a list of corporate IP addresses and/or FQDN hostnames that a device at high risk cannot access.
To add conditional access to a specific network:
-
Go to Policy and select a policy profile.
-
Click Network > Content Inspection > Conditional Access.
-
Click Add.
A pop-up window appears.
-
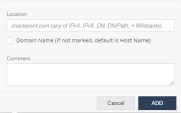
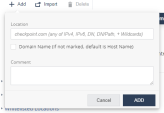
In the Location field, enter the network location in one of these formats: IPv4, IPv6, Domain Name (DN), DN/URL, + Wildcards.
-
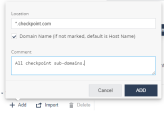
Select the Domain Name checkbox to enter location as domain name.
For example, if you enter Location as google.com, and select this checkbox, it is interpreted as domain name and includes all URLs in *.google.com. If not set, location value is interpreted as host name (www.google.com). -
(Optional) Add comments.
-
Click Add.
-
To import conditional access for a list of URLs, click Import and upload the .CSV file with URL names list and comments.
-
To delete a network location from the list, select it and click Delete.
-
To save the policy changes, click Save.
URL Filter Categories
The URL filtering feature prevents access to websites as per the organization’s corporate policies. You can prohibit device access for URLs in a specific content category (for example, Gambling and Violence). You can enforce policies across all browser apps and non-browser specific apps, such as Facebook Messenger, Slack and WhatsApp.
The URL Filtering![]() Check Point Software Blade on a Security Gateway that allows granular control over which web sites can be accessed by a given group of users, computers or networks. Acronym: URLF. technology also allows you to allow and block domains.
Check Point Software Blade on a Security Gateway that allows granular control over which web sites can be accessed by a given group of users, computers or networks. Acronym: URLF. technology also allows you to allow and block domains.
|
|
Note - When URL Filtering is coupled with On-device Network Protection > Always ON > Allow user to suspend On-device Network Protection, users can disable ONP for a specific amount of time (5 minutes, 30 minutes, or 2 hours), to access blocked websites or categories. This provides flexibility in a BYOD environment. However, the user cannot suspend ONP if the device is at High risk. If the device moves to at High risk while in suspension, Conditional Access is enabled. |
To edit URL filtering categories:
- Go to Policy and select a policy profile.
-
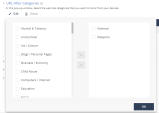
Click Network > Content Inspection > URL Filter Categories.
-
Click Edit.
A pop-up windows appears.
-
In the left column, select the categories that you want to block access to, and click >.
-
To undo a selection, in the right column, select the category and click <.
-
Click OK.
-
To save the policy changes, click Save.
The organization may decide not to track such events due to user privacy concerns. In that case, administrator can block these categories, but not track the events per category.
Networks - Blocked Locations
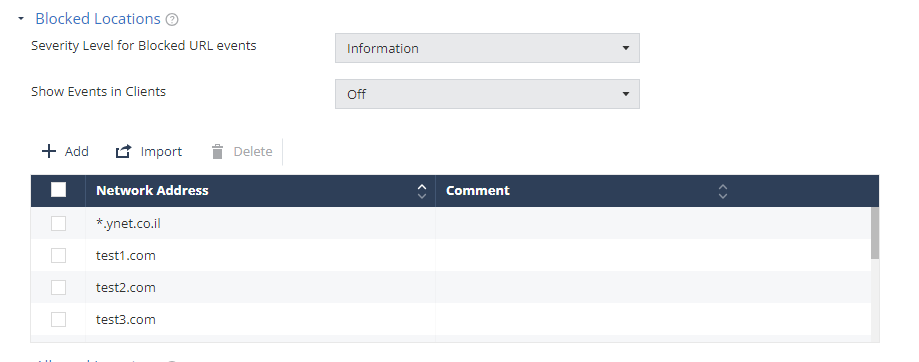
You can block the device access to specific network locations, regardless of the subject category or risk level of the device. In addition, you can also set the severity level for the events generated when Harmony Mobile blocks access to these network locations and configure whether to show the event notification in the Harmony Mobile Protect App.
|
|
Note - To view the event severity level, go to Forensics > Events & Alerts. |
To add a network location to the Blocked Locations list:
- Go to Policy and select a policy profile.
-
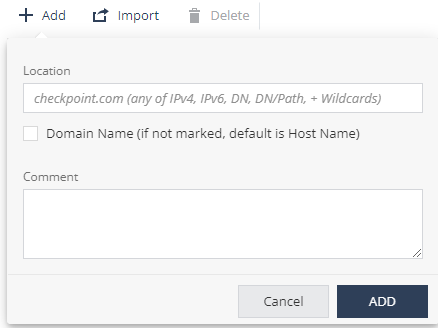
Click Network > Content Inspection > Blocked Locations.
-
Click Add.
A pop-up window appears.
-
In the Location field, enter the network location in one of these formats (IPv4, IPv6, Domain Name (DN), DN/URL, + Wildcards).
-
(Optional) Add your comments.
-
Click Add.
-
To import a list of network locations, click Import and upload the .CSV file with the locations list.
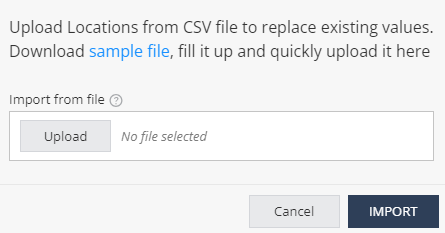

Note - The uploaded list replaces the existing list. This allows you to import a list of locations from other systems, such as Firewall and Gateway, into Harmony Mobile On-device Network Protection policy settings.
-
From the Severity Level for Blocked URL events drop-down list, select the severity level.
-
From the Show Events in Clients drop-down list, select one of these:
-
Off (Default) - The end-user does not receive the event notification in the Harmony Mobile Protect App, when Harmony Mobile blocks access to the network location.
-
On - The end-user receives an event notification in the Harmony Mobile Protect App, when Harmony Mobile blocks access to the network location.
-
-
To remove a network location from the list, select it and click Delete.
-
To save the policy changes, click Save.
|
|
Note - If a domain in the blocked location is still accessible by the device, then the domain is in the default allowed list. Collect the device logs (see sk179614) and contact Check Point Support. |
Networks - Allowed Locations
You can allow access to specific network locations or domains from the user device, regardless of the subject category or risk level of the device. For example, a self-service help desk site.
To add a network location to the allowed list:
- Go to Policy and select a policy profile.
-
Click Network > Content Inspection > Allowed Locations.
-
Click Add.
A pop-up window appears.
-
In the Location field, enter a network location in one of these formats (IPv4, IPv6, Domain Name, DN/URL, +wildcards).
-
(Optional) In the Comment field, add your comments.
-
Click Add.
-
To import a list of locations, click Import and upload a .CSV file with a list of locations and comments.

Note - The uploaded list replaces the existing list. This allows administrators to import a list of locations from other systems such as Firewall/Gateway into Harmony Mobile On-device Network Protection (ONP) policy settings.
-
To remove a network location from the list, select it and click Delete.
-
To save the policy changes, click Save.
Allowed Applications
You can allow authorized Android applications to access the internet on the mobile device. You can configure the application list to ensure that a specific Android application can always access the internet from a user device, regardless of the device risk level.
|
|
Note - This setting impacts the traffic generated by the listed applications while the Policy > Application > Application Exceptions setting relates to the risk of the app. |
To add an application to allowed list:
- Go to Policy and select a policy profile.
-
Click Network > Content Inspection > Allowed Applications.
-
Click Add.
A pop-up window appears.
-
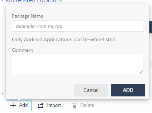
In the Package Name field, enter the Android application Package Name (For example, com.cp.xyz).
-
(Optional) Add your comments.
-
Click Add.
-
To import a list of applications, click Import and upload a .CSV file with a list of applications’ package names and comments.

Note - The uploaded list replaces the existing list. This allows administrators to import a list of applications from other systems such as Firewall/Gateway into Harmony Mobile On-device Network Protection (ONP) policy settings.
-
To remove an item from the list, select it and click Delete.
-
To save the policy changes, click Save.
To summarize, Harmony Mobile blocks:
-
Traffic from mobile apps flagged as malicious based on the BRE verdict.
-
Traffic to malicious internet resources based on ThreatCloud reputation and risk score.
-
Traffic to destinations marked as blocked locations (in Harmony Mobile or in IoC Management in Infinity XDR/XPR)
-
Traffic which is not compliant with the corporate policy, such as URLs blocked in URL Filter Categories.
-
Traffic from mobile apps in blocked categories (Android only)
Traffic that is safe (safe domains or not posing a security risk) and compliant with the corporate policy is allowed.
HTTPS Exceptions
You can create an exception list for network locations that you want to exclude from HTTPS inspection, for specific sites or web categories for end-users' privacy.
Prerequisite
Before you add network locations to HTTPS exceptions, make sure that SSL inspection is enabled. For more information, see HTTPS Settings.
To add a network location to the HTTPS exception list:
-
Go to Policy and select a policy profile.
-
Go to Network > Content Inspection and click HTTPS Exceptions.

-
Click the + icon.
A pop-up window appears.
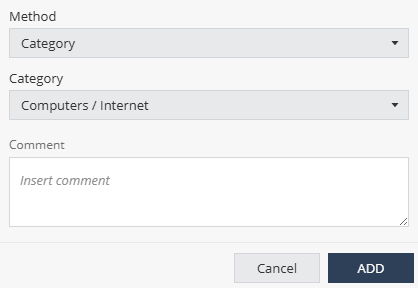
-
From the Method list:
-
To exclude by category, select Category and select the category from the Category list.
-
To exclude a subnet, select Subnet and enter the subnet value in the Subnet field.
-
To exclude a domain or URL, select Domain and enter the domain or URL value in the Domain/URL field.
-
-
(Optional) Enter your comments.
-
Click Add.
-
To import a list of exceptions from a JSON file:
-
Click the
 icon.
icon. -
Click Upload and select the JSON file that contains the exception list.
-
Click Import.
The system appends the imported list to the existing list.
-
-
To export the HTTPS Exceptions list, click the
 icon and click Export.
The system exports the exception list as a JSON file and saves it on your computer. You can import this list to other policies.
-
To search for an exception, enter the value in the Search box.
-
To remove an item from the list, select it and click the
 icon.
icon. -
To save the policy changes, click Save.
WiFi Network Protection Settings
To set the device protection for different MITM attacks:
- Go to Policy and select a policy profile.
-
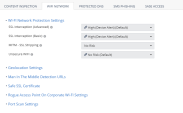
Click Network > WiFi Network and select the device risk level (from High to No Risk):
Setting
Description
SSL Interception (Advanced)
Set the risk level when MITM attack
 Man-in-the-Middle attack. A general term for when a perpetrator positions himself in a conversation between a user and an application (either to eavesdrop or to impersonate one of the parties), making it appear as if a normal exchange of information is underway. intercepts HTTP traffic by using a valid certificate that does not match the certificate of the server.
SSL Interception (Basic)
Set the risk level when MITM attack intercepts HTTP traffic by using an invalid certificate that does not exist on the device trusted certificates, or is not trusted by a root CA.
MITM - SSL Stripping
Set the risk level when MITM attack intercepts all network traffic redirection from HTTP to HTTPS and strips the HTTP calls leaving the traffic as HTTP.
Unsecure WiFi
Set the risk level when the device connects to an unsecure WiFi network that is open or has no data encryption. For example, a public WiFi hotspot.
-
To save the policy changes, click Save.
Geolocation Settings
This setting enables collection of the device GPS location when a network attack is detected.
This information is used to provide map detail on the Network tab.
To enable geo location capability:
- Go to Policy and select a policy profile.
-
Click Network > WiFi Network.
-
Select the Geolocation Collection checkbox.
This enables it from the Dashboard side. The user must allow the Harmony MobileProtect App to use the location on their device to collect geo location information.
-
To save the policy changes, click Save.
Man In The Middle Detection URLs
You can monitor suspicious URLs for Man-in-the-Middle (MITM) attacks. If Harmony Mobile detects any change in the SSL certificate used by the URL, it is categorized as a MITM attack and assigns a risk level for the device.
The risk level is the value set in WiFi Network Protection Settings > MITM - SSL Stripping.
To add the URLs for the MITM detection:
- Go to Policy and select a policy profile.
-
Click Network > WiFi Network > Man In The Middle Detection URLs.
-
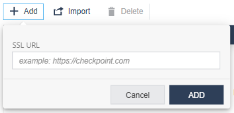
Click Add.
A pop-up window appears.
-
In the SSL URL field, enter the URL.
-
Click Add.
-
To import a list of URLs, click Import and upload a .CSV file with URL names list and comments.
-
To remove a URL from the list, select it and click Delete.
-
To save the policy changes, click Save.
Safe SSL Certificate
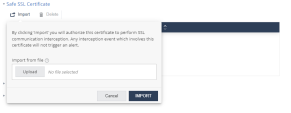
You can import trusted SSL certificates and authorize them to intercept SSL traffic so that any change in the certificate is not interpreted as a MITM attack.
To import a SSL certificate:
- Go to Policy and select a policy profile.
-
Click Network > WiFi Network > Safe SSL Certificate.
-
Click Import and upload the certificate in
.pemformat.Click Import.
-
To delete a certificate, select it and click Delete.
-
To save the policy changes, click Save.
Rogue Access Point On Corporate Wi-Fi Settings
Harmony Mobile detects and sends alerts about rogue Wi-Fi access points. These access points attempt to manipulate corporate end-users on their mobile devices and connect them to a fake access point disguised as a workplace SSID![]() Service Set Identifier. The technical term for a wireless network name that you see when you connect your device to your wireless home network.. The hacker can also perform a man-in-the-middle attack, reveal corporate credentials or steal sensitive data. You can set the risk level and policy related to this attack technique in this section.
Service Set Identifier. The technical term for a wireless network name that you see when you connect your device to your wireless home network.. The hacker can also perform a man-in-the-middle attack, reveal corporate credentials or steal sensitive data. You can set the risk level and policy related to this attack technique in this section.
To detect rogue access point, you must add the corporate used SSIDs and the external IPs. Any access point that uses the corporate SSID but does not go to the internet through one of the corporate’s external (public) IPs is not a corporate-owned access point and is therefore a suspected rogue access point.
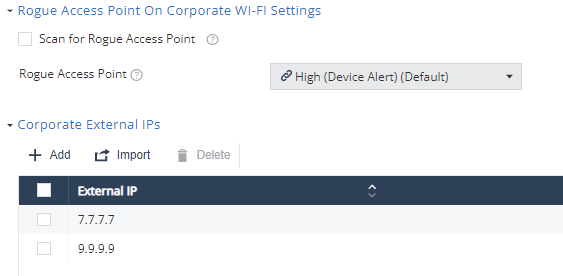
To detect rogue access point using your corporate Wi-Fi identity:
- Go to Policy and select a policy profile.
-
Click Network > WiFi Network > Rogue Access Point On Corporate Wi-Fi Settings.
-
Select the Scan for Rogue Access Point checkbox.
-
From the Rogue Access Point drop-down list, select the device risk level (default is High (Device Alert)).
-
Configure the Corporate External IPs.
-
Configure the Corporate SSIDs.
-
To save the policy changes, click Save.
When Harmony Mobile detects a rogue corporate WiFi on a mobile device, the device risk level changes to the one set in this policy. If the risk level is High and Conditional Access is configured with locations to block, then the access to those corporate resources is blocked immediately.
You can monitor the events and device risk level to manage this threat.
Port Scan Settings
Harmony Mobile detects scan attempts for open ports on a mobile device. Set the risk level and the policy associated with this attack technique in this section.
To detect port scan on your corporate mobile devices:
- Go to Policy and select a policy profile.
-
Click Network > WiFi Network > Port Scan Settings.
-
Select the Alert on Port Scanning checkbox.
-
From the Port Scanning Detected drop-down list, select the device risk level (default is Medium (Device Alert)).
-
From the Port Scanning Detected Event Severity Level drop-down list, select the event severity level (default is Critical).
-
To save the policy changes, click Save.
Protected DNS
Protected DNS provides secured DNS services over Harmony Mobile On-device Network Protection.
A protected DNS service:
-
Enhances user privacy and security.
-
Ensures that users use their corporate DNS servers instead of the Internet Service Provider (ISP) servers, thereby preventing DNS-spoofing attacks.
-
Enforces safe DNS protocols such as DNS over HTTPS (DoH) instead of the plain DNS requests (UDP/53) for end-user privacy.
To configure protected DNS policy settings:
- Go to Policy and select a policy profile.
-
Go to Network > Protected DNS and set these parameters:
Item
Description
Protected DNS Mode
Indicates whether to enable the protected DNS feature. When it is enabled, Harmony Mobile on-device Protected DNS becomes the default DNS service for the mobile device.
Protected DNS cannot be set
Set the risk level if the protected DNS feature cannot be set on the device due to one of these reasons:
-
Device is already configured with Private DNS (Android).
-
DNS server is inactive.
-
DNS server does not support secure DNS (DoH/DoT).
Plain Server Address
Add the plain DNS service. Set the IPv4 and IPv6 server addresses for the plain DNS service.
Private Host Names
Add the HTTPS host name to add private (third-party) protected DNS service.
-
-
To save the policy changes, click Save.
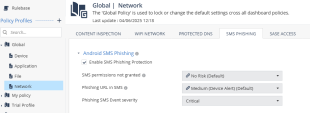
SMS Phishing
Android SMS Phishing
The Android SMS Phishing setting allows you to enable SMS phishing protection on Android devices. Harmony Mobile blocks only the URLs categorized as phishing by ThreatCloud.
|
|
Important - For SMS phishing protection to work, the end-user must grant Harmony Mobile the permission to read SMS messages on the device. To enable the SMS permission on the device, see Preventing SMS Phishing in Harmony Mobile Protect App for Android User Guide. |
To enable SMS phishing protection:
-
Go to Policy and select a policy profile.
-
Go to Network > SMS Phishing.
-
Select the Enable SMS Phishing Protection checkbox.
-
From the SMS permissions not granted list, select the risk level if the user does not grant Harmony Mobile the SMS permission on the device.
-
From the Phishing URL in SMS list, select the risk level if Harmony Mobile detects a SMS with phishing URL.
Harmony Mobile notifies the user to manually delete the message from the device. The device is set to No Risk after the user deletes the message.
-
Click Save.
|
|
Note - For iOS devices, the SMS phishing feature is enabled on the device. It blocks the URLs categorized as malicious by ThreatCloud. To enable this feature on the device, see Preventing SMS Phishing in Harmony Mobile Protect App for iOS User Guide. |
Blocking Malicious URLs in SMS - ONP v/s SMS Phishing Protection
The table below compares how the SMS Phishing Protection and ONP features block malicious URLs in SMS on iOS and Android platforms.
|
Feature |
iOS |
Android |
|---|---|---|
|
SMS Phishing Protection
|
|
|
|
No user action is required to detect malicious links with SMS Phishing Protection (users do not need to open the SMS and tap the link). |
||
|
ONP |
ONP protects users from malicious URLs from different sources (SMS, Email, WhatsApp). However, to detect the malicious link with ONP, the user need to open the SMS/message source and tap the link. |
|
To ensure complete protection from malicious URLs in SMS, Check Point recommends to enable both ONP and SMS Phishing Protection.
SASE Access
|
|
Note - This feature is currently available in Early Availability (EA). |
In the SASE Access tab, you can configure access to Harmony SASE on the Harmony Mobile Protect App. Enabling Harmony SASE allows users to securely access corporate resources from their mobile devices.
|
|
Important - You must have a valid Harmony SASE account in Infinity Portal to activate it on mobile devices. |

To enable Harmony SASE access:
-
Go to Policy and select a policy profile.
-
Go to Network > SASE Access.
-
Select the Enable SASE access checkbox.

Notes:
-
Enabling Harmony SASE automatically enables Next Generation ONP. To disable next-gen ONP, you must first disable the Enable SASE access checkbox.
-
When you enable SASE access, the Network Protection Working Mode automatically changes to Proxy mode.
-
-
To block Harmony SASE access on devices in a specific risk level, select the checkbox and choose the risk level from the list.
-
Click Save.


