Automatic Deployment of Endpoint Clients
Software deployment rules are supported for Windows, macOS and Linux.
Use deployment rules to automatically download and install pre-configured packages on endpoint devices.
To manage your Endpoint Security clients and install Endpoint Security Policy on them, you must first deploy the Initial Client to them.
The Initial Client is the Endpoint Agent that communicates with the Endpoint Security Management Server![]() A Security Management Server that manages your Endpoint Security environment. Includes the Endpoint Security policy management and databases. It communicates with endpoint clients to update their components, policies, and protection data..
A Security Management Server that manages your Endpoint Security environment. Includes the Endpoint Security policy management and databases. It communicates with endpoint clients to update their components, policies, and protection data..
|
|
Notes- You can deploy the Initial Client to all your endpoint devices, using a third-party deployment tool, manually or remotely (see Remote Installation of Initial Client). |
|
|
Important - If you want to switch to a US-DHS and EU compliant Anti-Malware |

|
|
Caution - Windows Server 2016 and higher requires that you turn off Microsoft Windows Defender before you install the Harmony Endpoint Security Client. Perform the instructions in the sk159373 before you install or contact Check Point Support to request assistance with the installation. |
Automatic Deployment of Endpoint Clients
Using the Tiny Agent
The Tiny Agent is supported with Windows, macOS, and Linux. It is an enhancement to the current Initial Client package (which is a very thin client, without any blade, used for software deployment purposes).
The Initial Client is the Endpoint Agent that communicates with the Endpoint Security Management Server![]() Dedicated Check Point server that runs Check Point software to manage the objects and policies in a Check Point environment within a single management Domain. Synonym: Single-Domain Security Management Server..
Dedicated Check Point server that runs Check Point software to manage the objects and policies in a Check Point environment within a single management Domain. Synonym: Single-Domain Security Management Server..
You can extract the Initial Client from the Tiny Agent.
The improvements include:
-
The Tiny Agent has a very small executable (smaller than 1MB).
-
Consolidates all the connection parameters in a single executable.
-
It can be shared in various forms, enabling fast, easy and seamless first-time deployment.
-
Once combined with the Dynamic Package, it installs only what is necessary for each machine.
-
It is agnostic to the client version.
-
It passes Smart Screen validation - no more download warnings.
-
It reduces network traffic for installing selected blades.
It is available for cloud deployments and for on-premises deployments running Endpoint Security Management Server![]() Check Point Single-Domain Security Management Server or a Multi-Domain Security Management Server.R81 or higher.
Check Point Single-Domain Security Management Server or a Multi-Domain Security Management Server.R81 or higher.
To deploy the Endpoint Security Client using the Tiny Agent:
-
Do any one of these:
Click
Steps
Policy > Deployment Policy > Software Deployment and then click Download Endpoint on the top banner. -
Select a Download version and a Virtual group.
-
Do one of these:
-
To download the file immediately, click Download for the relevant OS and transfer the file to the endpoints.
Client
OS
Downloaded file
Endpoint Windows EPS_<Year>_<Version>.exe macOS EPS_TINY.zip Linux
installScript.sh
Browse
Windows
BrowserSetup.exe macOS
BrowserSetup.zip
ChromeOS
BrowserSetup_chromeos_Laptop.exe or BrowserSetup_chromeos_Desktop.exe
-
To download the file using a download link, click
 and click Copy download link.
When the download link is ready, the Send the Link by Email window appears.
-
Click
 to copy to the link.
 -
Share the download link with users (for example, by email) to download the file.
-
-
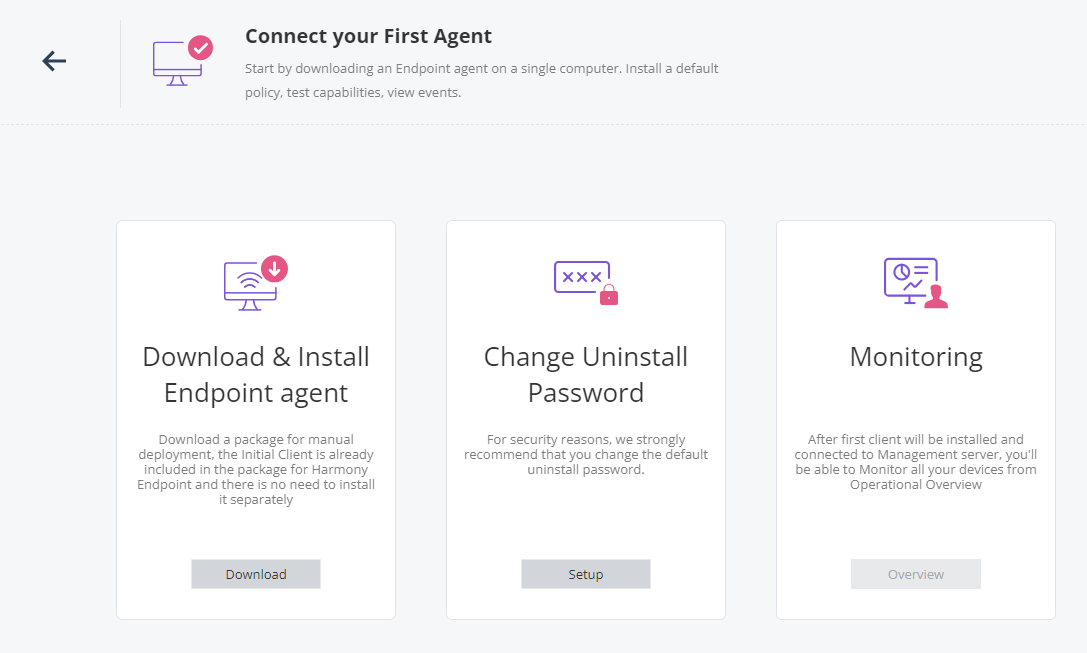
Overview, and then click Download Endpoint on the top banner. Overview > Getting Started > Let's Start Connect Your First Agent -
In the Download & Install Endpoint agent widget, click Download.
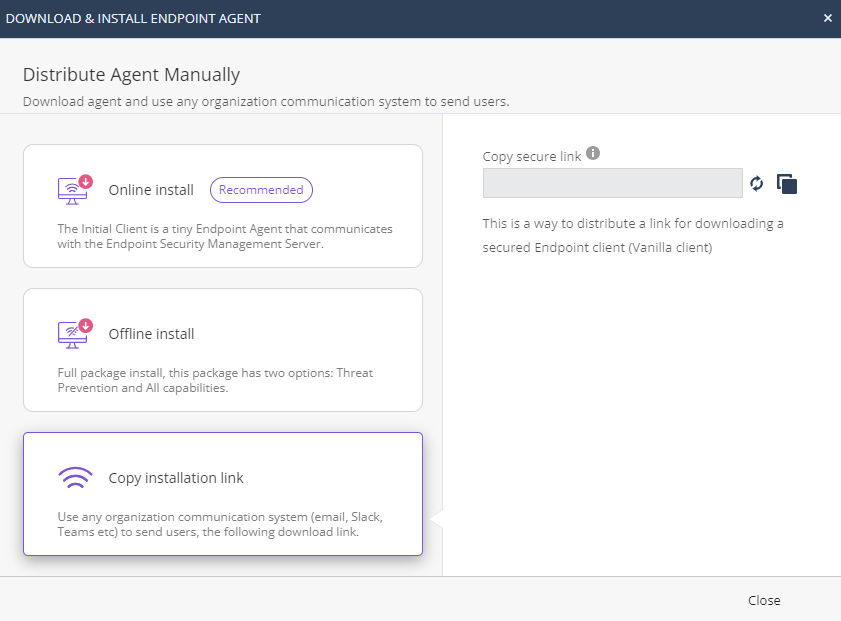
The Download & Install Endpoint Agent window appears.
-
Click Online Install.
-
From the Operating System list, select the OS.
-
From the Version list, select the client version.
-
-
For Windows:
-
Run the exe file to install the Harmony Endpoint Security client.
-
If you want to use the msi file, then convert the exe file into a msi file:
-
Open the Command Prompt window by selecting Run as administrator.
-
Run:
cd <Path where you have downloaded the exe file>For example,
cd C:\Users\User\Downloads -
Run:
EndpointSetup.exe /CreateMSI -
Transfer the msi file to the endpoints and run the msi file to install the Harmony Endpoint Security client.

Note - For silent installation, run
msiexec.exe /i <path to msi file>\EPS.msi /qn SILENTINSTALL=1.
-
-
-
For macOS:
-
Unzip the file and open the EPS_TINY folder.
-
To install the Harmony Endpoint Security client, do one of these:
-
Run the EPNano.app file.
-
In the terminal window, run:
./EPNano.app/Contents/MacOS/EPNano
-
-
-
For Linux:
-
If you downloaded the installScript.sh file, run the file on the endpoint to install the Harmony Endpoint Security client.
-
If you copy the download link, on the Linux machine, run:
-
curl "paste_downlowd_link" -o install.sh -
chmod+ x install.sh -
sudo ./install.sh install
-
-
-
Continue with Deployment Rules.
|
|
Note - You can deploy the Initial Client to all your endpoint devices, using a third-party deployment tool, manually or remotely (see Remote Installation of Initial Client). |
Troubleshooting Issues with the Tiny Agent on Windows OS
The Tiny Agent shows simple error messages in cases of network issues (connectivity problems, proxy issue, and so on).
|
Console Error |
Description |
Remediation |
|---|---|---|
|
|
Exception occurred (either allocation failed on any internal component, or another type of abnormal termination) |
Download the file again and check its signature (it could be corrupted), and make sure you have enough free RAM. |
|
|
Either we cannot verify our own signature, or map the installer in the memory. |
Make sure you have enough memory. |
|
|
Failed to parse the URL for downloading |
File downloaded from the Management Server is corrupted. Contact Check Point Support. |
|
|
Failed to verify downloaded |
Make sure that your Security Gateway |
|
|
Failed to get program files from Microsoft. |
Make sure your OS is updated. |
|
|
Either there is some Check Point product installed, or the Administrator cannot create folders in the Program Files folder |
Make sure that the Endpoint Security Client is not already installed. |
|
|
Either there is some Check Point product installed, or the Administrator cannot create folders in program files folder |
Make sure that the Endpoint Security Client is not already installed. |
|
|
Cannot run Windows Installer to install |
Make sure Windows Installer is enabled. |
|
|
Failed to download |
Make sure you have access to CDN: sc1.checkpoint.com |
|
|
Data corruption occurred, or data added to the file is corrupted |
Make sure the file is not corrupted, and/or that you downloaded it from the correct location. |
|
|
Failed to find the server config information. |
Make sure you downloaded the file from the portal. |
|
|
Another installation is stuck, or has not finished. |
Reboot the machine, or fix/complete any pending installation. |
Log File Location
The log file is located here:
|
|
Silent Installation
Run:
|
|
This package includes the specified components to be installed on the endpoint device.
You can distribute it automatically with deployment rules.
You can configure the policies for the components before or after you deploy the component package.
Deploy the Endpoint Security component package with deployment rules.
Using the Vanilla Client
|
|
Note - The Vanilla client is supported only for Windows-based endpoints. |
The Vanilla client is similar to the Tiny Agent but receives the connection parameters separately that prevents unauthorized clients to connect to the Harmony Endpoint Management Server.
To deploy the Endpoint Security Client using the Vanilla Client:
-
Go to Overview > Getting Started > Let's Start Connect Your First Agent.
-
In the Download & Install Endpoint agent widget, click Download.
The Download & Install Endpoint Agent window appears.
-
Click Copy Installation link.
-
Click
 .
.The download link appears in the field on the left.
-
Click
to copy the link. -
Do one of these:
To
Do
Install the Vanilla client directly on the endpoint -
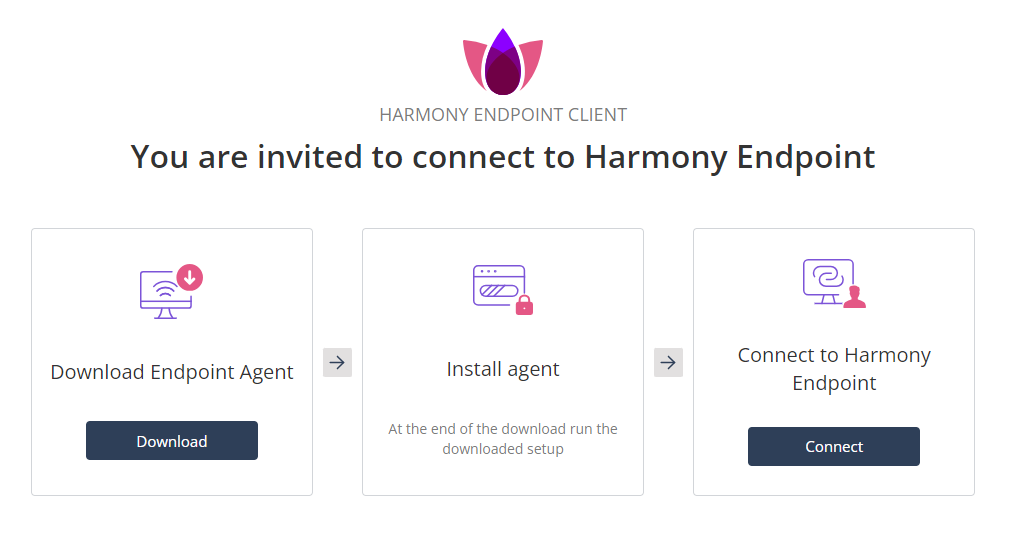
On the endpoint where you want to install the client, open the link in a browser.
Note - Make sure that the user has Administrator role in the endpoint.
-
In the Download Endpoint Agent widget, click Download.
The system downloads the EndpointSetup.exe file.
-
Run the EndpointSetup.exe to register the client.
The Ready to connect dialog box appears.
-
Click OK.
-
In the Connect to Harmony Endpoint widget, click Connect.
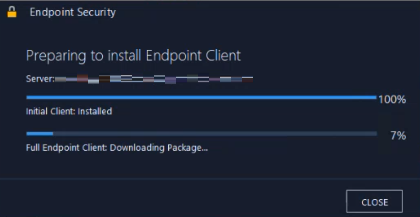
The Endpoint Security dialog box appears that shows the client installation status.
Install the Vanilla client remotely on the endpoint On the endpoint where you want to install the client, run this command as the Administrator:
EndpointSetup.exe /url <link>The system downloads the Vanilla client, installs it and then connects to the Harmony Endpoint Management Server.
Install the Vanilla client remotely on the endpoint using third-party distribution applications, for example, Microsoft InTune -
Run this command as the Administrator:
EndpointSetup.exe /createmsi /url <link>The system downloads the EPS.msi file.
-
Distribute the EPS.msi file using third-party MDM application. For more information, see Remote Installation of Initial Client.
-
-
When the installation is complete, the Harmony Endpoint Security Client is installed on the endpoint and connected to the Harmony Endpoint Management Server.
-
Continue with Deployment Rules.
Deployment Rules
Deployment rules let you manage Endpoint Security Component Package deployment and updates.
Deployment rules work on both Windows OS and macOS. Linux OS is not supported yet.
The Default Policy rule applies to all Endpoint devices for which no other rule in the Rule Base![]() All rules configured in a given Security Policy. Synonym: Rulebase. applies.
All rules configured in a given Security Policy. Synonym: Rulebase. applies.
You can change the default policy as necessary.
You can define more rules to customize the deployment of components to groups of Endpoint devices with different criteria, such as:
-
Specific Organizational Units (OUs) and Active Directory nodes.
-
Specific computers.
-
Specific Endpoint Security Virtual Groups, such as the predefined Virtual Groups ("All Laptops", "All Desktops", and others.). You can also configure your own Virtual Groups.
Deployment rules do not support user objects.
Mixed groups (that include both Windows OS and macOS objects) intersect only with the applicable members in each rule.
-
From the left navigation panel, click the Policy view.
-
Click Deployment Policy > Software Deployment.
-
From the top toolbar, click Clone Above or Clone Below.
The Clone Rule window opens.
-
Configure the rule:
-
Enter the rule name
-
Select the groups to which the rule applies.
Mixed groups (that include both Windows OS and macOS objects) intersect only with the applicable members in each rule.
-
Select the applicable parts of the organization.
-
Select the affected devices.
-
-
Click OK to create the new rule.
-
Click the new rule to select it.
-
In the right section Capabilities & Exclusions:
-
Click Windows, macOS or Linux.
-
Select the Version.
For Linux, click distros to view the supported distributable and version. For example, CentOS or Ubuntu.
Note - You can use the Do not install option to temporarily halt enforcing software deployment rules to the endpoints, for example, during maintenance or internal testing of Harmony Endpoint Security client.
-
Select Capabilities.
-
For Linux, only the Anti-Malware blade is supported with the exported package.
-
For capabilities supported by Windows, macOS and Linux, see sk169996.
Note - The third-party Anti-Malware status in the Harmony Endpoint Security Client is not displayed:
-
If the Anti-Malware capability is not installed
-
If the Anti-Malware capability is installed but turned off in the Threat Prevention policy (For more information, seeWeb & Files Protection) or disabled by the user on the Harmony Endpoint Security Client.
-
-
For general limitations on macOS, see sk110975.
-
-
-
Configure the deployment settings:
-
Select the applicable package version.

Caution - The Endpoint Security client package version must match the client package version selected in the exported package. Otherwise, the system discards the capabilities selected in the Software Deployment rule.
-
Select the package capabilities.
-
-
Click Save.
-
Above the right section Capabilities & Exclusions, click Install Policy.
See Installation and Upgrade Settings for local deployment options.