RDP Applications
Harmony Connect Application-Level supports access to a desktop over the Remote Desktop Protocol (RDP) through these modes:
|
|
Note - The Remote Desktop Connection Broker (RD Connection Broker) is not supported for both browser-based and native RDP. |
Browser-based RDP
Browser-based RDP is an HTML5 web application (Guacamole) for users to access a remote desktop through a browser.
To set up a browser-based RDP server:
- Go to Policy > Access Control > Application Access and click Add.
-
In the Add New Application window, select RDP.
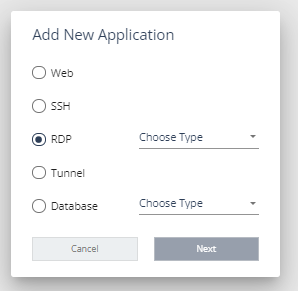
-
For Choose Type, select Browser-based RDP, and click Next.
-
Enter the information for these fields:
Item
Description
Server Name Name for the desktop. This name is displayed for the remote user in the Harmony Connect User App Portal. Server site Location of your server. Internal address IP address or FQDN of your internal server. -
Under Server permissions:
-
To allow users to share a clipboard between the local computer and the RDP desktop, select the Allow clipboard checkbox.
-
To allow file sharing with the RDP desktop, select the Allow file share checkbox.
-
-
Under login mechanism:
-
To allow users to log on to the RDP desktop with their corporate credentials, select Transparent.
-
To allow users to log on to the RDP desktop with specific credentials, select Managed and enter the Username and Password.
-
-
Click Launch.
-
In the Access Permissions tab, click Edit Permissions.
-
In the Groups list, select the user groups that must have access to the RDP desktop.
The user groups is added to the Authorized group table.
-
Click Save.
-
To view the RDP server details, click the Details tab.
To edit and save the details, click the edit icon
 . For more information on tags, see Managing Tags.
 -
Specify the amount of time until the user token expires. After the user token expires, you must download the client and connect to the RDP desktop again. For more information, see User Session.
-
In the Settings menu, click Application Access.
-
In the Require a new token ... hours field for RDP, specify the number of hours.
-
To allow users to reconnect to the RDP desktop with the current token (RDP file) before it expires, select the One time password(OTP) checkbox.
-
-
To return to the Application Access page, click
 Applications at the top of the page.
The new RDP application shows in the Application Access page.
Users with permissions can access the RDP desktop through the:
-
User App Portal
-
Designated URL: https://REGION.<App_Name>.<Site_Name>.connect.checkpoint.com/ACCOUNT
Native RDP Client
The native RDP client is for users to access a remote desktop through a client.
|
|
Notes:
|
Supported Clients
Native RDP is supported on these clients:
-
Microsoft Terminal Services Client (MSTSC)
-
Microsoft Remote Desktop Client (MSRDC)
Supported Operating Systems
Native RDP is supported on these operating systems:
-
Windows 10
-
macOS Big Sur
To set up a native RDP client server:
- Go to Policy > Access Control > Application Access and click Add.
-
In the Add New Application window, select RDP.
-
For Choose Type, select Native RDP Client, and click Next.
-
Enter the information for these fields:
Item
Description
Server Name Name for the desktop. This name is displayed for the remote user in the Harmony ConnectUser App Portal. Server site Location of your server. Internal address IP address or FQDN of your internal server. -
Under Server permissions, to allow users to share clipboard between the local computer and the RDP desktop, and to allow file sharing with the RDP desktop, select the Allow clipboard and fileshare checkbox.

Note - Only Transparent login mechanism is supported. The user can log on to the RDP desktop with corporate credentials only.
-
Click Launch.
-
In the Access Permissions tab, click Edit Permissions.
-
In the Groups list, select the user groups that must have access to the RDP desktop.
User groups are added to the Authorized group table.
-
Click Save.
-
To view the RDP server details, click the Details tab.
To edit and save the details, click the edit icon
. For more information on tags, see Managing Tags. -
To return to the Application Access page, click
Applications at the top of the page.The new RDP application shows in the Application Access page.
-
Specify the amount of time until the user token expires. After the user token expires, you must download the client and connect to the RDP desktop again. For more information, see User Session.
-
In the Settings menu, click Application Access.
-
In the Require a new token ... hours field for RDP, specify the number of hours.
-
To allow users to reconnect to the RDP desktop with the current token (RDP file) before it expires, select the One time password(OTP) checkbox.
-
Users with permissions can access the RDP desktop through the User App Portal.
For more information, see the Harmony Connect Portal User Guide.