Reports for MSPs
|
|
Important - From this page, MSPs can schedule reports for child accounts within the same region. If a child account is located in a different region, you need to schedule the reports directly from that child account, as described in Reports. |
The Reports page allows Managed Service Providers (MSP) administrators to generate these reports for their child accounts.
-
Security Report Summary - Provides an overview of security events for the Check Point products you are subscribed to in Infinity Portal.
-
GenAI Protect Summary - Provides an overview of the GenAI activity in your organization.
-
Threat Prevention Summary - Provides an overview of all Threat Prevention events for the Check Point products you are subscribed to in Infinity Portal.
You can generate the report on demand or create a schedule to generate the report and send it to the required recipients.
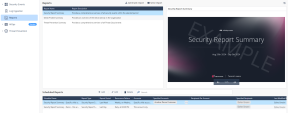
To view the Reports page, access the Infinity Events Administrator Portal and click Reports.
Generating Reports On Demand
From the Reports section, you can generate and download the Security Report Summary on demand.
To generate Security Report Summary on demand:
-
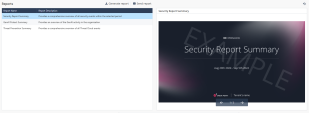
Go to Reports and select the report template in the Reports section.
The system displays the sample report on the right side.
-
To generate the report, click Generate report.
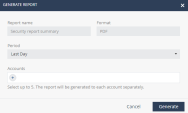
The Generate Report window appears.
-
From the Period list, select the time frame to generate the report.
-
Last Day - The system generates the report for the previous day.
-
Last Week - The system generates the report for the last seven days.
-
Last Month - The system generates the report for the last 30 days.
-
-
In the Accounts field, click + and then select the child accounts. You can select up to five accounts.
-
Click Generate.
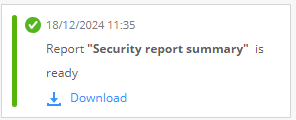
The Recent activities window appears and shows the report generation status.

Note - The Recent activities window shows the download activities from the past seven days.
When the report is ready, the system downloads it automatically. If you selected multiple accounts, it downloads each report separately.
-
To download the report later:
-
Click the
 icon at the top-right corner.
The Recent activities window appears.
-
Click the Download link.

-
Sending Reports
To send a report to specific users:
-
Go to Reports and select the report template in the Reports section.
-
Click Send report.
The Send Report window appears.
-
From the Period list, select the time frame to generate the report.
-
Last Day - The system generates the report for the previous day.
-
Last Week - The system generates the report for the last seven days.
-
Last Month - The system generates the report for the last 30 days.
-
-
From the Accounts list:
-
To send the report to recipients of specific child accounts:
-
Select Specific child accounts.
-
From the Accounts list, click + and select the child accounts you want to include.
Each report will contain information specific to the individual child account.
-
From the Recipients per account list, click + and select the user roles of recipients in the account that receive the report.
-
Primary Admins - Users with Primary Administrator role in Global Roles in the selected account.
-
Tenant Admins - Users with Admin role in Global Roles or in Specific Service Roles in the selected account.
-
Read-Only - Users with Read-Only role in Global Roles or in Specific Service Roles in the selected account.

Note - If the account does not have any users with the selected role, the system will not send the report.
-
-
To send the report to specific recipients, click Add specific recipients and select the recipients.
-
-
To send the report only to recipients of MSP account:
-
Select This account only.
-
In the Recipients field, click + and select the user roles of recipients in the account that receive the report.
-
Primary Admins - Users with Primary Administrator role in Global Roles in the selected account.
-
Tenant Admins - Users with Admin role in Global Roles or in Specific Service Roles in the selected account.
-
Read-Only - Users with Read-Only role in Global Roles or in Specific Service Roles in the selected account.

Note - If the account does not have any users with the selected role, the system will not send the report.
-
-
To send the report to specific recipients, click Add specific recipients and select the recipients.
The report will include consolidated security events from both MSP account and all its child accounts.
-
-
-
Click Send.
Scheduled Reports
From the Scheduled Reports section, you can schedule the generation of summary reports and email it to the required recipients.
The Scheduled Reports table shows:
|
Item |
Description |
|---|---|
|
Schedule Name |
Name of the scheduled report. |
|
Report Type |
Type of the report:
|
|
Report Period |
Time frame for which the report is generated:
|
|
Recurrence Pattern |
Frequency, day(s) and time at which the report is sent, in your local time zone. |
|
Accounts |
Accounts to which the report is sent:
|
|
Specified Accounts |
Specified child accounts to which the report is sent / not sent. |
|
Recipients Per Account |
User roles of recipients in the account that receive the report. |
|
Specified Recipients |
Specific MSP users to whom all child account reports are sent. |
|
Last Modified |
Date and time when the scheduled report was last updated. |
Adding a Scheduled Report
|
|
Important - To add, edit or delete a scheduled report, you must have Admin role in Global Roles or Specific Service Roles. |
-
Go to Reports.
-
In the Scheduled Reports section, click Add.
The Schedule Report window appears.
-
From the Type list, select the report type:
-
Security Report Summary
-
Threat Prevention Summary
-
-
In the Schedule Name field, enter a name for the scheduled report.
-
From the Period list, select the time frame to generate the report.
-
Last Day - The system generates the report for the previous day.
-
Last Week - The system generates the report for the last seven days.
-
Last Month - The system generates the report for the last 30 days.

Note - The Period field is enabled only when the Recurrence is Weekly or Monthly.
-
-
In the Send To section:
-
From the Accounts list:
-
To send the security report only to the recipients of MSP account, select This account only.
The report will include consolidated security events from both MSP account and all its child accounts.
-
To send the report to the recipients of all child accounts, select All child accounts.
Each report will contain information specific to the individual child account.

Note - This includes both existing and new child accounts.
-
To exclude recipients in some child accounts, select All child accounts except.
From the Exclude accounts list, click + and select the child accounts you want to exclude.

-
To send the report to recipients of specific child accounts, select Specific child accounts.
From the Include accounts list, click + and select the child accounts you want to include.

-
-
From the Recipients per account list, click + and select the user roles of recipients in the account that receive the report.
-
Primary Admins - Users with Primary Administrator role in Global Roles in the selected account.
-
Tenant Admins - Users with Admin role in Global Roles or in Specific Service Roles in the selected account.
-
Read-Only - Users with Read-Only role in Global Roles or in Specific Service Roles in the selected account.

Note - If the account does not have any users with the selected role, the system will not send the report.
-
-
To send the report to specific users in the MSP account:
-
Click Add specific recipients.
-
Click + and add the recipients.
These MSP users will receive the security reports of all the child accounts configured in Accounts.
-
-
-
In the Recurrence section:
-
Select the frequency to send the report:
-
Daily
-
Weekly (You can select multiple days)
-
Monthly (You can select multiple dates)
-
-
Under Export at, select the time to send the report.

Note - The timezone is the local timezone of the administrator who scheduled the report.
-
-
Click Save.
The system sends the report in PDF format to the email addresses of the selected account admins or users.
Managing Scheduled Reports
-
To edit a scheduled report:
-
Select the scheduled report and click Edit.
The Edit Scheduled Report window appears.
-
Make the required changes and click Save.
-
-
To search for a scheduled report, enter the text in the Search box. Partial text search is supported.
-
To delete a scheduled report, select the report and click Delete.


