Using the Settings
Use the Settings tab to learn how to use Management APIs, set the administrator's password, or migrate a self-hosted Security Management Server to Smart-1 Cloud.
General
|
|
Note - You can interact with the Security Management Server through APIs to perform the same tasks available in SmartConsole, such as creating objects, defining Security Policies, and deploying configurations. |
Service Information:
-
Status: The current service status.
-
Service Identifier: The unique service identifier based on the prefix provided during the service creation. When you contact Check Point, you must use this service identifier.
-
Version: The current Security Management Server version.
-
License: Shows "active" for the purchased Smart-1 Cloud license or "trial" for the evaluation license.
-
Expires: Shows the number of days before license expiration.
API & SmartConsole
SmartConsole:
-
Web SmartConsole
-
Instructions for using Installed SmartConsole
-
Streamed SmartConsole
From the Smart-1 Cloud home page, select Settings > API & SmartConsole.
The Management API page shows the current web request structure.
To copy these details, click the clipboard button.
For additional information, see Check Point Management API Reference (at the top, select the correct version) .
-
On the Smart-1 Cloud home page, go to Settings > Advanced > Restart Service.
-
Click Restart Environment.
The Restart Environment Confirmation window opens.
-
Follow the instruction on the screen.
-
Click Restart.
|
|
Note - The Restart Environment function is equivalent to executing |
Migrate
You can migrate your self-hosted Security Management Server to the Smart-1 Cloud environment.
|
|
Note - The migration operation overwrites tenant information and does not merge existing tenant data. |
|
|
Note - To connect your self-hosted Security Management Server to Infinity Services:
For detailed instructions, see sk177205. |
|
|
Important - You can migrate a Self-Hosted Security Management environment to Smart-1 Cloud only if Smart-1 Cloud has not been previously created in this Check Point Portal tenant. |
-
Open the Check Point Portal tenant connected to the self-hosted Security Management environment.
-
Select the self-hosted Security Management Server you want to migrate.
-
Click the three-dot menu:

-
To make sure you can migrate this Security Management Server to Smart-1 Cloud, select Run Pre-migrate verifier.
-
Click Migrate to Smart-1 Cloud.

Important - The migration process may take considerable time. The Smart-1 Cloud application will be unavailable during import. You will receive an email notification when the process completes and the service becomes available.

Notes:
-
After migrating a Standalone environment, it is divided into separate Security Management Server and Security Gateway components.
Post-migration, you must follow the procedure described in sk179444 - Migration from a Standalone environment to a Distributed environment.
This change is permanent. Security Management Server and Security Gateway replace the Standalone.
-
When migrating a Management High Availability environment to Smart-1 Cloud, you must remove the Secondary Management after migration (Management High Availability is not supported with Smart-1 Cloud).
-
Multi-Domain Security Management and Log Server are not supported.
-
-
After successful migration, in Smart-1 Cloud, navigate to Connect Gateway.
-
Click the plus (+) icon below the existing Security Gateway. Then select the Security Gateway you want to connect and follow the on-screen instructions.
-
For a Security Gateway running a version lower than R80.40 with Jumbo Hotfix Accumulator Take 89, reset the Secure Internal Communication (SIC) before initializing communication from SmartConsole to the Security Gateway. For more information, see sk65764.
Note - For Security Gateway/Security Management version R80.40 with Jumbo Hotfix Accumulator Take 89 and higher or Spark Firewall/Quantum Edge with version R80.20.40 and higher, SIC reset is not required on the Security Gateway.
You can import configurations from a self-hosted Management Server to Smart-1 Cloud.
Migration to Smart-1 Cloud is supported starting from Security Management Server version R81.10.
To migrate an self-hosted Security Management Server to Smart-1 Cloud:
-
On the Smart-1 Cloud home page in Check Point Portal, go to Settings > Migrate.
-
Below Export Data, click Download to download the migration tools.
-
On the self-hosted Security Management, run the export tool.
-
Below Import and Start, click Choose file to upload the export file.
-
Click Upload & Start to start the migration process.
Important - The migration process may take considerable time. During import, the Smart-1 Cloud application will be unavailable. You will receive an email notification when the process completes and the service becomes available.
-
After successful migration, in Smart-1 Cloud, navigate to Connect Gateway.
-
Click the plus (+) icon below the existing Security Gateway. Then select the Security Gateway you want to connect and follow the on-screen instructions.
-
For a Security Gateway running a version lower than R80.40 with Jumbo Hotfix Accumulator Take 89, reset the Secure Internal Communication (SIC) before initializing communication from SmartConsole to the Security Gateway. For more information, see sk65764.
Note - For Security Gateway/Security Management version R80.40 with Jumbo Hotfix Accumulator Take 89 and higher or Spark Firewall/Quantum Edge with version R80.20.40 and higher, SIC reset is not required on the Security Gateway.
Cloud Firewall Configuration
Smart-1 Cloud lets administrators configure Cloud Firewall in the GUI.
Limitation:
-
The Smart-1 Cloud web interface does not support configuring CME for the Cloud Firewall for OCI Instance Pools solution.
How to enable Cloud Firewall in Smart-1 Cloud
In the Smart-1 Cloud view in the Check Point Portal , go to Settings > Advanced > Cloud Firewall.
Add an account
-
To add an account, on the corresponding cloud provider tile, click Add account.
The CME Account window opens.
-
Give the account a name.
-
In the Platform drop-down list, select AWS, GCP, or Azure.
-
Enter the parameters.
-
Click OK to save the changes.
Parameters for AWS
|
Parameter |
Description |
|---|---|
|
Access Key ID |
AWS Access Key ID. This parameter is mandatory. |
|
Secret Access Key |
AWS Secret Key. This parameter is mandatory. |
|
Role Authentication (IAM) |
This option is available only in on-premises Security Management Serverdeployments. It is not available in Smart-1 Cloud. |
|
Regions |
The AWS regions in which the Security Gateways are being deployed. |
|
STS Role |
The Amazon Resource Name (ARN) of an IAM role to assume. |
|
STS External ID |
An optional STS External ID to use when assuming an IAM role in the account. |
|
Scan Gateway Load Balancer subnets |
Enable to scan Gateway Load Balancer subnets. |
|
Synchronize VPN |
Enable to synchronize VPN. |
|
Sub Accounts |
Add new sub accounts or configure properties of existing sub accounts. The sub-account name must be unique. Enter STS Role or STS External ID. |
Parameters for Azure
|
Parameter |
Description |
|---|---|
|
Application ID |
The service principal’s application ID in UUID format. |
|
Client Secret |
The service principal's client secret value. |
|
Directory ID |
The service principal's Directory ID in UUID format. |
| Subscription ID |
The subscription ID where the VMSS resides in UUID format. |
|
Azure Environment |
Select the environment in the drop-down list. The default value is "Azure Cloud". |
Parameters for GCP
|
Parameter |
Description |
|---|---|
|
Service Account Key Authentication |
Download a public service account key file in JSON format. |
Edit an account
-
To edit an account, click the Edit button at the right, above the cloud provider tiles.
The CME Overview window opens.
-
In the Accounts table, select the account you want to edit and click the "pencil" icon in the toolbar above the table.
The CME Account window opens.
-
Edit the parameters.
-
Click OK to save the changes.
Add a Security Gateway configuration template
-
To add a Security Gateway configuration template to the account, on the corresponding cloud provider tile, click Add template.
The CME Template window opens.
-
Give the Security Gateway configuration template a name.
-
In the Gateway Settings section, in the Account drop-down list, select the applicable Account.
-
Select the Security Gateway version.
-
Enter a one-time password.
-
Confirm the one-time password.
-
On the Network Security and Threat Prevention tabs, select the checkboxes for the blades you want to enable on the Security Gateway.
-
In the CME Attributes section, select the policy to install on the Security Gateway.
Note - To add support for AWS Transit Gateways to the AWS account, configure the below parameters in the CME Attributes section.
Parameters for AWS Transit Gateway
Parameter
Description
VPN Domain
A VPN Domain.
VPN Community
A VPN Star community where the VPN Gateway is the center.
TGW Static Routes
Enter network addresses (CIDR) to create a static route on each Gateway of the Transit Gateway auto-scaling group.
TGW Static Spokes
Spoke CIDR is learned from the TGW over BGP and is re-advertised by the Gateways of the TGW auto-scaling group to the AWS TGW.
For more information on AWS Transit Gateway, refer to Cloud Firewall for AWS Auto Scale Group with Transit Gateway Deployment Guide.
Note - To add IPv6 support to the Azure account, select the IPv6 checkbox in the CME Attributes section.
-
Provide the repository script name and parameters if necessary.
-
In the Logs section, add log servers.
-
In the NAT section, select which settings to use for communication with the Security Management Server or log servers when they are behind NAT or in the public cloud.
Note - This section is enabled only for the R82 version of Security Gateway.
-
Click OK to save the changes.
Edit a Security Gateway configuration template
-
To edit a Security Gateway configuration template, click the Edit button at the right, above the cloud provider tiles.
The CME Overview window opens.
-
In the Accounts table, select the account which templates you want to edit.
-
In the Gateway Templates table, select the template you want to edit and click the "pencil" icon in the toolbar above the table.
The CME Template window opens.
-
Edit the parameters.
-
Click OK to save the changes.
Advanced settings
To open the Advanced Settings window, click the Advanced link at the right, above the cloud provider tiles. In this section, you can:
-
Change the Security Management Server name.
-
Change the Delay Cycle value (the waiting time after each poll cycle).
-
Download logs with information about CME operations and API calls.
Forwarding Events to SIEM
Event forwarding is an easy and secure procedure to export logs. You can forward logs, events, and saved applications data from the Check Point environment to a Syslog server or a SIEM (Security Information and Event Management) provider such as Splunk, QRadar, or ArcSight. These SIEM providers process large amounts of data and then display it on dashboards for analysis or send notifications.
SIEM export volume affects licensing and usage metrics.
|
|
Important - Pricing and log processing:
|
Forward to SIEM configuration
To access the Forward to SIEM Configuration, from the Smart-1 Cloud home page, select Settings > Advanced > Forward to SIEM.
In the configuration page you see a table with forward to SIEM destinations, and information for the destination, such as status, encryption, name, target port, protocol and format.
Adding a new destination
To add a new destination, on the Forward to SIEM Configuration screen, click New.
|
|
Note - It is currently supported to add up to 3 destinations. |
The Add Forwarding Destination window opens.
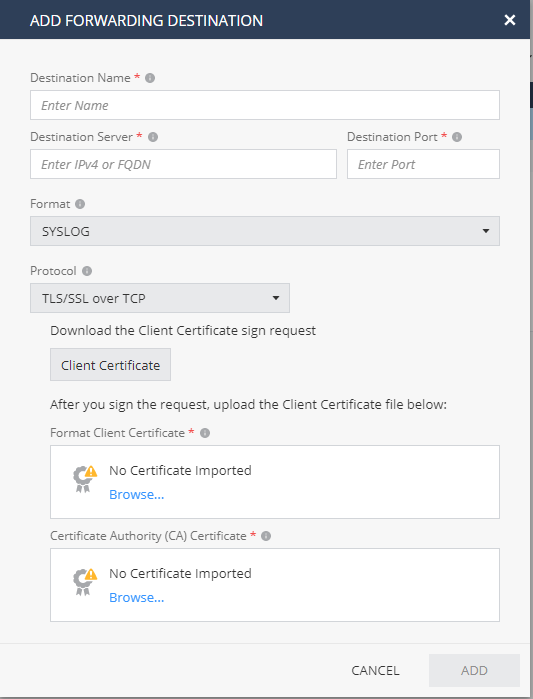
-
Destination name: Enter a unique name for the destination.
-
Destination Server: Enter IP address or FQDN.
Note - The IP address must be public.
-
Destination Port: The destination port number.
-
Format: The destination log format. Can be Syslog, CEF, JSON, Splunk, LEEF, Generic, LogRhythm, or RSA.
-
Protocol: The destination protocol, can be either TLS over TCP, TCP, or UDP
TLS/SSL over TCP Configuration
It is recommended to export logs over an encrypted connection using the TLS protocol. When using TLS, it is important to know that only mutual authentication is allowed. For mutual authentication, you need these two certificates:
-
The Certificate Authority (CA) certificate (in PEM format) that signs both the client (Smart-1 Cloud side) and the server (SIEM side) certificates. The CA certificate can be a self-signed certificate.
-
Client certificate.
Procedure:
-
Click the Client Certificate box to download the Client certificate sign request (cp_client.csr).
Note - Signing the request is done in your organization and is not part of Smart-1 Cloud services.
-
After you sign the request, click Browse below the Client Certificate box to upload the signed certificate.
Important - If it takes time to obtain the signed certificate for upload, you can close the Add Forwarding Destination window. Open it again later when you have the signed certificate, fill in all the details, and just click Browse to upload the certificate.
You do not need to click the Client Certificate box again, because this creates a new sign request.
-
Upload the CA certificate.
Edit the destination
To edit the destination, on the Forward to SIEM page, select a destination and click Edit.
You can change all destination properties except for the destination name.
Delete the destination
To delete a destination, on the Forward to SIEM page, select a destination and click: Delete.
Write confirm in the deletion dialog box.
Start, stop, or restart the destination
To start, stop, or restart sending logs to the destination, on the Forward to SIEM page, select a destination, click More Actions, and select the action you want to perform:
-
Stop Forwarding - Stop sending logs to the destination
-
Start Forwarding - Start sending logs to the destination
-
Restart Forwarding - Restart sending logs to the destination
Troubleshooting
If no logs arrive to your SIEM, follow these steps:
|
|
Important - For information and updates on Smart-1 Cloud external FQDNs and their associated IP addresses, see sk182699. |
-
Make sure that your Security Gateway does not block traffic from the Smart-1 Cloud public FQDN:
-
Ireland:
eu-west-1.allowed-ips.checkpoint.com -
N. Virginia:
us-east-1.allowed-ips.checkpoint.com -
Sydney:
ap-southeast-2.allowed-ips.checkpoint.com -
Mumbai:
ap-south-1.allowed-ips.checkpoint.com -
UAE:
me-south-1.allowed-ips.checkpoint.com
-
-
Check if all the details in the configuration are correct.
-
If you use TLS, make sure you are using the correct certificates.
-
Restart the destination.
If the issue persists, contact Check Point support and open a Service Request.