Best Practices
Management APIs
Smart-1 Cloud provides Management APIs that let you perform operations typically done in SmartConsole - such as creating objects, configuring policy, or modifying system settings. You can run these operations either from command‑line tools or through HTTPS‑based web services.
Before using the Management APIs:
-
Create an administrator account in SmartConsole.
-
Assign a permission profile that includes Management API Login. (Open SmartConsole, go to Permission Profile > Management and make sure Management API Login is enabled.)
Ways to use the Management APIs
You can access the Management API using one of these methods:
-
"
mgmt_cli" command line tool-
Installed by default on all Security Gateways running Gaia R80.10 and higher.
-
Can be used in scripts in the Expert mode.
-
Available on Windows as part of the SmartConsole installation (default path:
C:\Program Files (x86)\CheckPoint\SmartConsole\R8x.x\PROGRAM\) -
You can copy and run it on a Windows computer.
-
For a full list of options, run "
mgmt_cli". -
For full documentation, see the Check Point Management API Reference (at the top, select the correct version) .
-
-
Web Services (REST API)
-
Send HTTPS requests directly to the Management Server.
-
Suitable for automation platforms, Postman, and integrations.
-
Example (CLI)
This command adds a host object using mgmt_cli. It requests a username and password.
|
|
Smart-1 Cloud APIs
Smart-1 Cloud includes REST APIs for automating key operational tasks such as:
-
Creating a new Smart-1 Cloud environment
-
Registering a Security Gateway
-
Retrieving service information
-
Managing Security Policy and objects in Security Management.
The API can be used through cURL, Postman, or any HTTPS-capable tool.
Example: Adding a Simple Gateway with the Web API
This example shows how to add a new gateway object using the Web API. The steps are equivalent to the CLI command:
|
|
-
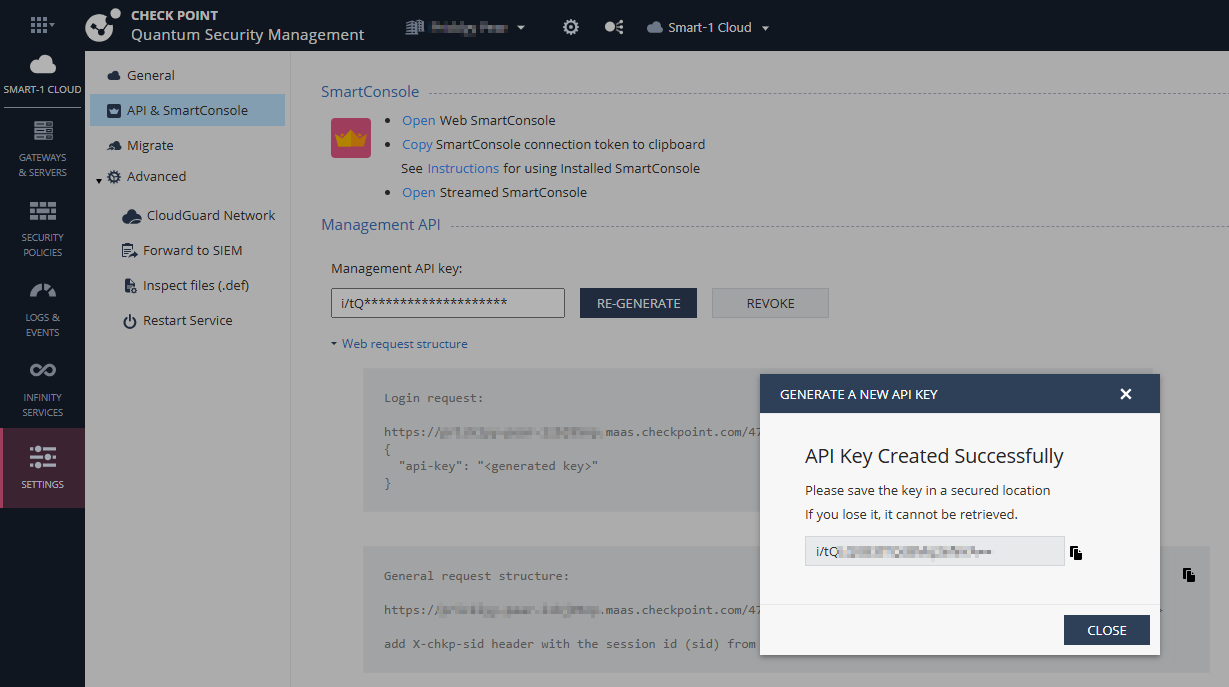
Open the Web SmartConsole.
-
Go to Settings > API & SmartConsole.
-
In the Management API section, click Generate.
The Generate a new API key window opens.
-
Copy the newly generated API key and close the window.
Before sending API commands, you must authenticate and obtain a session ID (sid).
Log in using cURL
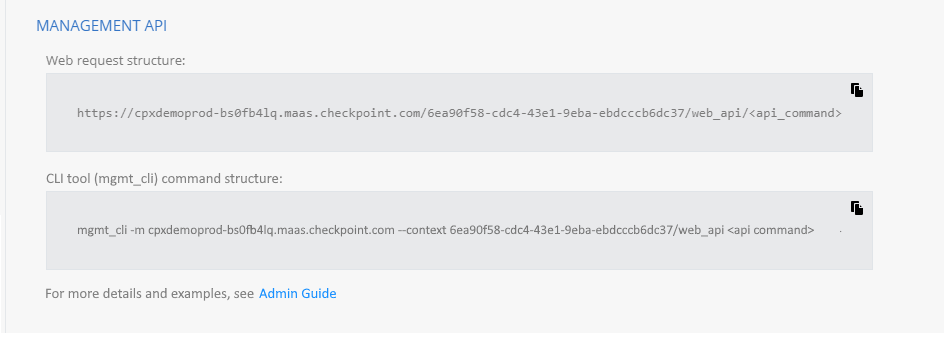
(Optional) Define the base URL:
BASE_URL="https://<MAAS-HOST>/<DOMAIN-UID>/web_api"Send a login request:
curl --location "$tenant_URL/login" \
  --header 'Content-Type: application/json' \
  --data '{
    "api-key": "<API_KEY>"
  }'
Example Response
Includes {"sid": "<SESSION_ID>"} — save this value.
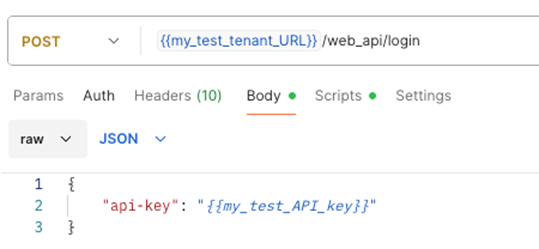
Log in using Postman
Method/URL: POST https://<MAAS-HOST>/<DOMAIN-UID>/web_api/login
Headers: Content-Type: application/json
Body (raw, JSON):
{"api-key": "<API_KEY>"}(Optional) Auto-save the SID using Postman Tests tab:
const json = pm.response.json();
if (json.sid) {
  pm.environment.set('SID', json.sid);
}
After logging in and obtaining a session ID, you can add a simple gateway to the Check Point Management Server using the API.
You can use one of these options:
-
Option A – Add a Spark Gateway with IP Address and Trust Settings
-
Option B – Add a Security Gateway with Cloud Trust Token (SIC and Authentication Token)
Option A – Add a Spark Gateway with IP Address and Trust
Use this option for Spark appliances or gateways with a known static IP.
Add with Static IP using cURL
curl --location "$BASE_URL/add-simple-gateway" \
--header 'Content-Type: application/json' \
--header "X-chkp-sid: $SID" \
--data '{
"name": "<GATEWAY_NAME>",
"ip-address": "<GATEWAY_IP>",
"hardware": "1800 Appliances",
"allow-smb": true,
"one-time-password": "<OTP>",
"trust-settings": {
"initiation-phase": "when_gateway_connects"
}
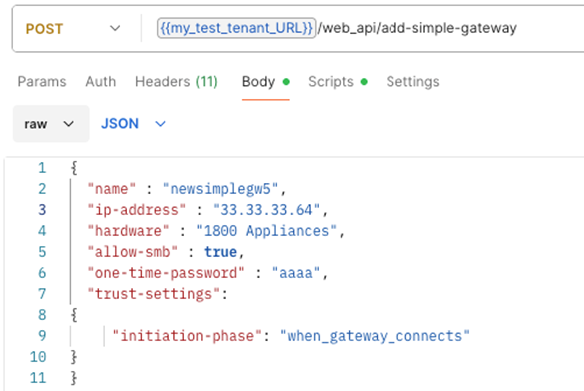
}'Add with Static IP using Postman
Method/URL: POST https://<MAAS-HOST>/<DOMAIN-UID>/web_api/add-simple-gateway
Headers:
-
Content-Type: application/json -
X-chkp-sid: {{SID}}(saved in Step 2)
Body (raw, JSON):
{
  "name": "<GATEWAY_NAME>",
  "ip-address": "<GATEWAY_IP>",
  "hardware": "1800 Appliances",
  "allow-smb": true,
  "one-time-password": "<OTP>",
  "trust-settings": {
    "initiation-phase": "when_gateway_connects"
    }
}
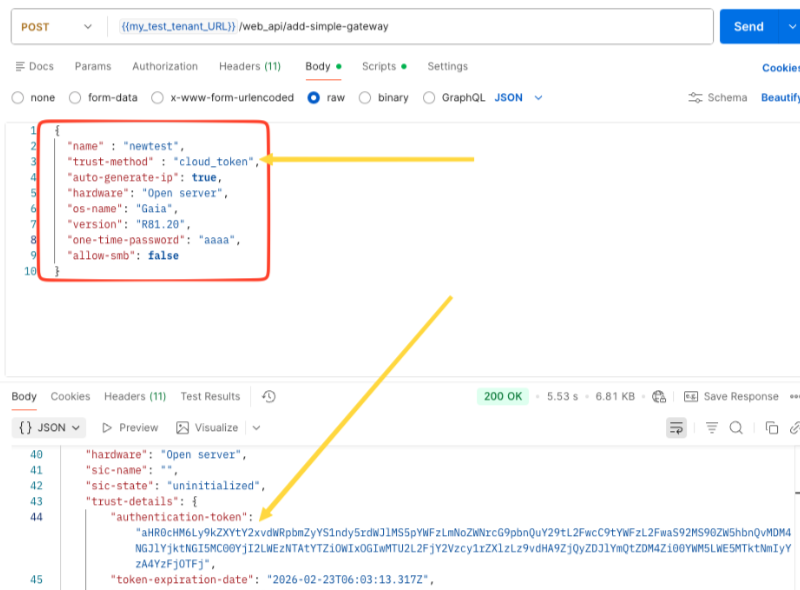
Option B – Add a Security Gateway with Cloud Trust Token
This option creates a Security Gateway object in Smart-1 Cloud and generates an authentication token you can use to connect the Security Gateway to Smart-1 Cloud.
Add with Token using Postman
Method/URL: POST https://<MAAS-HOST>/<DOMAIN-UID>/web_api/add-simple-gateway
Headers:
-
Content-Type: application/json -
X-chkp-sid: {{SID}}(saved in Step 2)
Body (raw, JSON):
{
  "name": "MyGateway",
  "trust-method": "cloud_token",
  "auto-generate-ip": true,
  "hardware": "Open server",
  "os-name": "Gaia",
  "version": "R82",
  "one-time-password": "[Credentials]",
  "allow-smb": false
}
Applying the Authentication Token on the Security Gateway
After the API request completes, the response contains the cloud authentication token.
On the Security Gateway:
|
|
Replace "authentication-token" with the token returned by the API.
All API changes must be published before they take effect.
Publish using cURL
curl --location "$BASE_URL/publish" \
--header 'Content-Type: application/json' \
--header "X-chkp-sid: $SID" \
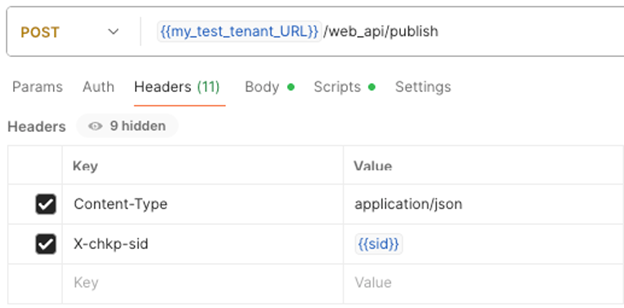
--data '{}'Publish using Postman
Method/URL: POST https://<MAAS-HOST>/<DOMAIN-UID>/web_api/publish
Headers:
-
Content-Type: application/json -
X-chkp-sid: {{SID}}
Body (raw, JSON):
{}
Streamed SmartConsole
Smart-1 Cloud supplies SmartConsole that runs on a web browser. The Streamed SmartConsole offers the full functionality of the Web SmartConsole, but it runs in a different information system environment.
|
|
Note - The Streamed SmartConsole includes a built-in timeout mechanism that ends the session after 15 minutes of inactivity or after two hours of continuous use, whichever occurs first. |
Working with Files
-
Use the top toolbar to upload or download files.
-
Uploaded files are stored temporarily in My Files.
-
To download files to your device, select them and use the toolbar’s download option.
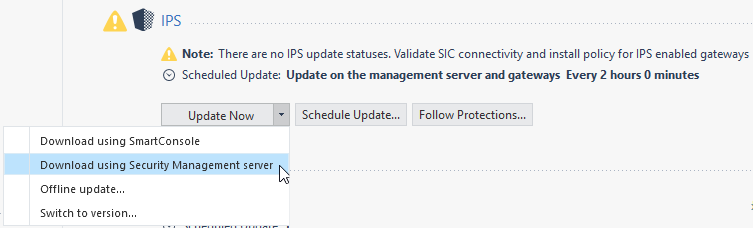
IPS Updates
Smart-1 Cloud environments have Internet connectivity by default. For optimal performance:
-
Configure IPS updates to download through the Security Management Server, not SmartConsole.
Automatic Updates
Refer to sk166056 for the current list of Smart-1 Cloud Automatic Updates.
Smart-1 Cloud Licensing
Management License
Smart-1 Cloud automatically applies default management licenses to the Management Server , enabling all management capabilities by default. You do not need to install or monitor them manually.
However, the actual services, features, and capacity limits available to you are determined by the Smart-1 Cloud licenses assigned to your User Center account.
Smart-1 Cloud License
-
New accounts include a 30‑day trial. To continue to use the service after the trial period, contact Check Point Sales to purchase a license.
-
Trial includes all functionality except:
-
Compliance
-
Version upgrades
-
Log export SIEM
-
|
|
Note - Licenses are additive; allocate all licenses to the same Check Point User Center account linked with the Check Point Portal account. |
Activating a License
-
Go to Global Settings > Contracts.
-
Click Associated Accounts and select Attach Account.
-
Enter the User Center credentials and click Next.
-
Select the license and click Finish.
Your license is shown on the Contracts page.

|
Notes:
|