Advanced Configuration
Use these commands on the Security Gateway to see the communication status and clear the communication between the Security Gateway and the Smart-1 Cloud service.
Smart-1 Cloud Gateway Commands
How to Connect a Security Gateway Behind a NAT/Proxy or Third-Party Security Gateway
In Smart-1 Cloud, the Security Gateway opens an HTTPS tunnel to the service. Smart-1 Cloud can open a Secure Internal Communication (SIC) to the Security Gateway when the tunnel is finished and operational.
You must allow outbound HTTPS traffic to the FQDNs listed below to allow the communication between the Security Gateway and the service:
|
Region |
Service FQDN |
|---|---|
|
Your Smart-1 Cloud domain (generic) |
|
|
APAC |
|
|
Canada |
|
|
Europe |
|
|
India |
|
|
United Arab Emirates (UAE) |
|
|
United States |
|
How to Connect a Spark Firewall Appliance with a Dynamic IP (DAIP)
Step 1: Create a Gateway object
-
From the left navigation panel, click Gateways & Servers.
-
Click the New icon
 or a New Gateway button and select Gateway....
The Check Point Gateway properties window opens.

-
Fill in the required fields for the Check Point Security Gateway:
-
Enter name - The name for the Security Gateway.
-
IP Address - Select the Dynamic Address checkbox.
-
-
Click Yes in the Enable Dynamic Address? window.
Step 2: Prepare the connection
-
In the Device section, click Connect.
The Connect Device window opens.
-
In the Security Gateway section, select Spark Firewall.
-
In the Connection preference section, select Prepare the object now, connect the Security Gateway later.
-
Click Next.
Step 3: Configure Authentication
-
Set up the one-time password (OTP) for secure communication between the Security Gateway and Smart-1 Cloud.
-
Choose how to identify the device:
-
MAC Address
-
Gateway Name
-
First to Connect

-
-
Click Next and securely save the generated token. This will be used on the Spark Firewall device later.
-
Click Close and then OK.
-
Publish the changes and push the Policy.
Step 4: Connect the Spark Firewall Appliance
-
Connect to the Spark Firewall WebUI, navigate to the Security Management tab, and click Setup.
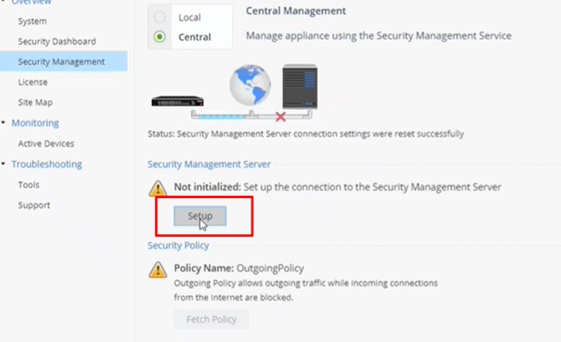
-
Select the Use Security Management service checkbox and click Next.
-
Click Use the Check Point Portal to generate a new authentication token and paste the token. Click Connect.
-
Wait for the status to change to Connected successfully to the Security Management Server, then click Next.
-
Set the one-time password and click Next:
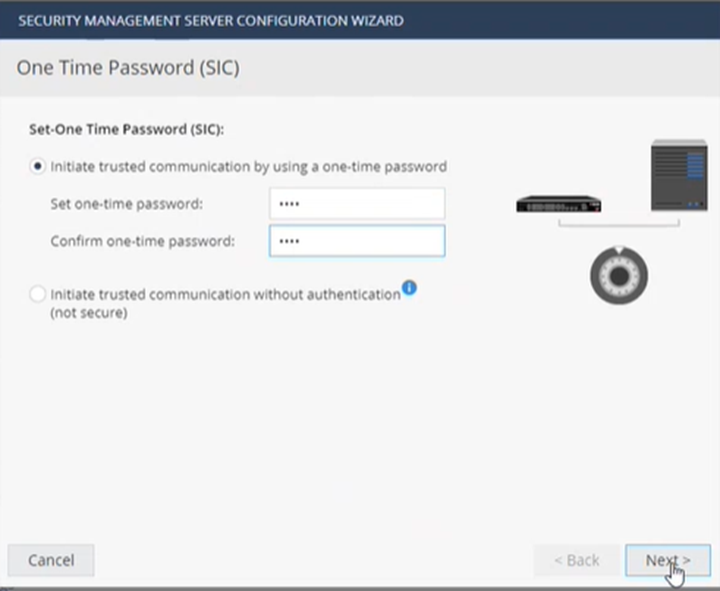

Important - Do not select the "Initiate trusted communication without authentication" option. Authentication with the SIC password is required.
-
Check Connect to the Security Management Server now and click Connect.


Note - The following message will appear:
"Security Policy Installation: Trust is established with the Security Management Server. However, unable to fetch the Security Policy from the Management Server"
After the trust is established, you can continue with the process.
-
Click Finish.
Step 5: Finalize configuration in Smart-1 Cloud
-
Connect to the Smart-1 Cloud WebUI.
-
In Gateways & Servers, double-click the Spark Firewall device that was configured earlier. The device properties window opens.
-
Under Network Management, select General.
-
In the Interfaces menu, select Get Interfaces with Topology.

-
Once it is done, publish the changes.
How to Configure the Query Settings in SmartConsole
-
From the left navigation panel, click Logs & Monitor > Logs.
-
To the right of the query field, click Options > Tools > Query Settings.
-
In the Query Settings window, configure the applicable settings.
-
Click OK.
For more information, see the Logging and Monitoring Administration Guide for your version.
How to Connect a Local Active Directory to Smart-1 Cloud
Smart-1 Cloud administrators who want to use a local Microsoft Active Directory (AD) server for Identity Awareness must configure the Security Gateway to act as a proxy between Smart-1 Cloud and the local AD server.
This integration enables supported user‑based access control scenarios that rely on directory information retrieved through the gateway.
Supported scope and limitations
This integration's scope includes:
-
This feature works only with Microsoft Active Directory.
Note - Microsoft Active Directory refers to on‑premises Active Directory Domain Services (AD DS). This integration does not apply to Microsoft Entra ID (formerly Azure AD).
-
The feature supports only the User Picker in the Access Role object.
These settings are not supported:
-
Identity Awareness Configuration wizard
-
Client certificate
-
Legacy user picker
-
Fetch branches
-
LDAP tree
-
Fingerprint configuration, including:
-
Fetching the fingerprint
-
Defining a fingerprint in the LDAP server definition for Smart-1 Cloud to on-premises Active Directory
-
-
-
Identity Logging is not supported.
Requirements
Make sure the following requirements are met before starting the configuration.
Platform and deployment requirements
-
A Security Gateway running R80.20 or higher on Gaia OS.
-
Spark Firewall appliances running R80.20.00 or higher on OS (see the Spark Firewall Appliances Centrally Managed Administration Guide for your version).
-
This deployment does not use:
-
DAIP gateways
-
Externally managed gateways
-
Network and connectivity requirements
-
The Security Gateway has network access to the Active Directory domain controller.
-
One of the following communication methods is available:
-
Clear - Communication between the Security Management Server and the Security Gateway is encrypted by SIC. Communication from the Security Gateway to the Active Directory server is not encrypted.
-
SSL - The Active Directory domain controller allows SSL connections.
-
Active Directory Integration Consideration
When integrating Active Directory, consider this:
-
The account used to configure the LDAP Account Unit must have appropriate Active Directory permissions for the selected identity integration.
-
For User Picker functionality, the account must have permission to perform LDAP queries.
-
For Security Gateway functionality, the required permissions depend on the identity sources configured on the Security Gateway.
-
Some functional constraints are imposed externally and cannot be resolved by adjusting permissions or configuration settings alone.
Configuration
To connect your local AD server to Smart-1 Cloud:
-
In the Streamed SmartConsole, open the Objects window on the right, click New > Host and create a host for the Domain Controller.
-
Create an LDAP Account Unit:
Click New > More > User/Identity > LDAP Account Unit. -
On the Servers tab, add an LDAP server.
-
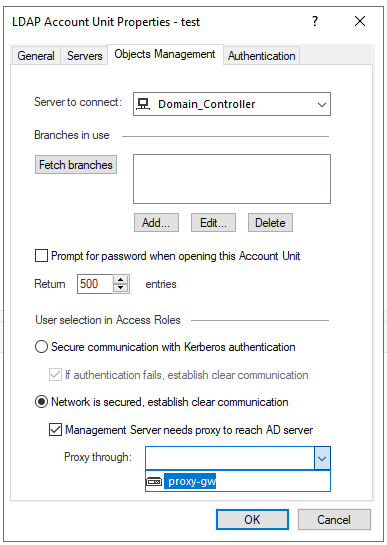
On the Object Management tab, in the Server to connect field, select the host object you created for the Domain Controller.
-
Add branches manually.
Fetching branches is not supported.
-
The branch name is the suffix of the Login DN that starts with
DC=. -
Example:
-
Login DN:
CN=John.Smith,CN=Users,DC=mycompany,DC=com -
Branch name:
DC=mycompany,DC=com
-
-
-
Select Management Server needs proxy to reach AD server.
-
In the Proxy through field, select the Security Gateway or Security Cluster that has a route to the AD server.
-
Click OK
The Security Gateway acts as a proxy between Smart-1 Cloud and the local Active Directory, enabling supported Identity Awareness user selection in Access Roles, within the documented scope and limitations.
How to Configure Access to Security Gateway Gaia Portal
The IP address in the Security Gateway object represents the interface between the Security Gateway and the service.
This IP address is internal (private) and you cannot use it on the Internet.
|
|
Note - If a Security Gateway object is created with a static IP address, access to the Security Gateway Gaia Portal is allowed without any change. |
To allow access to the Security Gateway Gaia Portal:
-
In SmartConsole, navigate to Gateways & Servers.
-
Open the Security Gateway object.
-
From the left tree, click Platform Portal.
-
Change the primary URL to the Security Gateway IP address used for Gaia login.
-
Publish the SmartConsole session.
-
Install the Access Control policy.
Example:
The displayed Gateway IP address is the MaaS tunnel IP address.

Change the Platform Portal IP address to the Security Gateway IP address used for the Gaia login.

How to Configure Access from the Security Gateway External IP Address to the Internal Asset with Static NAT
Smart-1 Cloud uses the Security Gateway object's primary IP address for tunnel communication between the Security Gateway and the cloud service. It is a virtual interface.
|
|
Note - When configuring NAT rules, standard settings are available if the Security Gateway object is created with a static IP address. |
Consequently, this rule's destination IP address is a virtual tunnel IP address, not the Security Gateway's physical external interface.
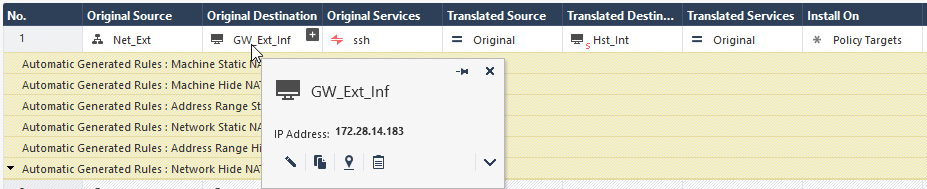
This screenshot shows the IP address in the tooltip:

To configure access from the Security Gateway's External IP address to the Internal Asset with NAT Policy, a static rule in Smart-1 Cloud, you must create a dummy object with the physical IP address of the Security Gateway. You then use it in the NAT rule.
In this screenshot, the dummy Host object ("GW_Ext_int") that contains the Security Gateway's physical IP address, replaces the Security Gateway object ("GW-183").

How to Configure IP Address Selection by Remote VPN Peer
There are some methods that can determine how remote peers resolve the IP address of the local Security Gateway.
Configure these settings in Security Gateway Properties > IPSec VPN > Link Selection.
|
|
Note - If you create the Security Gateway object with a static IP address and not with the tunnel IP address, link selection is not required. You can use the standard settings for VPN configuration on the Security Gateway. We recommend configuring in Smart-1 Cloud a static IP address in the Security Gateway object for VPN configuration. |
Smart-1 Cloud uses the Security Gateway object's primary IP address for tunnel communication between the Security Gateway and our cloud service. It is a virtual interface.
Consequently, you cannot use the Main address option.
As an alternative, use one of these options to select an address from the topology table:
Option 1:
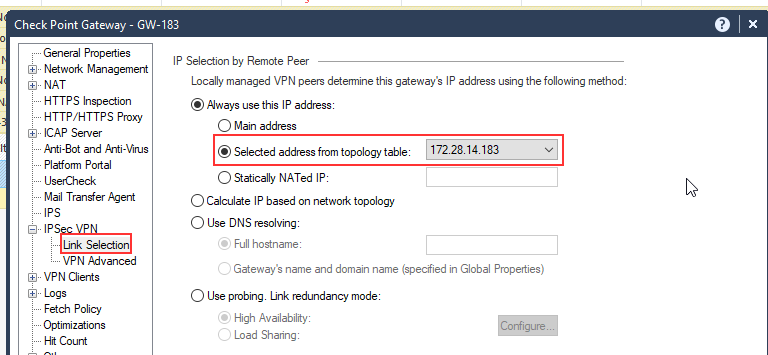
Option: 2
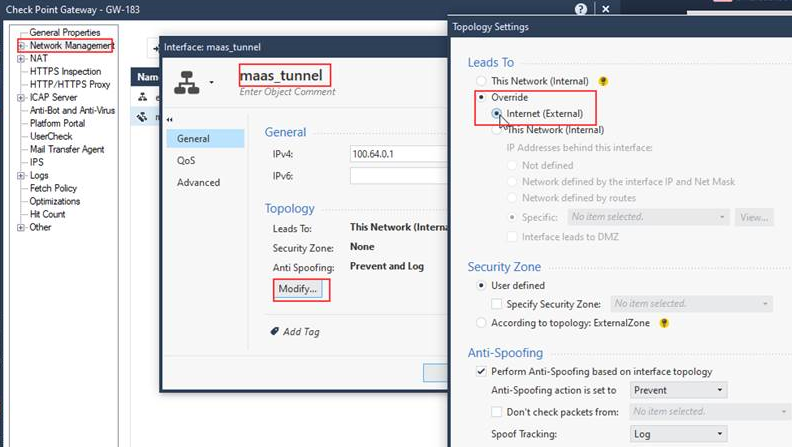
Smart-1 Cloud Configuration for Site-to-Site VPN
When you configure a Site-to-Site VPN between two gateways, the VPN status can show as "down".
To resolve this issue, it is necessary to configure the topology of the maas_tunnel interface as "Internet (External)."
|
|
Note - You require this configuration only when you have Site-to-Site VPN between two Security Gateways (not clusters). |
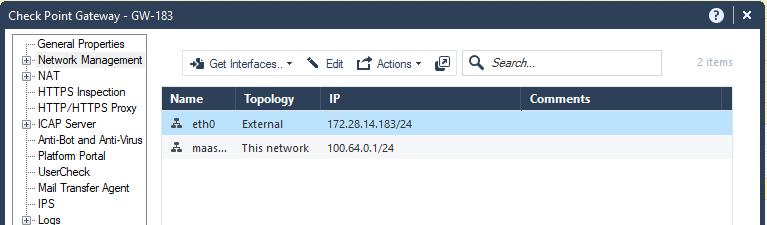
To configure a Site-to-Site VPN in SmartConsole:
-
From the left navigation panel, click Gateways & Servers.
-
Open the Security Gateway object.
-
Navigate to Network Management.
-
Select the maas_tunnel interface > click Edit.
-
On the general page, click Modify.
-
Select Override > Internet (External).
-
Click OK.
-
Run steps 2-7 again for all Security Gateways in the Site-to-Site VPN.
-
Install the Access Control policy on all applicable Security Gateways.
Example:
Configuring MDPS to Activate a MaaS Tunnel Interface
You can configure Management Data Plane Separation (MDPS) to activate the MaaS_Tunnel interface in the Management Plane context.
-
Connect to the relevant Security Gateway using SSH or console access.
-
Add required MDPS tasks. For this, run the commands below to add the tunnel processes to MDPS:
add mdps task process vtunneladd mdps task process wstunnel -
Reboot the Security Gateway to apply the changes.