Additional Information
Configuring Outbound Protection
There is an option to set up the Cloud Firewall Auto Scaling Group to inspect outbound HTTP/HTTPS traffic.
Administrators can use this to inspect and control traffic of various web clients such as:
-
Servers and containers that require software and image updates from repositories located outside the VPC.
-
Virtual Desktop environments that run inside the VPC and access the Internet.
In the diagram below, web clients in private subnets are configured to use an ELB as their HTTP/HTTPS proxy. This Proxy ELB is configured to forward TCP connections to the Cloud Firewall Auto Scaling Group.
Each Cloud Firewall Gateway in the group is configured as an HTTP/HTTPS proxy that listens on the proxy port. The Cloud Firewall Gateway inspects the proxied HTTP/HTTPS connections, and can be used to log the URL.
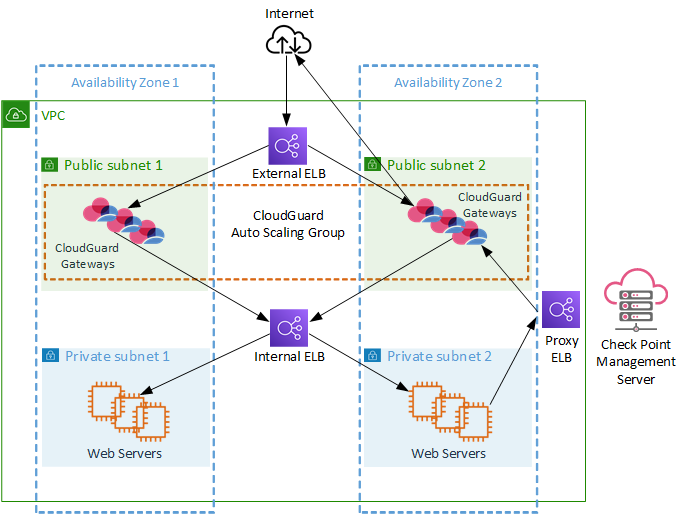
Connections that arrive at the Cloud Firewall Gateways have a source IP address that belongs to the proxy ELB rather than the web client. Because the ELB acts as a TCP proxy, and not as an HTTP proxy, no "X-Forwarded-For" HTTP header is present to identify and log the original client. Instead, the ELB is set up by the CloudFormation template to add a Proxy Protocol header. This allows the Cloud Firewall Gateways to log the original client address.
|
|
Notes:
|
For additional information, see AWS ELB proxy protocol.
In addition, you can set up the Cloud Firewall Gateways to do deep packet inspection of encrypted HTTPS traffic with the HTTPS Inspection![]() Feature on a Security Gateway that inspects traffic encrypted by the Secure Sockets Layer (SSL) protocol for malware or suspicious patterns. Synonym: SSL Inspection. Acronyms: HTTPSI, HTTPSi. feature. When this feature is enabled, the web clients must be set up to trust a CA certificate issued by the Security Management Server
Feature on a Security Gateway that inspects traffic encrypted by the Secure Sockets Layer (SSL) protocol for malware or suspicious patterns. Synonym: SSL Inspection. Acronyms: HTTPSI, HTTPSi. feature. When this feature is enabled, the web clients must be set up to trust a CA certificate issued by the Security Management Server![]() Dedicated Check Point server that runs Check Point software to manage the objects and policies in a Check Point environment within a single management Domain. Synonym: Single-Domain Security Management Server. during the HTTPS Inspection configuration. See the "Creating an Outbound Certificate" section below.
Dedicated Check Point server that runs Check Point software to manage the objects and policies in a Check Point environment within a single management Domain. Synonym: Single-Domain Security Management Server. during the HTTPS Inspection configuration. See the "Creating an Outbound Certificate" section below.
Configuration steps:
-
Security Management Server
 Check Point Single-Domain Security Management Server or a Multi-Domain Security Management Server. setup:
Important - It is necessary to allow access to the Cloud Firewall Gateways' proxy port only from the internal ELB. Specifically, if you want to prevent access from the Internet to these ports. Otherwise, malicious clients on the Internet can bounce off the Cloud Firewall Gateways to attack 3rd-party servers.
The proxy ELB is normally deployed in the same subnets as the Cloud Firewall Auto Scaling Group.
Use the firewall rule base
All rules configured in a given Security Policy. Synonym: Rulebase. to limit access to the HTTP/HTTPS proxy ports only from these subnets:-
In SmartConsole
Check Point GUI application used to manage a Check Point environment - configure Security Policies, configure devices, monitor products and events, install updates, and so on., create a network object for each subnet in which the Cloud Firewall Gateways are deployed. -
Create a network group object that includes the VPC subnets from the previous step, for example, "GatewaysSubnets".
-
Create the following rules in the firewall security rule
Set of traffic parameters and other conditions in a Rule Base (Security Policy) that cause specified actions to be taken for a communication session. base:Source
Destination
VPN
Services & Applications
Action
Track
Install On
GatewaysSubnets
GatewaysSubnets
* Any
HTTP_and_HTTPS_proxy
Accept
Log
Policy Targets
* Any
GatewaysSubnets
* Any
HTTP_and_HTTPS_proxy
Drop
Log
Policy Targets

Note - This table regards the Application Load Balancer. If you are using Network Load Balancer, set the source from "GatewaysSubnets" to "WebserverSubnets."
-
-
Run the following command on the Security Management Server to add a proxy port:
autoprov_cfg set template -tn < TEMPLATE-NAME> -pp <PROXY-PORT>Where:
-
<TEMPLATE-NAME>- Specifies the name of the Auto scaling Group's template that you selected when setting up Automatic Provisioning Check Point Software Blade on a Management Server that manages large-scale deployments of Check Point Security Gateways using configuration profiles. Synonyms: SmartProvisioning, SmartLSM, Large-Scale Management, LSM.. -
<PROXY-PORT >- Specifies the port on which the proxy would be listening.
-
-
If you want to use HTTPS Inspection, to enable it see Enabling and disabling Software Blades.
-
Web clients setup:
Use the AWS
Amazon® Web Services. Public cloud platform that offers global compute, storage, database, application and other cloud services. Management console to determine the DNS name of the proxy ELB. You should configure your web clients to use the proxy ELB as their HTTP/HTTPS proxy. Consult the documentation of your web clients in order to determine how to achieve this.
Notes:
-
While some applications might use the operating system proxy settings, other applications might have application specific proxy configuration.
-
Systems hosted in EC2 normally require that access to the metadata service on 169.254.169.254 is not directed through a proxy
If HTTPS Inspection is enabled on the Cloud Firewall Gateways, then you must also configure your web clients to trust the HTTPS Inspection certificate generated by the Security Management Server.
For instructions, see the web client documentation.
Note - While some applications might use a system wide certificate store to determine trust, other applications might have their own separate configuration.
-
Multiple external ELBs
If necessary, you can create additional external ELBs that forward traffic to the same pool of Cloud Firewall Gateways.
To do so, for each additional external ELB:
-
Create an additional internal ELB.
-
The external ELB must forwards traffic on the same port, on which the internal ELB is listening.
-
You must allocate unique TCP/UDP ports for each such pair (such as 8081, 8083, and other ports).
External ELB with multiple ports
If necessary, an external ELB can listen on multiple TCP/UDP ports (e.g. 80, 443). Traffic that arrives on these ports can be forwarded on either a single port or multiple ports.
Examples:
-
Listening on multiple ports, (e.g. 80, 443), forwarding on a single port (as in 8081).
-
Listening on multiple ports (e.g. 80, 443), forwarding on multiple ports (as in, 8081, 8443).
In both cases, there must be a corresponding internal ELB. The internal ELB must be listening on the same set of ports, to which the external ELB forwards its traffic.
|
|
Note - The ports used to forward traffic should be unique |
Cross-Zone Load Balancing
ELB supports Cross Zone Load Balancing. With Application Load Balancer, this feature is enabled by default upon creation.
With Network Load Balancer, it is necessary to manually enable this feature, after the Load Balancer is created:
-
Open the Amazon EC2 console.
-
From the main menu bar Load Balancers.
-
Right click on the newly created Network Load Balancer > Edit attributes.
-
Select the checkbox next to Cross-Zone load balancing.
-
Click Save.
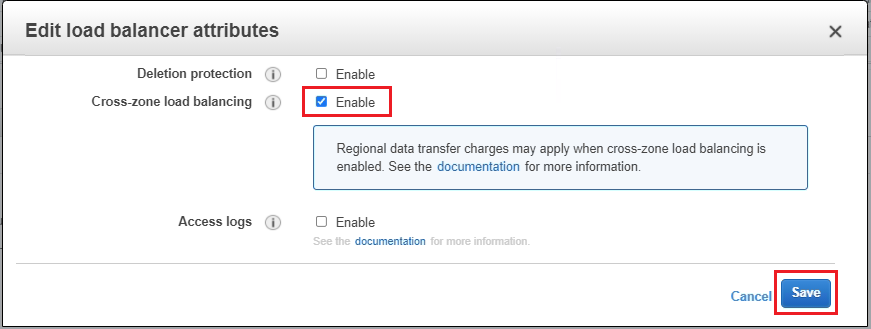
This step is required when one of the Load Balancers, internal or external, is deployed in more Availability Zones than its targets.
Removing an Elastic Load Balancer
To remove a Load Balancer:
-
Delete the Load Balancer entirely.
or
-
Remove the
x-chkptags from the Load Balancer.Make sure to wait for the CME cycle to finish (30 seconds by default), before applying any other changes.
Multiple VPCs
If necessary, the Cloud Firewall Gateways and the internal servers can be placed in different VPC's.
To place them in different VPC's:
-
Put the internal ELB in the same VPC as the internal servers.
-
Make sure that the Cloud Firewall Gateways can resolve the hostname of the internal ELB.
-
Make sure that there is connectivity from the Cloud Firewall Gateways to the internal ELB by either using VPC peering, or through an Internet Gateway.
Enabling inbound HTTPS Inspection
Follow these steps to enable HTTPS Inspection:
|
|
Note - An outbound CA certificate is necessary for inbound SSL inspection. If you have an outbound CA certificate you can skip these steps. Otherwise, create one in "Creating an Outbound Certificate". |
Creating an Outbound Certificate
-
In SmartConsole, from the left navigation panel, select Gateways & Servers.
-
Right click on one of the Cloud Firewall Gateways and click Edit.
-
From the left tree, select HTTPS Inspection.
-
In Step 1 click on Create to create new certificate, enter the required information and click OK.
-
In Step 2 you can export the newly created certificate for distributing the CA on client computers.
For more information click on Learn more.
-
Click OK.
-
From the left tree, select Security Policies > HTTPS Inspection > Policy.
-
Go to the Destination column, and edit the default rule.
-
Right-click Internet > Remove.
The object Any appears.
This means that the inspection takes place with a single-interface gateway.
-
Publish the SmartConsole session.
Creating an HTTPS Inspection Rule to Inspect SSL Traffic
-
Create a new HTTPS service:
-
In the Right Object Browser, click New > More > Service > TCP.
-
Enter service name, for example, https-8443.
-
For Protocol, select HTTPS.
-
For Port, select Customize and enter the port number.
-
-
Create an HTTPS Inspection rule to inspect SSL traffic belonging to this web application:
-
From the left tree, select Security Policies > HTTPS Inspection > Policy.
-
Add the following rule:
-
Source - Any
-
Destination - Any (do not use the Internet object)
-
Service - The HTTPS service you created
-
Action - Inspect
-
Certificate - The certificate you created
-
-
Publish the SmartConsole session
-
-
Enable the HTTPS Inspection blade as explained in sk130372 > Enabling and disabling Software Blades section.
Updating the Auto Scaling Group
|
|
Notes:
|
Updating AMI
-
For Launch Template:
-
Find the target AMI ID:
-
Open AWS Marketplace and search for Cloud Firewall.
-
Select the listing matching the one used to deploy the autoscaling group.
-
Click Continue to subscribe.
-
Click Continue to configuration.
-
Select the target version and build (For example: R81.20-631.1427).
-
Select the region of your autoscaling group.
-
Copy the AMI ID.
-
-
Update the autoscaling group launch template:
-
Open the Amazon EC2 console.
-
From the main menu bar select Launch Templates and select the launch template of the Auto Scaling Group.
-
Click Actions > Modify template (Create new version).
-
In Auto Scaling Guidance Check Provide guidance to help me set up a template that I can use with EC2 Auto Scaling.
-
Go to Application and OS Images (Amazon machine image) and click Browse more AMIs.
-
In the search box enter the AMI-ID (“ami-xxxxxxxxxxxxxxxxx”) copied in step #1.
-
Click the Community AMIs tab.
-
Click the Select button next to the AMI matching the AMI-ID you pasted in the search bar.
-
If you get the alert: Some of your current settings will be changed or removed if you proceed, review the changes and Confirm if you agree.
-
-
In Network settings section mark Select existing security group.
-
Examine your configuration in all other sections and create the launch template version.
-
-
From the Navigation Toolbar, select Auto Scaling Groups.
-
Select your Auto Scale Group.
-
Go to the Instance management tab.
-
Select the Instance you want to replace first.
-
In the Actions drop-down menu, click Detach. Make sure you have Replace Instance selected.
-
Do this for all other updating instances, one at a time.
Note - To monitor the draining state:
-
Go to EC2 Console > Load Balancing > Target Groups.
-
Select the Target Group.
-
Go to the Targets tab.
On this tab, you can see the following statuses:
-
Healthy – The instance is serving traffic.
-
Draining – The instance is being deregistered but is still handling existing connections. (AWS does not show the exact remaining time of connection draining, so this status means the Deregistration Delay is still active.)
-
Unused – Connection draining is done; the instance is fully deregistered.
-
Initial, Unhealthy, and other states.
-
-
-
For Launch Configuration:
-
Open the Amazon EC2 console.
-
From the Primary menu bar, select Launch Configurations and select the launch configuration of the Auto Scaling Group.
-
Click Actions > Copy launch configuration.
-
Go to Amazon machine image (AMI) and select the new AMI.
Follow these steps to find the desired AMI id:
-
Open the AWS Marketplace.
-
Search for Check Point and click on the relevant product listing.
-
Click Continue to Subscribe.
-
Click Continue to Configuration.
-
Select the relevant Software Version and Region.
-
Copy the Ami Id.
-
-
Examine your configuration in all other sections and create the launch configuration.
-
From the Navigation Toolbar, select Auto Scaling Groups.
-
Select the applicable Auto Scaling Group, click Edit.
-
In the Launch Configuration section, select the newly created launch configuration, named the same as the previous configuration with Copy concatenated to it, and select Update.
-
To apply this update, manually stop the Cloud Firewall Gateways one by one. The Auto Scaling Group deploys new Cloud Firewall Gateways with the updated AMI and not with the terminated gateways.
-
|
|
Notes:
|
Replace launch configuration with launch template
-
Copy a launch configuration to a launch template:
-
Open the Amazon EC2 console.
-
On the navigation pane below Auto Scaling, select Launch Configurations.
-
Select the launch configuration you want to copy and select Copy to launch template > Copy selected. It creates a new launch template with the same name and options as your selected launch configuration.
-
For New launch template name, you can use the name of the launch configuration (the default) or enter a new name. Launch template names must be unique.
-
Select Copy.
-
-
Replace the launch configuration for an Auto Scaling Group:
-
Open the Amazon EC2 console, and select Auto Scaling Groups from the navigation pane.
-
Select the check box next to your Auto Scaling Group.
A pane opens at the bottom of the page, showing information about the selected group.
-
On the Details tab, select Launch configuration, Edit.
-
Select Switch to launch template.
-
For Launch template, select your launch template.
-
For Version, select the launch template version, as needed. After you create versions of a launch template, you can select if the Auto Scaling Group uses the default or the latest version of the launch template when scaling out.
-
When you have finished, select Update.
-
IPS Geo Protection Based on "X-Forwarded-For" HTTP header
When the Check Point Cloud Firewall Auto Scaling Group is deployed behind a Load Balancer, you can log and control the country of origin of the clients as explained in sk115532 - IPS Geo protection based on "X-Forwarded-For" HTTP header in Check Point Cloud Firewall for AWS / Cloud Firewall for Azure.
Automatic Rule Placement
The Cloud Management Extension (CME) service creates automatic access (in the network layer) and NAT (in the NAT policy) rules for each Cloud Firewall Gateway for each internal ELB for each listener port. These rules are added at the top of the layers.
Sometimes it is preferable to add the rules in a specific place in the policy rather than at the top. To do this, create, a section for these rules in SmartConsole, and specifying the section name in the automatic provisioning configuration.
-
In SmartConsole, in the relevant Security Policy, create a new section:
-
Right click on a rule number, under which you wish to create the section.
-
Choose Create New Section Title and click Below.
-
Name the section. Make note of the name.
-
-
Use SSH to connect to the Security Management Server.
-
Log in to Expert mode.
-
Run the following command:
autoprov_cfg set template -tn <CONFIGURATION-TEMPLATE-NAME> -secn <SECTION-NAME>
Replace <CONFIGURATION-TEMPLATE-NAME> with the name of the configuration template you selected when Setting up Automatic Provisioning, for example, 'my-configuration-template'.
Replace <SECTION-NAME> with the name of the section you created in step 1.
If the section is specified in the configuration template, but it is not found in the rule base, the rules are added at the top by default.
For more information, see the Automatic Rule Placement section in the Cloud Management Extension Administration Guide.
|
|
Note - Changes such as moving the section in the Security Policy or changing the section name in the automatic provisioning configuration impact only newly provisioned Cloud Firewall Gateways. Rules for existing Cloud Firewall Gateways remain in place. If you want to apply these changes to all of the Cloud Firewall Gateways in the Auto Scaling Group, then terminate the old gateways and the Auto Scaling Group automatically create new gateways to take their place with the new configuration. |