Deploying a Centralized GWLB Security VPC
This section describes the steps to deploy a Cloud Firewall VPC with the Gateway Load Balancer.
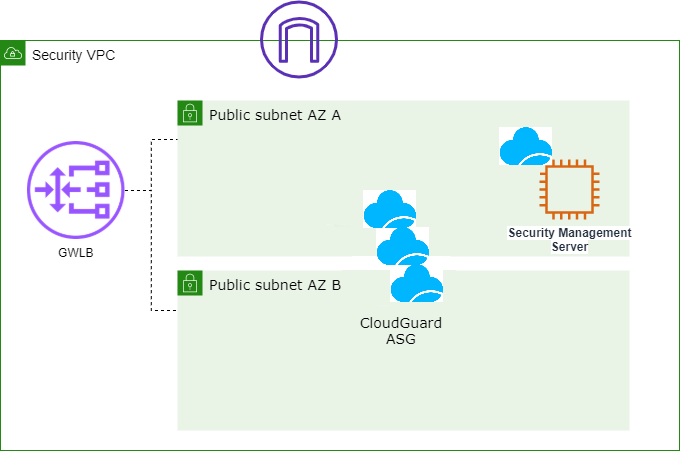
The Security VPC CloudFormation Template deploys a Cloud Firewall Auto Scaling Group, a Gateway Load Balancer, and an optional Security Management Server![]() Dedicated Check Point server that runs Check Point software to manage the objects and policies in a Check Point environment within a single management Domain. Synonym: Single-Domain Security Management Server..
Dedicated Check Point server that runs Check Point software to manage the objects and policies in a Check Point environment within a single management Domain. Synonym: Single-Domain Security Management Server..
Step 1: Prepare your AWS Account
To prepare your AWS account:
-
If you do not have an AWS
 Amazon® Web Services. Public cloud platform that offers global compute, storage, database, application and other cloud services. account, create one.
 -
Use the region selector in the navigation bar to select the AWS region where you want to deploy Check Point Cloud Firewall Auto Scaling on AWS.
-
Create a key pair in your preferred region.
-
Request a service limit increase for the AWS resources you plan to use, if necessary.
By default, this Deployment Guide uses:
-
c5.xlarge instances for Cloud Firewall Gateways
-
m5.xlarge instances for the Security Management Server
Check Point Single-Domain Security Management Server or a Multi-Domain Security Management Server..
-
Minimum Permissions for Deployment
Configure the relevant IAM policy with the minimum permissions for a successful deployment, as shown below.
In the AWS VPC Console, navigate to the IAM service, select the relevant IAM policy, copy the required permissions from this guide (see below) and paste them into the policy:
{
    "Version": "2012-10-17",
    "Statement": [
        {
            "Sid": "Permissions",
            "Effect": "Allow",
            "Action": [
                "SNS:CreateTopic",
                "SNS:DeleteTopic",
                "SNS:GetTopicAttributes",
                "SNS:Subscribe",
                "autoscaling:CreateAutoScalingGroup",
                "autoscaling:DeleteAutoScalingGroup",
                "autoscaling:DeletePolicy",
                "autoscaling:DescribeAutoScalingGroups",
                "autoscaling:DescribePolicies",
                "autoscaling:DescribeScalingActivities",
                "autoscaling:PutNotificationConfiguration",
                "autoscaling:PutScalingPolicy",
                "autoscaling:SetInstanceProtection",
                "autoscaling:UpdateAutoScalingGroup",
                "cloudformation:CreateStack",
                "cloudformation:DeleteStack",
                "cloudformation:DescribeStacks",
                "cloudformation:ListStackResources",
                "cloudformation:ValidateTemplate",
                "cloudwatch:DeleteAlarms",
                "cloudwatch:PutMetricAlarm",
                "ec2:AllocateAddress",
                "ec2:AssociateAddress",
                "ec2:AssociateRouteTable",
                "ec2:AttachInternetGateway",
                "ec2:AttachNetworkInterface",
                "ec2:AuthorizeSecurityGroupEgress",
                "ec2:AuthorizeSecurityGroupIngress",
                "ec2:CreateInternetGateway",
                "ec2:CreateLaunchTemplate",
                "ec2:CreateLocalGatewayRouteTable",
                "ec2:CreateNetworkInterface",
                "ec2:CreateRoute",
                "ec2:CreateRouteTable",
                "ec2:CreateSecurityGroup",
                "ec2:CreateSubnet",
                "ec2:CreateTags",
                "ec2:CreateVpc",
                "ec2:CreateVpcEndpointServiceConfiguration",
                "ec2:DeleteInternetGateway",
                "ec2:DeleteLaunchTemplate",
                "ec2:DeleteNetworkInterface",
                "ec2:DeleteRoute",
                "ec2:DeleteRouteTable",
                "ec2:DeleteSecurityGroup",
                "ec2:DeleteSubnet",
                "ec2:DeleteVpc",
                "ec2:DeleteVpcEndpointServiceConfigurations",
                "ec2:DescribeAccountAttributes",
                "ec2:DescribeAddresses",
                "ec2:DescribeAvailabilityZones",
                "ec2:DescribeInstanceAttribute",
                "ec2:DescribeInstanceTypes",
                "ec2:DescribeInstances",
                "ec2:DescribeInternetGateways",
                "ec2:DescribeKeyPairs",
                "ec2:DescribeLaunchTemplateVersions",
                "ec2:DescribeLaunchTemplates",
                "ec2:DescribeNetworkAcls",
                "ec2:DescribeNetworkInterfaces",
                "ec2:DescribeRegions",
                "ec2:DescribeRouteTables",
                "ec2:DescribeSecurityGroups",
                "ec2:DescribeSubnets",
                "ec2:DescribeTags",
                "ec2:DescribeVolumes",
                "ec2:DescribeVpcAttribute",
                "ec2:DescribeVpcClassicLink",
                "ec2:DescribeVpcClassicLinkDnsSupport",
                "ec2:DescribeVpcEndpointServiceConfigurations",
                "ec2:DescribeVpcEndpointServicePermissions",
                "ec2:DescribeVpcs",
                "ec2:DetachInternetGateway",
                "ec2:DetachNetworkInterface",
                "ec2:DisassociateAddress",
                "ec2:DisassociateRouteTable",
                "ec2:ModifyNetworkInterfaceAttribute",
                "ec2:ModifySubnetAttribute",
                "ec2:ModifyVpcAttribute",
                "ec2:ReleaseAddress",
                "ec2:RevokeSecurityGroupEgress",
                "ec2:RunInstances",
                "ec2:TerminateInstances",
                "elasticloadbalancing:AddTags",
                "elasticloadbalancing:CreateListener",
                "elasticloadbalancing:CreateLoadBalancer",
                "elasticloadbalancing:CreateTargetGroup",
                "elasticloadbalancing:DeleteListener",
                "elasticloadbalancing:DeleteLoadBalancer",
                "elasticloadbalancing:DeleteTargetGroup",
                "elasticloadbalancing:DescribeListeners",
                "elasticloadbalancing:DescribeLoadBalancerAttributes",
                "elasticloadbalancing:DescribeLoadBalancers",
                "elasticloadbalancing:DescribeTags",
                "elasticloadbalancing:DescribeTargetGroupAttributes",
                "elasticloadbalancing:DescribeTargetGroups",
                "elasticloadbalancing:DescribeTargetHealth",
                "elasticloadbalancing:ModifyLoadBalancerAttributes",
                "elasticloadbalancing:ModifyTargetGroupAttributes",
                "iam:AddRoleToInstanceProfile",
                "iam:AttachRolePolicy",
                "iam:CreateInstanceProfile",
                "iam:CreatePolicy",
                "iam:CreateRole",
                "iam:DeleteInstanceProfile",
                "iam:DeletePolicy",
                "iam:DeleteRole",
                "iam:DeleteRolePolicy",
                "iam:DetachRolePolicy",
                "iam:GetInstanceProfile",
                "iam:GetPolicy",
                "iam:GetPolicyVersion",
                "iam:GetRole",
                "iam:ListAttachedRolePolicies",
                "iam:ListInstanceProfilesForRole",
                "iam:ListPolicyVersions",
                "iam:ListRolePolicies",
                "iam:PutRolePolicy",
                "iam:RemoveRoleFromInstanceProfile"
            ],
            "Resource": "*"
        },
        {
            "Sid": "IAMPassRole",
            "Effect": "Allow",
            "Action": "iam:PassRole",
            "Resource": "*",
            "Condition": {
                "StringEquals": {
                    "iam:PassedToService": "ec2.amazonaws.com"
                }
            }
        }
    ]
}
{
    "Version": "2012-10-17",
    "Statement": [
        {
            "Sid": "Permissions",
            "Effect": "Allow",
            "Action": [
                "SNS:CreateTopic",
                "SNS:DeleteTopic",
                "SNS:GetTopicAttributes",
                "SNS:Subscribe",
                "autoscaling:CreateAutoScalingGroup",
                "autoscaling:DeleteAutoScalingGroup",
                "autoscaling:DeletePolicy",
                "autoscaling:DescribeAutoScalingGroups",
                "autoscaling:DescribePolicies",
                "autoscaling:DescribeScalingActivities",
                "autoscaling:PutNotificationConfiguration",
                "autoscaling:PutScalingPolicy",
                "autoscaling:SetInstanceProtection",
                "autoscaling:UpdateAutoScalingGroup",
                "cloudformation:CreateStack",
                "cloudformation:DeleteStack",
                "cloudformation:DescribeStacks",
                "cloudformation:ListStackResources",
                "cloudformation:ValidateTemplate",
                "cloudwatch:DeleteAlarms",
                "cloudwatch:DescribeAlarms",
                "cloudwatch:ListTagsForResource",
                "cloudwatch:PutMetricAlarm",
                "ec2:AllocateAddress",
                "ec2:AssociateAddress",
                "ec2:AuthorizeSecurityGroupEgress",
                "ec2:AuthorizeSecurityGroupIngress",
                "ec2:CreateLaunchTemplate",
                "ec2:CreateNetworkInterface",
                "ec2:CreateRoute",
                "ec2:CreateSecurityGroup",
                "ec2:CreateTags",
                "ec2:CreateVpcEndpointServiceConfiguration",
                "ec2:DeleteLaunchTemplate",
                "ec2:DeleteNetworkInterface",
                "ec2:DeleteSecurityGroup",
                "ec2:DeleteVpcEndpointServiceConfigurations",
                "ec2:DescribeAddresses",
                "ec2:DescribeInstanceAttribute",
                "ec2:DescribeInstanceTypes",
                "ec2:DescribeInstances",
                "ec2:DescribeKeyPairs",
                "ec2:DescribeLaunchTemplateVersions",
                "ec2:DescribeLaunchTemplates",
                "ec2:DescribeNetworkInterfaces",
                "ec2:DescribeSecurityGroups",
                "ec2:DescribeSubnets",
                "ec2:DescribeTags",
                "ec2:DescribeVolumes",
                "ec2:DescribeVpcEndpointServiceConfigurations",
                "ec2:DescribeVpcEndpointServicePermissions",
                "ec2:DescribeVpcs",
                "ec2:DescribeRegions",
                "ec2:DetachNetworkInterface",
                "ec2:DisassociateAddress",
                "ec2:ModifyNetworkInterfaceAttribute",
                "ec2:ReleaseAddress",
                "ec2:RevokeSecurityGroupEgress",
                "ec2:RunInstances",
                "ec2:TerminateInstances",
                "elasticloadbalancing:AddTags",
                "elasticloadbalancing:CreateListener",
                "elasticloadbalancing:CreateLoadBalancer",
                "elasticloadbalancing:CreateTargetGroup",
                "elasticloadbalancing:DeleteListener",
                "elasticloadbalancing:DeleteLoadBalancer",
                "elasticloadbalancing:DeleteTargetGroup",
                "elasticloadbalancing:DescribeListeners",
                "elasticloadbalancing:DescribeLoadBalancerAttributes",
                "elasticloadbalancing:DescribeLoadBalancers",
                "elasticloadbalancing:DescribeTags",
                "elasticloadbalancing:DescribeTargetGroupAttributes",
                "elasticloadbalancing:DescribeTargetGroups",
                "elasticloadbalancing:DescribeTargetHealth",
                "elasticloadbalancing:ModifyLoadBalancerAttributes",
                "elasticloadbalancing:ModifyTargetGroupAttributes",
                "iam:AddRoleToInstanceProfile",
                "iam:AttachRolePolicy",
                "iam:CreateInstanceProfile",
                "iam:CreatePolicy",
                "iam:CreateRole",
                "iam:DeleteInstanceProfile",
                "iam:DeletePolicy",
                "iam:DeleteRole",
                "iam:DeleteRolePolicy",
                "iam:DetachRolePolicy",
                "iam:GetInstanceProfile",
                "iam:GetPolicy",
                "iam:GetPolicyVersion",
                "iam:GetRole",
                "iam:ListAttachedRolePolicies",
                "iam:ListInstanceProfilesForRole",
                "iam:ListPolicyVersions",
                "iam:ListRolePolicies",
                "iam:PutRolePolicy",
                "iam:RemoveRoleFromInstanceProfile"
            ],
            "Resource": "*"
        },
        {
            "Sid": "IAMPassRole",
            "Effect": "Allow",
            "Action": "iam:PassRole",
            "Resource": "*",
            "Condition": {
                "StringEquals": {
                    "iam:PassedToService": "ec2.amazonaws.com"
                }
            }
        }
    ]
}
{
    "Version": "2012-10-17",
    "Statement": [
        {
            "Sid": "Permissions",
            "Effect": "Allow",
            "Action": [
                "SNS:CreateTopic",
                "SNS:DeleteTopic",
                "SNS:GetTopicAttributes",
                "SNS:Subscribe",
                "autoscaling:CreateAutoScalingGroup",
                "autoscaling:DeleteAutoScalingGroup",
                "autoscaling:DeletePolicy",
                "autoscaling:DescribeAutoScalingGroups",
                "autoscaling:DescribePolicies",
                "autoscaling:DescribeScalingActivities",
                "autoscaling:PutNotificationConfiguration",
                "autoscaling:PutScalingPolicy",
                "autoscaling:SetInstanceProtection",
                "autoscaling:UpdateAutoScalingGroup",
                "cloudformation:CreateStack",
                "cloudformation:DeleteStack",
                "cloudformation:DescribeStacks",
                "cloudformation:ListStackResources",
                "cloudformation:ValidateTemplate",
                "cloudwatch:DeleteAlarms",
                "cloudwatch:DescribeAlarms",
                "cloudwatch:ListTagsForResource",
                "cloudwatch:PutMetricAlarm",
                "ec2:AllocateAddress",
                "ec2:AssociateAddress",
                "ec2:AssociateRouteTable",
                "ec2:AttachInternetGateway",
                "ec2:AttachNetworkInterface",
                "ec2:AuthorizeSecurityGroupEgress",
                "ec2:AuthorizeSecurityGroupIngress",
                "ec2:CreateInternetGateway",
                "ec2:CreateLaunchTemplate",
                "ec2:CreateLocalGatewayRouteTable",
                "ec2:CreateNatGateway",
                "ec2:CreateNetworkInterface",
                "ec2:CreateRoute",
                "ec2:CreateRouteTable",
                "ec2:CreateSecurityGroup",
                "ec2:CreateSubnet",
                "ec2:CreateTags",
                "ec2:CreateVpc",
                "ec2:CreateVpcEndpoint",
                "ec2:CreateVpcEndpointServiceConfiguration",
                "ec2:DeleteInternetGateway",
                "ec2:DeleteLaunchTemplate",
                "ec2:DeleteNatGateway",
                "ec2:DeleteNetworkInterface",
                "ec2:DeleteRoute",
                "ec2:DeleteRouteTable",
                "ec2:DeleteSecurityGroup",
                "ec2:DeleteSubnet",
                "ec2:DeleteVpc",
                "ec2:DeleteVpcEndpointServiceConfigurations",
                "ec2:DeleteVpcEndpoints",
                "ec2:DescribeAccountAttributes",
                "ec2:DescribeAddresses",
                "ec2:DescribeAvailabilityZones",
                "ec2:DescribeInstanceAttribute",
                "ec2:DescribeInstanceTypes",
                "ec2:DescribeInstances",
                "ec2:DescribeInternetGateways",
                "ec2:DescribeKeyPairs",
                "ec2:DescribeLaunchTemplateVersions",
                "ec2:DescribeLaunchTemplates",
                "ec2:DescribeNatGateways",
                "ec2:DescribeNetworkAcls",
                "ec2:DescribeNetworkInterfaces",
                "ec2:DescribePrefixLists",
                "ec2:DescribeRegions",
                "ec2:DescribeRouteTables",
                "ec2:DescribeSecurityGroups",
                "ec2:DescribeSubnets",
                "ec2:DescribeTags",
                "ec2:DescribeVolumes",
                "ec2:DescribeVpcAttribute",
                "ec2:DescribeVpcClassicLink",
                "ec2:DescribeVpcClassicLinkDnsSupport",
                "ec2:DescribeVpcEndpointServiceConfigurations",
                "ec2:DescribeVpcEndpointServicePermissions",
                "ec2:DescribeVpcEndpoints",
                "ec2:DescribeVpcs",
                "ec2:DetachInternetGateway",
                "ec2:DetachNetworkInterface",
                "ec2:DisassociateAddress",
                "ec2:DisassociateRouteTable",
                "ec2:ModifyNetworkInterfaceAttribute",
                "ec2:ModifySubnetAttribute",
                "ec2:ModifyVpcAttribute",
                "ec2:ReleaseAddress",
                "ec2:RevokeSecurityGroupEgress",
                "ec2:RunInstances",
                "ec2:TerminateInstances",
                "elasticloadbalancing:AddTags",
                "elasticloadbalancing:CreateListener",
                "elasticloadbalancing:CreateLoadBalancer",
                "elasticloadbalancing:CreateTargetGroup",
                "elasticloadbalancing:DeleteListener",
                "elasticloadbalancing:DeleteLoadBalancer",
                "elasticloadbalancing:DeleteTargetGroup",
                "elasticloadbalancing:DescribeListeners",
                "elasticloadbalancing:DescribeLoadBalancerAttributes",
                "elasticloadbalancing:DescribeLoadBalancers",
                "elasticloadbalancing:DescribeTags",
                "elasticloadbalancing:DescribeTargetGroupAttributes",
                "elasticloadbalancing:DescribeTargetGroups",
                "elasticloadbalancing:DescribeTargetHealth",
                "elasticloadbalancing:ModifyLoadBalancerAttributes",
                "elasticloadbalancing:ModifyTargetGroupAttributes",
                "iam:AddRoleToInstanceProfile",
                "iam:AttachRolePolicy",
                "iam:CreateInstanceProfile",
                "iam:CreatePolicy",
                "iam:CreateRole",
                "iam:DeleteInstanceProfile",
                "iam:DeletePolicy",
                "iam:DeleteRole",
                "iam:DeleteRolePolicy",
                "iam:DetachRolePolicy",
                "iam:GetInstanceProfile",
                "iam:GetPolicy",
                "iam:GetPolicyVersion",
                "iam:GetRole",
                "iam:ListAttachedRolePolicies",
                "iam:ListInstanceProfilesForRole",
                "iam:ListPolicyVersions",
                "iam:ListRolePolicies",
                "iam:PutRolePolicy",
                "iam:RemoveRoleFromInstanceProfile"
            ],
            "Resource": "*"
        },
        {
            "Sid": "IAMPassRole",
            "Effect": "Allow",
            "Action": "iam:PassRole",
            "Resource": "*",
            "Condition": {
                "StringEquals": {
                    "iam:PassedToService": "ec2.amazonaws.com"
                }
            }
        }
    ]
}
{
    "Version": "2012-10-17",
    "Statement": [
        {
            "Sid": "Permissions",
            "Effect": "Allow",
            "Action": [
                "SNS:CreateTopic",
                "SNS:DeleteTopic",
                "SNS:GetTopicAttributes",
                "SNS:Subscribe",
                "autoscaling:CreateAutoScalingGroup",
                "autoscaling:DeleteAutoScalingGroup",
                "autoscaling:DeletePolicy",
                "autoscaling:DescribeAutoScalingGroups",
                "autoscaling:DescribePolicies",
                "autoscaling:DescribeScalingActivities",
                "autoscaling:PutNotificationConfiguration",
                "autoscaling:PutScalingPolicy",
                "autoscaling:SetInstanceProtection",
                "autoscaling:UpdateAutoScalingGroup",
                "cloudformation:CreateStack",
                "cloudformation:DeleteStack",
                "cloudformation:DescribeStacks",
                "cloudformation:ListStackResources",
                "cloudformation:ValidateTemplate",
                "cloudwatch:DeleteAlarms",
                "cloudwatch:DescribeAlarms",
                "cloudwatch:ListTagsForResource",
                "cloudwatch:PutMetricAlarm",
                "ec2:AllocateAddress",
                "ec2:AssociateAddress",
                "ec2:AssociateRouteTable",
                "ec2:AuthorizeSecurityGroupEgress",
                "ec2:AuthorizeSecurityGroupIngress",
                "ec2:CreateLaunchTemplate",
                "ec2:CreateNatGateway",
                "ec2:CreateNetworkInterface",
                "ec2:CreateRoute",
                "ec2:CreateRouteTable",
                "ec2:CreateSecurityGroup",
                "ec2:CreateSubnet",
                "ec2:CreateTags",
                "ec2:CreateVpcEndpoint",
                "ec2:CreateVpcEndpointServiceConfiguration",
                "ec2:DeleteLaunchTemplate",
                "ec2:DeleteNatGateway",
                "ec2:DeleteNetworkInterface",
                "ec2:DeleteRouteTable",
                "ec2:DeleteSecurityGroup",
                "ec2:DeleteSubnet",
                "ec2:DeleteVpcEndpointServiceConfigurations",
                "ec2:DeleteVpcEndpoints",
                "ec2:DescribeAddresses",
                "ec2:DescribeInstanceAttribute",
                "ec2:DescribeInstanceTypes",
                "ec2:DescribeInstances",
                "ec2:DescribeKeyPairs",
                "ec2:DescribeLaunchTemplateVersions",
                "ec2:DescribeLaunchTemplates",
                "ec2:DescribeNatGateways",
                "ec2:DescribeNetworkInterfaces",
                "ec2:DescribePrefixLists",
                "ec2:DescribeRouteTables",
                "ec2:DescribeSecurityGroups",
                "ec2:DescribeSubnets",
                "ec2:DescribeTags",
                "ec2:DescribeVolumes",
                "ec2:DescribeVpcEndpointServiceConfigurations",
                "ec2:DescribeVpcEndpointServicePermissions",
                "ec2:DescribeVpcEndpoints",
                "ec2:DescribeVpcs",
                "ec2:DescribeRegions",
                "ec2:DetachNetworkInterface",
                "ec2:DisassociateAddress",
                "ec2:DisassociateRouteTable",
                "ec2:ModifyNetworkInterfaceAttribute",
                "ec2:ReleaseAddress",
                "ec2:RevokeSecurityGroupEgress",
                "ec2:RunInstances",
                "ec2:TerminateInstances",
                "elasticloadbalancing:AddTags",
                "elasticloadbalancing:CreateListener",
                "elasticloadbalancing:CreateLoadBalancer",
                "elasticloadbalancing:CreateTargetGroup",
                "elasticloadbalancing:DeleteListener",
                "elasticloadbalancing:DeleteLoadBalancer",
                "elasticloadbalancing:DeleteTargetGroup",
                "elasticloadbalancing:DescribeListeners",
                "elasticloadbalancing:DescribeLoadBalancerAttributes",
                "elasticloadbalancing:DescribeLoadBalancers",
                "elasticloadbalancing:DescribeTags",
                "elasticloadbalancing:DescribeTargetGroupAttributes",
                "elasticloadbalancing:DescribeTargetGroups",
                "elasticloadbalancing:DescribeTargetHealth",
                "elasticloadbalancing:ModifyLoadBalancerAttributes",
                "elasticloadbalancing:ModifyTargetGroup",
                "elasticloadbalancing:ModifyTargetGroupAttributes",
                "iam:AddRoleToInstanceProfile",
                "iam:AttachRolePolicy",
                "iam:CreateInstanceProfile",
                "iam:CreatePolicy",
                "iam:CreateRole",
                "iam:DeleteInstanceProfile",
                "iam:DeletePolicy",
                "iam:DeleteRole",
                "iam:DeleteRolePolicy",
                "iam:DetachRolePolicy",
                "iam:GetInstanceProfile",
                "iam:GetPolicy",
                "iam:GetPolicyVersion",
                "iam:GetRole",
                "iam:ListAttachedRolePolicies",
                "iam:ListInstanceProfilesForRole",
                "iam:ListPolicyVersions",
                "iam:ListRolePolicies",
                "iam:PutRolePolicy",
                "iam:RemoveRoleFromInstanceProfile"
            ],
            "Resource": "*"
        },
        {
            "Sid": "IAMPassRole",
            "Effect": "Allow",
            "Action": "iam:PassRole",
            "Resource": "*",
            "Condition": {
                "StringEquals": {
                    "iam:PassedToService": "ec2.amazonaws.com"
                }
            }
        }
    ]
}
Step 2: Subscribe to Check Point CloudGuard Network Security
To deploy a Cloud Firewall Security for Gateway Load Balancer, do these steps:
-
Log in to the AWS Marketplace.
-
Search for "Cloud Firewall".
-
Select one of these licensing options for the Cloud Firewall for Gateway Load Balancer:
Or one of these licensing options for a Check Point Security Management Server:
-
Select Continue to subscribe.
-
Select Accept Terms to confirm that you accept the AWS Marketplace license agreement.
Step 3: Deploy the Check Point Security Management Server
Use one of these options to deploy the Check Point Security Management Server:
-
Deploy the Security Management Server separately as described in sk130372 > Installing Check Point Security Management Server section.
-
Create an IAM role with read and write permissions as described in the section below or deploy the IAM role and attach it to the Security Management Server that manages the Cloud Firewall Gateway Load Balancing Auto Scale solution.
In the AWS VPC Console, add the required permissions for the Security Management Server.
Permissions to add:
|
Service |
Action |
|---|---|
|
autoscaling |
DescribeAutoscalingGroups |
|
ec2 |
DescribeInstances |
|
|
DescribeNetworkInterfaces |
|
|
DescribeSubnets |
|
|
DescribeRegions |
|
elasticloadbalancing |
DescribeLoadBalancers |
|
|
DescribeTags |
|
|
DescribeListeners |
|
|
DescribeTargetGroups |
|
|
DescribeRules |
|
|
DescribeTargetHealth |
You can also copy and paste the text below to your existing Management Server's IAM permissions:
Management IAM Permissions:
        "autoscaling:DescribeAutoScalingGroups",
        "ec2:DescribeInstances",
        "ec2:DescribeNetworkInterfaces",
        "ec2:DescribeSubnets",
        "ec2:DescribeRegions",
        "elasticloadbalancing:DescribeLoadBalancers",
        "elasticloadbalancing:DescribeTags",
        "elasticloadbalancing:DescribeListeners",
        "elasticloadbalancing:DescribeTargetGroups",
        "elasticloadbalancing:DescribeRules",
"elasticloadbalancing:DescribeTargetHealth"With the Solution CloudFormation Template, you can create a dedicated Security Management Server as part of the deployment.
Step 4: Deploy the Centralized Security VPC
This step details a procedure for deploying the Check Point Cloud Firewall Gateway Auto Scaling Group configured for AWS Gateway Load Balancer (GWLB) in a Centralized Security VPC.
|
CloudFormation (CFT) Template |
Description |
|---|---|
|
Creates a new VPC and deploys a Gateway Load Balancer, Check Point Cloud Firewall Gateway Auto Scaling Group, and an optional Security Management Server to the new VPC. |
|
|
Auto-Scaling group for Gateway Load Balancer into existing VPC |
Deploys a Gateway Load Balancer, Check Point Cloud Firewall Gateway Auto Scaling Group, and an optional Security Management Server to the existing VPC. |
Parameters for Deploying an Auto Scaling Group with a GWLB to a New VPC
Network Configuration:
|
Parameter Name |
Default Value |
Description |
|---|---|---|
|
|
Requires input |
Select, at minimum, two Availability Zones (AZs) for the VPC subnets. |
|
|
2 |
Specify the number of AZs to use in the VPC. This must align with the number of AZs selected for the Availability Zones parameter. |
|
|
10.0.0.0/16 |
Configure the CIDR block for the VPC. |
|
|
10.0.10.0/24 |
Specify a CIDR block for the public subnet. Use this format: x.x.x.x/16-28. |
|
|
10.0.20.0/24 |
Specify a CIDR block for the public subnet. Use this format: x.x.x.x/16-28. |
|
|
10.0.30.0/24 |
Specify a CIDR block for the public subnet. Use this format: x.x.x.x/16-28. |
|
|
10.0.40.0/24 |
Specify a CIDR block for the public subnet. Use this format x.x.x.x/16-28. |
General Settings:
|
Parameter Name |
Default Value |
Description |
|---|---|---|
|
|
Requires input |
Specify an EC2 key pair to enable SSH access to the instances created by this stack. |
|
|
True |
Enable or disable instance volume encryption with the default AWS Key Management Service (KMS) key. |
|
|
100 |
Set the root volume size in GB. |
|
|
gp3 |
Select the General Purpose SSD volume type. |
|
|
False |
Enable or disable protection against accidental instance termination. |
|
|
False |
Enable or disable establishing SSH connections through the AWS web console. |
|
|
True |
Enable or disable automatic download of Software Blade |
|
|
gwlb-management server |
Provide a name for the Security Management Server in the automatic provisioning configuration. |
|
|
gwlb-ASG-configuration |
Specify a name for a Cloud Firewall Gateway configuration template in the automatic provisioning configuration. |
|
|
Optional |
(Optional) Provide an email address to receive AWS notifications about scaling events. |
|
|
/etc/cli.sh |
Select the admin shell to enable advanced command line configuration for Cloud Firewall Gateways and Security Management Server. |
Gateway Load Balancer Configuration:
|
Parameter Name |
Default Value |
Description |
||
|---|---|---|---|---|
|
Gateway Load Balancer |
gwlb1 |
Provide a unique name for the Gateway Load Balancer. The name can have a maximum of 32 alphanumeric characters and hyphens.
|
||
|
|
tg1 |
Specify a unique name for the target group. The name can have a maximum of 32 alphanumeric characters and hyphens.
|
||
|
|
False |
Specify if requests from Service Consumers to create endpoints on your service require acceptance. The default value is set to False ("acceptance" is not required). |
||
|
|
True |
Enable or disable Cross-AZ Load Balancing.
|
Check Point Cloud Firewall Gateways Auto Scaling Group Configuration:
|
Parameter Name |
Default Value |
Description |
|---|---|---|
|
|
Check Point Gateway |
Provide a name tag for the Cloud Firewall Gateway instances. |
|
|
c5.xlarge |
Select the EC2 instance type for Cloud Firewall Gateways. |
|
|
2 |
Set the minimum number of Cloud Firewall Gateways in the Auto Scaling Group. |
|
|
10 |
Set the maximum number of Cloud Firewall Gateways in the Auto Scaling Group. |
|
|
R81.20-BYOL |
Select the version and license type for Cloud Firewall Gateways. |
|
|
Optional |
(Optional) Provide the admin user's password hash (use the command " |
|
|
Optional |
(Optional) Check Point recommends to set the admin user's password and maintenance-mode password for recovery purposes (use command |
|
|
Requires input |
Enter a SIC |
|
|
Private |
Select if provisioned Cloud Firewall Gateways use private or public addresses. |
|
|
False |
Enable or disable allocation of public IP addresses for Cloud Firewall Gateways. |
|
|
False |
Enable or disable support for IPv6 traffic inspection. |
|
|
False |
Enable or disable reporting of Check Point-specific CloudWatch metrics. |
|
|
Optional |
Provide an optional script with semicolon-separated commands to run on initial boot. |
|
|
Note - For more information on how to use Check Point metrics to trigger AWS Auto-Scaling events, refer to sk162592. |

Check Point Cloud Firewall Security Configuration:
|
Parameter Name |
Default Value |
Description |
|---|---|---|
|
|
True |
Specify False to use an existing Security Management Server, or True to deploy a new Security Management Server. If you select False, ignore the other parameters in this section. |
|
|
m5.xlarge |
Select the EC2 instance type for the Security Management Server. |
|
|
R81.20-BYOL |
Select the version and license type for the Security Management Server. |
|
|
Optional |
(Optional) Provide the admin user's password hash (use the command " |
|
|
Optional |
(Optional) Check Point recommends to set the admin user's password and maintenance-mode password for recovery purposes (use the command |
|
|
Standard |
Specify the name of the Security Policy |
|
|
Requires input |
Specify the network allowed to connect to the Security Management Server through web, SSH, and graphical clients. |
|
|
Locally managed |
Select between local management or management over the Internet based on the Cloud Firewall Gateway accessibility. If, at minimum, one of the Cloud Firewall Gateways that you want to manage is not directly accessed through its private IP address, select Over the internet. |
|
|
Requires input |
Specify the network allowed for communication of Cloud Firewall Gateways with the Security Management Server. |
|
|
Note - Interfaces of Auto Scaling Group instances are automatically configured with Internal Topology. This is not defined in SmartConsole |
|
|
Important - The External Load Balancer sends health probes to TCP port 8117 to determine the health of the Cloud Firewall Gateways, so port 8117 must be open on the Cloud Firewall Gateways. |
Step 5: Configure the Check Point Security Management Server
Install and Configure Cloud Management Extension
Follow these steps to set up the Cloud Management Extension (CME), which manages Cloud Firewall integration with AWS GWLB and seamlessly operates the GWLB solution.
-
Install CME on the Security Management Server.
Install the latest CME tool on your Security Management Server. See sk157492.
For more details, see the "Structure and Configuration" section in the Cloud Management Extension Administration Guide.
-
Configure the Security Management Server using the "autoprov_cfg" tool.

Important - If you have existing configurations for other Check Point Cloud Firewall solutions, do not initialize your configuration. Instead, add the Controller or Template for the GWLB solution with the applicable configuration
The autoprov_cfg tool configures the Security Management Server with all the settings needed for GWLB.
Follow these steps:
-
Connect to the CLI on the Security Management Server.
-
Log in to the Expert mode.
-
Run each of the commands below.
Commands and their options:
-
To initialize the autoprov_cfg configuration with IAM credentials, run:
autoprov_cfg init AWS -mn "<MANAGEMENT-NAME>" -tn "<TEMPLATE-NAME>" -otp "<SIC-KEY>" -ver R81.20 -po "<POLICY-NAME>" -cn "<CONTROLLER-NAME>" -r "<REGIONS>" -iamOptions:
-
-mn- Security Management Server name -
-tn- Template name -
-otp- One-time SIC password -
-ver- Cloud Firewall Gateway version -
-po- Policy package name -
-cn- Controller name -
-r- Comma-separated list of regions -
-iam- Use IAM to connect to AWS
-
-
To configure auto provisioning controller for GWLB Scan Subnets mode, run:
autoprov_cfg set controller AWS -cn "<CONTROLLER-NAME>" –ssOptions:
-
-ss- Enables GWLB Scan Subnets mode
-
-
To display autoprov_cfg configuration and make sure all the configurations are correct, run:
autoprov_cfg show all -
To test the configuration and make sure it is correct, run:
service cme test
Important - Make sure there are no errors in the test results.
-
Step 6: Post Deployment - Manually Deploying the Gateway Load Balancer Endpoint
Use the AWS Management Console or the latest version of the AWS CLI tool to manually deploy a Gateway Load Balancer Endpoint to the service consumer's VPC.
Follow these steps:
-
Create a dedicated subnet for the Gateway Load Balancer Endpoint (GWLBe) in the Servers VPC and set the default route through the AWS Internet Gateway (IGW).
-
Create the GWLBe in the newly created subnet with the command below.
AWS CLI Command:
|
|
|
|
Note - Find the Service Name in the CloudFormation outputs ‘ |
For more information about Gateway Load Balancer Endpoints, see the AWS VPC Gateway Load Balancer documentation.
Step 7: Post Deployment - Tag Subnets for Inspection
|
|
Note - This section applies only to Solution 1 without a Transit Gateway. Solution 2 with a Transit Gateway does not support spoke subnet tagging. |
To enforce GWLB inspection, manually tag subnets:
-
Go to VPC > Subnets.
-
Choose Servers subnets from the Server VPC.
-
Specify tags:
Tag key
Tag value
Tag value example
x-chkp-gwlb-inbound<CIDR_a,CIDR_b,CIDR_c,...>
1.1.0.0/16, 1.2.3.4/32
x-chkp-gwlb-outbound<CIDR_a,CIDR_b,CIDR_c,...>
0.0.0.0/0
|
|
Notes:
|
When a subnet is GWLB-tagged, CME automatically:
-
Configures ingress routing through the GWLBe.
-
Creates Check Point policy rules in the Security Policy rule base
All rules configured in a given Security Policy. Synonym: Rulebase. according to tag value to allow traffic to and from the tagged subnet.The GWLB-value on a subnet represents a list of CIDRs to allow traffic:
-
to– for outbound tag -
from- for inbound tag
-
These policy rules are added for a tagged subnet in the Security Management Server rule![]() Set of traffic parameters and other conditions in a Rule Base (Security Policy) that cause specified actions to be taken for a communication session. base:
Set of traffic parameters and other conditions in a Rule Base (Security Policy) that cause specified actions to be taken for a communication session. base:
Inbound:
|
Source |
Destination |
Action |
|
|
|
Accept |
Outbound:
|
Source |
Destination |
Action |
|
|
|
Accept |
When a subnet is untagged, CME:
1. Disables ingress routing for that subnet.
2. Removes related security rules from the rule base.
|
|
Note - Do not manually change these rules. CME restores any changes to align with the subnet tags. |
Termination
To stop the environment:
-
Untag all subnets in the Servers VPC(s) (remove x-chkp-gwlb-X tags).
-
Disable Scan Subnets flag on your CME controller with this command:
autoprov_cfg delete controller AWS -cn "<CONTROLLER-NAME>" –ss -
Remove all related resources from your AWS environment.
-
Remove the Security VPC CFT Stack from your AWS account.