Deployment Steps
Use the steps listed below to deploy your AWS![]() Amazon® Web Services. Public cloud platform that offers global compute, storage, database, application and other cloud services. Transit Gateway.
Amazon® Web Services. Public cloud platform that offers global compute, storage, database, application and other cloud services. Transit Gateway.
Step 1: Preparing Your AWS Account
To prepare your AWS account, do these steps:
-
If you do not already have an AWS account, create one at AWS.
-
Use the region selector in the navigation bar to choose the AWS region, where you want to deploy Check Point CloudGuard Cross AZ Cluster
 Two or more Security Gateways that work together in a redundant configuration - High Availability, or Load Sharing. on AWS.
 -
Create a key pair in your preferred region.
-
If necessary, request a service limit increase for the AWS resources you are going to use.
You may have to do this, if you have an existing deployment that uses the AWS resources below, and you may exceed the default limit with this deployment.
The resources that may need a service limit increase are:
-
Number of On-demand EC2 instances.
-
Number of Elastic IP addresses.
-
Number of VPCs for each region.
-
Number of VPN connections for each region.
-
Number of Customer for each region.
-
Number of virtual private for each region.
-
VPN connections for each VPC.
-
By default, this Deployment guide uses c5.xlarge for the Security Gateways and m5.xlarge for the Security Management Server![]() Dedicated Check Point server that runs Check Point software to manage the objects and policies in a Check Point environment within a single management Domain. Synonym: Single-Domain Security Management Server..
Dedicated Check Point server that runs Check Point software to manage the objects and policies in a Check Point environment within a single management Domain. Synonym: Single-Domain Security Management Server..
Deployment minimum permissions
For a successful deployment, the relevant IAM policy must have minimum permissions set configured below.
In the AWS VPC![]() AWS Virtual Private Cloud. A private cloud that exists in the public cloud of Amazon. It is isolated from other Virtual Networks in the AWS cloud. Console navigate to IAM service, select the relevant IAM policy and copy/paste this text:
AWS Virtual Private Cloud. A private cloud that exists in the public cloud of Amazon. It is isolated from other Virtual Networks in the AWS cloud. Console navigate to IAM service, select the relevant IAM policy and copy/paste this text:
{
    "Version": "2012-10-17",
    "Statement": [
        {
            "Sid": "Permissions",
            "Effect": "Allow",
            "Action": [
                "SNS:CreateTopic",
                "SNS:DeleteTopic",
                "SNS:GetTopicAttributes",
                "SNS:Subscribe",
                "autoscaling:CreateAutoScalingGroup",
                "autoscaling:DeleteAutoScalingGroup",
                "autoscaling:DeletePolicy",
                "autoscaling:DescribeAutoScalingGroups",
                "autoscaling:DescribePolicies",
                "autoscaling:DescribeScalingActivities",
                "autoscaling:PutNotificationConfiguration",
                "autoscaling:PutScalingPolicy",
                "autoscaling:SetInstanceProtection",
                "autoscaling:UpdateAutoScalingGroup",
                "cloudformation:CreateStack",
                "cloudformation:DeleteStack",
                "cloudformation:DescribeStacks",
                "cloudformation:ListStackResources",
                "cloudformation:ValidateTemplate",
                "cloudwatch:DeleteAlarms",
                "cloudwatch:DescribeAlarms",
                "cloudwatch:ListTagsForResource",
                "cloudwatch:PutMetricAlarm",
                "ec2:AllocateAddress",
                "ec2:AssociateAddress",
                "ec2:AssociateRouteTable",
                "ec2:AttachInternetGateway",
                "ec2:AttachNetworkInterface",
                "ec2:AuthorizeSecurityGroupEgress",
                "ec2:AuthorizeSecurityGroupIngress",
                "ec2:CreateInternetGateway",
                "ec2:CreateLaunchTemplate",
                "ec2:CreateLocalGatewayRouteTable",
                "ec2:CreateNetworkInterface",
                "ec2:CreateRoute",
                "ec2:CreateRouteTable",
                "ec2:CreateSecurityGroup",
                "ec2:CreateSubnet",
                "ec2:CreateTags",
                "ec2:CreateVpc",
                "ec2:DeleteInternetGateway",
                "ec2:DeleteLaunchTemplate",
                "ec2:DeleteNetworkInterface",
                "ec2:DeleteRoute",
                "ec2:DeleteRouteTable",
                "ec2:DeleteSecurityGroup",
                "ec2:DeleteSubnet",
                "ec2:DeleteVpc",
                "ec2:DescribeAccountAttributes",
                "ec2:DescribeAddresses",
                "ec2:DescribeAvailabilityZones",
                "ec2:DescribeInstanceAttribute",
                "ec2:DescribeInstanceTypes",
                "ec2:DescribeInstances",
                "ec2:DescribeInternetGateways",
                "ec2:DescribeKeyPairs",
                "ec2:DescribeLaunchTemplateVersions",
                "ec2:DescribeLaunchTemplates",
                "ec2:DescribeNetworkAcls",
                "ec2:DescribeNetworkInterfaces",
                "ec2:DescribeRegions",
                "ec2:DescribeRouteTables",
                "ec2:DescribeSecurityGroups",
                "ec2:DescribeSubnets",
                "ec2:DescribeTags",
                "ec2:DescribeVolumes",
                "ec2:DescribeVpcAttribute",
                "ec2:DescribeVpcClassicLink",
                "ec2:DescribeVpcClassicLinkDnsSupport",
                "ec2:DescribeVpcs",
                "ec2:DetachInternetGateway",
                "ec2:DetachNetworkInterface",
                "ec2:DisassociateAddress",
                "ec2:DisassociateRouteTable",
                "ec2:ModifyNetworkInterfaceAttribute",
                "ec2:ModifySubnetAttribute",
                "ec2:ModifyVpcAttribute",
                "ec2:ReleaseAddress",
                "ec2:RevokeSecurityGroupEgress",
                "ec2:RunInstances",
                "ec2:TerminateInstances",
                "iam:AddRoleToInstanceProfile",
                "iam:AttachRolePolicy",
                "iam:CreateInstanceProfile",
                "iam:CreatePolicy",
                "iam:CreateRole",
                "iam:DeleteInstanceProfile",
                "iam:DeletePolicy",
                "iam:DeleteRole",
                "iam:DeleteRolePolicy",
                "iam:DetachRolePolicy",
                "iam:GetInstanceProfile",
                "iam:GetPolicy",
                "iam:GetPolicyVersion",
                "iam:GetRole",
                "iam:ListAttachedRolePolicies",
                "iam:ListInstanceProfilesForRole",
                "iam:ListPolicyVersions",
                "iam:ListRolePolicies",
                "iam:PutRolePolicy",
                "iam:RemoveRoleFromInstanceProfile"
            ],
            "Resource": "*"
        },
        {
            "Sid": "IAMPassRole",
            "Effect": "Allow",
            "Action": "iam:PassRole",
            "Resource": "*",
            "Condition": {
                "StringEquals": {
                    "iam:PassedToService": "ec2.amazonaws.com"
                }
            }
        }
    ]
}{
"Version": "2012-10-17",
"Statement": [
{
"Sid": "Permissions",
"Effect": "Allow",
"Action": [
"SNS:CreateTopic",
"SNS:DeleteTopic",
"SNS:GetTopicAttributes",
"SNS:Subscribe",
"autoscaling:CreateAutoScalingGroup",
"autoscaling:DeleteAutoScalingGroup",
"autoscaling:DeletePolicy",
"autoscaling:DescribeAutoScalingGroups",
"autoscaling:DescribePolicies",
"autoscaling:DescribeScalingActivities",
"autoscaling:PutNotificationConfiguration",
"autoscaling:PutScalingPolicy",
"autoscaling:SetInstanceProtection",
"autoscaling:UpdateAutoScalingGroup",
"cloudformation:CreateStack",
"cloudformation:DeleteStack",
"cloudformation:DescribeStacks",
"cloudformation:ListStackResources",
"cloudformation:ValidateTemplate",
"cloudwatch:DeleteAlarms",
"cloudwatch:DescribeAlarms",
"cloudwatch:ListTagsForResource",
"cloudwatch:PutMetricAlarm",
"ec2:AllocateAddress",
"ec2:AssociateAddress",
"ec2:AuthorizeSecurityGroupEgress",
"ec2:AuthorizeSecurityGroupIngress",
"ec2:CreateLaunchTemplate",
"ec2:CreateNetworkInterface",
"ec2:CreateSecurityGroup",
"ec2:CreateTags",
"ec2:DeleteLaunchTemplate",
"ec2:DeleteNetworkInterface",
"ec2:DeleteSecurityGroup",
"ec2:DescribeAddresses",
"ec2:DescribeInstanceAttribute",
"ec2:DescribeInstanceTypes",
"ec2:DescribeInstances",
"ec2:DescribeKeyPairs",
"ec2:DescribeLaunchTemplateVersions",
"ec2:DescribeLaunchTemplates",
"ec2:DescribeNetworkInterfaces",
"ec2:DescribeSecurityGroups",
"ec2:DescribeSubnets",
"ec2:DescribeTags",
"ec2:DescribeVolumes",
"ec2:DescribeVpcs",
"ec2:DescribeRegions",
"ec2:DetachNetworkInterface",
"ec2:DisassociateAddress",
"ec2:ModifyNetworkInterfaceAttribute",
"ec2:ReleaseAddress",
"ec2:RevokeSecurityGroupEgress",
"ec2:RunInstances",
"ec2:TerminateInstances",
"iam:AddRoleToInstanceProfile",
"iam:AttachRolePolicy",
"iam:CreateInstanceProfile",
"iam:CreatePolicy",
"iam:CreateRole",
"iam:DeleteInstanceProfile",
"iam:DeletePolicy",
"iam:DeleteRole",
"iam:DeleteRolePolicy",
"iam:DetachRolePolicy",
"iam:GetInstanceProfile",
"iam:GetPolicy",
"iam:GetPolicyVersion",
"iam:GetRole",
"iam:ListAttachedRolePolicies",
"iam:ListInstanceProfilesForRole",
"iam:ListPolicyVersions",
"iam:ListRolePolicies",
"iam:PutRolePolicy",
"iam:RemoveRoleFromInstanceProfile"
],
"Resource": "*"
},
{
"Sid": "IAMPassRole",
"Effect": "Allow",
"Action": "iam:PassRole",
"Resource": "*",
"Condition": {
"StringEquals": {
"iam:PassedToService": "ec2.amazonaws.com"
}
}
}
]
}Step 2: Subscribing to Check Point CloudGuard Network
To subscribe to Check Point CloudGuard Network, do these steps:
-
Log in to the AWS Marketplace.
-
Search for "CloudGuard Network Security".
-
Select one of these licensing options for Check Point CloudGuard Security Gateways:
-
CloudGuard Network Security with Threat Prevention & SandBlast BYOL
-
CloudGuard Network Security Next-Gen Firewall with Threat Prevention
-
CloudGuard Network Security with Threat Prevention and SandBlast
Or one of these licensing options for a Check Point CloudGuard Security Management Server
Check Point Single-Domain Security Management Server or a Multi-Domain Security Management Server.:
Note - If you want to manage more than five Security Gateways, select the BYOL option and contact Check Point Sales to purchase a license.
-
-
Select Continue to subscribe.
-
Select Accept Terms to confirm that you accept the AWS Marketplace license agreement.
|
|
Note - In the deployment steps that follow, the system prompts for the licensing information for the Security Gateways and Security Management Server that you selected. |
Step 3: Deploying the Check Point Security Management Server
Use one of these options to deploy the Check Point Security Management Server
-
Using the Existing On-Premises Security Management Server or the Security Management Server in AWS
-
Deploying a Dedicated Security Management Server as Part of the Security VPC
-
Deploying a New Security Management Server with a Management CloudFormation Template
Using the Existing On-Premises Security Management Server or the Security Management Server in AWS
In AWS VPC Console, configure the required permissions for the Security Management Server:
Required Permissions
{
  "Version": "2012-10-17",
  "Statement": [
  {
  "Action": [
  "ec2:DescribeInstances",
  "ec2:DescribeNetworkInterfaces",
  "ec2:DescribeSubnets",
  "ec2:DescribeVpcs",
  "ec2:DescribeSecurityGroups",
  "elasticloadbalancing:DescribeLoadBalancers",
  "elasticloadbalancing:DescribeTags",
  "elasticloadbalancing:DescribeListeners",
  "elasticloadbalancing:DescribeTargetGroups",
  "elasticloadbalancing:DescribeRules",
  "elasticloadbalancing:DescribeTargetHealth",
  "autoscaling:DescribeAutoScalingGroups",
  "ec2:DescribeRegions",
  "ec2:DescribeCustomerGateways",
  "ec2:CreateCustomerGateway",
  "ec2:DeleteCustomerGateway",
  "ec2:DescribeRouteTables",
  "ec2:EnableVgwRoutePropagation",
  "ec2:DisableVgwRoutePropagation",
  "ec2:DescribeVpnGateways",
  "ec2:CreateVpnGateway",
  "ec2:AttachVpnGateway",
  "ec2:DetachVpnGateway",
  "ec2:DeleteVpnGateway",
  "ec2:DescribeVpnConnections",
  "ec2:CreateVpnConnection",
  "ec2:DeleteVpnConnection",
  "ec2:DescribeTransitGateways",
  "ec2:DescribeTransitGatewayRouteTables",
  "ec2:DescribeTransitGatewayAttachments",
  "ec2:AssociateTransitGatewayRouteTable",
  "ec2:DisassociateTransitGatewayRouteTable",
  "ec2:EnableTransitGatewayRouteTablePropagation",
  "ec2:DisableTransitGatewayRouteTablePropagation",
  "ec2:GetTransitGatewayAttachmentPropagations",
  "cloudformation:DescribeStacks",
  "cloudformation:DescribeStackResources",
  "cloudformation:ListStacks"
  ],
  "Resource": "*",
  "Effect": "Allow"
  },
  {
  "Action": [
  "cloudformation:CreateStack",
  "cloudformation:DeleteStack"
  ],
  "Resource": "arn:aws:cloudformation:*:*:stack/vpn-by-tag--*/*",
  "Effect": "Allow"
  }
  ]
}|
|
Note - To deploy a new IAM role with read-write permissions,, run this CloudFormation Template. |
Deploying a Dedicated Security Management Server as Part of the Security VPC
The solution CloudFormation Template has the option to create a dedicated Security Management Server as part of the deployment.
Deploying a New Security Management Server with a Management CloudFormation Template
Deploy the Security Management Server separately as described in sk130372, in the section Installing Check Point Security Management Server.
|
|
Note - To deploy a new IAM role with read-write permissions, run this CloudFormation Template. |
Step 4: Configuring the Check Point Security Management Server
To configure the Check Point Security Management Server, do these steps:
-
Optional: Enabling the CloudGuard Controller
Configuring the "Auto_Provisioning" Automation
There are two options to configure auto-provisioning for the first time on the Security Management Server:
Configuration with the CloudGuard Auto Scaling Transit Gateway First Time Configuration Wizard
To configure with the CloudGuard Auto Scaling Transit Gateway First Time Configuration Wizard:
|
|
Important - This procedure removes all existing configuration. To keep it, use the |
-
Connect to the command line on the Check Point Security Management Server.
-
Log in to the Expert mode.
-
Run:
tgw-menu -
Follow the First Time Configuration Wizard.
Note - The
tgw-menusupports multi-account configuration.For more information, see AWS Transit Gateway, Outbound Auto Scale, and Management in Cross-Accounts
-
To test or change the existing configuration, use the
autoprov_cfgutility.
Enabling the CloudGuard Controller
We recommend to enable the CloudGuard Controller![]() Provisions SDDC services as Virtual Data Centers that provide virtualized computer networking, storage, and security. to benefit from more CloudGuard features.
Provisions SDDC services as Virtual Data Centers that provide virtualized computer networking, storage, and security. to benefit from more CloudGuard features.
To use the CloudGuard Controller capabilities, you must install the required Jumbo Hotfix Accumulator![]() Collection of hotfixes combined into a single package. Acronyms: JHA, JHF, JHFA.. See the Known Limitation VSECC-784 in sk141173.
Collection of hotfixes combined into a single package. Acronyms: JHA, JHF, JHFA.. See the Known Limitation VSECC-784 in sk141173.
For more information, see the CloudGuard Controller Administration Guide.
Configuring the Access Control Policy
To configure the Access Control policy:
-
Connect with SmartConsole
Check Point GUI application used to manage a Check Point environment - configure Security Policies, configure devices, monitor products and events, install updates, and so on. to your Check Point Security Management Server. -
If the Security Management Server and the Security Gateway
Dedicated Check Point server that runs Check Point software to inspect traffic and enforce Security Policies for connected network resources. have to communicate through public IP addresses, make sure that the Security Management Server object is defined with the elastic IP address.Edit the Security Management Server object and change the IP address.

Important - If you change the main IP address of the Security Management Server, you must issue and install the license(s) for the new IP address.
-
Create the Security Policy
Collection of rules that control network traffic and enforce organization guidelines for data protection and access to resources with packet inspection. you want to install on the Transit Gateways:-
In SmartConsole, click Menu > Manage policies and layers.
-
From the left tree, click Policies.
-
From the top toolbar, click New.
-
Enter the policy package name.
Important - Use the package name you set when you executed the
autoprov_cfgutility. -
Select the Policy Types.
-
Click OK.
-
Click Close.
-
-
Add the required explicit rules:
-
In SmartConsole, from the left navigation panel, click Security Policies.
-
At the top, click the plus sign to open the Manage Policies tab.
-
Select the new policy package your created earlier.
4-A. Add the applicable explicit Access Control rules.
-
In the top left Access Control section, click Policy.
-
Add the applicable rules.
4-B. Add a Manual NAT rule
Set of traffic parameters and other conditions in a Rule Base (Security Policy) that cause specified actions to be taken for a communication session. that hides all internet sources behind the Auto Scale Group instances:-
Connect with SmartConsole to Security Management Server / Domain Management Server.
-
Create a Dynamic Object
Special object type, whose IP address is not known in advance. The Security Gateway resolves the IP address of this object in real time. named LocalGateway.
Note - Skip this step if a Dynamic Object by that name already exists.
-
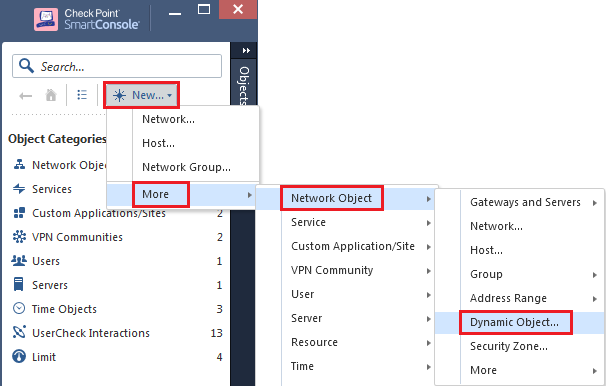
In the Object Browser, click on New, go to More menu, go to Network Object menu, click on Dynamic Object.
-
Enter the name LocalGateway:

-
-
In the top left Access Control section, click NAT.
-
From the top toolbar, click Add rule and select Add rule to bottom.
Important - This rule must be the last rule in the NAT rule base
All rules configured in a given Security Policy. Synonym: Rulebase.. -
Configure this Manual NAT rule:
-
Original Source: Select the object called
All Internet -
Original Destination:
*Any -
Original Services:
*Any -
Translated Source: Select the object called
LocalGateway
Note - Make sure red capital letter H appears between the object icon and the object name. Otherwise, right-click on the object > NAT Method > Hide.
-
Translated Destination:
=Original -
Translated Services:
=Original -
Install On: Transit Gateways
-
-
-
We recommend you create an explicit VPN Directional rule in the Access Control Policy to allow the required services to work over the VPN tunnels:
5-A. Enable the support for VPN directional rules:
-
In SmartConsole, click Menu > Global properties.
-
In the left tree, click VPN > Advanced.
-
Select Enable VPN Directional Match in VPN Column.
-
Click OK.
5-B Create an explicit VPN Directional cleanup rule:
-
Source: Applicable Objects
-
Destination: Applicable Objects
-
VPN: All these:
Community -> CommunityCommunity -> External_clear -
Services & Applications: Applicable Services
-
Action:
Drop -
Track:
None, orLog -
Install On: Transit Gateways
-
Step 5: Deploying the Security Transit Gateway Auto Scaling Group
To deploy the Security Transit Gateway Auto Scaling Group, follow these steps:
Deploying the AWS Transit Gateway
Do the AWS instructions to deploy Transit Gateways.
When you create the Transit Gateway configure these settings in Amazon VPC console:
-
Disable the Default route table association.
-
Disable the Default route table propagation.
-
For cross-account spokes, enable the Auto accept shared attachments.
-
Add this tag:
Tag Key:
x-chkp-vpnTag Value:
<MANAGEMENT-NAME>/<VPN-COMMUNITY-NAME>Where:
-
<MANAGEMENT-NAME>- Specifies the name of the Management Server. Use the same name you used when you executed theautoprov_cfgutility. -
<VPN-COMMUNITY-NAME>- Specifies the name of the VPN Community. Use the same name you used when you created the VPN Community.
-
|
|
Note - If you did not disable the Default route table association and the Default route table propagation settings, then delete the existing Transit Gateway and create a new one. If you do not delete the previous Transit Gateway, AWS associates and propagates all attachments to the Transit Gateway to the same default Transit Gateway route table. As a result, traffic cannot flow directly between spokes and through CloudGuard Gateways. To change this, move the association and propagation to the correct Transit Gateway route table. |
Deploying the Security Transit Gateway Auto Scaling Group
To launch the Transit Gateway template into your AWS account, click here.
After the Security Gateways are created, they are automatically added to the Management Server database. You can see them in SmartConsole.
|
|
Important - When creating a new Management Server, remember to:
|
|
|
Note - To review all configurations from Management run:
|
Parameters for Deploying a Transit Gateway into a New VPC
Network Configuration:
| Parameter Name | Default Value | Description | ||
|---|---|---|---|---|
|
|
|
The CIDR block for the VPC |
||
|
|
Requires Input |
The specific Availability Zones you want to use for resource distribution. This field shows the available zones in your selected region. You must select at least two Availability Zones from this list. The logical order of your selections is preserved in your deployment. |
||
|
|
|
Number of Availability Zones to use in the VPC.
|
||
|
|
|
CIDR block for Public Subnet 1 located in the 1st Availability Zone. If you choose to deploy a Management Server, it is deployed in this subnet. |
||
|
|
|
CIDR block for Public Subnet 2 located in the 2nd Availability Zone. |
||
|
|
|
CIDR block for Public Subnet 2 located in the 3rd Availability Zone. |
||
|
|
|
CIDR block for Public Subnet 2 located in the 4th Availability Zone. |
General Settings:
| Parameter Name | Default Value | Description |
|---|---|---|
|
|
Requires Input |
A pair of public and private keys that allows you to connect safely to your instance after it launches. When you created an AWS account, this is the key pair you created in your preferred region. |
|
|
|
When you select Yes, your instance can automatically download Software Blade For information on configuration, see sk111080. |
Check Point CloudGuard Network Security Gateway Auto Scaling Group Configuration:
| Parameter Name | Default Value | Description | ||
|---|---|---|---|---|
|
|
Optional: Check Point Gateway |
AWS name tag of the Security Gateways. |
||
|
|
|
The EC2 instance for the Security Gateways. |
||
|
|
|
The minimum number of Security Gateway instances in the Auto Scaling Group. |
||
|
|
|
The minimum number of Security Gateway instances in the Auto Scaling Group. |
||
|
|
|
The license to use for the Security Gateways. By default, "version" points to the current recommended version and "license" is set to NGTX. |
||
|
|
Optional |
The administrator password hash. Run this command to get the password hash:
|
||
|
|
Requires input |
One-time activation key. Enter a string that contains 8 to 127 alphanumeric characters. |
||
|
|
|
The organization Autonomous System Number (ASN
|
||
|
|
Optional |
The email address, to which notifications about scaling events are sent. |
Check Point CloudGuard Network Management Server Configuration:
| Parameter Name | Default Value | Description | ||
|---|---|---|---|---|
|
|
|
|
||
|
|
|
Select accept to allow all traffic between the Spoke VPCs and from the Spoke VPCs to the Internet. |
||
|
|
|
The EC2 type for the Management Server. |
||
|
|
|
The license to use for the Management Server. |
||
|
|
Optional |
The administrator password hash. Run this command to get the password hash:
|
||
|
|
|
Enables (On) or Disables (Off) these Software Blades:
|
||
|
|
|
Specify the networks, from which clients (SmartConsole, Gaia Portal |
||
|
|
|
Select Over the internet if the Management Server is not able to connect to Security Gateways, then it is necessary for you to manage them from their private IP addresses. |
||
|
|
|
Only Security Gateways from this CIDR range of IP addresses are allowed to communicate with the Management Server. |
Settings for Automatic Provisioning![]() Check Point Software Blade on a Management Server that manages large-scale deployments of Check Point Security Gateways using configuration profiles. Synonyms: SmartProvisioning, SmartLSM, Large-Scale Management, LSM. with Management Server:
Check Point Software Blade on a Management Server that manages large-scale deployments of Check Point Security Gateways using configuration profiles. Synonyms: SmartProvisioning, SmartLSM, Large-Scale Management, LSM. with Management Server:
Step 6: Configuring Security Transit Gateway Auto Scaling Group
To configure the Security Transit Gateway Auto Scaling Group, do these steps:
Attaching Spoke VPCs to the Transit Gateway
To attach spokes VPCs to the Transit Gateway:
-
Create the Spoke VPCs and its subnets.
-
Attach all Spoke VPCs to the Transit Gateway you just created.
-
Add a default route to the Transit Gateway in each Spoke VPC route table:
Destination: 0.0.0.0/0
Target: Transit Gateway ID
|
|
Notes:
|
Configuring Transit Gateway Route Tables
To configure Transit Gateway Route Tables:
-
In Amazon VPC console, go to the Transit Gateway Route Tables tab.
-
Configure a checkpoint route table:
-
Create a new checkpoint route table.
Later, the CloudGuard Transit Gateway VPN attachments are automatically associated with this route table.
-
Add this tag:
Tag Key:
x-chkp-vpnTag Value:
<MANAGEMENT-NAME>/<VPN-COMMUNITY-NAME>/associateWhere:
-
<MANAGEMENT-NAME>- Specifies the name of the Management Server. Use the same name you used when you executed theautoprov_cfg utility. -
<VPN-COMMUNITY-NAME>- Specifies the name of the VPN Community. Use the same name you used when you created the VPN Community. -
associate- Specifies that the auto provisioning service associates dynamically the CloudGuard Gateway VPN tunnels with the route table.
-
-
Propagate the route table to your spokes. For that:
-
Open the route table.
-
Go to the Propagation tab. Click Create propagation.
-
Choose each spoke attachment and click Create propagation.
This creates a route from each CloudGuard Transit Gateway VPN attachments to all spoke VPCs.
This lets the CloudGuard Transit Gateways to route traffic to the Spoke VPCs over their VPN tunnels.
-
-
-
Configure a spokes route table:
-
Create a new spokes route table.
Later, the spokes are automatically propagated to the CloudGuard Transit Gateway VPN attachments.
-
Add this tag:
Tag Key:
x-chkp-vpnTag Value:
<MANAGEMENT-NAME>/<VPN-COMMUNITY-NAME>/propagateWhere:
-
<MANAGEMENT-NAME>- Specifies the name of the Management Server. Use the same name you used when you executed theautoprov_cfg utility. -
<VPN-COMMUNITY-NAME>- Specifies the name of the VPN Community. Use the same name you used when you created the VPN Community. -
propagate- Specifies that the auto provisioning service propagates dynamically the spokes to the CloudGuard Transit Gateway VPN tunnels in the route table.
-
-
Associate your spokes to the route table. For that:
-
Open the spoke route table.
-
Go to the Associations tab. Click Create association.
-
Choose each spoke attachment you created earlier and click Create association.
This creates a default route to all VPN tunnels (which route by ECMP), and a specific route to each VPN attachment to respond to the requesting Transit Gateway.
This lets the spoke VPCs to route traffic through the CloudGuard Transit Gateway over their VPN attachments.
-
When the CloudGuard Transit Gateway provisioning starts, a VPN tunnel is created for each Transit Gateway.
-
The automation performs these tasks:
-
Creates a VPN connection with two tunnels.
-
Creates an attachment to the Transit Gateway you tagged in the section Deploying the AWS Transit Gateway.
-
Associates each VPN attachment with the checkpoint route table.
-
Propagates each VPN attachment to the spokes route table.
Step 7: Reviewing and Testing the Deployment
If the set up was successful, these components show:
-
In AWS Management Console:
-
Each Gateway has a VPN connection with two tunnels in the UP status.
-
Under the Transit Gateway Route tables:
-
In the spokes route table, all spokes VPCs are propagated to the CloudGuard Security Gateways VPN attachments.
-
In the checkpoint route table, all CloudGuard Security Gateways VPN attachments are associated.
-
-
-
In Check Point SmartConsole:
-
All the Check Point CloudGuard Security Gateways (you defined in the Auto Scaling Group in Amazon EC2 Console) are provisioned successfully.
-
On the Management Server, the command "
service cme test" runs and ends without errors. -
Check Point IPsec VPN
Check Point Software Blade on a Security Gateway that provides a Site to Site VPN and Remote Access VPN access. Software Blade is enabled, on each Security Gateway. -
Star VPN Community with both gateways, each configured as a Center Gateway.
-
Security Policy with a Directional VPN rule exists.
-
The Security Policy is installed successfully on the Security Gateways.
-
(Optional) Enable Transit Gateway Appliance Mode
The TGW Appliance Mode allows traffic inspection to happen on different AZ's than the traffic is sourced from or destined to.
With the AWS Transit Gateway Appliance Mode, you have the ability to specify attachments that should forward network flows out of the same AZ regardless of the flow's direction and from what availability zone it originated. The AWS Transit Gateway Appliance Mode ensures that network flows are symmetrically routed to the same AZ and network appliance. For more information AWS Transit Gateway Appliance Mode, see this example: Appliance in a shared services VPC.
To set Transit Gateway Appliance Mode on the Security VPC attachment, use this AWS CLI command with the latest version of AWS CLI v2:
aws ec2 modify-transit-gateway-vpc-attachment --transit-gateway-attachment-id <tgw-attach-xyx> --options ApplianceModeSupport="enable"
Follow these steps to set Transit Gateway Appliance Mode on the Security VPC attachment from the AWS console:
-
Log in to the AWS Management Console.
-
From the primary menu bar, select VPC > Transit Gateway attachments > select the Security VPC attachment.
-
Click Actions > Modify transit gateway attachment.
-
Check Appliance Mode support.
-
Click Modify transit gateway attachment.