Smart Banners
Overview
Smart Banners are customizable banners added to incoming emails that Email Security found clean of threats.
These banners help distinguish external, unverified, or potentially fraudulent emails and so on that serve these main purposes:
-
Make users cyber-aware - The banners draw user attention to suspicious elements in the email that - combined with the user insights - might lead to the understanding that the email is malicious.
-
Remind users to follow the company policy - The banners alert the user to follow company policies for particular emails. For example, emails that contain invoices or requests to modify a partner's billing information.
Attaching Smart Banners to Emails
To attach Smart Banners to emails:
-
Create or edit an existing Threat Detection policy for Office 365 Mail or Gmail. See Threat Detection Policy for Incoming Emails.
-
Set the policy protection mode as Prevent (Inline).

Note - Smart Banners are not supported for policies in Detect and Detect and Remediate protection mode.
-
Scroll down to Clean Emails section and for Clean Workflow, select Deliver with Smart Banners.
-
Click Save.
|
|
Notes:
|
Customizing Smart Banners
To customize a Smart Banner:
-
Click User Interaction > Smart Banners.
-
Click on the banner.
The banner's preview appears.
-
Click the
 icon on the banner.
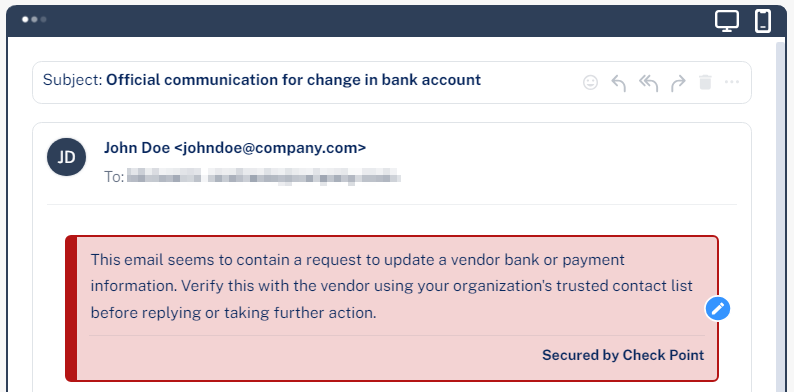
-
To change the banner's severity and color, select Low, Medium, or High.
-
Make the required changes to the text.
-
Click Save and Apply.
To remove the Secured by
-
Go to User Interaction > Smart Banners.
-
Click Settings next to the Smart Banners at top left corner.
The Smart Banners Config pop-up appears.

-
Clear the Add "Secured by Check Point" to all banners checkbox.
-
Click OK.
Enabling/Disabling Specific Smart Banners
Email Security delivers the emails with a specific Smart Banner if they match the use case the banner covers.
To enable or disable specific Smart Banners, do these:
-
Go to User Interaction > Smart Banners.
-
Toggle the button On/Off to the left of the required banner.
-
Click Save and Apply.
Automatically Enabling New Smart Banners
-
Go to User Interaction > Smart Banners.
-
Click Settings next to the Smart Banners at top left corner.
The Smart Banners Config pop-up appears.
-
Enable the Automatically enable newly introduced banners checkbox.
-
Click OK.
Excluding Specific Sender Domains from Smart Banner
Email Security allows administrators to exclude Smart Banners from emails sent by specific domains. To do that:
-
Go to User Interaction > Smart Banners.
-
Click Settings next to the Smart Banners at top left corner.
The Smart Banners Config pop-up appears.
-
Select the Exclude sender domains checkbox.
-
In the Excluded sender addresses / domains field, enter the required addresses or domain(s) separated by commas.
-
Click OK.
Adding Smart Banners to Allow-Listed Emails
Email Security allows administrators to apply Smart Banners to allow-listed emails, ensuring users receive consistent guidance.
This feature reinforces security awareness without altering existing allow-listed email configurations and ensures organizations maintain consistent user education and awareness, even when specific senders bypass phishing inspection.
To add smart banners to allow-listed emails:
-
Go to Security Settings > Security Engines.
-
In the Phishing Detection section, click Configure for Anti-Phishing.
-
In the Configure Anti-Phishing pop-up that appears, scroll-down to Email Bomb - Excluded addresses section.
-
Select the Add Smart Banners to allow-listed emails checkbox.

Note - If you select the Add Smart Banners to allow-listed emails checkbox, Email Security adds Smart Banners to allow-listed emails, even if they match an Anti-Phishing Allow-List rule.
-
Click Save.
Supported Smart Banners
Email Security supports these Smart Banners:
|
Category |
Smart Banner Name |
Description |
Default Severity |
Priority |
Is enabled by default? |
|---|---|---|---|---|---|
|
Business email compromise |
Sender resembles a real contact |
Email from a sender that resembles but is not identical to a contact the recipient is corresponding with. |
High |
1 |
Yes |
|
Request to update payment details 1 |
Email that resembles a request from vendors to change their payment details. |
High |
2 |
Yes |
|
|
Invoice from a new vendor 1 |
Email with an invoice from a vendor that never contacted before. |
Medium |
21 |
Yes |
|
|
Payroll information update request 1 |
Emails from external senders requesting to update their payroll information. |
Low |
41 |
Yes |
|
|
Financial transaction requests |
Emails with Invoices / POs 1 |
Email that contains a request for payment in the form of invoice or purchase order. |
Low |
42 |
Yes |
|
Payment request via payment service |
Email that contains a payment request received via accounts in payment services. |
Low |
43 |
Yes |
|
|
Avoiding inspection
|
Emails with links to restricted resources |
Email with links to resources with restricted access, possibly in order to avoid inspection. |
Low |
44 |
Yes |
|
Emails that appear to be from an e-sign service 6 |
Emails that contains a link to an e-sign document, possibly in order to avoid inspection. |
Low |
45 |
Yes |
|
|
Fundamentals |
Sender name different than address |
Email from sender with a name that is significantly different from the email address which may indicate an impersonation attempt. |
High |
3 |
Yes |
|
Reply-to domain recently created and its address is different than the sender’s |
Email with reply-to address different from sender address and whose reply-to domain is created recently. |
High |
4 |
Yes |
|
|
Sender domain created recently 2 |
Email whose sender domain was created recently. |
Medium |
23 |
Yes |
|
|
Sender SPF failed |
Email that failed SPF checks. |
Medium |
24 |
Yes |
|
|
Incoming emails from external senders |
Email from an external sender (outside the organization). |
Informative (blue) |
81 |
No |
|
|
Impersonation
|
First-time sender to recipient 3,4,5 |
Email from a sender that never sent an email to the recipient before. |
Low |
47 |
No |
|
First-time sender to recipient domain 4,5 |
Email from a sender that never exchanged an email with the recipient domain before. |
Low |
46 |
No |
|
|
Sender resembles a person within the organization |
Emails from a first-time sender whose display name is identical to a person within the organization. |
Medium |
22 |
Yes |
1 These banners apply only to emails written in English and German.
2 This banner will be applied to emails only if the sender's domain was created in the last 100 days.
3 The First-time sender banner will not be applied to the recipient's emails after 24 hours from the sender's first email.
4 If an email is sent to multiple recipients, the banner will be added only if the condition applies to all recipients.
5 The banner will not be added if the sender domain regularly interacts in high volumes with other recipients from your domain. This exception does not apply to public domains. For example, gmail.com.
6 If an email appears to reference an electronic signature and may contain links that cannot be inspected for phishing or viruses, ensure its authenticity before clicking any links or taking further action.