Data Loss Prevention (DLP) Policy
DLP Policy filters outgoing emails to ensure that sensitive data does not reach unauthorized recipients.
In addition, it can also filter incoming emails to ensure sensitive data is not stored in your organization's mailboxes and/or that it is shared only through authorized delivery methods.
For more details about the DLP security engine, see Data Loss Prevention .
|
|
Note - If an email contains a ZIP file, Harmony Email & Collaboration recursively scans all files within the archive to detect any DLP violations. |
In this chapter:
Sync Times with Microsoft
-
If you change the policy protection mode from Monitor Only or Detect and Remediate mode to Prevent (Inline) mode, it takes time to start protecting in Prevent (Inline) mode. It could take up to an hour, depending on the number of protected users in the Harmony Email & Collaboration account.
-
When adding a user to the scope of a Prevent (inline) policy that is not set to All Users and Groups, it may take up to 1 hour for emails from this user to be inspected inline.
-
When a new user is added to Microsoft 365, administrators can include them in the policy scope within 10 minutes or it might take up to 24 hours.
Enhanced DLP Policy using Microsoft Purview Sensitivity Labels
Harmony Email & Collaboration allows administrators to define Data Loss Prevention (DLP) policies using Microsoft Purview Sensitivity Labels, enabling effective management of sensitive data shared through emails, messages, attachments or files.
-
Relevant SaaS Applications: Office 365 Mail, OneDrive, SharePoint, and Microsoft Teams.
-
Supported file formats: Emails, DOCX, XLSX, PPTX, PDF.
To define Data Loss Prevention (DLP) policies using Microsoft Purview Sensitivity Labels:
-
Go to Policy.
-
Open an existing DLP policy or create a new one.
-
Go to the DLP Criteria section.
-
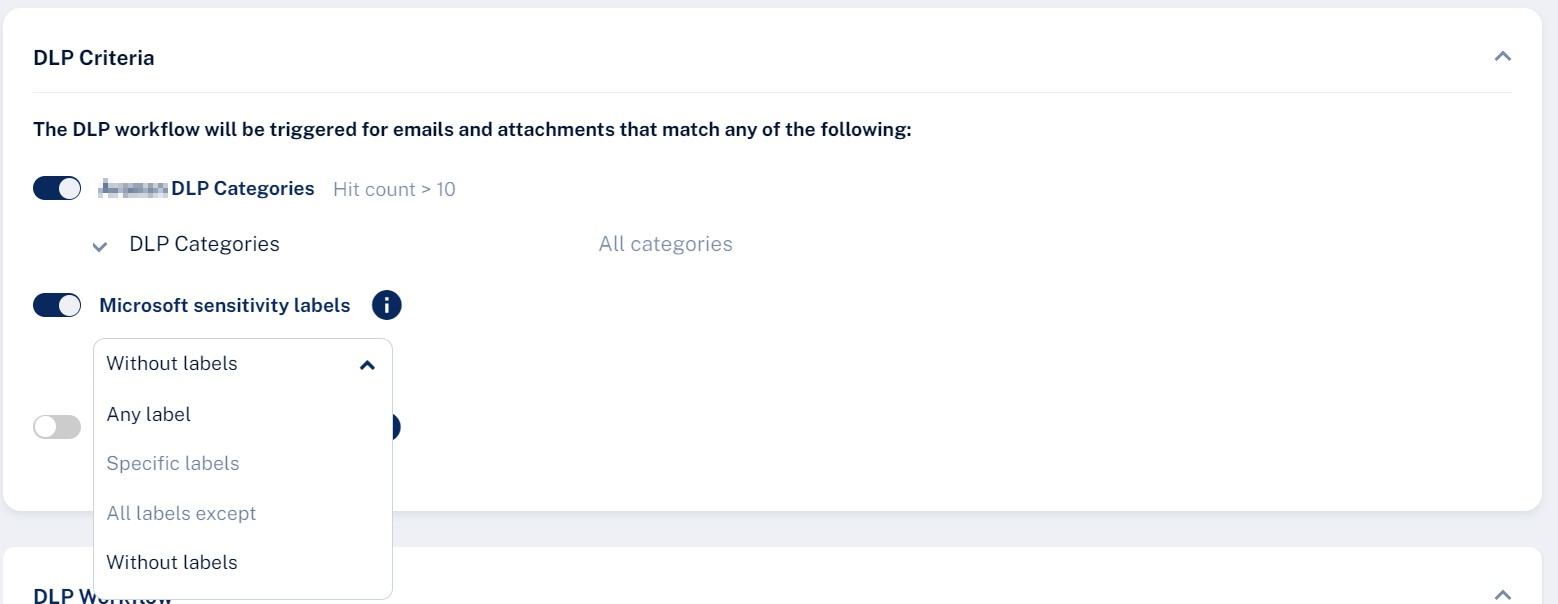
Enable the Microsoft sensitivity labels toggle button and from the list, select one of these:
-
Any label
-
Specific labels and then enter the label name
-
All labels except and then enter the label name
-
Without labels

Note - After enabling Microsoft sensitivity labels for the first time, an administrator must reauthorize the Check Point application to grant the InformationProtectionPolicy.Read.All permission. For more information, see Microsoft Graph permissions reference - Microsoft Graph | Microsoft Learn
-
-
To include the email and attachment without labels, select the Include emails/attachments without labels checkbox.
-
Click Save and Apply.
Configure DLP Policy with File Type Criteria
You can configure a DLP policy to detect and act on messages that include specific file types as attachments.
To add file type in DLP criteria:
-
Go to Policy.
-
Open an existing DLP policy or create a new one.
-
Go to the DLP Criteria section and enable the File Type toggle button.
-
Enter the required file type and select from the predefined list.
If you select multiple file types, the text box expands accordingly.

Note - When file type criteria are configured, the system updates Send Email Alert To section to include placeholders for the selected file types. This allows administrators to see which file types triggered the alert.
-
Click Save and Apply.


