Alerts Management
The Alerts Management feature allows you to create, view, and manage DMARC related alerts in your environment. You can review existing alerts, export alert data, and configure new alerts based on DMARC, SPF, and domain activity.
Managing Alerts
The Alerts Management page shows a list of all created alerts in your environment.
To view the Alerts Management page, click DMARC > Alerts & Reports.
| Column | Description |
|---|---|
| State |
State of the alert.
|
| ID | Displays the unique identifier assigned to the alert. |
| Name | Displays the name of the alert. |
| Type | Shows the alert type. |
| Domains | Displays the domains to which the alert applies. |
| Excluded Domains | Displays the domains to which the alert is not applied. |
|
Created By |
The name of the user who created the alert. |
|
Create Date |
The date and time when the alert was created. |
|
Email Recipients |
Lists the email recipients who receive alert notifications. |
|
Create Event |
Indicates whether an event will be generated when the alert triggers.
|
|
Send Emails |
Indicates whether email notifications are enabled for the alert.
|
|
Notes |
Additional information or comments related to the alert. |
To export the details to a CSV, click Export to CSV in the top right corner of the table.
Adding a New Alert
To add a new alert:
-
Access the Email Security Administrator Portal.
-
From the left navigation panel, go to DMARC > Alerts & Reports.
-
In the Alerts Management page that appears, click Add Alert.
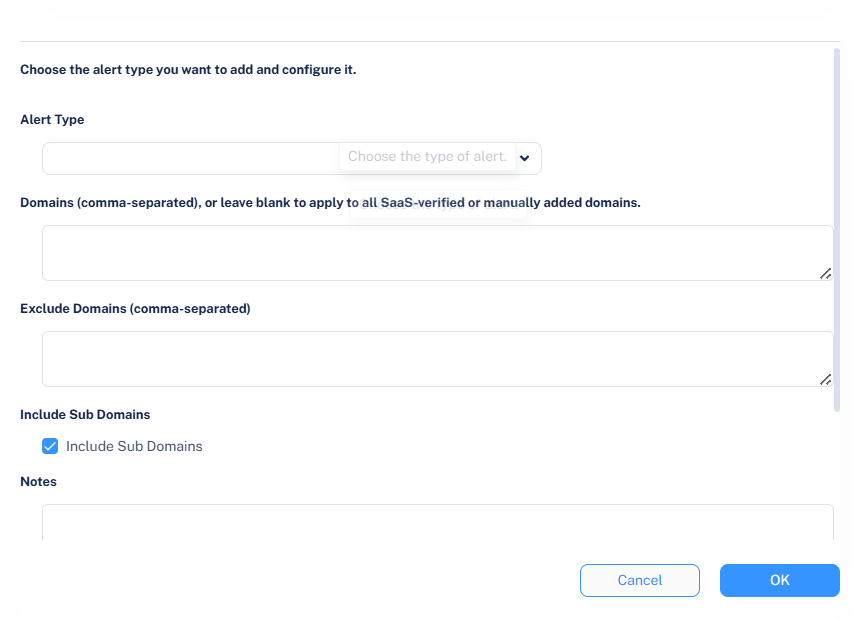
-
From the Alert Type dropdown, select the required alert type.
-
Error in SPF record
-
Error in DMARC record
-
Drop in daily DMARC success rate
-
Stopped receiving DMARC reports
-
New failing source
-
-
In the Domains (comma-separated), or leave blank to apply to all SaaS-verified or manually added domains field, enter the domains for which you want to create the alert.

Note - You can enter multiple domains separated by commas. Leave the field blank to apply the alert to all SaaS-verified or manually added domains.
-
In the Exclude Domains (comma-separated) field, enter the domains you want to exclude from receiving alert notifications.
Note - You can enter multiple domains separated by commas. The system does not send alerts for these domains.
-
In the Include Sub Domains section, select the Include Sub Domains checkbox to apply the alert to all subdomains.
Note - By default, the Include Sub Domains checkbox is selected.
-
In the Notes field, enter any additional information or comments about the alert.
-
For a Drop in daily DMARC success rate alert type:
-
In the Drop Percentage field, enter the required daily DMARC success rate drop percentage that triggers the alert.
Note - By default, the Drop Percentage is set to 20 percent.
-
In the Baseline Period (Days) field, enter the number of days used to calculate the average DMARC success rate for comparison.
Note - By default, the Baseline Period (Days) is set to 3 days. A longer period provides a more stable average, while a shorter period reacts faster to recent changes.
-
-
For Stopped receiving DMARC reports alert type:
-
In the For the Last Hours field, enter the required number of hours after which the alert should be triggered if DMARC reports have not been received.
Note - By default, the For the Last Hours is set to 36 hours.
-
-
For the New failing source alert type:
-
In the Failure Rate field, enter the required failure rate percentage that triggers the alert.
Note - By default, the Failure Rate is set to 40 percent.
-
-
In the Minimum Days Between Events field, enter the minimum number of days that must pass before the system creates a new event for a DMARC success rate drop.
Note - By default, the value is set to 7 days. If an event was recently triggered, the system creates a new event only after this threshold is reached.
-
From the Severity dropdown, select the severity level of the alert.
-
Lowest
-
Low
-
High
-
Medium
-
Critical
-
-
In the Create Event section, select the Create Event checkbox to create an event in the Events page when the alert triggers.
Note - If Create Event is enabled, the system creates a Security Event of type Alert in the Events page.
-
In the Send Emails section, select the Send Emails checkbox to send email notifications when the alert triggers.
-
In the Email Recipients section, select the required users and groups and click Add to Selected.
-
-
Click OK.