Deploying Endpoint Security Client Using Jamf Pro
You can use Jamf Pro to deploy Endpoint Security Client on your macOS endpoints.
Use Case
If you already use Jamf Pro to manage your organization’s endpoints, you can also use it to deploy Endpoint Security Client on these managed endpoints.
Prerequisites
Endpoint Security requires these credentials for integration with Jamf Pro:
-
Client ID
-
Secret
Configuration
-
Log in to the Jamf Pro portal.
-
From the toolbar, click Management Settings > API Roles and Clients.
-
Open the API Roles tab and click New.
-
In the Display name field, enter a display name for the roles.
-
In the Jamf Pro API role privileges field, select these options:
-
Read Smart Computer Groups
-
Delete Scripts
-
Delete Policies
-
Create Scripts
-
Create Policies
-
Read Smart User Groups
-
Read Static Computer Groups
-
Update Policies
-
Read Policies
-
Update Scripts
-
Read Scrips
-
-
Click Save.
-
Open the API Clients tab.
-
Click New.
-
In the Name field, enter a name for the API client.
-
In the API Roles field, select the role you created for the client.
-
In the Access Token Lifetime field, select 120.
-
Click Enable API Client.
-
Click Save.
-
Click Generate Client Secret.
-
In the Generate client credentials window, click Create secret.
-
In the Save client secret window, click Copy client credentials to clipboard. Keep the credentials to use in the Jamf Pro integration (Step 2).
-
In the Check Point Portal, open the Endpoint Security main menu.
-
From the left taskbar, click Endpoint Setting > UEM Integration.
-
Click the plus (+) icon.
The Create UEM Integration window opens to the Select UEM screen.
-
Select JAMF and click Next.
The Connect to UEM App screen opens.
-
In the Connect to UEM App screen, do this:
-
In the Organization prefix field, enter the organizational prefix of the unique URL you use to log in to Jamf Pro.
Example: Acme Corporation uses the URL acmecorp.jamfcloud.com. The organization prefix is acmecorp.
-
In the Client Id field, enter the Client ID you generated and saved in Step 1.
-
In the Client secret field, enter the Client secret you generated and saved in Step 1.
-
Click Verify.
-
Click Next.
The Distribute Installer screen opens.
-
-
In the Distribute Installer screen, do this:
-
In the Application Name field, enter a name for the application.
-
In the Add Jamf Distribution Groups field, select the applicable Jamf Pro groups for the distribution of the Endpoint installer.
-
In the Installer Version, select a version of Endpoint Security Client for macOS.
-
Click Create.
After 1-3 minutes, a new Check Point Installer Integration Card appears.
-
Overview of the Check Point Installer Integration Card
In the Check Point Installer Integration Card, you can see information about the JAMF integration, edit the integration, and sync the integration.
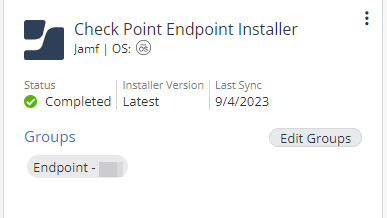
Information in the card
This information appears in the card:
-
Application name - name of the Jamf application
-
Status - status of the integration (example: Completed)
-
Installer version - the version of the Check Point Endpoint Installer
-
Last sync - the date that the Check Point Endpoint Installer most recently fetched the application from JAMF (format: MONTH/DAY/YEAR)
-
Groups - a list of JAMF groups that are assigned to the application
To edit the JAMF integration:
-
Click the menu icon
 > Edit.
 -
Change one or more of these:
-
application name
-
assigned groups
-
Secret
-
-
Click Edit UEM Integration.
To sync the JAMF Integration:
Click the menu icon ![]() > Sync.
> Sync.