Configuring Clients for Non-Persistent Desktops
General
The Solution:
-
One or more Signature Servers.
Responsible for the store of the latest Anti-Malware signatures in a shared location.
-
Many specially configured clients that load signatures from the shared folder.
-
If the shared signatures server is not available, the client uses signatures from the golden image.

Recommended Steps:
-
Set up a signature server machine.
-
Set up a client machine (golden image).
-
Create a test pool.
-
Deploy the production pool.
Settings availability for Non-Persistent Desktops
| Basic Functionality | Servers R80.30 and Lower | Servers R80.40 | Servers R81 and Higher |
|---|---|---|---|
|
Disable Periodic Scan |
Use Client Registry |
Use web management or SmartEndpoint |
Use web management or SmartEndpoint |
|
Configure Shared Signature |
Use Client Registry |
Use Client Registry |
Use web management or SmartEndpoint |
Shared Signatures Server
-
Installs as a regular Endpoint Security Client and becomes a "signature server" later.
Note - Create a specific policy in SmartEndpoint to configure it.
-
Responsible for holding the latest Anti-Malware signatures.
The signatures store in a read-only shared folder and update according to policy.
-
Must run on a persistent virtual machine, preferably on the same storage as the clients.
-
Must connect to the Endpoint Policy Server or the Internet to update signatures.
Setting Up the Signatures Server
You can set up the Signature Server with a policy.
-
The Endpoint Security Management Server version R81 (and higher) and the Endpoint Security Clients version E84.20 (and higher) support the policy setup.
-
To enable the policy setup:
-
Create a new Computer Group and assign a Signature Server machine to the new group.
-
Clone the Anti-Malware rule and assign it to the new Computer Group.
-
Edit the Signature Update action in the new rule.
-
Select Set as shared signature server.
-
Enter the folder where your signatures must reside, such as
C:\Signatures.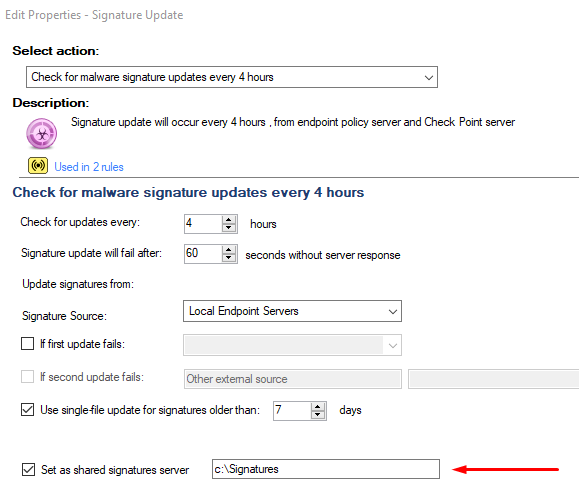
 Note - If the folder does not exist, the endpoint creates it for you.
 -
Apply policy.
-
-
Important - Manual VDI configuration (applied with manually setting the Virtual Machine registry or with the script) has a higher priority than configuration performed by policy. If you want to apply settings by policy after earlier manual settings, you must disable the manual settings first. Set the following registry key:
On 64-bit:
HKEY_LOCAL_MACHINE\SOFTWARE\WOW6432Node\CheckPoint\Endpoint Security\Anti-Malware\VdiPolicySetup=(DWORD)0x01On 32-bit:
HKEY_LOCAL_MACHINE\SOFTWARE\CheckPoint\Endpoint Security\Anti-Malware\VdiPolicySetup=(DWORD)0x01
Setup Validation
Wait 20 minutes to make sure:
-
Signatures version is current.
-
Shared Signatures folder exists with Anti-Malware signatures.
Important - If the folder is empty, the setup is invalid.
Client Machine Configuration for Non-Persistent Desktops
Creating a Basic Golden Image for Non-Persistent Desktops
See Basic Golden Image Settings for the procedure to create a basic golden image.
Set Up the Client Machine
You can set up the client machines (the golden image) by policy.
The Endpoint Security Management Server version R81 (and higher) and the Endpoint Security Clients version E84.20 (and higher) support the policy setup.
-
Disable the Anti-Malware periodic scan. See Appendix.
-
Setting the VDI client signature source.
-
Create a new Computer Group and assign a Golden Image machine to the new group.
-
Clone the Anti-Malware rule and assign it to the new Computer Group.
-
Edit the Signature Update action in the new rule.
-
Find the Signature Source label and select Shared Signature Server.
-
Enter the path of the shared folder, such as
\\192.168.18.5\Signatures.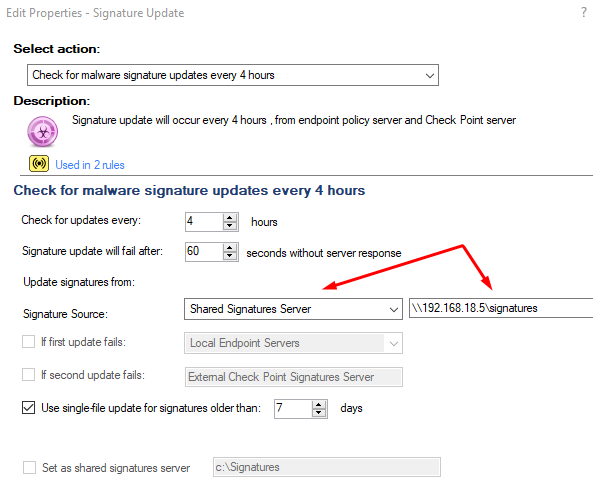
-
Apply policy.
-
When applying VDI settings through Policy to Golden Image, you must apply VDI settings through Policy to cloned Virtual Machines.
-
Important - Manual VDI configuration (applied with manually setting the Virtual Machine registry or with the script) has a higher priority than configuration performed by policy. If you want to apply settings by policy after earlier manual settings, you must disable the manual settings first. Set the following registry key:
On 64-bit:
HKEY_LOCAL_MACHINE\SOFTWARE\WOW6432Node\CheckPoint\Endpoint Security\Anti-Malware\VdiPolicySetup=(DWORD)0x01On 32-bit:
HKEY_LOCAL_MACHINE\SOFTWARE\CheckPoint\Endpoint Security\Anti-Malware\VdiPolicySetup=(DWORD)0x01
Post Setup Actions
-
Make sure the Shared Signatures folder is accessible from the golden image and the folder has signatures.
-
Make sure the Anti-Malware signatures are current.
-
Scan for malwares with the latest Anti-Malware signatures.
Creating a Pool for Non-Persistent Desktops
|
|
Note - Check Point recommends that each created pool will use a different machine naming pattern. This will prevent situations where Management Server has duplicate machine entries from different pools. |
VMware Horizon Key Points
This procedure is mandatory to create supported Horizon pools for Non-Persistent Virtual Desktops:
-
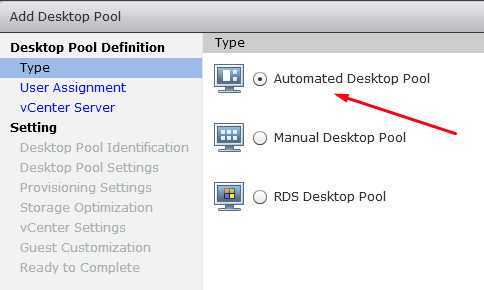
In VMware Horizon, choose Automated Desktop Pool in the Type panel of Add Desktop Pool.
-
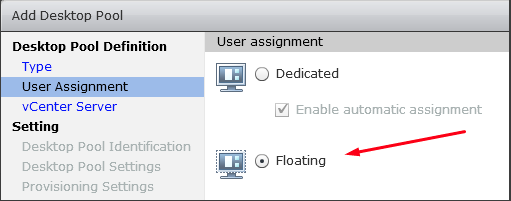
In the User Assignment panel, choose Floating.
-
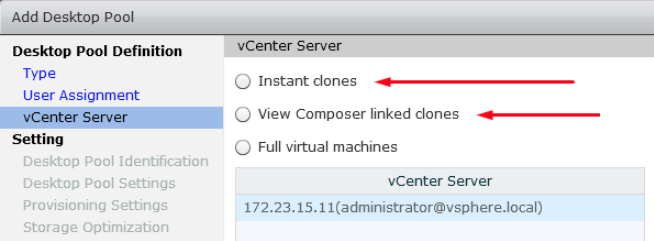
In the vCenter Server panel, choose Instant Clones or Linked Clones.
-
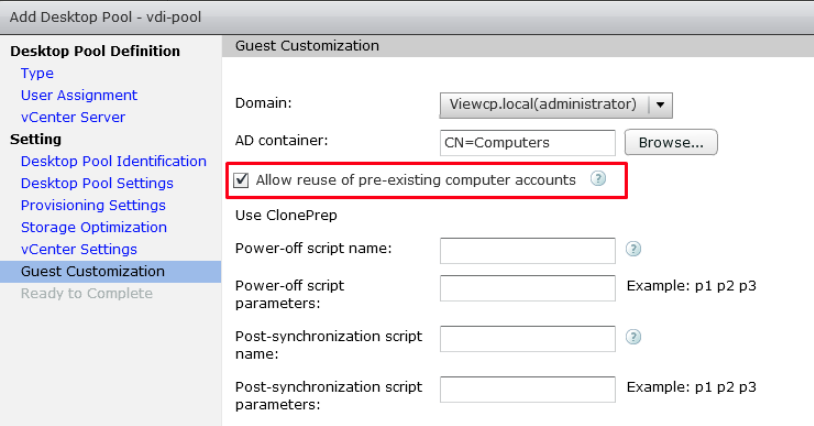
In the Guest Customization panel, select Allow reuse of pre-existing computer account.
Citrix Xen-Desktop Key Points
-
When you select the Operating System type, use Single-Session OS.
-
When you select the User Experience type, use a non-dedicated desktop experience.
Pool Validation
Access a few cloned machines and make sure that:
-
Machines connect to the Endpoint Security Management Server.
-
Applicable Software Blades run.
-
Anti-Malware signatures are current.
-
Machines appear on the Server User Interface.
Software Blades for Non-Persistent Desktops
The Endpoint Security client capabilities for non-persistent virtual desktops are:
-
Anti-Malware
-
Fully supported when configured with the Shared Signatures Server.
-
-
Compliance, Firewall and Application Control, Remote Access VPN, and URL Filtering
-
Fully supported.
-
-
Forensics
-
Partially supported.
-
The Forensics database contains data for the current session.
-
Forensics Reports generate as usual.
-
-
-
Threat Emulation and Anti-Exploit
-
Partially supported.
-
Signatures are not in cache.
-
Signatures download for each new instance.
-
-
-
Anti-Bot
-
Partially supported.
-
Signatures are not in cache.
- Signatures download for each new instance.
-
Cached data (such as the URLs checked against Threat-Cloud and Detection List) are lost on logoff.
-
-
-
Ransomware "Honeypots"
-
Partially supported.
-
Part of the Golden Image.
-
-
-
Behavioral Guard
-
Partially supported.
-
Signatures are not in cache.
-
Signatures download for each new instance.
-
-
-
Full Disk Encryption and Capsule Docs
-
Not supported for non-persistent desktops.
-
