Deployment & Configuration
Pre-Requisites
-
Set the environment variable SPLUNK_HOME to the home location of the Splunk directory
-
The Dome9 App works with Splunk Enterprise 7.1, 7.2, or 7.3.
-
You must create a Dome9 API Key and Secret create Dome9 exclusions
-
You must create a Splunk HEC event collector token for data collection
Single Server Deployment
In a single server deployment, a single instance of Splunk Enterprise works as data collection node, indexer and search head. In this scenario, install both Check Point Dome9 applications on this node. Complete the setup of the App, following the steps in the App configuration section below.
The application can be installed either from the command line, or from the Splunk UI.
-
from the UI, log into Splunk. Navigate to App→Manage Apps and click Install app from a file. Then choose the SPL file to install and click upload the SPL.
-
from the command line, navigate to the $SPLUNK_HOME/bin folder, and run this command:
./splunk install app Check Point_dome9_app_for_splunk-XX-XXXX-XX.spl
Distributed Deployment
Configure App on Search head for taking exclude action.
Configure HEC event collector and the Dome9 App on a heavy forwarder.
We are assigning reportTime as _time.
Add-on Configuration for Data Collection
For data collection we need to create an HEC input in Splunk. Follow these steps to configure this:
-
Navigate to Settings > Data inputs > HTTP Event Collector.
-
Click Global Settings.
-
Enable All Tokens, if not already enabled.
-
Click Save.
-
Click New Token.
-
Follow the wizard to create a new HEC token.
-
Enter a name for the token.
-
Click Next.
-
For Source type, use Select and from dropdown choose Check Point:dome9:alerts. (The sourcetype might not be listed if you have not installed the App)
-
For App context, select Check Point Dome9 App for Splunk.
-
For Index, you can select any existing index or you can create any custom index. Follow https://docs.splunk.com/Documentation/Splunk/7.3.2/Indexer/Setupmultipleindexes for details. If the setup is in the distributed environment then the index needs to be created on Indexers from cluster master, and needs to be pushed to all the indexers.
-
Click Next and then Submit.
-
-
Copy the Token Value.
To set up Alerts forwarding from Dome9 to Splunk follow these steps in the Dome9 UI:
-
Log in to the Dome9 server:
-
Navigate to Compliance & Governance > Notification.
-
Click Add Notification.
-
Enter these details for the Notification:
-
Enter a name and a description for the notification.
-
In Immediate Notification, select Send to HTTP Endpoint.
-
In Endpoint URL, enter:
https://<splunk_ip_or_host>:<HEC-port(default-9029)>/services/collector/raw
-
Set Authentication Type to Basic.
-
Add x in Username.
-
Add <HEC token> in Password.
-
Select the JSON - Full entity checkbox.
-
Click Save.
-
-
Select the policies from which alerts need to be forwarded to Splunk.
-
Navigate to Compliance & Governance > Policies.
-
Click Edit Notifications for the policy for which you want to send alerts.
-
Select the Notification created above (step 4), and click Save.
After this, Dome9 will automatically send new alerts to Splunk.
-
To send all the Alerts (including existing ones) to Splunk for the first time, follow these steps:
-
Click Send All Alerts button in front of the Policy.
-
Select Webhook from Notification Type.
-
Select the created notification from Notifications list.
-
Click Send.
-
-
If you are collecting data in a custom index then you need to update the macro definition. Follow these steps to update the macro definition:
-
Navigate to Settings > Advanced search > Search macros.
-
Change App to Check Point Dome9 App for Splunk.
-
Search for Check Point_dome9_data and click it.
-
Change value in the definition section from index=* to index=<custom-index>.
The custom-index is the index which you have selected in Data Collection section while creating HEC token.
-
Keep sourcetype="Check Point:dome9:alerts" as it is.
-
Final value should look something like:
index=main sourcetype="Check Point:dome9:alerts"
To perform exclusion actions over an unencrypted network, follow these steps:
-
Navigate to $SPLUNK_HOME$/etc/apps/Check Point_dome9_app_for_splunk/bin/lib/certifi.
-
Open the cacert.pem file and add your custom certificate details at the end of the file.
-
Save the file.
-
Restart the Splunk server.
Add-on Configuration for Exclude Actions
First, configure API information from the setup page.
Follow these steps to configure the App:
-
Navigate to Manage Apps.
-
Find Check Point Dome9 App For Splunk and click Setup.

-
From the Splunk UI, navigate to Apps > Manage Apps > Check Point Dome9 App for Splunk > Set up.
-
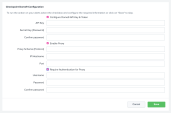
Enter the following details of your Dome9 server and save the configuration:
-
API Key: Check Point Dome9 API Key
-
Secret Key (Password): Check Point Dome9 API Secret Key
-
Select the checkbox Enable Proxy, if you want to use proxy server to connect to Check Point Dome9 server, and add the below proxy details:
-
Proxy Scheme: Provide proxy protocol (http / https / socks4 / socks5).
-
IP / Hostname: IP address or hostname of proxy instance.
-
Port: Port used to connect to proxy instance.
-
Authentication for Proxy: Check this option if your proxy configuration requires authentication.
-
Username: Provide proxy username.
-
Password: Provide proxy password.
-
-
* Note: If you clear the Configure Dome9 API Key & Token checkbox and click Save, you would not be able to use "Exclude" functionality in the Alerts dashboard.
By default, SSL Verification is enabled.
If you don't want to verify your SSL certificate, follow these steps:
-
Navigate to:
$SPLUNK_HOME$/etc/apps/Check Point_dome9_app_for_splunk/local. -
Open the file Check Point_dome9.conf file and add/update the following:
[connection_params]
ssl_verify = false
-
Save the file and restart Splunk
The Check Point Dome9 App is now configured and ready to be used.
Upgrading the App
User can upgrade Check Point Dome9 App for Splunk using the CLI or the Splunk UI.
Upgrade in CLI:
-
Download the TAR of App or TA from the Splunk base.
-
Stop the Splunk server
$SPLUNK_HOME/bin/splunk install app APP_NAME.tgz –update 1 –auth username:password -
Start the Splunk Server.
Upgrade in Splunk UI:
-
Click Manage Apps.
-
Click Install App from file and select the Check Point Dome9 App For Splunk tarball.
-
Check the option Upgrade app.
Checking this will overwrite the app if it already exists.