AWP for Azure Environments
When you enable AWP, it adds permissions to the App Registration created during your environment onboarding to CloudGuard. These permissions allow AWP to manage the necessary resources for the scan.
The data that the AWP scanner sends to CloudGuard are only CVEs and paths of the secrets.
All resources that AWP creates in your subscription have the Owner: CG.AWP tag.
Onboarding Workflow
To enable AWP on your Azure environment:
-
In the CloudGuard portal, navigate to Assets > Environments.
-
Click Enable in the AWP column for your Azure
 Collection of integrated cloud services that developers and IT professionals use to build, deploy, and manage applications through a global network of data centers managed by Microsoft®. environment.
 -
Follow the instructions on the wizard page that opens.
-
Select the scan mode: SaaS or In-Account. For more details, see Azure SaaS Mode and Azure In-Account Mode.
-
For In-Account mode, select enabling AWP for an independent account or centralized configuration. For more details, see Independent Accounts.
-
For Centralized In-Account configuration, enable AWP separately for a centralized account and for each Sub-account. For more details, see Centralized Account and its Sub-Accounts.
-
-
Click the link to open your account in Azure Cloud Shell or use AZ CLI in your terminal.
-
Copy the script created by the AWP engine. You can download the script to review or edit it based on your needs.
-
Run the script in the shell or terminal.
AWP creates the required resources and roles in your Azure subscription to allow the AWP scanner to run.

Important - Make sure you do not change the mode (SaaS/In-Account) during the onboarding. For successful onboarding, you must use the same mode that you select in Step 3a.
-
-
In the CloudGuard wizard, click Enable AWP. CloudGuard completes the process to enable AWP scanning.
|
|
Caution - When you enable AWP, make sure there is no lock on your Azure subscription or on the AWP resource group. AWP cannot delete locked resources, which causes additional costs. |

Onboarding script
Based on the selected mode, CloudGuard enables different flags for the command that generates an onboarding script. You do not have to copy and paste the command as is. Instead, you can use the flags to change the command and run it edited.
| Flag | Description |
|---|---|
|
-t, |
(Optional) Additional tags to apply to resources created during the onboarding process; format: 'Key1=Value1,Key2=Value2'. These tags are not related to the custom tags created during the scan. |
Azure SaaS Mode
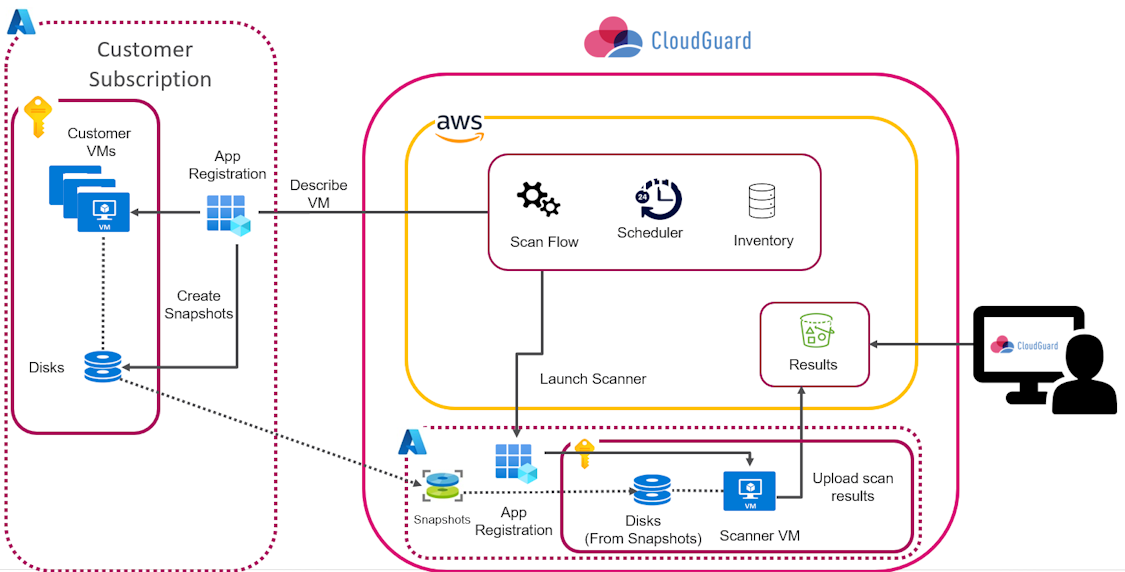
In Azure SaaS mode, AWP copies customer disks to CloudGuard's snapshots and disks. They are connected to the scanner VMs that display the toxic combinations found on the copied disks. During the workload scanning, no resources are created on the customer's side.
|
|
Note - AWP does not support scanning of Function Apps in SaaS mode. |
Resources and Permissions for Azure SaaS Mode
In this mode, all scan resources are created on the CloudGuard AWP side, including snapshots, disks, and scanner VMs. AWP creates a single custom role called CloudGuard AWP VM Data Share which includes actions to permit reading customer's disks.
AWP creates the AWP-Data-Share custom role with the permissions to:
-
describe the account VM configuration to get the disk IDs
-
read disk data and generate its snapshot
CloudGuard AWP VM Data Share role is assigned to a subscription that is onboarded.
|
|
Note - In Azure SaaS mode, AWP skips encrypted volumes with a customer-managed key. |
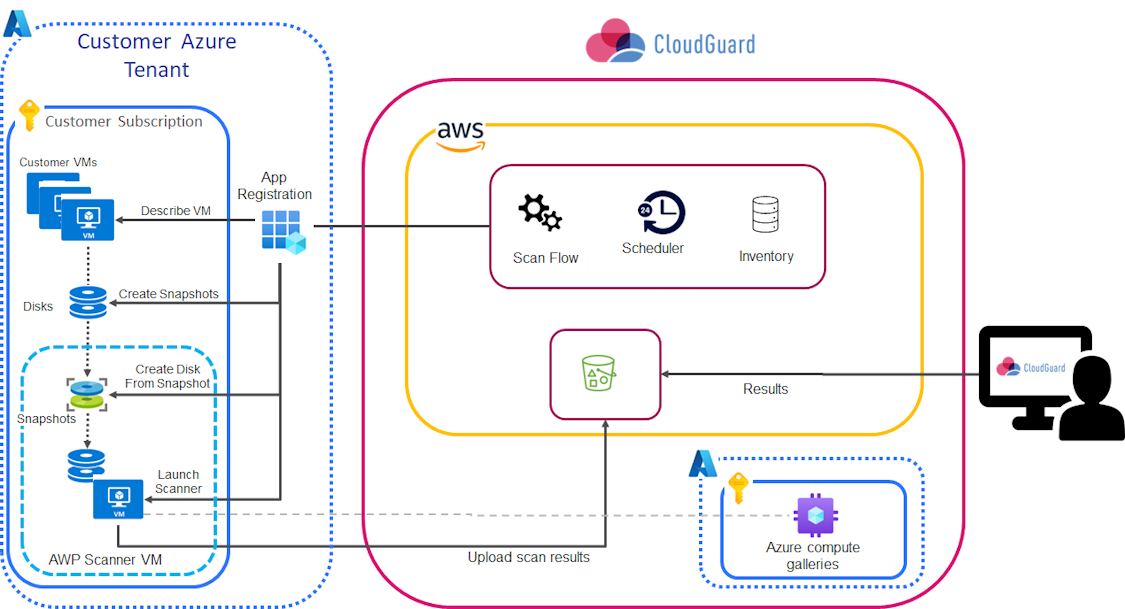
Azure In-Account Mode
In the In-Account mode, all scan resources (snapshots, disks, VNets, and scanner VMs) are created on the customer's side, therefore the workload data always remains inside the customer tenant perimeter.
Independent Accounts
In the In-Account mode for independent accounts, AWP generates the scan resources inside the same subscriptions, whose workloads it scans.
To scan Function Apps, the scanner Virtual Machine launches in the customer subscription. To reach the Function App resource and download its content in runtime, it needs a User-Assigned Managed Identity. This resource belongs to a resource group. It can be granted with permissions in the same way as an App Registration (RBAC![]() Role-Based Access Control - Manages authorization decisions, allowing admins to dynamically configure access policies through the Kubernetes API.).
Role-Based Access Control - Manages authorization decisions, allowing admins to dynamically configure access policies through the Kubernetes API.).
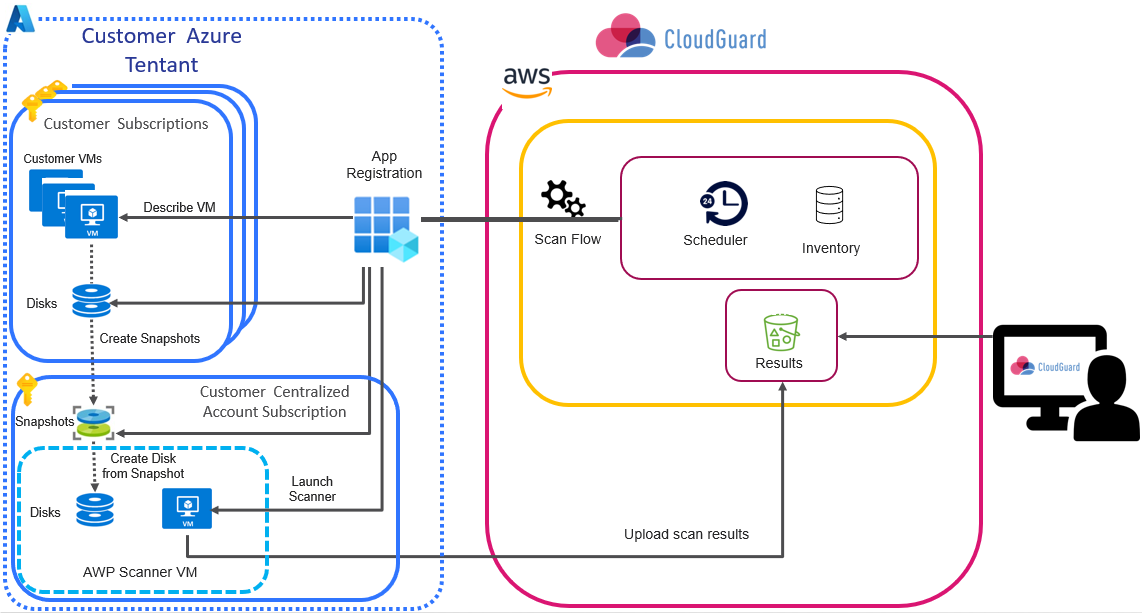
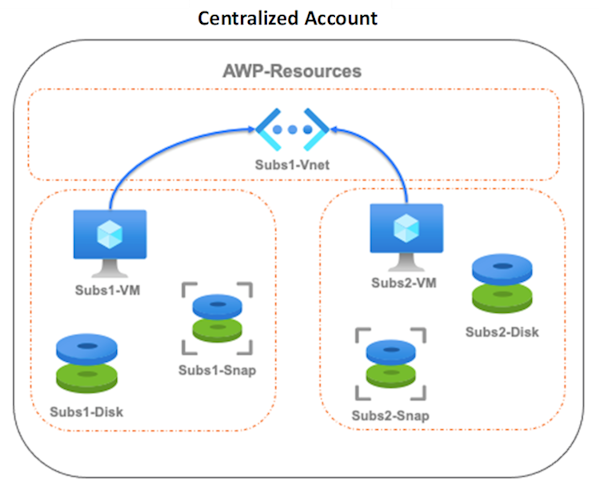
Centralized Account and its Sub-Accounts
When you select to use the In-Account mode for independent accounts, AWP creates multiple resources on your subscription during its scanning. If you have many subscriptions, these multiple distributed resources can be impracticable for management and billing. In such cases, you can configure one of your onboarded Azure subscriptions as a Centralized account, where all AWP scans and resources are located. You can configure other Azure subscriptions on the same tenant as Sub-accounts to have their scanners and AWP resources located in the centralized account.
Prerequisites
-
For the centralized account, you can select every Azure subscription onboarded to CloudGuard but not onboarded to AWP.
-
For a sub-account, make sure it has the required permissions to create resources on the centralized account - see Resources and Permissions for Azure In-Account Mode.
Resources and Permissions for Azure In-Account Mode
Virtual Machines
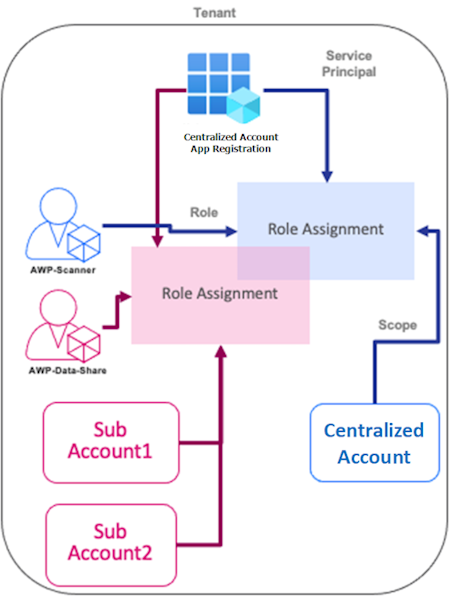
AWP creates two primary custom roles in the customer Azure tenant and assigns them based on the scan mode selected during the subscription onboarding. These roles are:
-
CloudGuard AWP VM Scan Operator role is assigned to a subscription that hosts the scans, for example, in the Standard In-Account or Centralized Account modes. It provides permissions to:
-
Read, Create or Delete Snapshots
-
Read, Create or Delete Disks
-
Create network components such as VNets and Security Groups
-
Create and Delete Scanner VMs
-
-
CloudGuard AWP VM Data Share role is assigned to a subscription whose workloads are to be scanned, for example, in the Standard In-Account or Sub-Account modes. It provides permission to read customer disks.
For Standard In-Account mode:
-
Create an AWP dedicated resource group.
-
Assign the Scan-Operator and Data-Share custom roles.
For Centralized Account:
-
Create an AWP dedicated resource group for common resources, such as VNet, to be in use for various Sub-Accounts' scans.
-
Assign the Scan-Operator custom role.
For Sub Account:
-
Create an AWP dedicated resource group for the subscription in the Centralized account subscription, where all scan resources for the sub-account workloads are located.
-
Assign the Data-Share custom role with the scope of the sub-account subscription.
Function Apps
AWP uses a user-assigned managed identity attached to the Function App scanner. This identity is the most safe way to launch a scanner capable of obtaining a Function-App source code, because it does not need transferring secrets or credentials.
When you click Enable AWP, CloudGuard onboarding script creates its resources and custom roles for a specific task of Function App scanning:
-
Resources
-
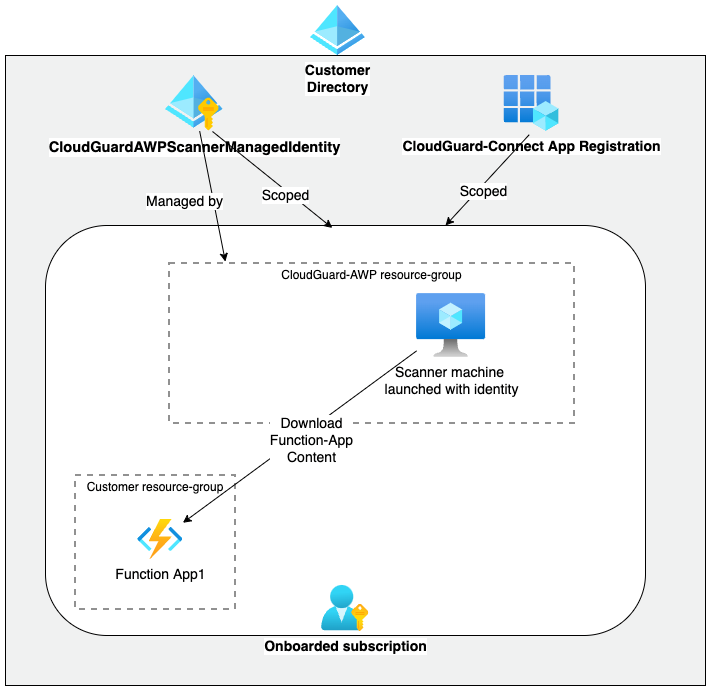
CloudGuardAWPScannerManagedIdentity – A user-assigned managed identity that enables the Function App scanner to download the Function App source code.
-
-
Custom Roles
-
CloudGuardAWPFunctionAppScanOperator - A role assigned to the CloudGuard-Connect app registration that allows to launch Function App scanner attached to the managed identity.
-
CloudGuardAWPFunctionAppScanner - A role assigned to the managed identity to enable the Function App scanner to access the Function App source code.
-
The diagram below shows an In-Account deployment that enables the Function-App scanning.
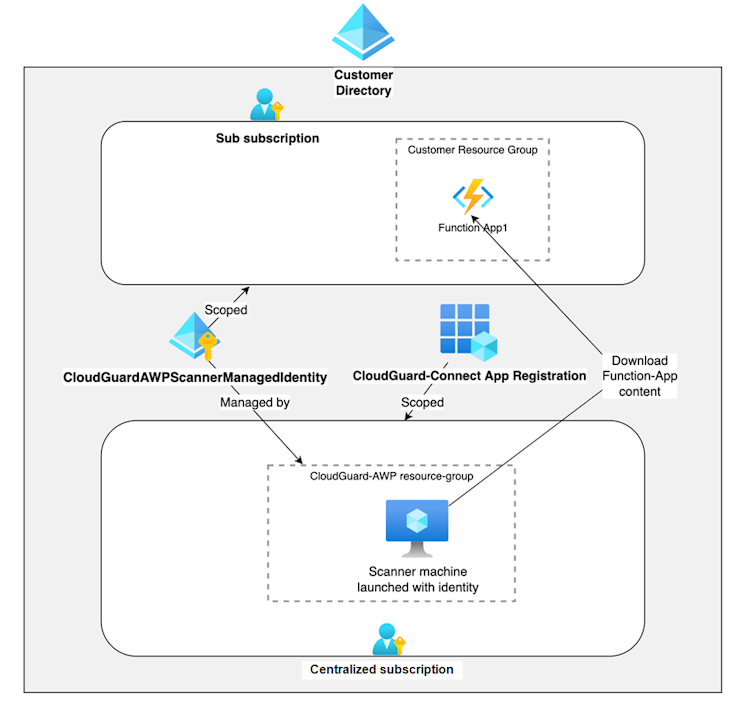
The diagram below shows a Centralized-Sub-Account deployment that enables the Function-App scanning in a Centralized account.
Azure Account Encryption
AWP supports several types of Azure encryption:
-
Encryption at Host
-
Azure Disk Storage Server-Side Encryption
-
Azure Disk Encryption
|
Encryption Type |
Key Type |
SaaS |
In-Account |
Centralized |
|||
|---|---|---|---|---|---|---|---|
|
|
Linux |
Windows |
Linux |
Windows |
Linux |
Windows |
|
|
Encryption at Host |
N/A |
Yes |
Yes |
Yes |
Yes |
Yes |
Yes |
|
Server-Side Encryption |
Platform-Managed key |
Yes |
Yes |
Yes |
Yes |
Yes |
Yes |
|
|
Customer-Managed key |
No |
No |
Yes |
Yes |
Yes |
Yes |
|
Azure Disk Encryption |
Customer-Managed key |
No |
No |
Yes |
Yes |
No |
No |
For more information about Azure encryption, see the Azure documentation.
Encryption at Host
Encryption at host (EAH) adds one more level to Azure security while enhancing Azure Disk Storage Server-Side Encryption. It ensures that all temp disks and disk caches are encrypted at rest and flow encrypted to the Storage clusters.
AWP uses encryption at host whenever possible. Thus, if your subscription has EAH registered, AWP scanners are launched with EAH activated for In-Account and Centralized scan modes. For SaaS scan mode, AWP scanners are launched with EAH by default.
|
|
Note - For VMs encrypted with Azure disk encryption, AWP scanners are launched without EAH. |
Server-Side Encryption
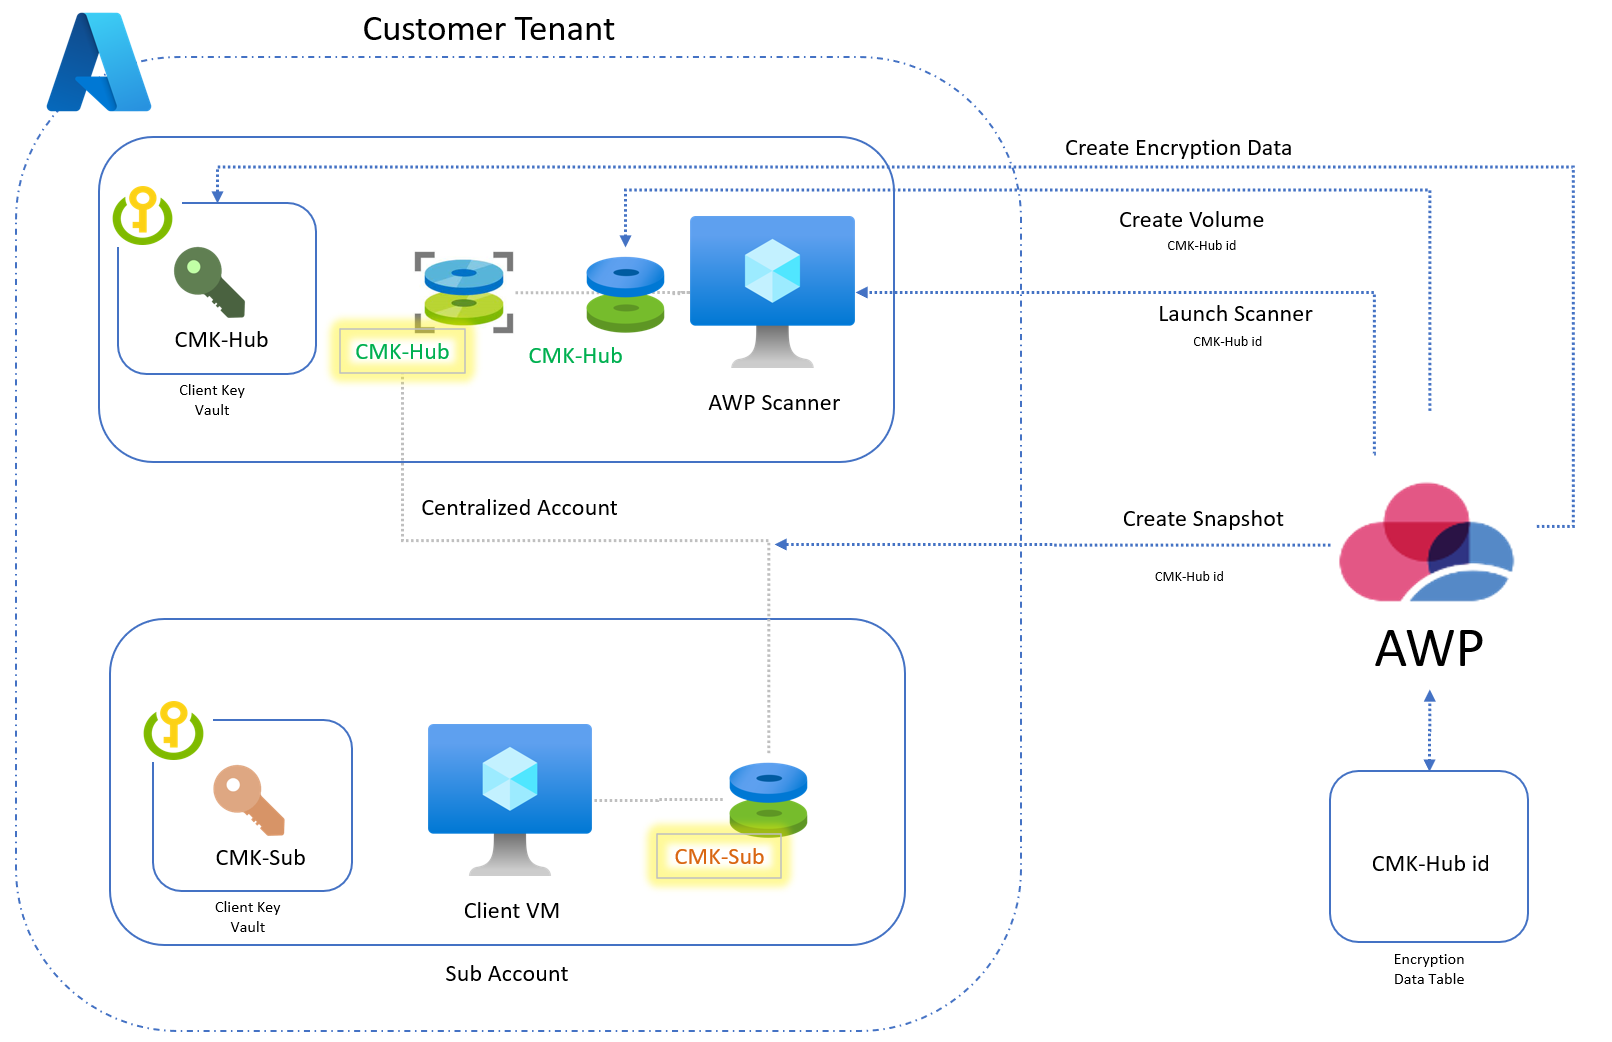
If you use server-side encryption (SSE) with customer-managed keys (CMK) for managed disks, AWP can scan the disks with the same encryption method (SSE + CMK) in Azure Centralized Account mode.
For each region with a VM in one of the sub-accounts, AWP dynamically creates a new CMK in the AWP Key Vault and a dedicated DES (Disk Encryption Set). The AWP scanner uses these resources to scan the customer's VM. All resources are created in the centralized account, with one set for each region.
Infrastructure Preparation
When one of the sub-accounts has a VM in a new region, AWP prepares the scanning infrastructure and creates in the region:
-
Key Vault
-
RSA Key in the Key Vault (CMK-HUB)
-
Dedicated DES (Disk Encryption Set) associated with the CMK-HUB.
Scanning
To scan the disks:
-
AWP makes a snapshot from the sub-account disk and stores it encrypted with CMK-HUB in the centralized account.
-
AWP creates a Disk encrypted with CMK-HUB from the snapshot and launches the scanner.
|
|
Note - CloudGuard skips scanning of VM instances with CMK-encrypted disks if you do not enable this option explicitly. |
Scanning of workloads with multiple disks and mixed encryption is done based on the particular disk's encryption method:
-
The disks encrypted with PMK (Platform-Managed key) are scanned with the centralized account's PMK.
-
The disks encrypted with CMK are scanned with the dynamically generated AWP CMK.
To enable scanning of disks with SSE CMK encryption:
-
During the subscription onboarding to AWP (see Onboarding Workflow), in step 2, select the Advanced option, then select Use SSE CMK encrypted disks scan.
-
Optionally, edit the names of these roles:
-
CloudGuard AWP Crypto Creator
-
CloudGuard AWP Disk Encryptor
CloudGuard adds the applicable parameters to the onboarding script.
-
-
Continue onboarding as usual.
To enable scanning of disks with SSE CMK encryption through API:
POST /workload/agentless/azure/accounts/<<ACCOUNT_ID>>/enableCentralizedAccount
{ "agentlessAccountSettings": {"sseCmkEncryptedDisksScan": true //default: false
}
}
For more details, see the API Reference Guide
Scanning Workflow
To prepare your VM for AWP scanning:
-
With the App Registration, AWP gathers information about your VM disks.
-
With the App Registration, AWP remotely creates snapshots from the VM disks.
-
When all disks have their equivalent snapshots created, a scanner machine launches with the disks created from snapshots and performs the scanning.
For In-Account mode, this VM runs in the same region as the original VM, in a custom VNet that AWP creates for this task.
-
The scanner outbound traffic is restricted by a security group rule that limits access exclusively to:
-
Azure AppService
-
Azure ManagementAPI
-
Azure Storage
-
Azure ResourceManager
-
-
No inbound rules are configured.
To ensure that network traffic remains within the Azure backbone, the VNet utilizes Microsoft.Storage and Microsoft.Web service endpoints.
-
-
When the scan is complete, AWP sends a request to delete all the resources created for the scan.
To prepare your Function App for AWP scanning:
The AWP scanner downloads code.
Ignoring a VM Scan
If you need to deliberately skip scanning a VM, set a tag for the VM in the Azure portal.
To set a tag for the AWP scanner to ignore a Virtual Machine:
-
In the Azure portal, open your Virtual Machine.
-
Navigate to Tags and add a new tag with the name
CG_AWP_SKIP_SCANand the valueANY.
Offboarding AWP
To remove AWP from your Azure subscription, you must complete these two major steps:
-
Running a script that deletes all the resources that AWP created in your Azure account.
-
Deleting your account from the AWP database.
Before you remove AWP from a centralized account, make sure to remove it from all connected sub-accounts.
Use the CloudGuard API to generate the offboarding script.
-
Generate the script with the Get Azure Offboarding Data API call. For more details, see the API Reference Guide
-
Open your account in Azure Cloud Shell or use AZ CLI in your terminal.
-
Paste the script created by the API engine. You can download the script to review or edit it based on your needs.
-
Run the script in the shell or terminal.
Use the CloudGuard API to remove AWP. In the case of deleting AWP from a sub-account, this also deletes the resources associated with it in the centralized account.
-
Remove the account with the Disable Azure Account API call. For more details, see the API Reference Guide
|
|
Note - Deleting your Azure account from CloudGuard removes the account from AWP, which does not scan it anymore. |
Creating a Dedicated VNet
During each scanning process, AWP creates a custom VNet in the region where your VM runs. You can use your own VNet (not recommended), for subscriptions onboarded to AWP with In-Account or In-Account Centralized mode.
To use your dedicated VNet, create all the required resources and follow these general instructions:
-
Virtual Network (VNet) - Create a VNet in each region that has workloads to be scanned.

Note - The VNet and other resources created for a Centralized subscription are used for all its sub-accounts.
-
Network Security Group - Create a Network Security Group
A set of access control rules that acts as a virtual firewall for your virtual machine instances to control incoming and outgoing traffic. with specific security rules that allow outbound traffic to regional Azure Storage, Azure App Service, Azure API Management, and Azure Resource Manager. No inbound is required. If you do not include Function App scans, include only Azure Storage and omit other rules. -
Subnet - Create the necessary subnets in the VNet. Associate each subnet with the Network Security Group created earlier.
-
Custom tag - Add a custom tag with the
CG_AWP_NETWORKkey (key:CG_AWP_NETWORKvalue: any) to the VNet and related resources (route table). -
Storage account access - Make sure you have access to a storage account.
|
|
Note - When you switch the VNet mode from |
Customer VNet API
You can indicate that your VNet is managed by you during the onboarding process or update the account settings after it is onboarded.
To add an independent account:
POST V2/workload/agentless/azure/accounts/{accountNumber}/enable
{"scanMode": "inAccount",
"agentlessAccountSettings": {"inAccountScannerVPC": "ManagedByCustomer"
}
}
For more details, see the CloudGuard API Reference Guide
To add a centralized account:
POST V2/workload/agentless/azure/accounts/{accountNumber}/enableCentralizedAccount
{ "agentlessAccountSettings": {"inAccountScannerVPC": "ManagedByCustomer"
}
}
For more details, see the CloudGuard API Reference Guide
To update account settings:
PATCH V2/workload/agentless/{provider}/accounts/{accountNumber}/settings
{"inAccountScannerVPC": "ManagedByCustomer"
}
For more details, see the CloudGuard API Reference Guide
More Links