Configure CloudGuard SSO with JumpCloud
Based on JumpCloud documentation
Single Sign-On (SSO) with JumpCloud
Prerequisites
To successfully complete the integration between JumpCloud and CloudGuard, you must use an owner account in CloudGuard.
|
|
Notes:
|

To restrict access to a smaller group of users:
-
Notice the IdP URL name for this app in the Application details, for example, https://sso.jumpcloud.com/saml2/ ConnectorName.
-
Create a new Tag and name it SSO-ConnectorName. Important: This tag name is case sensitive.
-
Add users to this Tag who should be given access to CloudGuard via Single Sign-On. Any other users who are not in this tag will be denied access.

Important - If the Tag does not exist, all users in your organization will be authorized to access CloudGuard.
-
Log in to CloudGuard with a super user account.
-
Navigate to Settings > Security & Authentication.
-
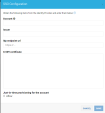
In the SSO section, select Enabled.
-
In the Account ID field, enter a unique value (no spaces) that is later used to identify your company's SSO configuration with CloudGuard (your company name is a good value to use here) and copy this value.
-
In the Issuer field, enter https://YOURDOMAIN.com (replace YOURDOMAIN with your company's unique domain).
-
In the Idp Endpoint Url field, enter https://sso.jumpcloud.com/saml2/dome9.
-
In the X.509 Certificate field, paste your entire public certificate (see Note 3 above).
-
Click Save.
-
Create a test user to test your configuration as appears in Adding a New User in the Dome9 Portal.
-
Fill in the necessary fields to create the user and ensure that SSO User is toggled to On.
-
To enable a pre-existing user to sign in via SSO, see Connecting a user to SSO for Dome9 accounts.

-
Log into the JumpCloud Admin console at https://console.jumpcloud.com.
-
Click Applications in navigation pane on the left.
-
Click the green + icon in the upper left corner and find CloudGuard in the list.
-
Click Configure.
-
In the IdP Entity ID field, enter https://YOURDOMAIN.com/(this should be the same value that you entered in the Issuer field in CloudGuard, with "/" at the end).
-
Click Upload Private Key and upload your private key (see Note 3 above).
-
Click Upload IdP Certificate and upload your public certificate (see Note 3 above).
-
In the ACS URL field, enter https://secure.dome9.com/sso/saml/ACCOUNT_ID (replace ACCOUNT_ID with the value that you entered in the Account ID field in CloudGuard).
-
Click Activate.
Test the SSO Configuration
-
Log into the JumpCloud User Console with the email you used to create a test user in CloudGuard (or another email used by a CloudGuard account that does not have owner privileges, see Note 2 above).
-
Click the CloudGuard icon.
-
You should automatically be logged in to CloudGuard.
-
In your Web browser, navigate to https://secure.dome9.com/sso/ACCOUNT_ID.
-
If necessary, log into the JumpCloud User Console as the appropriate user (see Note 2 above).
-
Now you automatically log in to CloudGuard.