Configure SSO JIT Provisioning on OneLogin
OneLogin configuration
-
In OneLogin, in the Applications tab, add your app.
-
In the Users tab, add relevant users (previously configured).
-
In the CloudGuard portal, navigate to the Roles page in the Settings menu.
-
Create a new role.
-
In OneLogin, navigate to Users -> Roles.
-
Create a new role, with the same name as the role created in CloudGuard above.
-
Edit the new role.
-
Create a new app SAML Test Connector (IdP).
-
Select Apps in the menu, and click Add App
-
Search for the newly created app (SAML Test Connector (IdP))
-
Set the name and click Save.
-
In the Configuration tab, set the following:
-
CloudGuard-onelogin-SSO - set to the SSO
 Single Sign-On (SSO) - A session/user authentication process that permits a user to enter one name and password in order to access multiple applications. account ID configured in CloudGuard
 -
RelayState - https://secure.dome9.com
-
Audience - https://secure.dome9.com
-
Recipient - https://secure.dome9.com/sso/saml/CloudGuard-onelogin-SSO
-
ACS URL - https://secure.dome9.com/sso/saml/CloudGuard-onelogin-SSO
-
-
In the Parameters tab, click Add parameter.
-
In the name field, enter memberOf (or another name).
-
Click Save.
-
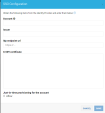
Navigate to the Security & Authentication page in the Settings menu.
-
In the SSO section, click Enabled.
-
Enter these details for the SSO configuration:
-
"Account ID" - enter the Value that you entered instead of "Name-up-select"
-
"Issuer" - enter the "Issuer URL" from OneLogin.
-
"Idp endpoint url" - enter the Identity Provider Single Sign-On URL from OneLogin.
-
"X.509 Certificate" - enter the X.509 Certificate from OneLogin.
-
-
Select the Just-in-time provisioning for the account option.
-
In Attribute name in SAML for just-in-time role, add the name that you entered instead of the member Of, above (step 14).
-
Click Save.
-
Navigate to the Roles page in the Settings menu.
-
Create a role with the same name as the name of the Role that you created in OneLogin.
-
If the mail address user for OneLogin is already known in CloudGuard, add another user in OneLogin, with the role from the previous step.

Note - JIT Provisioning is created for a user who does NOT exist in CloudGuard, but belongs to a CloudGuard SSO account.
