Configure CloudGuard SSO with Microsoft Entra ID
To enable Single Sign-On (SSO![]() Single Sign-On (SSO) - A session/user authentication process that permits a user to enter one name and password in order to access multiple applications.) with Microsoft Entra ID (formerly Azure
Single Sign-On (SSO) - A session/user authentication process that permits a user to enter one name and password in order to access multiple applications.) with Microsoft Entra ID (formerly Azure![]() Collection of integrated cloud services that developers and IT professionals use to build, deploy, and manage applications through a global network of data centers managed by Microsoft®. AD), start the configuration on the Microsoft Azure
Collection of integrated cloud services that developers and IT professionals use to build, deploy, and manage applications through a global network of data centers managed by Microsoft®. AD), start the configuration on the Microsoft Azure![]() Collection of integrated cloud services that developers and IT professionals use to build, deploy, and manage applications through a global network of data centers managed by Microsoft®. portal. You can then log in to CloudGuard as super user to configure SSO and redirect users' login requests to the Identity Provider login page. After it, CloudGuard administrative users can log in with SSO.
Collection of integrated cloud services that developers and IT professionals use to build, deploy, and manage applications through a global network of data centers managed by Microsoft®. portal. You can then log in to CloudGuard as super user to configure SSO and redirect users' login requests to the Identity Provider login page. After it, CloudGuard administrative users can log in with SSO.
Adding the CloudGuard Application
In these steps, you add the CloudGuard application from the gallery to your list of managed SaaS applications.
To add CloudGuard from the gallery:
-
In the Azure portal, on the left navigation panel, click Microsoft Entra ID.
-
Navigate to Enterprise applications and select All applications.
-
Click New application to add a new application.
-
In the search field, type CloudGuard and select the Check Point CloudGuard Posture Management (Microsoft Entra ID) application from the results panel.

-
Click Create to add the application.

Configuring Microsoft Entra ID Single Sign-On
In these steps, you configure SAML as single sign-on method in Microsoft Entra ID.
To configure Microsoft Entra ID SSO with CloudGuard:
-
In the Azure portal, on the CloudGuard application integration page, select Single sign-on from the Manage menu.
-
From the gallery of available methods, select SAML.

-
On the Set up single Sign-On with SAML page, click the pencil icon of Basic SAML Configuration to edit the settings.
-
To configure the application in the IDP-initiated mode:
-
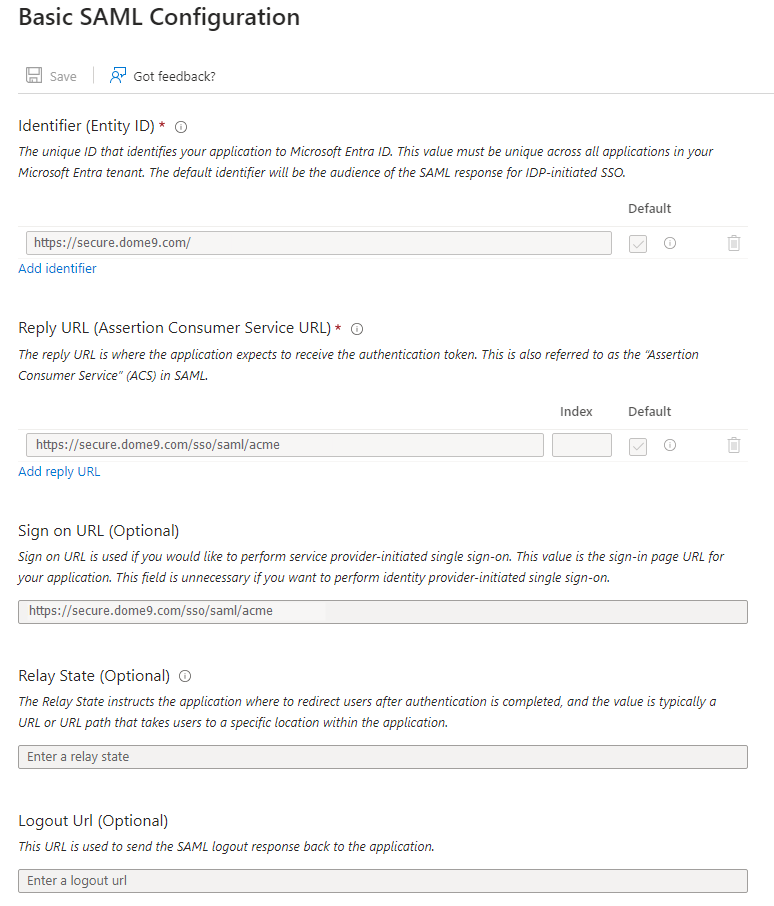
In the Identifier field, enter your data center address, for example,
https://secure.dome9.com/.
Note - In this and similar fields below, replace the generic address (https://secure.dome9.com/) with your regional (YYY) address:
-
United States -
www.dome9.com -
Europe -
www.eu1.dome9.com -
Singapore -
www.ap1.dome9.com -
Australia -
www.ap2.dome9.com -
Canada -
www.cace1.dome9.com -
India -
www.ap3.dome9.com
-
-
In the Reply URL field, enter a URL with the pattern:
https://secure.YYY.dome9.com/sso/saml/<yourcompanyname>.
Note - Enter your company name in the CloudGuard portal as explained in step 4a of Configuring Single Sign-On in CloudGuard.
-
-
To configure the application in the SP-initiated mode, select Show advanced URL settings and, in the Sign on URL field, enter a URL with the pattern
https://secure.YYY.dome9.com/sso/saml/<yourcompanyname>. -
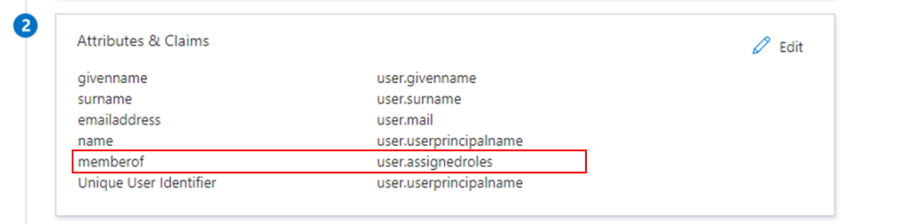
Add custom attribute mappings to your SAML token attributes configuration. See the image below for the list of required attributes. The memberof attribute is non-default, so you have to search it to add. All other attributes are default and immediately available.
-
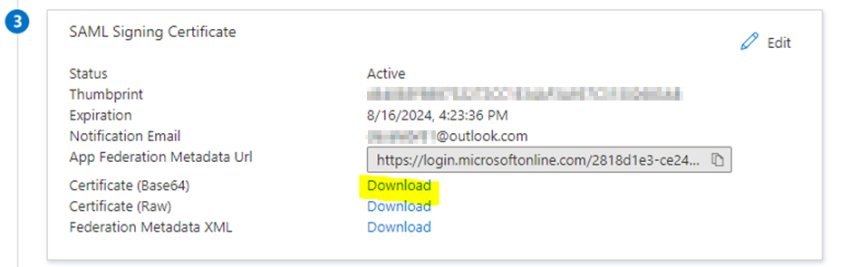
In the SAML Signing Certificate section, click Download for Certificate (Base64) and save the certificate file on your hard drive.
-
If you want to automate the application configuration, click Install the extension to install the My Apps Secure Sign-in browser extension. If you want to configure it manually, go to step 2 in Configuring Single Sign-On in CloudGuard below.
-
After you add the extension, click Set up Check Point CloudGuard Posture Management (Microsoft Entra ID) to open the CloudGuard portal.
Configuring Single Sign-On in CloudGuard
-
Log in to the CloudGuard portal with the super user credentials. The browser extension installed in step 8 of the previous section automatically configures the application and automates steps 2-5 below.
-
If you want to set up the application manually, in a new web browser tab, log in to the CloudGuard portal with super user credentials and go to Settings > Configuration > Security & Authentication.
-
In the SSO section, click ENABLE.
-
In the SSO Configuration window, enter these details:
-
Account ID - Enter the company name. It appears in the Reply URL and Sign on URL fields of the Basic SAML Configuration section at the Azure portal.
-
Issuer - Paste the value of Microsoft Entra ID from the Configuration URLs on the Azure portal.
-
IDP endpoint URL - Paste the value of Login URL from the Configuration URLs on the Azure portal.
-
X.509 certificate - In the Notepad, open the certificate your downloaded in step 7, copy its content into your clipboard, and then paste in this field.
-
Optionally, below Just-in-time provisioning for the account, click Allow to enable just-in-time provisioning. The Attribute name ... field appears.
-
In Attribute name in SAML for just-in-time role, make sure it contains the same memberOf name that you defined in step 6 of the Microsoft Entra ID configuration. See Just-in-Time (JIT) Provisioning with Microsoft Entra ID SSO below.
-
-
Click Save.
Selecting Users for SSO
-
In Microsoft Entra ID, select Allow select users to authenticate directly with CloudGuard to configure several users that can access CloudGuard directly, with their email address and password registered with CloudGuard. This is an important provision to ensure that there are users that can always log in locally and not be locked out of the portal in case of SSO misconfiguration.
Note - To access data through API, you have to authenticate to CloudGuard directly.
-
Select the users that can access CloudGuard with local (CloudGuard) authentication credentials or with SSO.
-
Verify user access with SSO. Administrative users with enabled SSO must log in to Microsoft Entra ID and click the CloudGuard application icon to access CloudGuard.
Just-in-Time (JIT) Provisioning with Microsoft Entra ID SSO
If you configure the option in steps 4e and 4f of Configuring Single Sign-On in CloudGuard, you can enable JIT provisioning for users in the CloudGuard SSO account. These users cannot have their registration to CloudGuard with a user name and password. JIT users must log in to Microsoft Entra ID and access the CloudGuard portal with SSO.