Configure CloudGuard SSO with OneLogin
OneLogin Configuration
-
On OneLogin, navigate to Apps, and select Add App.
-
Search for Dome9 (CloudGuard).
-
Click the app icon.
-
Enter a Display Name and click Save.
-
In the configuration page, enter a Dome9 (CloudGuard) Client ID and click Save.
CloudGuard Configuration
-
Log in to the CloudGuard portal, with a super user account.
-
Navigate to the Authentication page in the Settings.
-
In the SSO section, click Enabled.
-
Click Edit to open the SSO Configuration window.
-
Enter details for the SSO
 Single Sign-On (SSO) - A session/user authentication process that permits a user to enter one name and password in order to access multiple applications. provider as follows:
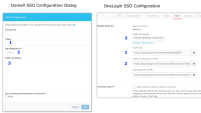
-
In the Account ID, enter the CloudGuard Client ID, created above in OneLogin (step 5).
-
Click Save.

To enable Just-In-Time provisioning, see the Configure SSO JIT Provisioning on OneLogin.