Instructions for a Data Center Provider
This section describes the required steps for a Data Center Provider to deploy the Check Point AIFF environment.
Prerequisites
See sk184795 > Section "Prerequisites" > "Prerequisites for a Data Center Provider".
Step 1 - Configure the Management Server
-
Use an existing Management Server or install a new one.
See sk184795 > Section "Prerequisites" > "Prerequisites for a Data Center Provider":
-
The row "Security Management Server (SMS)".
-
The row "Multi-Domain Security Management Server (MDSMS)".
See the R82.10 Installation and Upgrade Guide :
-
Chapter "Installing a Security Management Server" > Section "Installing One Security Management Server only, or Primary Security Management Server in Management High Availability".
-
Chapter "Installing a Multi-Domain Server" > Section "Installing One Multi-Domain Server Only, or Primary Multi-Domain Server in Management High Availability".
-
-
Install a valid Check Point license.
-
From sk184795 > section "Downloads", download the AI Factory Firewall package for a Multi-Domain Security Management Server to your computer.
-
Connect to the command line on the Management Server.
-
Log in.
-
If the default shell is Gaia Clish, then go to the Expert mode:
expert -
Create the directory for the required scripts:
mkdir /home/admin/MDM -
Copy this AIFF package from your computer to the Management Server to the directory "
/home/admin/MDM/". -
Extract the archive package:
cd /home/admin/MDMtar xvfz <Name of Archive Package> -
If you are working on a Multi-Domain Security Management Server, configure a pool of IPv4 addresses for new Domains that manage AIFF Security Gateways:

Note - If you are working on a Security Management Server, skip to Step 2 - Configure a new Tenant (GPC and Domain)).
Notes:
-
You perform this step only one time.
-
You can see the current pool in these ways:
-
Connect with SmartConsole to the MDS context > click the Multi Domain view > click the Domains page > in the header row, right-click the Multi-Domain Server > click Edit > click the Multi Domain page > refer to the IP Range section.
-
With the Management API command "
show mds" (see Check Point Management API Reference (at the top, select the correct version) ).
-
-
All Domain Management Servers (that are assigned automatically) share this pool. The AIFF Security Gateway only draws IP addresses that are currently available in the pool when creating a new Domain.
-
If you already have an IP Range defined, make sure there are enough IP addresses available for your AIFF domains and do not use the parameter "
--ip_range" in syntax.
Syntax:
python3 config_MDS.py [–-ip_range="<Start IPv4 Address> – <End IPv4 Address>"]Example:
python3 config_MDS.py -–ip_range="192.168.10.20 – 192.168.10.50"The "
config_MDS.py" script:-
Optionally, configures the specified IPv4 pool for new Domains.

Important - This script overwrites the current configured IP Range.
-
Initializes the Global Policy Assignment, so new Domains automatically inherit certain policy elements.
-
Configures the Service Group object called "
Kubernetes" that contains the relevant service objects.
-
Step 2 - Configure a new Tenant (GPC and Domain)
-
Configure a new Group Policy Controller (GPC):
Important - You must perform this step when you create a new Domain for a new tenant.
-
Install a new Check Point Security Gateway (GPC).
See sk184795 > Section "Prerequisites" > "Prerequisites for a Data Center Provider" > row Group Policy Controller (GPC).
 Steps for a Virtual Machine
Note - The steps below are for VMware ESXi.
-
In your virtualization platform, create a new Virtual Machine with the required hardware specifications.
Do not power on the Virtual Machine yet.
-
In the Virtual Machine settings, add two network adapters:
-
The first network adapter appears in the Check Point Gaia OS as eth0 (this procedure uses it as the external interface).
-
The second network adapter appears in the Check Point Gaia OS as eth1 (this procedure uses as the internal interface).
You can add more interfaces, if you need.
-
-
In the Virtual Machine settings, add the CD/DVD drive and select the Check Point ISO image.
-
Power on the Virtual Machine.
-
In the Virtual Machine's BIOS, configure the CD/DVD drive as the first boot device.
-
Go through the Gaia installation wizard.
-
Wait for the ISO installation to complete and show the message about the reboot.
-
In the Virtual Machine settings, disconnect the CD/DVD drive.
-
In the console window, press Enter to reboot.
-
In the Virtual Machine's BIOS, configure the Hard Disk device as the first boot device.
-
Wait for the Gaia OS to boot and show the login prompt:
login: -
Log in with these credentials:
Username: admin
Password: Enter the password you configured during the Gaia installation.
-
In VMware, connect a client computer to the first network adapter of the Virtual Machine that represents the external interface eth0.
On this client computer, configure the relevant interface with a static IPv4 address from the subnet that belongs to the external interface eth0 (the default gateway is the IPv4 address of this interface eth0).
-
On the client computer, with a web browser connect to Gaia Portal on the Check Point Security Gateway (GPC):
https://<IPv4 Address of eth0>Because Gaia Portal uses a self-signed certificate, your web browser will show a warning "
ERR_CERT_AUTHORITY_INVALID".Proceed with the connection.
Steps for a physical Check Point Appliance
-
Install a new Check Point Appliance.
See the relevant Getting Started Guide in sk96246 - Documentation For Check Point Appliances.
-
Install the required Check Point image and reboot.
-
Connect a cable from a client computer to the port MGMT on the Check Point Appliance.
On this client computer, configure the relevant interface with these settings:
-
A static IPv4 address from the subnet that belongs to the port MGMT
-
The default gateway is the IPv4 address of this port MGMT
-
-
On a client computer, with a web browser connect to Gaia Portal on the Check Point Security Gateway (GPC):
https://192.168.1.1Because Gaia Portal uses a self-signed certificate, your web browser will show a warning "
ERR_CERT_AUTHORITY_INVALID".Proceed with the connection.
-
Log in with these default credentials:
Username: admin
Password: admin
Steps for a physical open server
-
Install a new open server.
Follow the relevant documentation from your vendor.
-
Install the required Check Point image and reboot.
-
Connect a cable from a client computer to the interface, on which you configured an IPv4 address during the Gaia installation wizard.
On this client computer, configure the relevant interface with these settings:
-
A static IPv4 address from the subnet that belongs to the relevant interface on the open server
-
The default gateway is the IPv4 address of the relevant interface on the open server
-
-
On a client computer, with a web browser connect to Gaia Portal on the Check Point Security Gateway (GPC):
https://192.168.1.1Because Gaia Portal uses a self-signed certificate, your web browser will show a warning "
ERR_CERT_AUTHORITY_INVALID".Proceed with the connection.
-
Log in with these credentials:
Username: admin
Password: Enter the password you configured during the Gaia installation.
-
-
Follow the First Time Configuration Wizard.
You must configure these settings:
-
In the Installation Type window, select Security Gateway and/or Security Management.
-
In the Products window:
-
In the Products section, select only Security Gateway.
-
In the Clustering section, clear Unit is a part of a cluster, type.
-
-
In the Dynamically Assigned IP window, select the applicable option.
-
In the Secure Internal Communication window, enter the applicable Activation Key (between 4 and 127 characters long).
Keep this activation key safe. You use it later on the Management Server.
-
-
In Gaia Portal, configure the applicable settings for your environment (additional administrator users, password security, and so on).
-
Install the valid Check Point license.
-
-
On the Management Server, configure a new Domain and connect it to the GPC:
If you do not want to configure the Global AIFF policy, then also specify the parameter "
–-no_global_policy".-
On a Security Management Server, run:
python3 createDomain.py --standalone --gw_ip="<IPv4 Address of GPC>" --gw_sic_pass="<SIC Activation Key for GPC>" [--no_global_policy]Example:
python3 createDomain.py --standalone --gw_ip="172.23.53.78" --gw_sic_pass="MySICpswrd!@" -
On a Multi-Domain Security Management Server, run:
python3 createDomain.py --name="<Name of New Domain>" --gw_ip="<IPv4 Address of GPC>" --gw_sic_pass="<SIC Activation Key for GPC>" [--no_global_policy]Example:
python3 createDomain.py --name="New_Domain" --gw_ip="172.23.53.78" --gw_sic_pass="MySICpswrd!@"
where:
Parameter
Description
<Name of New Domain>Specifies the name of the Domain.
<IPv4 Address of GPC>Specifies the IPv4 address of the GPC.
<SIC Activation Key for GPC>Specifies the SIC Activation Key you configured on the GPC.
--no_global_policySpecifies not to configure the Global AIFF policy.
--standaloneConfigures a Security Management Server.
The "
createDomain.py" script:-
Creates a new Domain with an IPv4 address from the configured IPv4 pool.
-
Configures an internal administrator user ("
<Name of New Domain>_admin") with required permissions. -
Connects the GPC to the new Domain (creates the corresponding Security Gateway object with the platform "Open Server").
-
Prepares the default policy called "
AIFF_Default_Policy" for the AIFF Security Gateway object:This policy includes the Global Policy that is applied from the Multi-Domain Security Management Server through Global Assignment.
Note - You can edit this default Security Policy - before you deploy the AIFF Container on the DPU.
-
Create this file with the required variable values for the new Domain:
Note - The Data Center Provider must provide this file to the End-Customer.
-
On a Security Management Server:
home/admin/MDM/standalone/zero_touch_parameters.json -
On a Multi-Domain Security Management Server:
/home/admin/MDM/<Name of Domain>/zero_touch_parameters.json
Required variables:
-
domain_ip -
mgmt_server_fingerprint -
mgmt_api_key -
domain_name -
aicp_policy_name
-
-
-
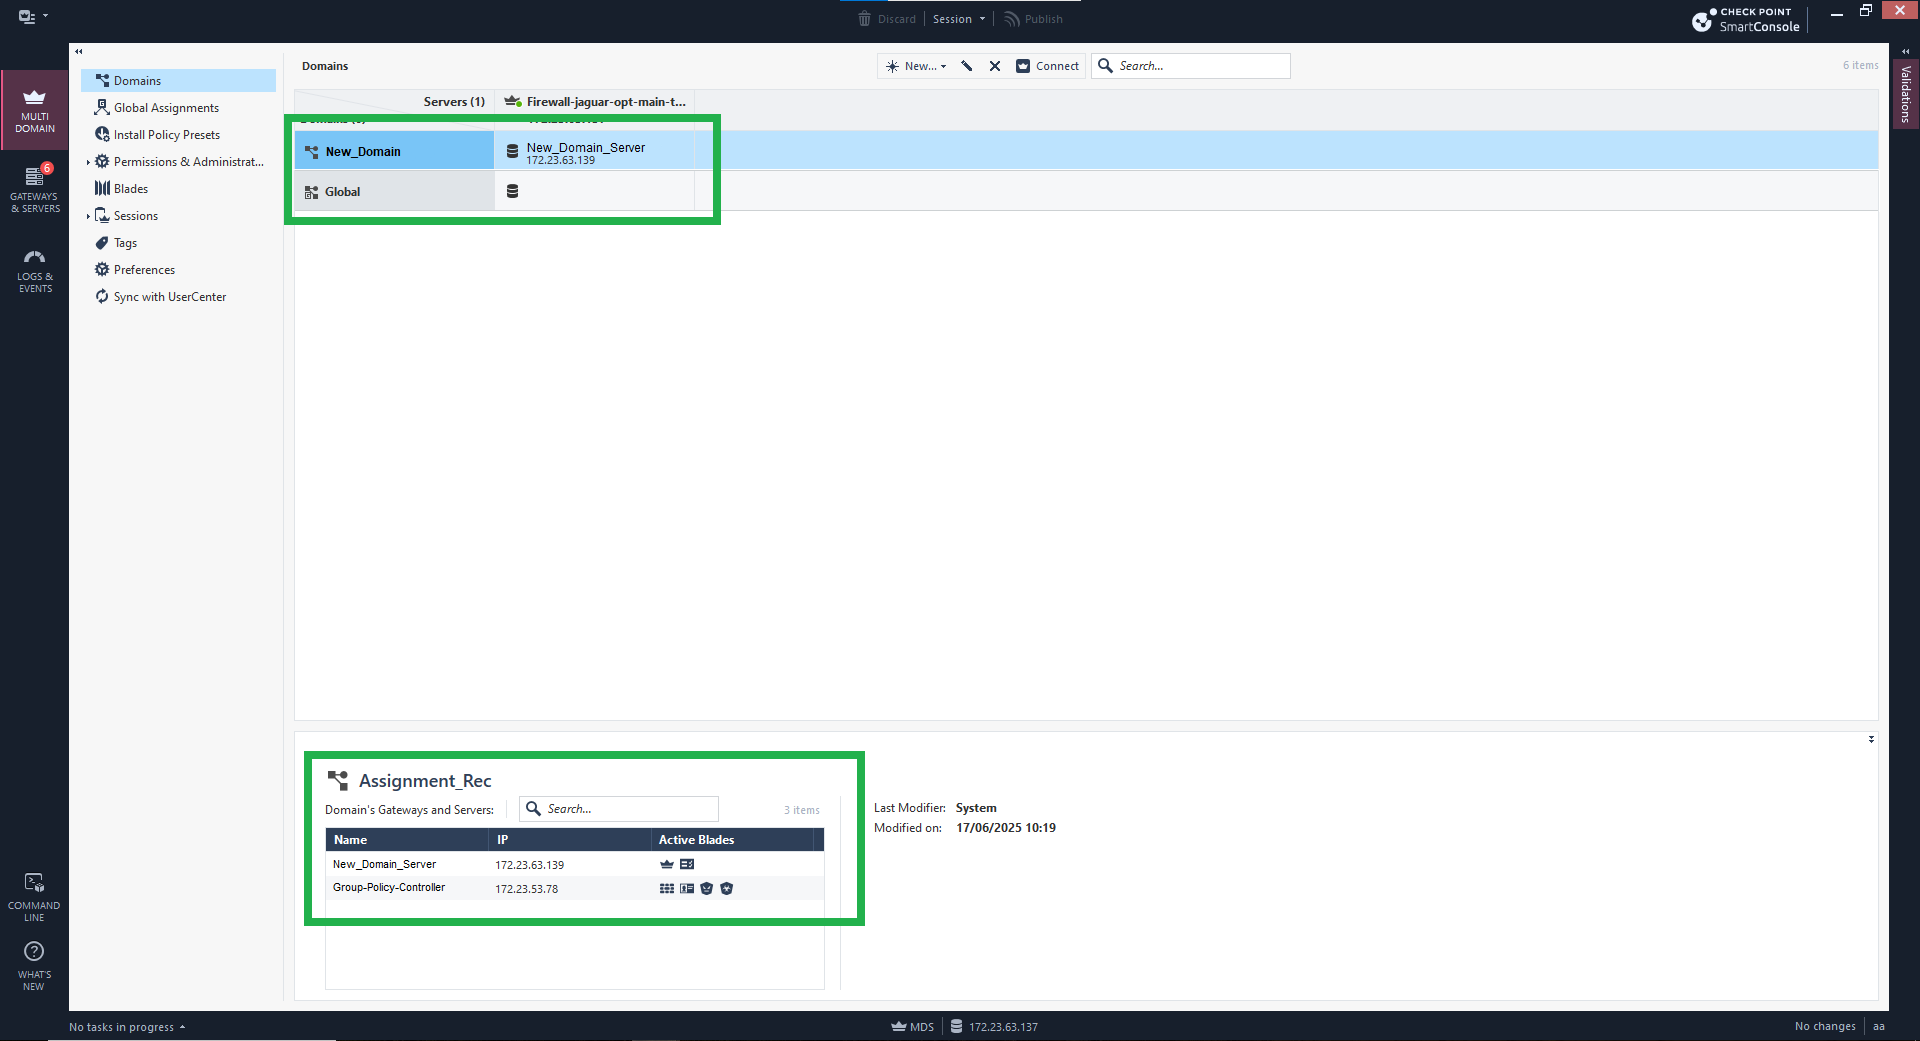
In SmartConsole, examine the new Domain and the GPC:
-
Connect with SmartConsole to the Management Server.
If you are working with a Multi-Domain Security Management Server:
-
Connect to the context "MDS".
-
From the left navigation panel, click Multi Domain.
-
In the top panel, click Domains.
-
-
The GPC (and the new Domain) must appear on this page.
Example for a Multi-Domain Security Management Server:
-
Domain:
Name:
New_DomainIPv4:
172.23.63.139 -
GPC:
Name:
Group-Policy-ControllerIPv4:
172.23.53.78
-
-