Advanced Configuration
You can configure advanced options on Gaia OS from the Gaia Portal or the Gaia Clish.
Connecting to the Smart-1 Appliances CLI
To connect to the command line interface of the Smart-1 Appliances, use one of these:
-
Use the included serial console cable (DB9-to-DB9), or the DB9-to-RJ-45 adapter, and a terminal emulation software, such as PuTTY (from Windows) or Minicom (from Unix/Linux).
-
Use an SSH connection to the management interface (if SSHD is configured).
To connect to the appliance CLI using the serial console cable DB9-to-DB9 and a terminal emulation software:
-
Connect one end of the serial console cable DB9-to-DB9 directly to the Serial console port on the appliance.
-
Use a screwdriver to attach the cable screws to the Serial console port.
-
Connect the other end of the serial console cable to your computer (console server).
-
On your computer, open a terminal emulation software.
-
Configure the serial connection parameters: 9600bps, 8 bits, no parity, 1 stop bit (8N1), Flow Control - None.
-
Establish the serial connection to the appliance.
To connect to the appliance CLI using the the DB9-to-RJ-45 adapter and a terminal emulation software:
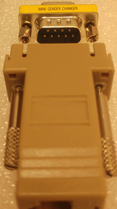
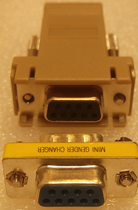
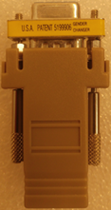
Your appliance may be shipped with one of two types of the DB9-to-RJ-45 adapters:
|
Type of the |
Description |
|---|---|
|
A DB9-to-RJ-45 adapter |
The adapter connects directly to the Serial console port on the Smart-1 Appliances. |
|
A DB9-to-RJ-45 adapter |
The adapter connects to the Serial console port on the Smart-1 Appliances through the DB9 gender changer.
|
If your appliance is shipped with the DB9-to-RJ-45 adapter without plastic protrusions on the DB9 end:
-
Connect the DB9 connector of the DB9-to-RJ-45 adapter directly to the Serial console port on the appliance.
-
Use a screwdriver to attach the DB9-to-RJ-45 adapter screws to the Serial console port.
-
Connect the RJ45 end of the serial console cable to the RJ45 port on the DB9-to-RJ-45 adapter.
-
Connect the other end of the serial console cable to your computer (console server).
-
On your computer, open a terminal emulation software.
-
Configure the serial connection parameters: 9600bps, 8 bits, no parity, 1 stop bit (8N1), Flow Control - None.
-
Establish the serial connection to the appliance.
If your appliance is shipped with the DB9-to-RJ-45 adapter that has plastic protrusions on the DB9 end:
-
Connect the DB9 gender changer to the Serial console port on the appliance.
-
Use a screwdriver to attach the DB9 gender changer screws to the appliance.
-
Connect the DB9-to-RJ-45 adapter to the DB9 gender changer.
-
Use a screwdriver to attach the DB9-to-RJ-45 adapter screws to the DB9 gender changer.
-
Connect the RJ45 end of the serial console cable to RJ45 port on the DB9-to-RJ-45 adapter.
-
Connect the other end of the serial console cable to your computer (console server).
-
On your computer, open a terminal emulation software.
-
Configure the serial connection parameters: 9600bps, 8 bits, no parity, 1 stop bit (8N1), Flow Control - None.
-
Establish the serial connection to the appliance.
To connect to the appliance CLI using an SSH connection to the management interface (if SSHD is configured):
-
If you connect to your appliance through a Firewall, make sure to define the applicable security rules that allow such SSH connection from your computer to your appliance.
-
On your computer, open an SSH client software (for example, PuTTY).
-
Start a connection to the IP address that you assigned to the MGMT interface on your appliance.
-
Log in with the applicable credentials:
State
Username
Password
Before completing the
First Time
Configuration WizardadminadminAfter completing the
First Time
Configuration WizardYour configured password
Your configured password
Configuring SmartEvent
To learn how to connect the SmartEvent components to a Security Management Server and to a Multi-Domain Management Server, see the Logging and Monitoring Administration Guide for your Management Server version.