Step 1: Installing the SGM Image on Scalable Chassis
Use one of these procedures to install an image on the Security Gateway Modules (SGMs):
-
Using an ISO image on a removable media (DVD or USB)
-
Using a snapshot import
-
Scalable Chassis 44000 support PXE installation on Slot 6 (SGM 2_06 / SGM 1_06) by changing the
kdevicetoeth3.
Installing the SGM Image from a Removable Media
You can install an ISO image on the SGMs from a USB stick or DVD.
To copy the ISO image to a removable media:
|
Step |
Instructions |
|---|---|
|
1 |
Download the ISO image file from the R82 Home Page for Chassis: sk181127. |
|
2 |
Copy the file to a removable media in one of these ways: |
|
3 |
You can install many SGMs at one time. Copy the ISO image to many USB sticks or DVDs. |
To install an ISO image on the SGMs:
|
Step |
Instructions |
||
|---|---|---|---|
|
1 |
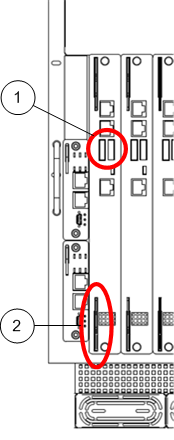
Connect the removable media to the left-most SGM on the Chassis in one of these ways:
|
||
|
2 |
Connect the supplied DB9 serial cable to the console port on the front of the left-most SGM on the Chassis. |
||
|
3 |
Connect to the left-most SGM using a terminal emulation program. |
||
|
4 |
Reboot the SGM by partially sliding it out and immediately pushing it back in place:
|
||
|
5 |
When the first screen appears in the terminal emulation program, select Install Gaia on the system and press Enter.
|
||
|
6 |
Press OK to continue with the installation. After the installation, the Chassis begins the boot process, and status messages appear in the terminal emulation program. |
||
|
7 |
Install the SGM image on the other SGMs. To install on one SGM at a time, repeat all the steps for each SGM. To install on many SGMs at the same time:
|

Example:
|
|
|
Upgrading the SGM220 BIOS Firmware
To upgrade the BIOS:
|
Step |
Instructions |
|
|---|---|---|
|
1 |
Copy the BIOS file (the file name contains the string " |
|
|
2 |
Connect to the SGM over the SSH or console. |
|
|
3 |
Go to the directory with the BIOS file. |
|
|
4 |
Upgrade the BIOS firmware:
See the example below. Note - When the firmware update modifies the device ID, the |
|
|
5 |
Load the default CMOS settings from the new BIOS image uploaded before:
See the example below. |
|
|
6 |
Reboot the SGM in one of these ways:
|
|
|
7 |
Repeat the upgrade process for the backup BIOS firmware. |
To see the SGM firmware file, go to this directory:
|
|
Example: