Infinity Identity Integration
Infinity Identity acts as a unified identity repository across the Check Point ecosystem. In R82, a centralized configuration for Identity Providers lets you define one or more Identity Providers on the Infinity Portal and reuse the IdP configuration on multiple Security Gateways in SmartConsole![]() Check Point GUI application used to manage a Check Point environment - configure Security Policies, configure devices, monitor products and events, install updates, and so on. that have the Identity Awareness
Check Point GUI application used to manage a Check Point environment - configure Security Policies, configure devices, monitor products and events, install updates, and so on. that have the Identity Awareness![]() Check Point Software Blade on a Security Gateway that enforces network access and audits data based on network location, the identity of the user, and the identity of the computer. Acronym: IDA. Blade enabled.
Check Point Software Blade on a Security Gateway that enforces network access and audits data based on network location, the identity of the user, and the identity of the computer. Acronym: IDA. Blade enabled.
How It Works
This example uses Azure but applies to any IdP supported by the Infinity Portal.
-
A user defined in Azure attempts to access Amazon Web Services.
Note - If you have more than one IdP configured, the user is redirected to the Captive Portal
 A Check Point Identity Awareness web portal, to which users connect with their web browser to log in and authenticate, when using Browser-Based Authentication. to select an IdP.
 -
Upon successful authentication through the IdP, the user is granted access to Amazon based on your predefined rule
Set of traffic parameters and other conditions in a Rule Base (Security Policy) that cause specified actions to be taken for a communication session..
Prerequisites
-
Access to one of these supported cloud platforms.
-
An app on your chosen platform with permissions to create groups and assign users.
-
SmartConsole is connected to the Infinity Portal.
Supported IdPs
-
Microsoft ADFS
-
Microsoft Entra ID
-
Okta
-
RADIUS
-
OneLogin
-
Ping Identity
-
Google Workspace
-
Duo
-
Generic SAML Server
|
|
Important - Only the EU and US regions are supported in Infinity Identity configurations. |

How to Configure a Centralized Identity Provider
Before you begin, log in to SmartConsole, the Infinity Portal, and your IdP.
Check Point supports multiple Identity Providers. Refer to SSO Authentication Setup with Identity Provider for detailed procedures.
-
Open SmartConsole and log in to your Security Management Server
Dedicated Check Point server that runs Check Point software to manage the objects and policies in a Check Point environment within a single management Domain. Synonym: Single-Domain Security Management Server.. -
Select Infinity Services > click Get Started.
-
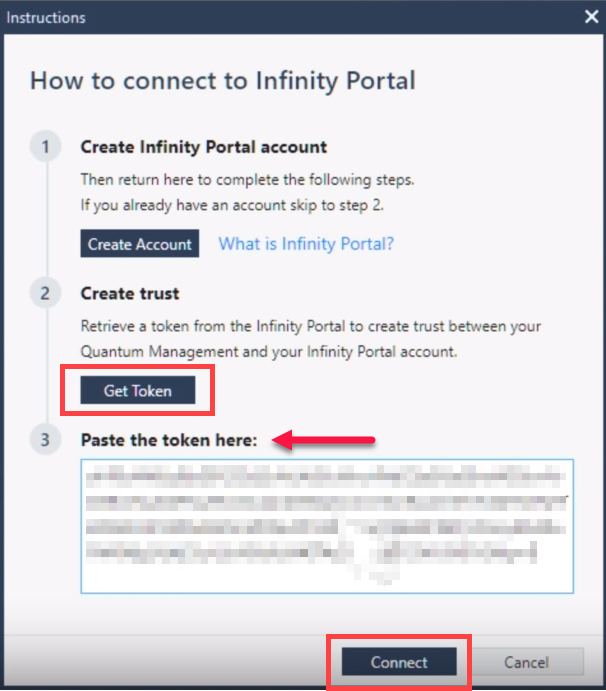
In the Instructions window How to connect to the Infinity Portal, click Get Token.
-
Navigate to the Infinity Portal to authenticate and select an account, agree to share your Security Management Server
Check Point Single-Domain Security Management Server or a Multi-Domain Security Management Server. data with the Infinity Portal, and copy the token. -
Return to SmartConsole, paste the token into the SmartConsole's instructions window and click Connect.
-
Wait for the Security Management Server to connect to the Infinity Portal.
-
On the Identity Provider app card, the following Infinity Identity app cards shows for R82 users:

-
In the Infinity Portal, make sure your Security Management Server is connected. The Connect status shows Active, as in this example:

-
Follow the steps for adding an IdP, see SSO Authentication Setup with Identity Provider.
-
Test connectivity, confirm the Identity Provider, run the connectivity test, and close.
-
The Identity Provider defined on the Infinity Portal is now available as a read-only object in SmartConsole.
-
In SmartConsole, open the gateway object (the one that you want to connect to the IdP) and enable the Identity Awareness Blade.
-
In the First Time Configuration Wizard, select Browser-Based Authentication > Next.
-
Select "I do not wish to configure an Active Directory at this time" and click Next > (again) Next > Finish.
-
In the navigation tree, select the Identity Awareness property and open the Browser-Based Authentication settings.
-
Below Authentication Settings, select Edit.
-
For the Authentication Method, select Identity Provider as the authentication method, and then select the IdP that you configured in the Infinity Portal. In this example, "Central IdP".

-
Click OK, and then OK again to save the settings.
-
In the Security Policies view, create a rule for testing purposes.
-
Name - Give the rule a name, for example, "Central_IdP".
-
Source - Add an Access Role that contains the user group assigned to your central IdP (such as Azure). The Access Role
Access Role objects let you configure network access according to: Networks, Users and user groups, Computers and computer groups, Remote Access Clients. After you activate the Identity Awareness Software Blade, you can create Access Role objects and use them in the Source and Destination columns of Access Control Policy rules. gets its groups and users in those groups from those defined on the IdP. To create an Access Role, see Creating Access Roles. -
Destination - For the Destination, select *Any.
-
Services & Applications - Select the applicable applications and sites.
-
Action - In the Action Settings window, the Action is Accept.
Also, make sure to select the checkbox Enable Identity Captive Portal. -
Track - Track matches on the rule with the Log.
-
-
Publish the session changes and click Install Policy > Install.