Important Information About Creating SIP Security Rules
-
Make sure to check Keep all connections if you do not want in-progress calls to drop every time you install policy.
-
In SmartConsole
 Check Point GUI application used to manage a Check Point environment - configure Security Policies, configure devices, monitor products and events, install updates, and so on., the Gateways & Servers tab, double-click your Security Gateway
 Dedicated Check Point server that runs Check Point software to inspect traffic and enforce Security Policies for connected network resources. object.
The Check Point Security Gateway window shows.
-
From General Properties > Other > Connection Persistence > Keep all connections > OK.
Note - Rematch connections is selected by default.
-
-
Do not configure special Network Objects to allow SIP signaling, use regular Network Objects. The Security Gateway dynamically opens ports for data connections (RTP/RTCP and others). Security Gateways support up to four different media channels per SIP SDP message.
-
When you use Hide NAT for SIP over UDP and Hide NAT for SIP over TCP, include the hidden IP address in the Destination of the SIP rule
 Set of traffic parameters and other conditions in a Rule Base (Security Policy) that cause specified actions to be taken for a communication session.. When you include the hidden IP address, this allows the initiation of the TCP handshake from the external network to the hidden IP.
 -
For NAT on SIP entities, we strongly recommended that you enable the Inspection Settings Strict SIP Protocol Flow Enforcement. See Configuring Inspection Settings in SmartConsole.
-
For Automatic configuration for Static NAT, you must add a NATed object to the Destination column in the Rule Base
 All rules configured in a given Security Policy. Synonym: Rulebase..
|
|
Important - For VoIP, you must configure Anti-Spoofing on the interfaces of the Check Point Security Gateway. |
|
|
Note - The old policy rules are still intact for calls already in-progress and they will not be dropped. |
Sample SIP Rules for an Endpoint-to-Endpoint Network
Sample VoIP Access Control:

|
Source |
Destination |
Services & Applications |
Action |
Comments |
|---|---|---|---|---|
|
Net_A Net_B |
Net_B Net_A |
OR
OR
|
Accept |
SIP bidirectional calls |
To configure bidirectional call rules for this peer-to-peer topology:
-
Configure an Access Control rule that allows IP phones in Net_A to call Net_B and the reverse.
-
Choose the applicable SIP service
-
Configure the VoIP rule.
-
Configure Hide NAT or Static NAT for the phones in the internal network.
Do this by editing the Network Object
 Logical object that represents different parts of corporate topology - computers, IP addresses, traffic protocols, and so on. Administrators use these objects in Security Policies. for the internal network (Net_A).
See Setting Up Your Network with Network Address Translation (NAT).
Sample SIP Rules for a Proxy in an External Network
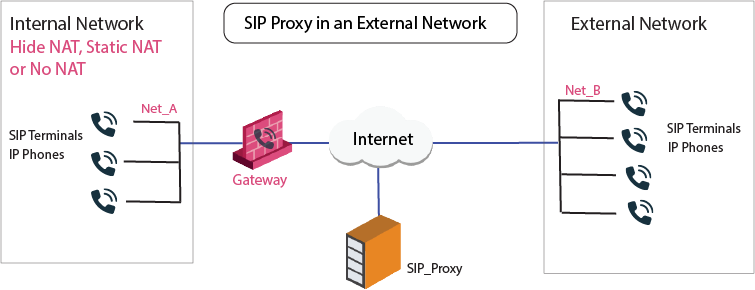
This illustration shows a SIP topology with a proxy in an external network.

Sample VoIP Access Control rules for this topology:
|
Source |
Destination |
Services & Applications |
Action |
Comments |
|---|---|---|---|---|
|
SIP_Proxy |
Net_A |
UDP:sip |
Accept |
SIP over UDP |
OR
|
Source |
Destination |
Services and Applications |
Action |
Comments |
|---|---|---|---|---|
|
SIP_Proxy |
Net_A |
SIP over TCP |
Accept |
SIP over TCP |
To allow bidirectional calls between SIP phones in internal and external networks:
-
Configure Network Objects (nodes or networks) for IP phones that are:
-
Managed by the SIP Proxy or Registrar
-
Permitted to make calls, and those calls inspected by the Security Gateway. In the image, these are Net_A.
-
-
Configure the Network Object for the SIP Proxy (
SIP_Proxy). -
Configure the VoIP rule.
-
Configure Hide NAT or Static NAT for the phones in the internal network.
Do this by editing the Network Object for the internal network (Net_A).
See Setting Up Your Network with Network Address Translation (NAT).
-
Install the Security Policy.
Sample SIP Rules for a Proxy-to-Proxy Topology
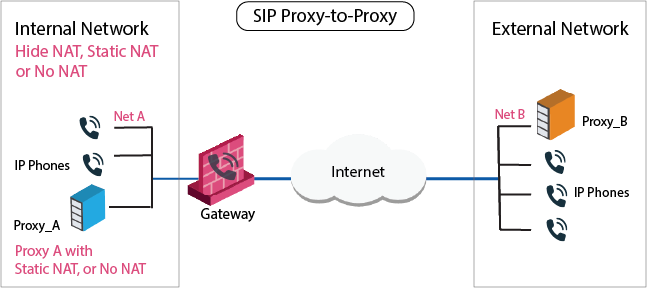
The image illustrates a Proxy-to-Proxy topology with Net_A and Net_B on opposite sides of the Security Gateway.

Sample VoIP Access Control rules for this topology:
|
Source |
Destination |
Services & Applications |
Action |
Comments |
|---|---|---|---|---|
|
Proxy_A Proxy_B |
Proxy_B Proxy_A |
UDP:sip |
Accept |
SIP over UDP |
OR
|
Source |
Destination |
Services & Applications |
Action |
Comment |
|---|---|---|---|---|
|
Proxy_A Proxy_B |
Proxy_B Proxy_A |
SIP over TCP |
Accept |
SIP over TCP |
To allow bidirectional calls between phones:
-
Configure the Network Objects (nodes or networks) for the phones permitted to make calls, and the calls subject to Security Gateway inspection.
In the image above, Net_A represents these phones.
-
Configure the Network Object for the proxy objects (Proxy_A and Proxy_B).
-
Configure the VoIP rule.
-
Configure Hide NAT or Static NAT for the phones in the internal network.
Do this by editing the Network Object for the internal network (Net_A).
See Setting Up Your Network with Network Address Translation (NAT).
-
In SmartConsole, install the policy.
Sample SIP Rules for a Proxy in DMZ Topology
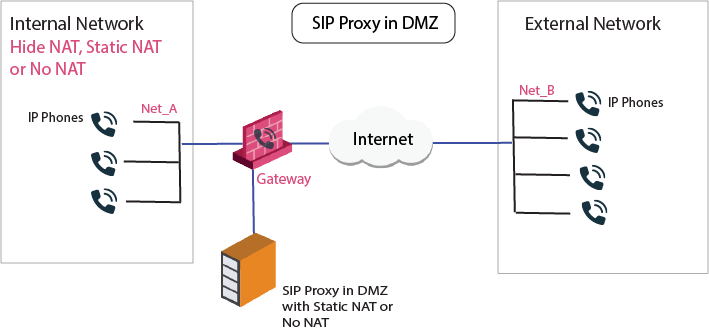
The image illustrates a SIP-based VoIP topology where a proxy is installed in the DMZ.

Sample VoIP Access Control rules for this topology:
|
Source |
Destination |
Services & Applications |
Action |
Comments |
|---|---|---|---|---|
|
Proxy_DMZ Net_A Net_B |
Net_A Net_B Proxy_DMZ |
UDP:sip |
Accept |
SIP over UDP |
OR
|
Source |
Destination |
Services & Applications |
Action |
Comments |
|---|---|---|---|---|
|
Proxy_DMZ Net_A Net_B |
Net_A Net_B Proxy_DMZ |
SIP over TCP |
Accept |
SIP over TCP |
Allow bidirectional calls between phones in internal and external networks (Net_A and Net_B) and configure NAT for the internal phones and the proxy in the DMZ (Proxy_DMZ).
To configure bidirectional calls between phones in the internal and external networks:
-
Configure Network Objects (nodes or networks) for phones that are permitted to make calls and for calls inspected by the Security Gateway. These are Net_A and Net_B.
-
Configure the Network Object for the proxy (Proxy_DMZ).
-
Configure the VoIP rules.
-
Configure Hide NAT or Static NAT for the phones in the internal network.
Do this by editing the Network Object for the internal network (Net_A).
See Setting Up Your Network with Network Address Translation (NAT).
-
Install the Security Policy.


