Route Injection Mechanism
Overview of Route Injection
Route Injection Mechanism (RIM) enables a Security Gateway![]() Dedicated Check Point server that runs Check Point software to inspect traffic and enforce Security Policies for connected network resources. to use dynamic routing protocols to propagate the encryption domain of a VPN peer Security Gateway to the internal network. When a VPN tunnel is created, RIM updates the local routing table of the Security Gateway to include the encryption domain of the VPN peer.
Dedicated Check Point server that runs Check Point software to inspect traffic and enforce Security Policies for connected network resources. to use dynamic routing protocols to propagate the encryption domain of a VPN peer Security Gateway to the internal network. When a VPN tunnel is created, RIM updates the local routing table of the Security Gateway to include the encryption domain of the VPN peer.
Note - Route Injection is not currently supported for IPv6.
RIM can only be enabled when permanent tunnels are configured for the community. Permanent tunnels are kept alive by tunnel test packets. When a Security Gateway fails to reply, the tunnel is considered "down." As a result, RIM deletes the route to the failed link from the local routing table, which triggers neighboring dynamic routing enabled devices to update their routing information accordingly. This results in a redirection of all traffic destined to travel across the VPN tunnel, to a pre-defined alternative path.
There are two possible methods to configure RIM:
-
Automatic RIM - RIM automatically injects the route to the encryption domain of the peer Security Gateways.
-
Custom Script - Specify tasks for RIM to perform according to specific needs.
Route injection can be integrated with MEP functionality, which sends return packets back through the same MEP Security Gateway.
Automatic RIM
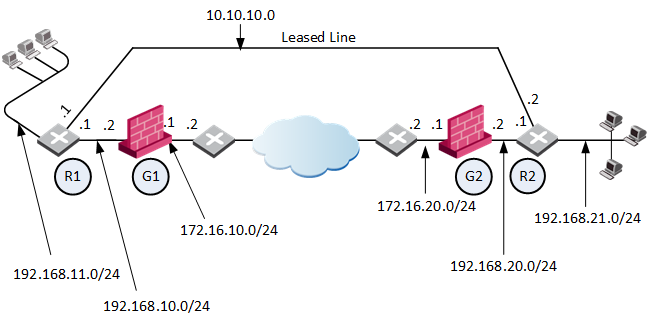
In this scenario:
|
Label |
Meaning |
|---|---|
|
R1 |
Router 1 |
|
G1 |
Security Gateway 1 |
|
R2 |
Router 2 |
|
G2 |
Security Gateway 2 |
-
RIM is enabled in the VPN community in which Security Gateway 1 and Security Gateway 2 participate.
-
When the Security Gateways create a VPN tunnel, and the Permanent Tunnel status changes to "UP", RIM updates the routing tables:
-
The routing table on Security Gateway 1 gets the routes for the encryption domain of Security Gateway 2.
-
The routing table on Security Gateway 2 gets the routes for the encryption domain of Security Gateway 1.
-
-
Security Gateway 1 has a dynamic routing neighborship with Router 1 and propagates RIM routes to Router 1.
-
Security Gateway 2 has a dynamic routing neighborship with Router 2 and propagates RIM routes to Router 2.
-
If the VPN tunnel becomes unavailable (Permanent Tunnel status with a peer changes to "DOWN"), then RIM removes routes from the routing tables of Security Gateway 1 and Security Gateway 2. The Security Gateways update their corresponding neighbors: Router 1 and Router 2. The routers start to send traffic over the leased line.
Below are the routing tables on the Security Gateways and Routers based on the diagram above. Entries in bold represent routes that RIM injected into the Security Gateway's local routing table:
For Security Gateway 1:
|
Destination |
Netmask |
Next Hop |
Metric |
|---|---|---|---|
|
0.0.0.0 |
0.0.0.0 |
172.16.10.2 |
1 |
|
192.168.21.0 |
255.255.255.0 |
172.16.10.2 |
1 |
|
192.168.11.0 |
255.255.255.0 |
192.168.10.1 |
1 |
Security Gateway 2:
|
Destination |
Netmask |
Next Hop |
Metric |
|---|---|---|---|
|
0.0.0.0 |
0.0.0.0 |
172.16.20.2 |
1 |
|
192.168.11.0 |
255.255.255.0 |
172.16.20.2 |
1 |
|
192.168.21.0 |
255.255.255.0 |
192.168.20.1 |
1 |
Router 1 (behind Security Gateway 1):
|
Destination |
Netmask |
Next Hop |
Metric |
|---|---|---|---|
|
0.0.0.0 |
0.0.0.0 |
192.168.10.2 |
1 |
|
192.168.21.0 |
255.255.255.0 |
192.168.10.2 |
1 |
|
192.168.21.0 |
255.255.255.0 |
10.10.10.2 |
2 |
Router 2 (behind Security Gateway 2):
|
Destination |
Netmask |
Next Hop |
Metric |
|---|---|---|---|
|
0.0.0.0 |
0.0.0.0 |
192.168.20.2 |
1 |
|
192.168.11.0 |
255.255.255.0 |
192.168.20.2 |
1 |
|
192.168.11.0 |
255.255.255.0 |
10.10.10.1 |
2 |
Custom Scripts
Custom scripts can be run on any Security Gateway in the community. These scripts are executed whenever a tunnel changes its state (example: goes "up" or "down"). Such an event, for example, can be the trigger that initiates a dial-up connection.
A script template custom_rim (with a .sh or .bat extension depending on the operating system) is provided in the $FWDIR/scripts/ directory.
Sample customized script:
#!/bin/sh # This script is invoked each time a tunnel is configured with the RIM option # and the tunnel changed state. # # You may add your custom commands to be invoked here. # Parameters read from command line. RIM_PEER_GW=$1 RIM_NEW_STATE=$2 RIM_HA_STATE=$3 RIM_FIRST_TIME=$4 RIM_PEER_ENC_NET=$5 case "${RIM_NEW_STATE}" inup) # Place your action for tunnels that came up ;; down) # Place your action for tunnel that went down ;; esac |
Where:
-
RIM_PEER_GW: Peer Security Gateway -
RIM_NEW_STATE: Change in the state of the Security Gateway (example: "up" or "down"). -
RIM_HA_STATE: State of a single Security Gateway in a cluster Two or more Security Gateways that work together in a redundant configuration - High Availability, or Load Sharing. (example: "standby" or "active").
 -
RIM_FIRST_TIME: The script is executed separately for each network in the peer's encryption domain. Though the script can be executed multiple times on a peer, this parameter is transferred to the script with the value of '1' only the first time the script runs on the peer. The value '1' indicates the first time this script is executed. The next time the script is executed, it is transferred with the value of '0' and the parameter is disregarded. For example, you can send an email alert to the system administrator the moment a tunnel goes down. -
RIM_PEER_ENC_NET: VPN domain of the VPN peer.
Injecting Peer Security Gateway Interfaces
You can inject the IP addresses of the peer Security Gateway into the routing tables, in addition to the networks behind the Security Gateway.
For example, after a VPN tunnel is created, RIM injects the encryption domain of the peer Security Gatewayinto the local routing tables of both Security Gateways. When RIM enabled Security Gateways communicate with a Security Gateway that has Hide NAT enabled, it is necessary to inject the peer's interfaces.
In this scenario:
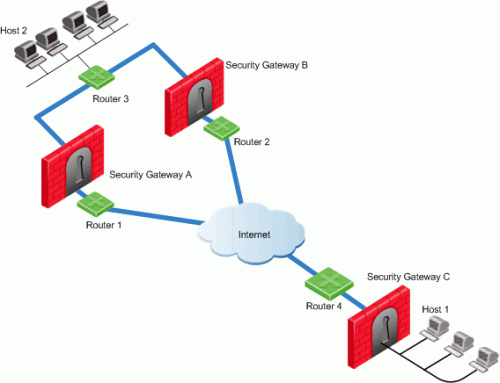
-
Security Gateways A and B are both RIM enabled and Security Gateway C has Hide NAT enabled on the external interface ("hiding" all the IP addresses behind it).
-
Host 1, behind Security Gateway C, initiates a VPN tunnel with Host 2, through Security Gateway A.
-
Router 3 holds routes to all the hosts behind Security Gateway C. Because Router 3 does not have the Hide NAT IP address of Security Gateway C, Router 3 cannot properly route packets back to Host 1.
To route back packets:
-
-
Click > Global properties.
-
Click VPN Advanced Properties > Tunnel Management.
-
Select RIM_inject_peer_interfaces. This injects Router 3 with all of the IP addresses of Security Gateway C (this includes the Hide NAT address).
-
Click OK.
-
Install the Access Control Policy.
-
-
Configure the router not to propagate the information injected to other Security Gateways. For example, in the scenario shown above this could result in Security Gateway B routing traffic to Security Gateway C through Security Gateway A.
Configuring RIM
Configuring RIM in a Star Community
-
In SmartConsole, click Objects > Object Explorer (or press Ctrl E).
-
From the left tree, select VPN Communities.
-
Open the applicable Star Community object.
-
From the left tree, click Tunnel Management.
-
In the Permanent Tunnels section, select Set Permanent Tunnels.
These Permanent Tunnels modes are then made available:
-
On all tunnels in the community
-
On all tunnels of specific Security Gateways
-
On specific tunnels in the community

Note - RIM can only be enabled on permanent tunnels. If Multiple Entry Point (MEP) is enabled on the community, you must select On all tunnels in the community. See Configuring Tunnel Features
-
-
Select Enable Route Injection Mechanism (RIM).
-
Click Settings.
The Star Community Settings window opens.
In the Community section:
-
Enable automatic Route Injection Mechanism - RIM runs automatically on the central or satellite Security Gateways.
-
Enable customer editable script execution - A customized script runs on central or satellite Security Gateways whenever a tunnel changes its state (goes up or down).
In the Tracking section:
-
Configure the applicable tracking options:
Log, Popup Alert, Mail Alert, SNMP Trap Alert, User Defined Alert
-
-
Click OK to close all configuration windows.
-
Close the Object Explorer.
-
Install the Access Control Policy.
-
If you selected Enable customer editable script execution, then you must edit the
$FWDIR/scripts/custom_rim.shscript on each of the Security Gateways.
Configuring RIM in a Meshed Community
-
In SmartConsole, click Objects menu > Object Explorer (or press Ctrl E).
-
From the left tree, select VPN Communities.
-
Open the applicable Meshed Community object.
-
From the left tree, click Tunnel Management.
-
In the Permanent Tunnels section, select Set Permanent Tunnels.
The following Permanent Tunnels modes are then made available:
-
On all tunnels in the community
-
On all tunnels of specific Security Gateways
-
On specific tunnels in the community
Note - RIM can only be enabled on permanent tunnels. If Multiple Entry Point (MEP) is enabled on the community, you must select On all tunnels in the community. See Configuring Tunnel Features.
-
-
Select Enable Route Injection Mechanism (RIM).
-
Click Settings.
The Meshed Community Settings window opens.
In the Community section:
-
Enable automatic Route Injection Mechanism - RIM runs automatically on the central or satellite Security Gateways.
-
Enable customer editable script execution - A customized script runs on central or satellite Security Gateways whenever a tunnel changes its states (goes up or down).
In the Tracking section:
-
Configure the applicable tracking options:
Log, Popup Alert, Mail Alert, SNMP Trap Alert, User Defined Alert
-
-
Click OK to close all configuration windows.
-
Close the Object Explorer.
-
Install the Access Control Policy.
-
If you selected Enable customer editable script execution, then you must edit the
$FWDIR/scripts/custom_rim.shscript on each of the Security Gateways.
Enabling the RIM_inject_peer_interfaces flag
To enable the RIM_inject_peer_interfaces flag:
-
In SmartConsole, click > Global properties.
-
Click Advanced > Configure.
-
Click VPN Advanced Properties > Tunnel Management.
-
Select RIM_inject_peer_interfaces.
-
Click OK.
-
Install the Access Control Policy.
Configuring RIM in Gaia
RIM automatically configures routes for peer encryption domains in the Gaia![]() Check Point security operating system that combines the strengths of both SecurePlatform and IPSO operating systems. OS kernel on Security Gateways:
Check Point security operating system that combines the strengths of both SecurePlatform and IPSO operating systems. OS kernel on Security Gateways:
-
When a VPN tunnel is up, RIM adds the applicable routes.
-
When a VPN tunnel is down, RIM removes the applicable routes.
If the VPN tunnel state changes from "DOWN" to "UP" again, it can take time for the routes for peer encryption domains to appear again in the routing table on Security Gateways. You can configure the Gaia OS kernel to keep these routes even when the VPN tunnel is down.
Configure the applicable settings on Security Gateways in Gaia Portal![]() Web interface for the Check Point Gaia operating system. or in Gaia Clish
Web interface for the Check Point Gaia operating system. or in Gaia Clish![]() The name of the default command line shell in Check Point Gaia operating system. This is a restricted shell (role-based administration controls the number of commands available in the shell)..
The name of the default command line shell in Check Point Gaia operating system. This is a restricted shell (role-based administration controls the number of commands available in the shell)..
-
Configuration in Gaia Portal:
-
In the tree view, click Advanced Routing > Routing Options.
-
In the Kernel Options area, select the Kernel Routes option.
-
Click Apply.
-
-
Configuration in Gaia Clish:
-
set kernel-routes on -
save config
-
Gaia Gateways in a Star VPN Community
For RIM to work, the Gaia Security Gateways in a star VPN community must publish the routes of the satellite networks to the router.
For Gaia Security Gateways to publish routes, run these CLI commands on all Security Gateways at the center of the community.
For more information, see the R81 Gaia Advanced Routing Administration Guide.
-
set routemap <Routemap Name> id <ID Number>For example:
set routemap RIM id 5 -
set routemap <Routemap Name> id <ID Number> match protocol kernelFor example:
set routemap RIM id 5 match protocol kernel -
set ospf export-routemap <Routemap Name> preference 1 onFor example:
set ospf export-routemap RIM preference 1 on -
set routemap <Routemap Name> id <ID Number> allowFor example:
set routemap RIM id 5 allow -
set routemap <Routemap Name> id <ID Number> onFor example:
set routemap RIM2 id 10 on -
set routemap <Routemap Name> id <ID Number> match nexthop <IP Address of OSPF Interface of the other RIM GW> onFor example:
set routemap RIM2 id 10 match nexthop <10.16.50.3> on -
set routemap <Routemap Name> id <ID Number> restrictFor example:
set routemap RIM2 id 10 restrict -
set ospf import-routemap <Routemap Name> preference 1 onFor example:
set ospf import-routemap RIM2 preference 1 on -
save config