The Global Domain
The Global Domain is a collection of rules, objects and settings shared with all Domains or with specific Domains. The system automatically creates the Global Domain when you install Multi-Domain Security Management. You cannot delete the Global Domain.
You organize global rules, objects and settings into global configurations. Each global configuration can include one or more of these components:
-
One Global Access Control Policy - Global rules that control access to network resources. This includes rules for Firewall, Application Control
 Check Point Software Blade on a Security Gateway that allows granular control over specific web-enabled applications by using deep packet inspection. Acronym: APPI., URL Filtering Check Point Software Blade on a Security Gateway that allows granular control over which web sites can be accessed by a given group of users, computers or networks. Acronym: URLF., and IPsec VPN Check Point Software Blade on a Security Gateway that provides a Site to Site VPN and Remote Access VPN access.. The Network Policy Layer is created automatically after installation or upgrade. You can manually create an Application or other Global Policy Layers as necessary.
 -
One Global Threat Prevention Policy - Global rules that prevent malware, intrusions and other threats. This includes rules for IPS
Check Point Software Blade on a Security Gateway that inspects and analyzes packets and data for numerous types of risks (Intrusion Prevention System)., Anti-Bot Check Point Software Blade on a Security Gateway that blocks botnet behavior and communication to Command and Control (C&C) centers. Acronyms: AB, ABOT., Anti-Virus Check Point Software Blade on a Security Gateway that uses real-time virus signatures and anomaly-based protections from ThreatCloud to detect and block malware at the Security Gateway before users are affected. Acronym: AV., and other Threat Prevention features. The Threat Prevention Policy Layer is created automatically after installation or upgrade. -
Global Objects - System objects and configuration settings that are common to all or to specific Domains. Connect to the Global Domain with SmartConsole
Check Point GUI application used to manage a Check Point environment - configure Security Policies, configure devices, monitor products and events, install updates, and so on. to create and configure global objects.
Connecting to the Global Domain
To connect to the Global Domain:
-
Connect to the Multi-Domain Server
Dedicated Check Point server that runs Check Point software to host virtual Security Management Servers called Domain Management Servers. Synonym: Multi-Domain Security Management Server. Acronym: MDS. with SmartConsole. -
In the Domains view, right-click the Global Domain, and then click Connect to Domain.
A SmartConsole instance opens for the Global Domain.
Changing the Global Domain
This section includes basic procedures for working the contents of the Global Domain.
When connected to the Global Domain you can:
-
Create, delete or change Global Access Control and Threat Prevention Policies.
-
Create, delete or change rules in Global Policies.
-
Create, delete or change global objects.
This activity is not supported in this release:
-
Defining Security Gateways as installation targets in global configuration rules. You must use local Policies to do this.
Working with Global Objects
Use global objects in global configuration rules. Global objects work much in the same way as objects in local Policy rules.
The Global Domain includes many, predefined global objects for your convenience. These default global objects are visible (read only), in the Global Domain. You cannot delete or change them.
You can create, change or delete user-defined global objects in the Global Domain only. Global objects are visible in local Domains in the read-only mode.
|
|
Important:
|

To add a new global object:
-
Connect to the Global Domain with SmartConsole.
-
Click the Objects menu, and then select an object type from the menu.
You can also create a new global object with the Object Explorer.
-
Configure the required parameters.
-
Click OK to save the new object.
To change a user-defined global object, select it in the Object Explorer, and then change the applicable settings.
To delete a user-defined object, select it in the Object Explorer and click Delete.
|
|
Important - After you complete the global object task, assign or reassign the global configuration to the applicable Domains. This action automatically:
|
Working with Global Configuration Rules
This section is a general overview of the procedure for defining rules in the Global Policies. To learn more about Policy rules and their configuration procedures, see the R81 Security Management Administration Guide.
Global Policy Layers have one placeholder for local Domain rules. You can create global rules above and below this placeholder. In the local Domain Policy Layer, you define local rules in the placeholder. If there are no local Domain rules, the placeholder can be empty.
The position of rules in Domain Policy Layers defines the order in which they are enforced. It is important to put rules in the correct sequence. Global Policy Layers do not have implied rules, but implied rules can be inherited from global properties in local Domains.
|
|
Best Practice - Define a global cleanup rule |
 >
>
There is no NAT Rule Base in the Global Domain and you cannot define NAT settings there. You must define NAT rules manually in Domain Policy Layers.
Workflow for global Domain Policy Layers:
-
Connect to the Multi-Domain Server with SmartConsole.
-
In the Domains view, right-click the Global Domain, and then click Connect to Domain.
A SmartConsole instance opens for the Global Domain.
-
Select Access Control and Threat Prevention Policy Layers and configure their rules.
-
Publish the SmartConsole session.
-
Go to Multi-Domain > Global Assignments, and assign the configuration to the local Domains. If you assigned the configuration before, and made changes to the Global Domain Policy, reassign the global domain configuration to the local Domains.
The system creates a task, during which these actions occur:
-
Makes sure that all Global and local Domain Layer rules are consistent and work together correctly. For example, it makes sure that new local Policy Layers are connected to existing local Domain Policy Layers.
-
Updates the local Domain and its Rule Base.
-
Publishes the changes again.
-
Changes the assignment status to Up to Date.
-
-
Install Policies on the local Domains.
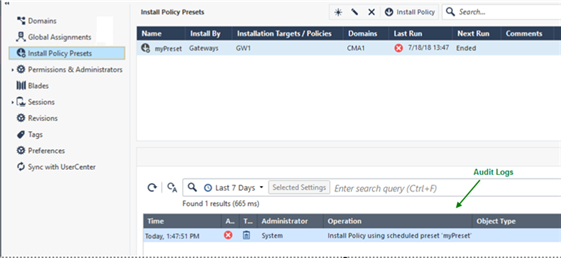
Policy Presets
SmartConsole lets you create Policy Presets for better policy installation planning. A Policy Preset is a collection of Security Gateways or Policy Packages for policy installation purposes. After you define a Preset, you can install policy on all the items which are included in the Preset at the same time. You also have the option to define a policy installation schedule for a specific Preset. In a large deployment Multi-Domain Server environment, Policy Presets help you save time and manage the policy installation process more efficiently.
You can create 2 types of Policy Presets:
-
By Gateways - Policies are installed on all Security Gateways in the Preset. The applicable policy is installed on each Security Gateway
Dedicated Check Point server that runs Check Point software to inspect traffic and enforce Security Policies for connected network resources. in the Preset. A Preset can include Security Gateways from different Domains, from the same Domain, Security Gateways with different policies or identical policies. -
By Policy Packages - All Policy Packages included in the Preset are installed on the Security Gateways that enforce it at the same time.
|
|
Note - A Preset by Policy Packages installs policy only on Security Gateways which enforce the selected Policy Packages included in the Preset. It does not necessarily install policy on all Security Gateways in a Domain. |
You can use Presets for policy installation only after you installed policy on the installation targets for the first time. Security Gateways with no policy installed on them are skipped during the installation process.
To create a Policy Preset:
-
In the Multi-Domain view, go to Multi-Domain > Install Policy Presets > New.
-
In Installation Targets, select one of these options:
-
By Gateways - This Policy preset is installed on the Security Gateways that you select.
-
By Policy Packages - This Policy preset is installed on the Security Gateways which enforce the selected Policy Packages.
-
-
In Scheduling:
You can schedule the policy installation to specific days and hours.
The hour of the policy installation is set to the time zone of:
-
The SmartConsole client - for a one-time installation.
-
The Multi-Domain Management Server
Check Point Single-Domain Security Management Server or a Multi-Domain Security Management Server. - for a recurring installation.
Use Case - Time Set for a Recurring Installation
In a one time installation, the installation time is according to the SmartConsole client. In a recurring installation, the installation time is according to the Multi-Domain Server. This affects how you set both the hour and the day on your local SmartConsole client.
Example 1:
Your SmartConsole client is in Israel, and your Multi-Domain Server is in New York.
- You want to schedule a recurring installation on Saturday 2 PM Israel time (14:00):
In your SmartConsole client > New Install Policy Preset > Scheduling, select:
Install policy at 14:00
Recurrence > Configure > Days in week > Saturday
- You want to schedule a recurring installation on Saturday 2 PM New York time (14:00):
In your SmartConsole client > New Install Policy Preset > Scheduling, select: Install policy at 21:00
Recurrence > Configure > Days in week > Saturday
Example 2:
Your SmartConsole client is in Israel, and your Multi-Domain Server is in New York.
- You want to schedule a recurring installation on Saturday 6 PM Israel time (18:00):
In your SmartConsole client > New Install Policy Preset > Scheduling, select:
Install policy at 18:00
Recurrence > Configure > Days in week > Saturday
- You want to schedule a recurring installation on Saturday 6 PM New York time (18:00):
In your SmartConsole client > New Install Policy Preset > Scheduling, select: Install policy at 01:00
Recurrence > Configure > Days in week > Sunday

Note - The hour of the policy installation is set to the time zone of:
-
The SmartConsole client - for a one-time installation.
-
The Multi-Domain Management Server
Virtual Security Management Server that manages Security Gateways for one Domain, as part of a Multi-Domain Security Management environment. Acronym: DMS. - for a recurring installation.
-
-
Publish the SmartConsole session.
You can see the next policy installation schedule in the Next Run column:

At any time, you can select a Preset and click Install Policy, regardless of the preset schedule.
The audit logs of your Preset activity show at the bottom of the Install Policy Presets page and in the Logs & Monitor view.
|
|
Note - The policy preset is installed on the Multi-Domain Server with the active global Domain. If a domain has no domain server on the Multi-Domain Server with the active global Domain, then the policy preset is not installed on this Domain. |
In this example, the Global policy will not be installed on Domain 2, because Domain 2 has no server in Multi-Domain Server2.
|
Servers Domains |
Multi-Domain Server 1 |
Multi-Domain Server 2 |
|---|---|---|
|
Domain1 |
Domain1_Server (Active) |
Domain1_Server_2 (Standby) |
|
Domain2 |
Domain2_Server (Active) |
No Server |
|
Global |
Standby |
Active |
In a one time installation, the installation time is according to the SmartConsole client. In a recurring installation, the installation time is according to the Multi-Domain Server. This affects how you set both the hour and the day on your local SmartConsole client.
Example 1:
Your SmartConsole client is in Israel, and your Multi-Domain Server is in New York.
- You want to schedule a recurring installation on Saturday 2 PM Israel time (14:00):
In your SmartConsole client > New Install Policy Preset> Scheduling, select:
Install policy at 14:00
Recurrence > Configure > Days in week > Saturday
- You want to schedule a recurring installation on Saturday 2 PM New York time (14:00):
In your SmartConsole client > New Install Policy Preset > Scheduling, select: Install policy at 21:00
Recurrence > Configure > Days in week > Saturday
Example 2:
Your SmartConsole client is in Israel, and your Multi-Domain Server is in New York.
- You want to schedule a recurring installation on Saturday 6 PM Israel time (18:00):
In your SmartConsole client > New Install Policy Preset > Scheduling, select:
Install policy at 18:00
Recurrence > Configure > Days in week > Saturday
- You want to schedule a recurring installation on Saturday 6 PM New York time (18:00):
In your SmartConsole client > New Install Policy Preset > Scheduling, select: Install policy at 01:00
Recurrence > Configure > Days in week > Sunday
You are the administrator for a corporation that has five branches, each branch in a different city. You manage the Security Gateways from a Multi-Domain console. In the Multi-Domain console, each branch is represented by a Domain. Each Domain has a mail security server. When there is a mail-related update, you must update the policy on all mail security servers (no update is required for the other Security Gateways in each Domain). How can you make the policy installation process more efficient?
Create a Preset which includes the mail security server in each Domain. After you create this Preset, each time it is necessary to update the Policy on the mail security servers, you can select this preset for installation. This way, you do not need to search and filter for each mail security server separately.
You can also schedule the policy installation for specific days and hours, for example, in the evening hours, when there are fewer employees at work.
Sample Access Control Policy Layer
Global Access Control rules use a placeholder for local Domain rules. The position of this placeholder in the Rule Base controls the order that Security Gateways handle global and local Policy rules. For simplicity of presentation, this example shows one Global Policy Layer that has both Network and Application rules. In the real world, there are different Policy Layers for these two rule types.
Sample Global Policy Layer
In this example, the placeholder for local Domain rules is rule number 3. Global Domain rules 1 and 2 run before the local Domain rules. Global rule 4 and the cleanup rule run after the local Domain rules.
Each local Domain Policy includes both Global Domain Policy rules and local Domain rules that apply to its Security Gateways. Local Domain Policy rules show in a Domain Layer under a parent rule.
Sample Domain Policy Layer with Global and Local Domain Rules
In this example, the Security Gateways handle the global configuration rules (1 and 2) and then the local Domain rules. If there is still no match in the local rules, the Security Gateways handle the last two global rules, including the cleanup rule..
Although a local Domain can define implied rules, it is a best practice to put critical global rules at the beginning of the Rule Base. Put the global cleanup rule at the end. This overrides the implicit cleanup rule and gives you flexibility to define an effective sequence for local Domain rules. .
Sample Threat Prevention Policy Layer
Global Threat Prevention rules use a placeholder for local Domain rules. The position of this placeholder in the Rule Base controls the order that Security Gateways handle global and local Policy rules. The first rule that matches traffic generates the specified action.
Sample global Policy Rule Base
In this example, the local Domain placeholder is rule number 3. Global Domain rules 1 and 2 run before the local Domain rules. Global Domain rule 4 is the default rule that runs after the local Domain rules.
Each Domain Policy includes both global rules and local rules that apply to its Security Gateways. Local Domain Policy rules show in a local Domain Layer under a parent rule.
Sample Domain Rule Base with global and local Domain Rules
This example shows Policy Layer with Global Domain rules together with the local Domain rules.
Using Layers with the Global Domain
-
You create Global Access Control and Threat Prevention Policy Layers in the Global Domain. You configure Local Domain Policy Layers in the applicable local Domains.
-
The Global Network Policy Layer is created automatically, but you can manually create a Global Application Layer. The Global Threat Prevention Layer is created automatically. If your policy installation targets contain Security Gateways R77.30 or lower, the Network and Application layers are the only supported layers. Do not create more Policy Layers.
-
In each Policy Layer, the position of the local Domain Policy Layer is defined by the position of its placeholder in the Rule Base. You can add global rules above or below the placeholder. You can define Threat Prevention rule exceptions for Global and local Domain Policy Layers.
-
You can temporarily disable the local Domain Policy Layer.
In SmartConsole for the applicable local Domain, right-click in the No column of the placeholder, and then select Disable. The Domain Policy shows as grayed-out.
To re-enable it, right-click the same cell, and select Disable again. Publish the SmartConsole session.
Note - You cannot disable local Policy Layers in the Global Domain. This option is not available.
-
To delete the rules from a local Domain Layer, click the pencil icon in the Action column, and select No domain rules in the local Domain. Publish the SmartConsole session.
-
To use a different Domain Policy Layer, click the pencil icon in the Action column, and select a different Domain Policy Layer from the list. Publish the SmartConsole session.
Upgrade Issues
When you upgrade an R77.X or earlier Multi-Domain Server, existing Policies are converted in this manner:
-
If a pre-R80.x Policy has a Global Access Control Policy with no defined rules (placeholder only), its mode is automatically set to no global Policy after an upgrade to R80.x. You can change the mode as necessary for both R80.x and pre-R80.x Policies.
-
The Firewall Policy is converted into an R80.10 Network Policy Layer. Its implicit cleanup rule is set to Drop.
-
The Application & URL Filtering Policy is converted to the Application Policy Layer. The implicit cleanup rule for it is set to Accept.
-
If a Domain contains IPS rules, an IPS Layer is automatically created in the R80.x Threat Prevention Policy for the applicable Domain.
Policy Layers and Administrator Permissions
The use of Policy Layers lets you define granular permissions for different aspects of security management. In a typical organization, only administrators with Global Management or Superuser privileges can work with Global Policy Layers. Domain Managers or Domain Level Only administrators typically have permissions to work with specified Policy Layers in their local Domains.
Dynamic Objects and Dynamic Global Objects
Dynamic objects are "logical" network objects for which IP addresses or address ranges are not explicitly defined. You define dynamic objects in the Global Domain and use them in global configuration rules. The dynamic objects are resolved to local objects when you assign the global policy to the local Domains.
You can create dynamic objects for most object types, including Security Gateways, hosts, services, networks and groups. Use the standard global objects available in SmartConsole or create your own global objects. All dynamic objects must have the _global suffix, which identifies the objects as global.
There are two types of dynamic objects:
-
Dynamic Global Network Objects - In each Domain, you define a host object with the same name as the global dynamic object. During the assignment of the global policy, the references to the global dynamic object in different rules are replaced by the reference to the local host object with the same name. The _global syntax triggers the reference replacement mechanism.
-
Dynamic Objects - The dynamic object is assigned an IP at the Security Gateway level, when you assign the global configuration to a Domain and install Policies on the Security Gateways. There is no need to create a corresponding local object.
The use of dynamic objects makes it possible to create global rules with no specified network objects. This lets you create rules that are templates.
Defining Rules with Dynamic Objects
To create a new global dynamic object:
-
Connect to Global Domain SmartConsole.
-
In the Object Explorer, select New > Network Objects > Dynamic Object.
-
Select:
-
Dynamic Global Network Object - The dynamic global object is replaced by a matching Domain object,
Or
-
Dynamic Object -The dynamic object is assigned an IP at the Security Gateway level.
-
-
In the New Dynamic Object window, enter a name.
For the Dynamic Global Network Object
Logical object that represents different parts of corporate topology - computers, IP addresses, traffic protocols, and so on. Administrators use these objects in Security Policies., the name must have the suffix _global. For example,FTP_Server_global. -
Drag the dynamic object to the applicable cells in the global Rule Base.
-
Publish the SmartConsole session.
-
Assign the Global Policy
On a Multi-Domain Security Management Server, a policy defined in the Global Domain. You can assigns this Global Policy to Domains. to all the applicable Domains.
To use a dynamic global network object in a local Domain rule:
-
Connect to SmartConsole for each applicable Domain.
-
In each Domain, create a local object with the same name as the Dynamic Global Network Object, with the
_globalsuffix.The local object must include the applicable local parameters, such as the IP address.
When you assign the global policy to the local Domain, the local object replaces this Dynamic Global Network Object.
For Dynamic Objects, there is no need to create an equivalent local object.
Applying Global Rules to Security Gateways by Function
You can create Security Rules in Global Domain that are installed on some Security Gateways or groups of Security Gateways and not others. This way, Security Gateways with different functions on one Domain can receive different security rules for a specified function or environment. When you install global policy to a number of similarly configured Domains, the related global rules are installed to all of the related Security Gateways on each Domain.
This feature is particularly useful for enterprise deployments of Multi-Domain Security Management, where Domains typically represent geographic subdivisions of an enterprise. For example, an enterprise deployment may have Domains for business units in New York, Boston, and London, and each Domain is similarly configured, with a Security Gateway (or Security Gateways) to protect a DMZ, and others to protect the perimeter. This capability lets you configure the global policy so that some global security rules are installed to DMZ Security Gateways, and different rules are installed to the perimeter Security Gateways.
|
|
Note - Global security rules can be installed on Security Gateways, and Open Security Extension (OSE) devices. |
To install a specified security rule on a specified Security Gateway or types of Security Gateways:
-
Connect to the Global Domain for the related Global Policy.
-
In the Objects Categories tree, go to New > Network Object > Dynamic Objects and select Dynamic Global Network Object.
-
Name the dynamic object, and add the suffix
_globalto the end of the name. -
Create rules to be installed on Security Gateways with this function, and drag the dynamic object you created into the Install On column for each rule.
-
Launch SmartConsole for each related Domain.
-
Create a group object with the name of the dynamic object you created, including the suffix
_global.Best Practice - While you can give a Security Gateway a name of the global dynamic object, we recommend to create a group to preserve future scalability (for instance, to include another Security Gateway with this function). We do not recommend changing the name of an existing Security Gateway to the dynamic object name.
-
Add to the group all the Security Gateways on the Domain that you want to receive these global security rules.
-
From the Multi-Domain Security Management view, re-assign the global policy to the related Domains.