Using Azure AD for Authorization
By incorporating SAML for user authentication, you can leverage Azure AD entities to control access to corporate resources.
Azure Active Directory (Azure AD) is a Microsoft cloud-based identity and access management service that offers identity and access capabilities for applications that run in Microsoft Azure.
Configuring Azure AD
This section describes the procedure for configuring Azure AD.
The procedure has two parts. Each part consists of these steps:
-
Part 1 - Configuration in Microsoft Azure Portal.
-
Part 2 - Configuration in Check Point SmartConsole.
Configuration in Microsoft Azure Portal
|
|
Note - For more information about configuration on the Microsoft Azure portal, refer to Microsoft Azure documentation. |
-
 Configuring Azure application
-
Log in to your Azure account in https://portal.azure.com/, click the username the top-right side, and make sure that the directory is correct.

Note - You must have at least one user and one group defined.
-
Make specified user group(s).
-
From the left-side menu, select Azure Active Directory.
-
Click Users.
-
In the Overview window, select the users from the list.
-
Click Home.
-
-
Select Enterprise Applications.
-
Click New Application > Non-gallery application.
-
In the Add your own application window, enter a name for your application (for example, checkpoint). Click Add.
-
In your application Overview window, click on your application and select App registrations option.
-
Click Owned applications >checkpoint.
-
Copy and save these parameters:
-
Application (client) ID
-
Directory (tenant) ID
-
-
Go to Certificates & Secrets > New client secret and set these parameters:
-
Description - Enter a free-text description (for example, Check Point).
-
Expires - Set an applicable expiration date.
-
-
Click Add.
-
Copy and save the client secret.

Note - You cannot retrieve this value after you perform a different operation or leave this blade.
-
-
 Configuring SAML as a Single Sign-On for your Azure application
-
Click on Home and select Azure Active Directory from the menu.
-
Click on Enterprise applications and go to All applications.
-
Select your application.
The application Overview window opens.
-
Click Single Sign-On.
-
Select SAML as the Single Sign-On method.
-
In the Set up Sign-On with SAML window, go to the User Attributes & Claims section and click the pencil icon to edit the claims.
The User Attributes & Claims window opens.
-
In the Required claim section, click Unique User Identifier (Name ID).
-
In the Manage claim window:
-
Attribute option - Select.
-
Source Attribute drop-down menu - Select user.localuserprincipalname.
-
-
Click Save to save the user claims, then close the window.
-
Back on the SAML Signing Certificate page, go to the Federation Metadata XML file and click Download.
The Federation Metadata XML is downloaded.

Note - Stay logged in to Azure and come back to it in the next steps.
-
-
 Registering your application
-
Click App Registrations > New registration.
-
Click Owned applications.
-
Select your application and click Register.
-
Click API permissions > Add a permission and select these permissions:
-
Microsoft Graph
-
Device.Read.All
-
GroupMember.Read.All
-
User.Read.All
-
-
Click Add permissions > Configured permissions > Grant admin consent for approval of your app API permissions. Click Yes.
Your application gets the granted permissions.
-
Configuration in Check Point SmartConsole
-
 Configuring Azure object
Use one of the following configuration options:
-
 Configure the Azure AD through the IDA wizard
-
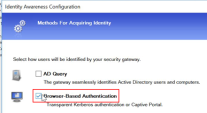
In SmartConsole, open the Gateway and click Identity Awareness.
-
On the Identity Awareness Configuration wizard, select only Browser-Based Authentication
 Authentication of users in Check Point Identity Awareness web portal - Captive Portal, to which users connect with their web browser to log in and authenticate. option.
Example:
-
Click Next.
-
From the Select Active Directory drop-down menu, select Create new Azure Active Directory.
-
Enter these settings that you created in Configuration in Microsoft Azure Portal:
-
Name - Enter a name for your application.
-
Application ID field - Enter the Application ID of the Service Principal in the UUID format
[xxxxxxx-xxxx-xxxx-xxxxxx]. -
Application Key - Enter the Client Secret created for the Service Principal.
-
Directory ID - Enter the Directory ID of the Service Principal in the UUID format
[xxxxxxx-xxxx-xxxx-xxxxxx].
Important - Do not configure specified multiple Azure AD objects with same Directory ID.
-
-
Click Test Connection.
-
After the connection is active, click Next > Next >Finish.
You can now select the new created Azure AD from the Users/Identities menu.
-
Publish the SmartConsole session.
-
-
 Configure a new server on the Objects bar
-
On Check Point SmartConsole, click New > More > User/Identity > Azure AD.
A New Azure AD window opens.
-
In the New Azure AD window, in the Service Principal Authentication section, configure these settings that you created in Configuration in Microsoft Azure Portal:
-
Name - Enter a name for your application.
-
Application ID field - Enter the Application ID of the Service Principal in the UUID format
[xxxxxxx-xxxx-xxxx-xxxxxx]. -
Application Key - Enter the Client Secret created for the Service Principal.
-
Directory ID - Enter the Directory ID of the Service Principal in the UUID format
[xxxxxxx-xxxx-xxxx-xxxxxx].
-
-
Click Test Connection.
-
Publish the SmartConsole session.
-
-
-
 Creating the Access Role with the Azure directory
-
In the object tree, click New> More > User/Identity > Access Role.
-
In the New Access Role window:
-
Enter a Name for the access.
-
Enter a Comment (optional).
-
Select a Color for the object (optional).
-
-
In the Users pane, select one of these:
-
Any user.
-
All identified users - Includes all users identified by a supported authentication method (internal users, Active Directory users, or LDAP users).
-
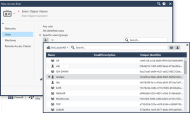
Specific users/groups - You can select the Azure Active Directory and select users or groups of users from the list.
-
-
Click OK.
-
Publish the SmartConsole session.
-
Use the created Azure Access Role to add the rules in the policy.

-
|
|
Best Practice - If you use Azure for the two of authentication and authorization, then Azure AD performs authentication through the SAML protocol with the SAML Identity Provider. To configure SAML for authentication, refer to SAML Identity Provider. |


