SAML Identity Provider
This section describes how to configure authentication using a 3rd party Identity Provider over the SAML protocol as an authentication method for Identity Awareness![]() Check Point Software Blade on a Security Gateway that enforces network access and audits data based on network location, the identity of the user, and the identity of the computer. Acronym: IDA. Gateway (Captive Portal
Check Point Software Blade on a Security Gateway that enforces network access and audits data based on network location, the identity of the user, and the identity of the computer. Acronym: IDA. Gateway (Captive Portal![]() A Check Point Identity Awareness web portal, to which users connect with their web browser to log in and authenticate, when using Browser-Based Authentication.) and for Mobile Access
A Check Point Identity Awareness web portal, to which users connect with their web browser to log in and authenticate, when using Browser-Based Authentication.) and for Mobile Access![]() Check Point Software Blade on a Security Gateway that provides a Remote Access VPN access for managed and unmanaged clients. Acronym: MAB. Portal as service providers.
Check Point Software Blade on a Security Gateway that provides a Remote Access VPN access for managed and unmanaged clients. Acronym: MAB. Portal as service providers.
Identity Provider is a system entity that creates, maintains, and manages identity information and provides authentication services. Service Provider is a system entity that provides services for users authenticated by the Identity Provider.
SAML Authentication Process Flow
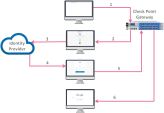
In the example diagram below:
-
The service is
google.com. -
The service provider is Identity Awareness Gateway (Captive Portal).
-
The Identity Provider is Okta.
|
|
|
Important - When you sign out from the Check Point service portal, it does not automatically sign out from the Identity Provider's session. |
SAML Configuration Procedure
-
 Configure Identity Awareness Captive Portal or Mobile Access Portal
-
To configure Identity Awareness Captive Portal, see Configuring Browser-Based Authentication.
-
To configure Mobile Access Portal, see R81 Mobile Access Administration Guide.
-
-
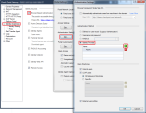
 Configure an External User Profile object
External User Profile represents all the users authenticated by the Identity Provider.
For configuration instructions, see Configure a generic user profile in the Legacy SmartDashboard.
-
 Configure an Identity Provider object
-
In SmartConsole
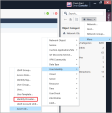
 Check Point GUI application used to manage a Check Point environment - configure Security Policies, configure devices, monitor products and events, install updates, and so on., from the Gateways & Servers view click New > More > User/Identity > Identity Provider.
A New Identity Provider window opens:
-
In the New Identity Provider window, in the Data required by the SAML Identity Provider section, configure these settings:
-
In the Gateway field, select the Security Gateway
 Dedicated Check Point server that runs Check Point software to inspect traffic and enforce Security Policies for connected network resources., which needs to perform the SAML authentication.
 -
In the Service field, select the service, through which to authenticate (Identity Awareness or Mobile Access).
SmartConsole automatically generates the data in these fields based on the previous two fields:
-
Identifier (Entity ID) – This is a URL that uniquely identifies a service provider (the Security Gateway, in our case)
-
Reply URL – This is a URL, to which the SAML assertions are sent
-
-
Configure SAML Application on an Identity Provider website.

Important - Do not close the New Identity Provider window while you configure the SAML application in your Identity Provider’s website. You continue the configuration later with the information you receive from the Identity Provider.
Follow the Identity Provider's instructions.
-
You must provide the values from the New Identity Provider window from the Identifier (Entity ID) and the Reply URL fields. Copy these values from SmartConsole and paste them in the corresponding fields on the Identity Provider's website.

Note - The exact names of the target fields on the Identity Provider's website might differ between Identity Providers.
-
Make sure to configure the Identity Provider to send the authenticated username in the email format (
alias@domain). -
Optional If you wish to receive the Identity Provider's groups, in which the user is defined, make sure to configure the Identity Provider to send the group names as values of the attribute called group_attr.

Note - When the user logs in to Azure Active Directory, PDP
 Check Point Identity Awareness Security Gateway that acts as Policy Decision Point: acquires identities from identity sources; shares identities with other gateways. returns a username that is an email address, and no groups. You must replace the userLoginAttr with email:
-
Do this:
-
Go to Edit > network objects and select the Gateway object.
-
Go to realms_for_blades > identity_portal, select userLoginAttr and replace it with email.
-
-
If you want PDP to return user groups, the Active Directory user must use the Azure username as an email address.
-
-
Make sure that at the end of the configuration process you get this information from the Identity Provider:
-
Entity ID - a URL that uniquely identifies the application
-
Login URL - a URL to access the application
-
Certificate – for validation of the data exchanged between the Security Gateway and the Identity Provider

Note - Some Identity Providers supply a metadata XML file, which contains this information.
-
-
-
In the New Identity Provider window, in the Data received from the SAML Identity Provider section, configure one of these settings:
-
Select Import the Metadata File to upload the metadata file supplied by the Identity Provider.
-
Select Insert Manually to paste manually the Entity ID and Login URL into the corresponding fields, and to upload the Certificate File. All these are supplied by the Identity Provider.
-

Note - Identity Provider object in SmartConsole does not support the import of RAW Certificate.

Important - If later you change the settings of the Browser-Based Authentication
 Authentication of users in Check Point Identity Awareness web portal - Captive Portal, to which users connect with their web browser to log in and authenticate. in the Identity Awareness Gateway object, or the settings of the Mobile Access Portal in the Mobile Access Gateway object, then you must update the applicable settings in the SAML application on the Identity Provider's website.
 -
-
 Configure the Identity Provider as an authentication method
To use the SAML Identity Provider object as an authentication method, you must configure the authentication settings.
 Configuring Identity Awareness Captive Portal
-
In SmartConsole, click the Gateways & Servers panel.
-
Open the Security Gateway object.
-
From the left tree click Identity Awareness.
-
Near the Browser-Based Authentication, click Settings.
-
In the Authentication Settings section, click Edit.
-
In the Authentication Method section, select Identity Provider.
-
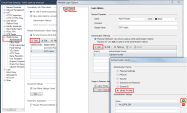
Click the green [+] button and select the SAML Identity Provider object.
Example:
-
Click OK.

Notes:
-
If you configure only one Identity Provider object, the end user is redirected to that Identity Provider's portal.
-
If you configure more than one Identity Provider object, the end user is asked to choose the Identity Provider for authentication.
 Configuring Mobile Access Portal
-
In SmartConsole, click the Gateways & Servers panel.
-
Open the Security Gateway object.
-
From the left tree click Mobile Access > Authentication.
-
In the Multiple Authentication Client Settings section, click Add to add a new Realm object.
-
On the Login Option pane, in the Usage in Gateway section, clear the box Use in Capsule Workspace.
-
On the Login Option pane, in the Authentication Method section, click Add.
-
Select Identity Provider.
-
Click the green [+] button and select the SAML Identity Provider object.

Notes:
-
Only one Identity Provider object is supported for each Realm.
-
Identity Provider must be the only authentication method configured for that Realm.
Example:
-
-
Click OK.
-
-
 Optional: Configure group authorization
 Configuring
For each group configured in your SAML application, you must create an equivalent Identity Tag object in SmartConsole.
The value of the Identity Tag must be identical to the value of the provided group or to the Object ID. See Using Identity Tags in Access Role Matching.

Note - If you use Azure AD, you must create the Identity Tag in SmartConsole by the Azure AD Group Object ID and not by the User Group name:
-
Open your Azure AD.
-
Go to the User Group you created in Azure.
-
Copy the Object ID and paste it in the Identity Tag > External Identifier field in SmartConsole.

Important If you use Mobile Access in Legacy mode, for each group configured in your SAML application instead of the Identity Tag you must create an equivalent User Group object in SmartConsole.
-
In the top left corner, click Objects > Object Explorer.
The Object Explorer window opens.
-
In the left navigation tree, click Users/Identity.
-
From the toolbar, click New > User > User Group.
-
Create a User Group object.

Note - The name of the User Group object must be identical to the provided group name.
-
Click OK.
-
Close the Object Explorer window.
 Configuring group authorization behavior
Security Gateway can authorize groups in different ways.
Authorization can refer to two types of groups:
-
Identity Provider groups- these are groups the Identity Provider sends
-
Internal groups- these are groups received from User Directories configured in SmartConsole
Available options to configure the authorization behavior:

Note - This configuration is per Realm.
You can view and change the authorization behavior on the Security Gateway.
Viewing the configured authorization behavior

Important - In a Cluster
 Two or more Security Gateways that work together in a redundant configuration - High Availability, or Load Sharing., the configured authorization behavior must be the same on all Cluster Members.
You see the configured behavior in one of these ways:
-
On Identity Awareness or Mobile Access Gateway, check the Check Point Registry value in the Expert mode:
# ckp_regedit -p SOFTWARE/Checkpoint/Ex_Groups < Realm Name> -
On the Identity Awareness Gateway:
pdp idp groups status
Configuring the authorization behavior

Important - In a Cluster, you must configure the same value on all Cluster Members.
You can set the behavior in one of these ways:
-
On Identity Awareness or Mobile Access Gateway, change the Check Point Registry value in the Expert mode:
# ckp_regedit -a SOFTWARE/Checkpoint/Ex_Groups < Realm Name> -n {0 | 1 | 2 | 3} -
On the Identity Awareness Gateway:
pdp idp groups set {only | prefer | union | ignore}

Notes:
-
If you use Mobile Access custom realm, add this prefix to the configured realm name:
ssl_vpn_ -
Make sure SAML directory and the applicable User Directory
 Check Point Software Blade on a Management Server that integrates LDAP and other external user management servers with Check Point products and security solutions. can synchronize with each other. Make sure that the LDAP lookup type of the applicable realm is set to "
mail".
-
-
 Install the Access Control Policy
-
In SmartConsole, click Install Policy.
-
Select the applicable policy.
-
Select Access Control.
-
Click Install.
-
|
|
Important - Before you use SAML configuration, make sure that your Security Policy |


