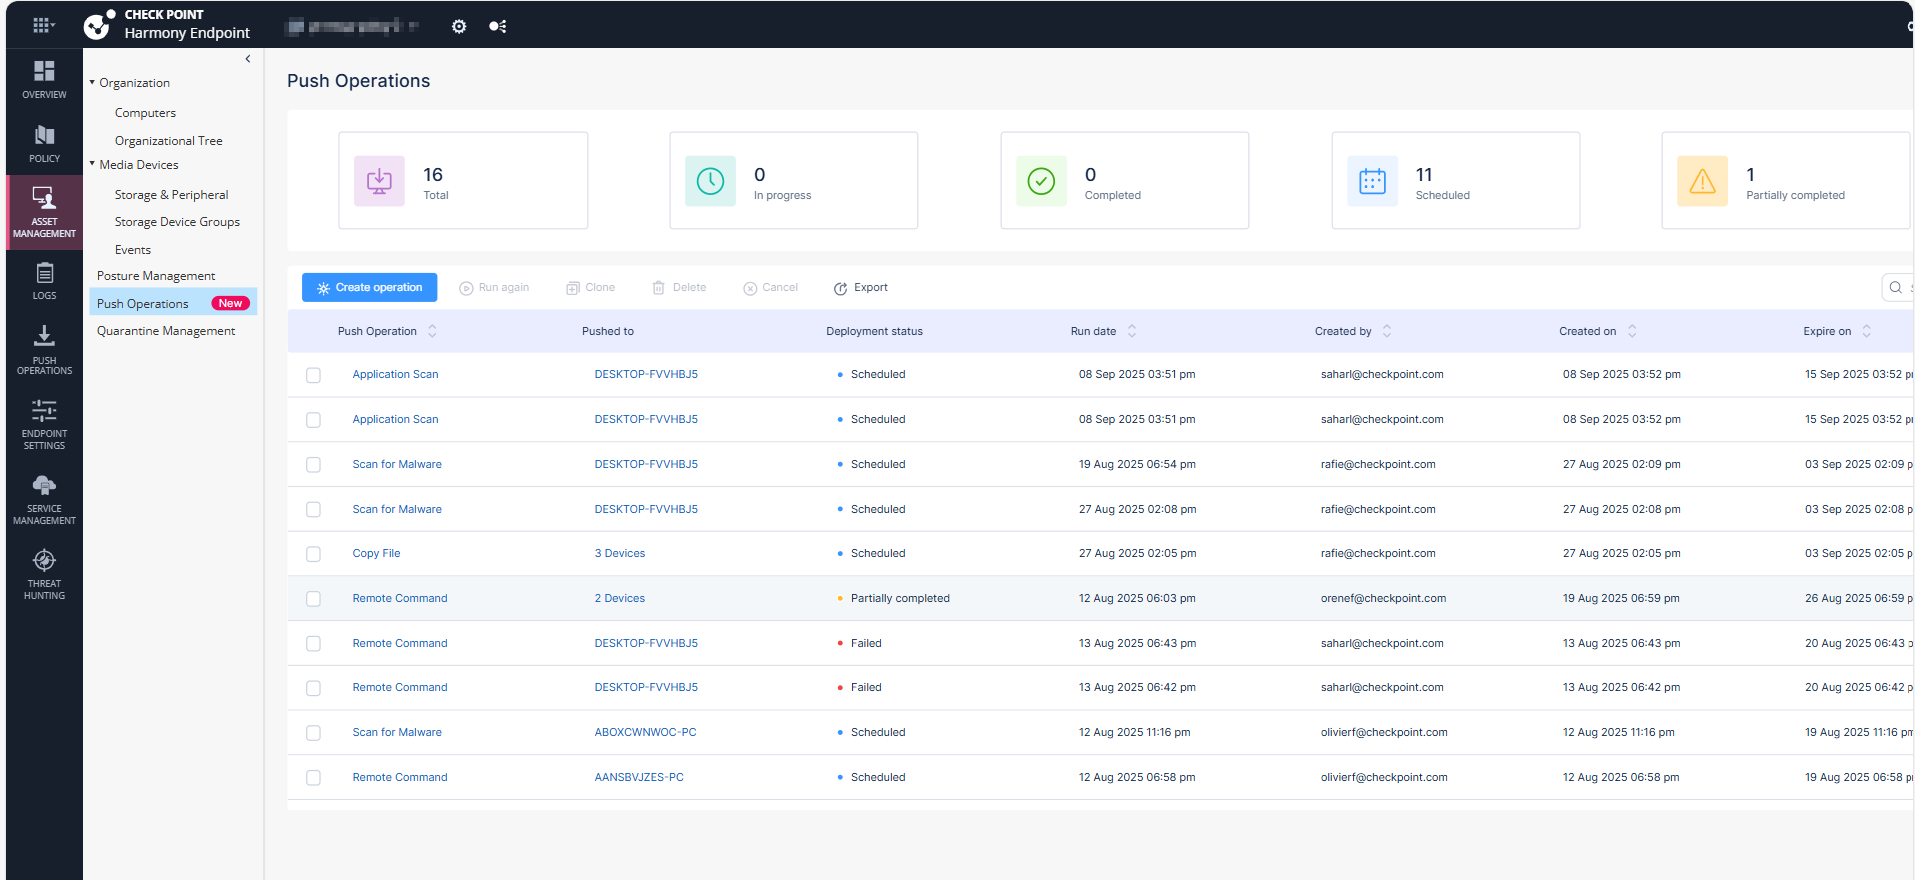
Push Operations
The Push Operations feature in Endpoint Security enables you to run predefined tasks remotely on managed endpoint devices. These tasks support automation, diagnostics, enforcement, and recovery workflows.
Accessing Push Operations
By default, the Push Operations page shows the list of all the push operations created and their statuses in the last 30 days.
To view the Push Operations page, click Asset Management > Push Operations.
Extending the Time Frame of Push Operations
To view push operations created in a specific period, select the time frame from the drop-down at the top right corner of the page.
-
Last 30 days
-
Last 7 days
-
Last day
Push Operations Dashboard Widgets
|
Widget Name |
Description |
|---|---|
|
Total |
Shows the total number of push operations created within the selected time frame. |
|
Scheduled |
Shows the total number of push operations configured and scheduled within the selected time frame. |
|
In Progress |
Shows the total number of push operations running on one or more endpoint devices within the selected time frame. |
|
Completed |
Shows the total number of push operations that ran successfully on all targeted endpoint devices within the selected time frame. |
|
Partially Completed |
Shows the total number of push operations that ran on some endpoint devices but failed or timed out within the selected time frame. |
|
Failed |
Shows the total number of push operations that failed on all targeted endpoint devices within the selected time frame. |
Push Operations Table
|
Column |
Description |
|---|---|
|
Push operation |
Shows the type of action performed. |
|
Pushed to |
Shows the list of devices. |
|
Deployment status |
Shows the status of the deployment.
|
|
Run date |
Shows the date and time when the push operation was executed. |
|
Created by |
Shows the user's email address that initiated the push operation. |
|
Created on |
Shows the date and time when the push operation was created. |
|
Expire on |
Shows the date and time when the push operation is going to expire. |
|
Comment |
Shows the comments associated with the push operation. |
Available Actions from Push Operations
-
Run Again: Re-executes a previously completed push operation on the selected devices.
-
Clone: Duplicates an existing push operation.
-
Delete: Removes a push operation.
-
Cancel: Stops a scheduled or in-progress push operation.
-
Export: Downloads a push operation data for reporting.
Creating a Push Operation
To create a new push operation:
-
Log in to the Endpoint Security Administrator Portal.
-
Navigate to Asset Management > Push Operations.
-
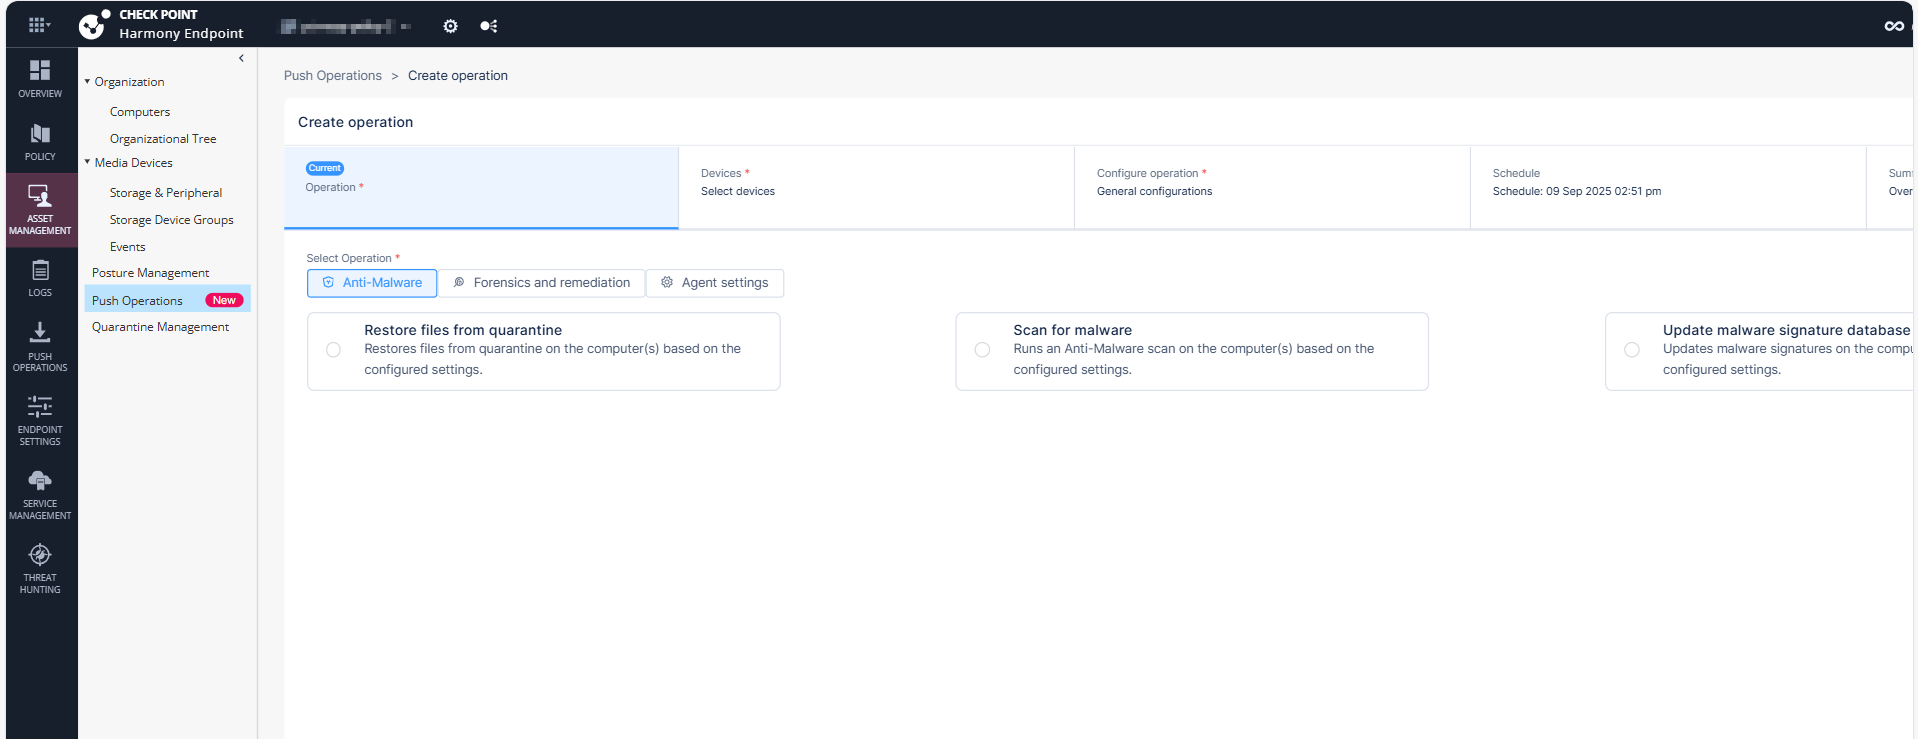
Click Create operation.
The Create operation page appears. You need to select the required operation and the required actions.
-
In the Operation tab, select the required operation.
 Click here to view the supported operations.
Category
Push Operations
Windows
macOS
Linux
Scan for Malware
Yes
Yes
Yes
Update Malware Signature Database
Yes
Yes
Yes
Restore Files from Quarantine
Yes
Yes
Yes
Forensics and Remediation
Analyze by Indicator
Yes
Yes
No
File Remediation
Yes
Yes
Yes
Isolate Computer
Yes
Yes
No
Release Computer
Yes
Yes
No
Agent Settings
Deploy New Endpoints
Yes
No
No
Collect Client Logs
Yes
Yes
No
Repair Client
Yes
No
No
Shutdown Computer
Yes
Yes
No
Restart Computer
Yes
Yes
No
Uninstall Client
Yes
Yes
No
Application Scan
Yes
Yes
No
Kill Process
Yes
Yes
No
Remote Command
Yes
Yes
Yes
Enable / Disable Self Protection
Yes
Yes
No
Collect Memory Dump
Yes
Yes
No
-
Click Next.
-
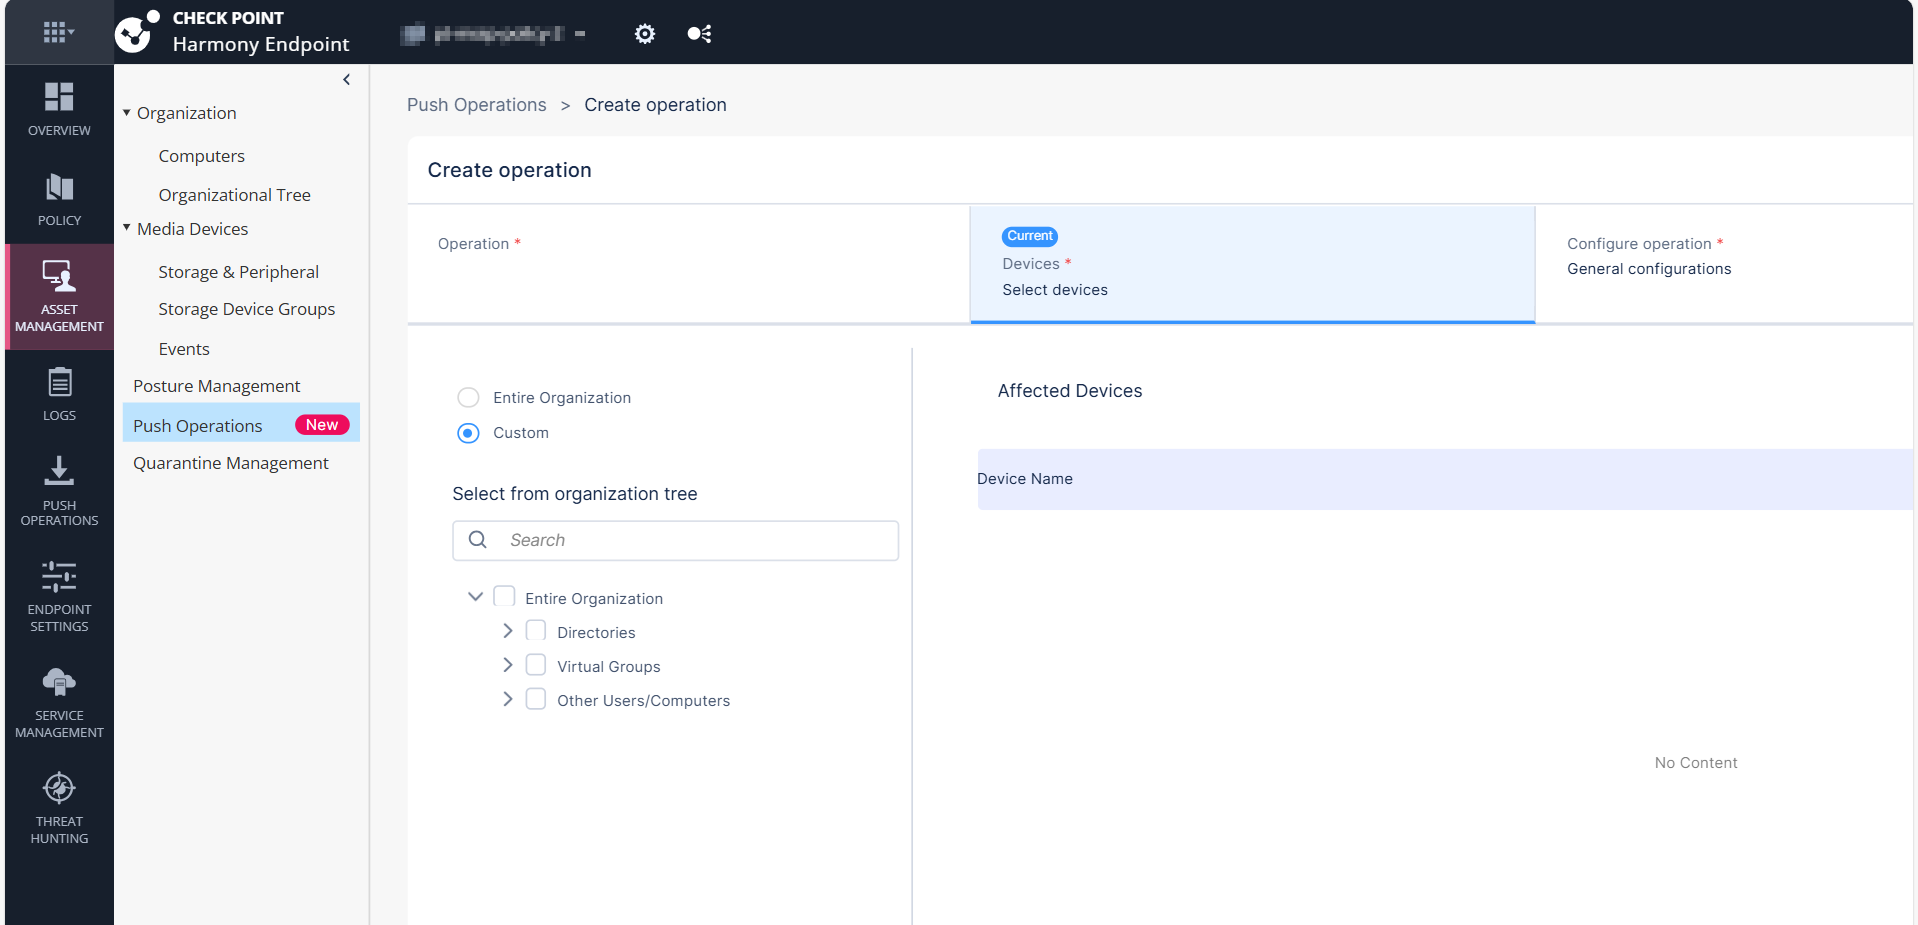
In the Devices tab, configure the required devices.
-
To perform a push operation for all organizational assets, select Entire organization.
-
To perform a push operation for specific affected assets, select Custom and choose the affected devices.
-
-
Click Next.
-
Configure the operation settings.
-
Anti-Malware
Push Operations
Description
Scan for Malware
Runs an Anti-Malware scan on the computer or computers, based on the configured settings.
Update Malware Signature Database
Updates malware signatures on the computer or computers, based on the configured settings.
Restore Files from Quarantine
Restores files from quarantine on the computer or computers, based on the configured settings.
To restore files from quarantine:
-
In the Full Path field, enter the path to file before it was quarantined including the file name. For example,
c:\temp\eicar.txt -
Click OK.
-
-
Forensics and Remediation
Push Operations
Description
Analyze by Indicator
Manually triggers collection of forensics data for an endpoint device that accesses or executes the indicator. The indicator can be a URL, an IP, a path, a file name or an MD5.
File Remediation
Quarantines malicious files and remediates them as necessary.
To move or restore files from quarantine:
-
Click
 and select the organization.
 -
Click Update Selection.
-
Select the device and click Next.
-
Add Comment, optional comment about the action.
-
To move the files to quarantine, select Move the following files to quarantine.
-
To restore the files from quarantine, select Restore the following files from quarantine.
-
Click
. -
From the drop-down:
-
Select Full file path or Incident ID:
-
In the Element field, enter the incident ID from the Endpoint Security Security client or enter the incident UID for the corresponding incident from the Logs menu in the Endpoint Security portal. To obtain the incident UID, open the log entry and expand the More section to view the incident UID.
-
Click OK
-
-
Select MD5 Hash:
-
Enter or upload the Element.
-
Click OK.
-
-
-
Click Finish.
Isolate Computer
Makes it possible to isolate a specific device that is under malware attack and poses a risk of propagation. This action can be applied on one or more devices. The Firewall component must be installed on the client in order to perform isolation. Only DHCP, DNS and traffic to the management server are allowed.
Release Computer
Removes device from isolation. This action can be applied on one or more devices.
-
-
Agent Settings
-
Deploy New Endpoints
Installs the Initial Client on the target devices remotely using any device as the medium to run the push operation. This is suitable if do not have third party tools such as Microsoft System Center Configuration Manager (SCCM) or Intune to install the client.

Note - The Deploy New Endpoints operation does not need Two-Factor Authentication (2FA).
Field
Description
Comment
Optional comment about the action.
Select the deployment endpoint
Select the target endpoint or device where you want to install the Initial Client from the organizational tree.

Caution - The target device must not be the same as the source device.
Endpoint version
Select the Endpoint Security Client version to install on the target device.
Note - Only Endpoint Security client versions with a corresponding exported package (Manual Deployment of Endpoint Clients) are showed here. You can only push a client version if the package exists in the export packages.
-
Collect Client Logs
Collects CPInfo logs from an endpoint based on the configured settings.
-
For Windows:
-
For Endpoint Security Client
Application installed on end-user computers to monitor security status and enforce security policies. versions E88.31 and higher, client logs are stored in the directory C:\ProgramData\CheckPoint\Endpoint Security\Temp. -
For Endpoint Security Client versions E88.30 and lower, client logs are stored in the directory C:\Windows\SysWOW64\config\systemprofile\CPInfo.
-
-
For macOS, client logs are stored in the directory /Users/Shared/cplogs.
Field
Description
Comment
Optional comment about the action.
Log set to collect
Select the scope of information for the logs.
Debug Info upload
Select the location to upload the logs:
-
Upload CPInfo reports to Check Point servers
-
Upload CPInfo reports to Corporate server - Update the relevant corporate server information.
Note - The Collect Client Logs operation does not need Two-Factor Authentication (2FA).
-
-
Repair Client
Repairs the Endpoint Security client installation. This requires a computer restart.
Notes:
-
This push operation applies only to Endpoint Security clients that have been upgraded to a newer version at least once after the installation.
-
The Repair Client operation does not need Two-Factor Authentication (2FA).
-
-
Shutdown Computer
Shuts down the computer or computers based on the configured settings.
Note - The Shutdown Computer operation does not need Two-Factor Authentication (2FA).
-
Restart Computer
Shuts down the computer or computers based on the configured settings.
Note - The Restart Computer operation does not need Two-Factor Authentication (2FA).
-
Uninstall Client
Uninstalls the Endpoint Security client remotely on the selected devices. This feature is supported for E84.30 client and above.
Note - The Uninstall Client operation needs Two-Factor Authentication (2FA).
-
Application Scan
Collects all available applications in a certain folder on a set of devices and then adds them to the application repository of the Application Control blade on that specific tenant.
Note - The Application Scan operation does not need Two-Factor Authentication (2FA).
-
Kill Process
Remotely kills/ terminate the processes.
Note - The Kill Process operation does not need Two-Factor Authentication (2FA).
-
Remote Command
-
Allows administrators to run both signed (introduced by CP) and unsigned (ones the customer creates) scripts on the Endpoint Security Client devices.
-
Especially useful in a non-AD environment.
-
Supplies tools/fixes to customers without the need to create new EP client/server versions.
-
Saves passwords securely when provided.
Notes:
-
The Remote Command operation needs Two-Factor Authentication (2FA).
-
The Remote Command feature is supported only in Windows clients running version E85.30 and above.
-
-
Enable / Disable Self Protection
The Enable / Disable Self Protection push operation allows the administrator to enable or disable the self protection capabilities on endpoints.
Limitations:
-
Enable - Enables the self protection capabilities.
-
Disable - Disables the self protection capabilities.
-
Timeout Command Expiration - Select the expiration time for the command.
Note - After the timeout, the command expires, and the self protection capabilities will be enabled automatically.
-
-
Collect Memory Dump
Collects Memory Dump from an endpoint based on the configured settings. Memory dump is a snapshot of system memory at specific instance of the active process and the operating system.
Note - The Collect Memory Dump push operation can be executed on one device at an instance.
Limitations:
-
Enable - Enables the self protection capabilities.
-
Disable - Disables the self protection capabilities.
-
Timeout Command Expiration - Select the expiration time for the command.
Note - After the timeout, the command expires, and the self protection capabilities will be enabled automatically.
Field
Description
Comment
Optional comment about the action.
Type
Select the type of memory dump to be collected.
-
Process - Captures memory dumps for one or more processes using process name or PID.
Notes:
-
The system generates multiple memory dumps if several processes share the same name.
-
Memory dumps are not supported for Protected Process Light (PPL) processes.
-
-
Kernel - Collects a kernel memory dump without requiring a system reboot.
Note - Kernel memory dump is not supported on Windows 7 devices.
-
Full - Initiates a BSOD to collect a full or active memory dump (requires prior configuration on the target device). For more information, see Dell documentation.
Note - It is optional to reboot the endpoint to collect the Full memory dump.
Process name
Enter the process name of the process memory dump.
Process PID
Enter the process PID of the process memory dump.
Dump info upload
Select the location to upload the memory dump:
-
Upload Memory Dump to AWS S3 - After the push operation is successful, the system shows a download option in the Operation output column of the Push Operation Endpoint Details section.
-
Upload Memory Dump to Check Point servers - After the push operation is successful, the system uploads the memory dump to this location:
-
For Windows Endpoint Security Client versions E88.31 and higher, client logs are stored in the directory C:\ProgramData\CheckPoint\EndpointSecurity\Temp.
-
For Windows Endpoint Security Client versions E88.30 and lower, client logs are stored in the directory C:\Windows\SysWOW64\config\systemprofile\CPInfo.
-
For macOS, client logs are stored in the directory /Users/Shared/cplogs.
-
-
Upload Memory Dump to Corporate server - Enter your corporate server details. After the push operation is successful, the system uploads the memory dump to the configured location in the corporate server.
Notes:
-
Automated packaging and upload of memory dump - All memory dumps are automatically zipped, segmented if necessary, and uploaded to the designated destination (Check Point FTP, Amazon S3, or custom FTP servers).
-
On 32-bit Windows systems, the ZIP file name is not displayed when uploading full memory dumps to an FTP server.
-
The Memory Dump feature is supported only on Endpoint Security for Windows client version E89.05 and later.
-
-
-
-
Click Next.
-
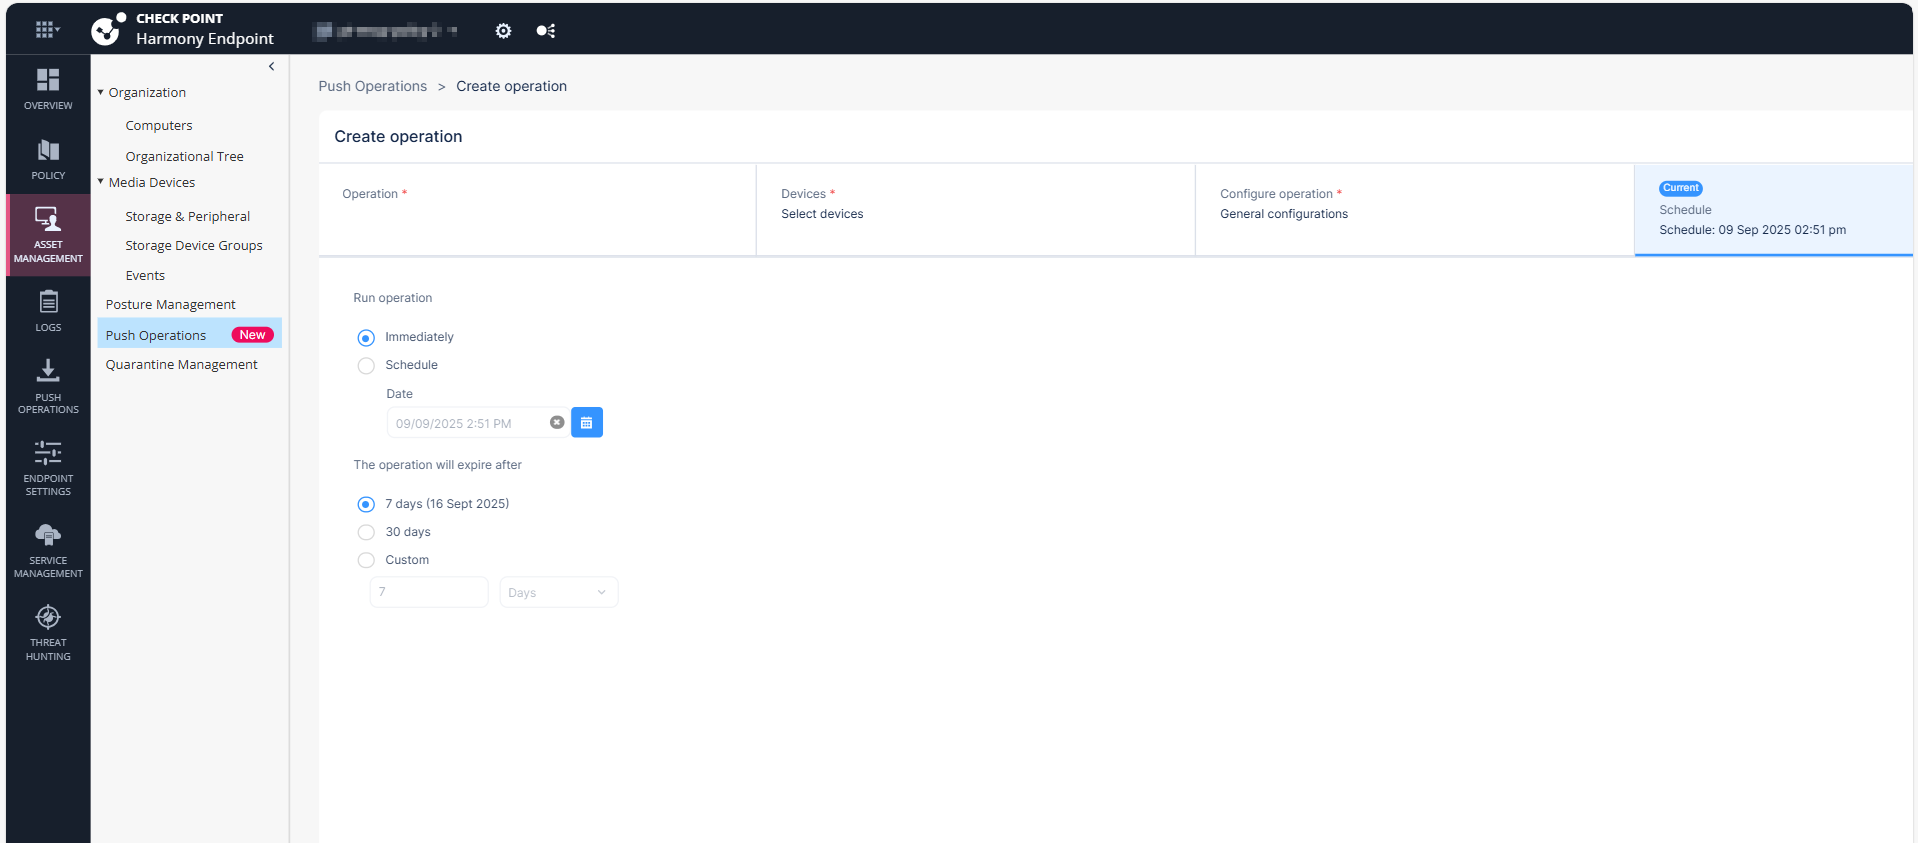
(Optional) In the Schedule tab, configure the schedule to run the operation.
-
In the Run Operation section:
-
To execute the operation immediately, select Immediately.
-
To schedule the date and time to run the operation, select Schedule and in the Date section, select the required date and time.
-
-
In the Expire on section, select the expiration time frame.
-
7 days
-
30 days
-
Custom
-
-
-
Click Next.
-
The Summary tab shows a summary of the selected operation.

-
Click Create.
Affected Devices Table
|
Column |
Description |
|---|---|
|
Devices |
Lists the selected devices. |
|
Operation status |
Displays the status of each device:
|
|
Status received on |
Displays the date and time when the operation was initiated on that device. |
|
Sent to device on |
Displays the date and time when the operation was sent to the device. |
|
Operation output |
Path or file location related to the operation. The Copy |
Filtering the Push Operations
To filter push operations, use one of the following ways:
-
Click on the Search bar on the top-right corner and enter the required text.
-
Click the Filter
 icon next to the Search bar and select the required options.