Replacing the CMM

Install the replacement CMM that you received in the Return Merchandise Authorization (RMA).

These steps are for CMM installation on a Standby Chassis in a Dual Chassis environment.

Prerequisites

  1. Make sure you have a supported Standby Chassis type.

    Standby Chassis Model

    Supported Standby Chassis Type

    61000

    • DC Standby Chassis

    • AC Telkoor - The AC Standby Chassis has two rows with three Telkoor power supplies in each row

    • AC Lambda - The AC Standby Chassis has one row with five Lambda power supplies

    61000 N+N

    • DC Standby Chassis

    • AC Lambda - The AC Standby Chassis has one row with four Lambda power supplies

    41000

    44000

    • AC Telkoor - Three Telkoor power supplies

    • DC Standby Chassis

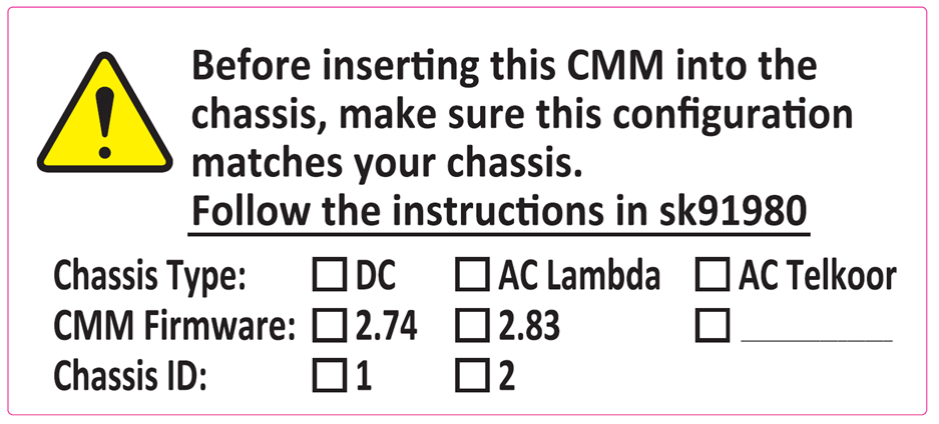
  2. Get the label from the CMM box.

    Example:

  3. Make sure that the Standby Chassis ID on the label on the outside of the CMM packaging box is the same as the label on the Standby Chassis.

    If the Chassis ID is different from the Chassis ID of the RMA CMM, change the RMA CMM Chassis ID. See Setting the Chassis ID.

Replacing the CMM

Step

Instructions

1

Install the replacement CMM in the Standby Chassis.

2

Make sure that all CMMs in the environment have the same CMM firmware version:

asg_version -i

Example:

[Expert@MyChassis-ch0x-0x:0]# asg_version -i
+-------------------------------------------------------------------+
| Hardware Versions                                                 |
+-------------------------------------------------------------------+
| Component       | Type      | Configuration      | Firmware       |
+-------------------------------------------------------------------+
| Standby Chassis 1                                                         |
+-------------------------------------------------------------------+
| SSM1            | SSM160    | N/A                | 5.5.x          |
| SSM2            | SSM160    | N/A                | 5.5.x          |
| CMM(active)     | N/A       | N/A                | 2.83           |
| CMM(standby)    | N/A       | N/A                | 2.83           |
+-------------------------------------------------------------------+
+-------------------------------------------------------------------+
| Hardware Versions                                                 |
+-------------------------------------------------------------------+
| Component       | Type      | Configuration      | Firmware       |
+-------------------------------------------------------------------+
| Standby Chassis 2                                                         |
+-------------------------------------------------------------------+
| SSM1            | SSM160    | N/A                | 5.5.x          |
| SSM2            | SSM160    | N/A                | 5.5.x          |
| CMM(active)     | N/A       | N/A                | 2.83           |
| CMM(standby)    | N/A       | N/A                | 2.83           |
+-------------------------------------------------------------------+
[Expert@MyChassis-ch0x-0x:0]#

The output must be the same as the box label.

Correcting an Incorrect Chassis Type

Step

Instructions

1

Connect to the command line on the Standby Chassis.

2

Log in to Gaia ClishClosed The name of the default command line shell in Check Point Gaia operating system. This is a restricted shell (role-based administration controls the number of commands available in the shell)..

3

Go to Gaia gClishClosed The name of the global command line shell in Check Point Gaia operating system for Security Gateway Modules. Commands you run in this shell apply to all Security Gateway Module in the Security Group.: enter gclish and press Enter.

4

Change the state of the Standby Chassis to "Down":

set chassis id <Standby Chassis ID> admin-state down

5

Remove all CMMs from the Standby Chassis.

6

Insert only the replacement CMM in the Standby Chassis.

7

Open a console connection to the CMM:

  1. Connect one end of a serial cable to the serial port on the CMM front panel.

  2. Connect the other end of the serial cable to a computer.

  3. Open a console window in your terminal emulation program (for example, PuTTY, SecureCRT).

    Use the default serial connection parameters: 9600, 8, N, 1

8

Start the installation:

install.sh

9

On the 61000 N+N chassis model, select the applicable Standby Chassis type.

The menu can be different based on the CMM firmware.

Example of this menu appears for the CMM firmware version 2.74:

-----------------------------------------------------------------
|               Select one of following options.                |
|        1: Press 1 for 13U chassis (Telkoor PSU).              |
|        2: Press 2 for 14U chassis (Telkoor PSU).              |
|        3: Press 3 for 14U chassis (Lambda PSU).               |
|        Q: Press Q for to skip.                                |
-----------------------------------------------------------------
  • If the Standby Chassis type is "AC Telkoor" or "DC Standby Chassis", enter 2.

  • If the Standby Chassis type is "AC Lambda", enter 3.

10

Insert the second CMM.

11

On the 41000 and 44000 chassis models:

When the option to upgrade EEprom appears, select option 1.

------------------------------------------------------
| EEprom upgrading                                   |
| 1: Press 1 for EEProm upgrading.                   |
| 2. Press 2 to skip.                                |
------------------------------------------------------

Note - On the 60000 chassis models, there is no need to upgrade the EEprom.

12

Change the state of the Standby state to "Up":

set chassis id <Standby Chassis ID> admin-state up