SmartTasks
Management SmartTasks let you configure automatic actions according to different triggers in the system. A SmartTask is a combination of trigger and action.
-
Triggers are events – currently defined in terms of existing management operations, such as installing a policy or publishing a session.
-
Actions are automatic responses that take place after the trigger event , such as running a script, posting a web request or sending email.
Available Triggers
-
Before Publish - Fired when an administrator publishes a session. The SmartTask passes the sessions meta-data (publishing administrator, domain information and session name) to the action. If the local Management API server is available, the session changes about to be published are formatted as a response to the "show changes" API.
-
After Publish - Fired after an administrator successfully publishes a session. The SmartTask passes the same information to the action as the Before Publish trigger.
-
After Install Policy - Fired after a policy has been installed. The SmartTask passes to the action information related to the policy installation task, such as the package installed, the administrator who initiated the installation and the task's result.
-
CloudGuard Controller Event - Fired when a new log is generated that matches this query in SmartConsole > Logging & Monitoring view > Logs tab:
blade:"CloudGuard IaaS" AND severity:Critical More Information
The Management Server
Check Point Single-Domain Security Management Server or a Multi-Domain Security Management Server. creates events in this JSON format:Copy{
"severity": "<VALUE1>",
"log-description": "<VALUE2>",
"product": "CloudGuard IaaS",
"gateway-name": "<VALUE3>",
"datacenter-name": [
"<VALUE4>",
"<VALUE5>",
"...",
"<VALUEx>"
],
"version": "1.0"
}This is an example script (in the Action field, select Run Script):
Copy#!/bin/sh
input=$(echo $1 | base64 --decode)
severity=$(echo $input | jq '.severity')
message=$(echo $input | jq '."log-description"')
gw_name=$(echo $input | jq '."gateway-name"')
dc_name=$(echo $input | jq '."datacenter-name"')
echo -e "Subject: CloudGuard Controller event\r\n\r\nSeverity: $severity\r\nMessage: $message\r\nData Center: $dc_name\r\nGateway: $gw_name" | sendmail --domain=acme.com -f no-reply@acme.com -v admin@acme.com --host=smtp.acme.com > /dev/null
echo "Email sent" -
After Submit - Fired after an administrator submits the current session for approval by another administrator (see Approval Cycle for Sessions (SmartWorkflow and Identity Provider)).
-
Before Submit - Fired immediately before an administrator submits the current session for approval by another administrator (see Approval Cycle for Sessions (SmartWorkflow and Identity Provider)).
-
Before Reject - Fired immediately before an administrator rejects a submitted session (see Approval Cycle for Sessions (SmartWorkflow and Identity Provider)).
-
After Reject - Fired after an administrator rejects a submitted session (see Approval Cycle for Sessions (SmartWorkflow and Identity Provider)).
-
Before Login - Fired immediately before an administrator logs in to SmartConsole.
-
After Approve - Fired after an administrator approves the session created by another administrator (see Approval Cycle for Sessions (SmartWorkflow and Identity Provider).
-
Before Approve - Fired immediately before an administrator approves the session created by another administrator (see Approval Cycle for Sessions (SmartWorkflow and Identity Provider)).
Available Actions
-
Run Script - Runs a pre-defined Repository Script. The first parameter that the script gets is a path to a file that contains the trigger's data. When the script is not configured to run on the local machine, the trigger's data is passed as Base64 encoded JSON data, which can be decoded to implement custom business logic. However, when the script is configured to run on the local machine, no decoding is needed.
For SmartTasks configured to run with "Before" operation triggers, the repository script can signal whether to abort or continue the operation by printing a JSON object with the "result" and optional "message" fields and then exit with code 0. If the value of the "result" field is "failure" the operation aborts.
For SmartTasks configured to run with other triggers, exit code 0 is treated as success. Any other exit code is treated as failure.

Note - By default, Repository Scripts run on the local Security Management Server
Dedicated Check Point server that runs Check Point software to manage the objects and policies in a Check Point environment within a single management Domain. Synonym: Single-Domain Security Management Server. although this can be customized using the Web API. -
Web Request - Executes an HTTPS POST web request to the configured URL. The trigger's data is passed as JSON data to the request's payload.
Notes:
-
The configured URL must start with HTTPS and the target web server capable of handling such requests.
-
For web servers with self-signed SSL certificates, establish trust by specifying the certificate's fingerprint. You can get the fingerprint by clicking Get Fingerprint in the SmartTask editor or by viewing the certificate in a web browser.
For SmartTasks configured to run with "Before" operation triggers, the repository script can signal whether to abort or continue the operation by responding with JSON object "result" and optional "message" fields and a status of 200 OK. If the value of the "result" field is "failure" the operation aborts.
For SmartTasks configured to run with other triggers, a "200 OK" return code is treated as success. Any other exit code is treated as failure.
-
-
Send Mail - Sends a configured email.
Notes:
-
Before you select this action, you must configure a Server object of type SMTP Server that represents your SMTP server.
-
You must configure the email template on the Advanced pane.
-
You can use this action only for these triggers: After Install Policy, After Submit, After Approve, After Publish, After Reject.
-
Configuring SmartTask Properties
-
Enter a unique name for the SmartTask - The name property is required and case sensitive.
-
Switch the SmartTask ON or OFF using the toggle button.
-
Optional - Enter a description for the SmartTask.
-
Select a trigger for the SmartTask.
-
Select an action that will happen once the trigger is fired.
-
Custom Data – You can add additional information to the JSON data sent with the trigger information by adding a JSON object to the Custom Data field. The JSON custom data is concatenated to the trigger's payload and passed to the action.
-
Optional - Add tags for the SmartTask object.
SmartTask Advanced Properties
The available advanced options depend on the action selected on the General tab.
Send Web Request
-
Time-out – Number of seconds before the request times out and the request aborted.
-
If the HTTPS request times out - Treat the time-out as an error and abort the event or continue normally.
-
X-chkp-shared-secret – Enter a shared secret that can be used by the target web server to identify the Security Management Server. The value is sent as part of the request in the X-chkp-shared-secret header in the out-going web request.
Run script
-
Time-out – Number of seconds before the request times out and the request aborted.
-
If the script fails to run or times-out – Treat time-out (or execution failure) as an error and abort the event or continue normally.
Send Email
Enter these email details:
-
To
-
Cc
-
Sender
-
Subject
-
Attachment
-
Body text
You can use the pre-defined options in the "To", "Cc", and "Sender" fields only for administrators that have an email address defined in SmartConsole. You cannot use these fields for administrators that are connected through an Identity Provider.
For administrators that do not have an email address defined in SmartConsole, do one of these:
-
Manually enter the applicable email addresses of the administrators, or
-
Create a mailing list of the administrators in your email program, and use the mailing list in the relevant field.
For example:
In an "After Session Approve" SmartTask, an administrator reviews and approves a change made by a submitter.
In the Email Configuration fields:
In the "To" field, instead of the pre-defined Submitter email" field, enter a mailing list of all the submitters.
In the "Cc" field, instead of the pre-defined "All reviewers" field" enter a mailing list of all the reviewers.
In the "Sender" field, instead of the pre-defined "Reviewer email" field, enter a dummy email, such as "SmartTask@mycompany.com".
For more information about the approval cycle workflow, see Session Flow for Administrators.
Use Case:
A company policy dictates that the publish operation must be used with a service request number as a prefix to the session name before saving any changes to the database, so the administrators can see what the rationale for changing the security policy![]() Collection of rules that control network traffic and enforce organization guidelines for data protection and access to resources with packet inspection. was.
Collection of rules that control network traffic and enforce organization guidelines for data protection and access to resources with packet inspection. was.
Procedure:
Add the Validate Session Name Prefix to the Scripts Repository.
-
Save the script in the repository.
Instructions
-
Click Gateways & Servers > Scripts > Scripts Repository > New (
 )
) -
Give the script a name.
-
In the Content text box, paste the script code below.
-
Click OK to save the script in the repository.
CopyScript Code#!/bin/bash
JQ=${CPDIR}/jq/jq
data=`echo $1 | base64 --decode -i`
# Extracting the required session name prefix for the session name based on the input JSON
sessionNamePrefix=`echo $data | $JQ -r .\"custom-data\".\"session-name-prefix\"`
# If there's no input session name prefix, publish is allowed
if [[ $sessionNamePrefix = "null" ]] || [[ -z "$sessionNamePrefix" ]]; then
printf '{"result":"success"}\n'
exit 0
fi
# Extracting the actual session name
sessionName=`echo $data | $JQ -r .session.\"session-name\"`
# Abort the publish if the session doesn't contain a name at all
if [[ $sessionName = "null" ]]; then
m1="Corporate Policy requires you to use a service request number for the session's name prefix."
m2="For example: ${sessionNamePrefix}######"
m3="Session name is missing. Please change your session's name to meet the requirements and try to publish again."
printf '{"result":"failure","message":"%s %s %s"}\n' "$m1" "$m2" "$m3"
exit 0
fi
# Abort the publish if the session name doesn't match the expected prefix
if [[ ! $sessionName == $sessionNamePrefix* ]]; then
m1="Corporate Policy requires you to use a ticket number as the session's name."
m2="For example: ${sessionNamePrefix}###### "
m2=${m2//\"/\\\"}
m3="Please change your session's name to meet the requirements and publish again."
printf '{"result":"failure","message":"%s %s %s"}\n' "$m1" "$m2" "$m3"
exit 0
else
# Session name matches the expected prefix, publish is allowed
printf '{"result":"success"}\n'
exit 0
fi -
-
Create a SmartTask to run the session validation script.
Instructions
-
Go to Manage & Settings > Tasks > SmartTasks > New (
). -
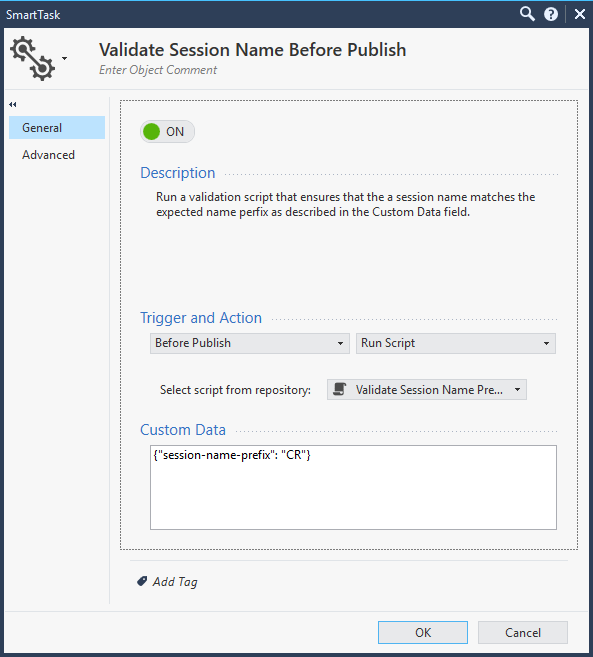
Give the new SmartTask a name (you can call it "
Validate Session Name Before Publish") -
In the Trigger and Action section, select from the drop down menu:
Before Publish and Run Script.
-
In the Select script from repository drop down, select the script saved in Step 1.
-
In the Custom Data field, enter this string:
{"session-name-prefix": "CR"}
Note - The variable "session-name-prefix" correlates to the variable used at the beginning of the script in Step 1. If these are not identical, this script cannot work and the process fails.
-
-
Publish the SmartConsole session.
-
Add a network object.
-
Publish the changes using the required prefix.
Note - If you publish the session without using the prefix, the process fails.