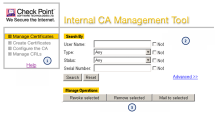
The ICA Management Tool
Overview
In the ICA![]() Internal Certificate Authority. A component on Check Point Management Server that issues certificates for authentication. Management Tool, an administrator can:
Internal Certificate Authority. A component on Check Point Management Server that issues certificates for authentication. Management Tool, an administrator can:
-
Manage certificates

Warning - Do not use the ICA Management Tool to change SIC
 Secure Internal Communication. The Check Point proprietary mechanism with which Check Point computers that run Check Point software authenticate each other over SSL, for secure communication. This authentication is based on the certificates issued by the ICA on a Check Point Management Server. certificates or VPN certificates. Change SIC and VPN certificates in SmartConsole
 Check Point GUI application used to manage a Check Point environment - configure Security Policies, configure devices, monitor products and events, install updates, and so on. only. Use the ICA Management Tool for user certificate operations only, such as certificate creation.
 -
Recreate CRLs
-
Configure the Internal Certificate Authority (ICA) parameters
-
Remove expired certificates
|
|
Note - The ICA Management Tool supports TLS. |
Check Point ICA is fully compliant with X.509 standards for both certificates and CRLs. See the related X.509 and PKI documentation, and RFC 2459 for more information.
For more information, see sk102837: Best Practices - ICA Management Tool configuration
Connecting to the ICA Management Tool
The ICA Management Tool is disabled by default.
To connect to the ICA Management Tool:
-
In SmartConsole, configure the required administrator and user objects.
You must create a certificate for these administrators and users.
You use this certificate to configure the permitted users in the ICA Management Tool and in the client web browsers.
-
In the command line on the Management Server
 Check Point Single-Domain Security Management Server or a Multi-Domain Security Management Server., add the required administrators and users that are permitted to use the ICA Management Tool.
cpca_client set_mgmt_tool add ... -
In the command line on the Management Server, start the ICA Management Tool.
cpca_client set_mgmt_tool on -
Check the status of the ICA Management Tool:
cpca_client set_mgmt_tool print -
Import the administrator's / user's certificate into the Windows Certificate Store:
-
Right-click the *.p12 file you saved when you created the required administrator / user, and click Install PFX.
The Certificate Import Wizard opens.
-
In the Store Location section, select the applicable option:
-
Current User (this is the default)
-
Local Machine
-
-
Click Next.
-
Enter the same certificate password you used when you created the required administrator / user certificate.
-
Clear Enable strong private key protection.
-
Select Mark this key as exportable.
-
Click Next.
-
Select Place all certificates in the following store > click Browse > select Personal > click OK.
-
Click Next.
-
Click Finish.
-
-
In a web browser, connect to the ICA Management Tool:
https://<IP Address of the Management Server>:18265
Important - The fact that the TCP port 18265 is open is not a vulnerability. The ICA Management Tool Portal is secured and protected by SSL. In addition, only authorized administrators and users are allowed to access it using a certificate.
-
A dialog box with this message appears:
Client AuthenticationIdentificationThe Web site you want to view requests identification.Select the certificate to use when connecting. -
Select the appropriate certificate for authenticating to the ICA Management Tool.
-
Click OK.
-
In the Security Alert dialog box, click Yes.


