Configuring VLAN Interfaces on Uplink Ports
Introduction
Starting in the R81.10 release for Quantum Maestro Orchestrators, Check Point integrated a major enhancement for the configuration of VLAN interfaces on the Uplink ports![]() Interfaces on the Quantum Maestro Orchestrator used to connect to external and internal networks. Gaia operating system shows these interfaces in Gaia Portal and in Gaia Clish. SmartConsole shows these interfaces in the corresponding SMO Security Gateway object. of a Quantum Maestro Orchestrator
Interfaces on the Quantum Maestro Orchestrator used to connect to external and internal networks. Gaia operating system shows these interfaces in Gaia Portal and in Gaia Clish. SmartConsole shows these interfaces in the corresponding SMO Security Gateway object. of a Quantum Maestro Orchestrator![]() A scalable Network Security System that connects multiple Check Point Security Appliances into a unified system. Synonyms: Orchestrator, Quantum Maestro Orchestrator, Maestro Hyperscale Orchestrator. Acronym: MHO.:
A scalable Network Security System that connects multiple Check Point Security Appliances into a unified system. Synonyms: Orchestrator, Quantum Maestro Orchestrator, Maestro Hyperscale Orchestrator. Acronym: MHO.:
-
Increased the number of supported VLAN interfaces on an Orchestrator:
-
No limit for each Uplink port.
-
The total supported number of VLAN interfaces is 9000 (more details are below).
-
-
All distribution modes are now supported on Uplink ports.
You can use all VLAN interfaces instead of only General + Layer 4 distribution (see sk165172).
-
All distribution modes are supported on each VLAN interface on an Uplink port, even if the Uplink port allows only specific VLAN interfaces.
-
It is no longer required to configure the VLAN interfaces on an Orchestrator.
Workflow:
-
Configure the applicable IP address on the physical interface (e.g., eth1-05) or VLAN interfaces (e.g., eth1-05.100) on the Security Group.
-
In SmartConsole:
-
Open the Security Gateway object for this Security Group.
-
From the left tree, click the Network Management page.
-
Click Get Interfaces > Get Interfaces Without Topology > click Accept.
-
Configure the topology settings for each interface.
-
Install the Access Control Policy on the Security Gateway object.
-
If there are changes in the configuration of the Security Group interfaces (for example, VLAN interfaces or distribution mode), then the Security Group automatically sends these changes to the Orchestrator. The Security Group does so after a policy installation or a manual change in Gaia gClish
 The name of the global command line shell in Check Point Gaia operating system for Security Appliances connected to Check Point Quantum Maestro Orchestrators. Commands you run in this shell apply to all Security Appliances in the Security Group..
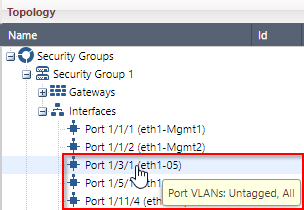
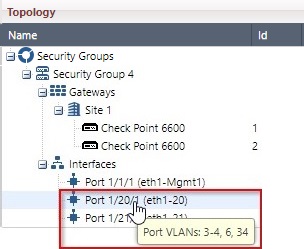
Viewing VLAN Interfaces on Uplink Ports in Gaia Portal
|
Step |
Instructions |
|---|---|
|
1 |
On the Orchestrator page, in the Topology section, expand Security Groups. |
|
2 |
Expand your Security Group. |
|
3 |
Expand Interfaces. |
|
4 |
Put the mouse cursor on an interface. VLAN information appears in the tooltip. |
|
|
Note - If this is a Dual Site deployment, and the Security Group contains Security Appliances that are located only at one of the sites (for example, Site 2), then the tooltip that shows VLAN interfaces appears only in Gaia Portal of the Orchestrator (for example, on Site 2) that is located at the same site as Security Appliances. |

|
|
Port:
Tooltip:
Explanation:
|
|
|
Port:
Tooltip:
Explanation:
|
Viewing VLAN Interfaces on Uplink Ports in Gaia Clish
Syntax
|
|
Parameters
|
Parameter |
Description |
|---|---|
|
|
Specifies the ID of the Security Group. To see the existing IDs, press the Tab key. |
Configuring More Than 4000 VLAN Interfaces on Orchestrators
If it is necessary to configure more than ~4000 VLAN interfaces on the Orchestrator, we recommend that you configure the physical interface on the Orchestrator as a VLAN trunk interface that allows all untagged and all tagged packet to be forwarded to the Security Group. This makes it possible for an internal automatic optimization to occur.
For a VLAN trunk interface to forward all tagged and all untagged packets, these conditions must be met:
-
VLAN Trunk mode must be enabled (see the instructions before how to enable the VLAN Trunk mode).
-
The distribution mode of all the VLAN interfaces on a specific physical interface must be the same (because this VLAN optimization occurs for each Orchestrator port).
Example
Physical interface on the Orchestrator - eth1-20
VLAN interfaces - eth1-20.33, eth1-20.44, eth1-20.55, eth1-20.66
Each of these four VLAN interfaces must have the same distribution mode.
If one or more of the VLAN interfaces of this specific base interface (eth1-20) have a different distribution than other VLAN interfaces, the internal automatic optimization is disabled. This is part of the design because the total supported number of VLAN interfaces has a limit.
For example, if the distribution mode of eth1-20.55 is different, then the Orchestrator forwards only the packets with the VLAN tags 33, 44, and 66 are forwarded to the applicable Security Group.
In the above case, automatic optimization occurs (allows all tagged and untagged packets for eth1-20). Therefore, an interface with this optimization is only considered as one VLAN interface out of total supported 9000 VLAN interfaces for this Orchestrator.
This means that when this optimization occurs, the full VLAN range can be used on all the Orchestrator interfaces without the limitation of the total supported VLAN interfaces.
To enable the VLAN Trunk mode:
|
|
Warnings:
|

|
Step |
Instructions |
|
|---|---|---|
|
1 |
Connect to the command line on one of the Orchestrators. |
|
|
2 |
Log in to Gaia Clish. |
|
|
3 |
Enable the VLAN Trunk mode:
|
|
|
4 |
Examine the status of the VLAN Trunk mode:
|
|
|
5 |
Restart the Maestro daemon:
|