Getting Started with Site-to-Site VPN
Site to Site VPN![]() An encrypted tunnel between two or more Security Gateways. Synonym: Site-to-Site VPN. Contractions: S2S VPN, S-to-S VPN. requires two or more Security Gateways with the IPsec VPN
An encrypted tunnel between two or more Security Gateways. Synonym: Site-to-Site VPN. Contractions: S2S VPN, S-to-S VPN. requires two or more Security Gateways with the IPsec VPN![]() Check Point Software Blade on a Security Gateway that provides a Site to Site VPN and Remote Access VPN access. Software Blade
Check Point Software Blade on a Security Gateway that provides a Site to Site VPN and Remote Access VPN access. Software Blade![]() Specific security solution (module): (1) On a Security Gateway, each Software Blade inspects specific characteristics of the traffic (2) On a Management Server, each Software Blade enables different management capabilities. enabled. Other Software Blades can be enabled on these Security Gateways.
Specific security solution (module): (1) On a Security Gateway, each Software Blade inspects specific characteristics of the traffic (2) On a Management Server, each Software Blade enables different management capabilities. enabled. Other Software Blades can be enabled on these Security Gateways.
Make sure that Trusted Communication is established between all Security Gateways and the Management Server![]() Check Point Single-Domain Security Management Server or a Multi-Domain Security Management Server..
Check Point Single-Domain Security Management Server or a Multi-Domain Security Management Server..
-
Create the Security Gateway
 Dedicated Check Point server that runs Check Point software to inspect traffic and enforce Security Policies for connected network resources. objects.
 -
Create the Trusted Communication (SIC
Secure Internal Communication. The Check Point proprietary mechanism with which Check Point computers that run Check Point software authenticate each other over SSL, for secure communication. This authentication is based on the certificates issued by the ICA on a Check Point Management Server.) with the Management Server. -
Enable the IPsec VPN Software Blade.
On the General Properties page, in the Network Security tab, select IPsec VPN.
-
Click OK.
Note - An internal CA certificate for the Security Gateway is created automatically.
You can create a Meshed or Star VPN Community![]() A named collection of VPN domains, each protected by a VPN gateway.. See VPN Communities.
A named collection of VPN domains, each protected by a VPN gateway.. See VPN Communities.
The procedure below shows an example of a Star Community.
-
From the left navigation panel, click Security Policies.
-
In the top left section Access Control, click Policy.
- In the bottom left section Access Tools, click VPN Communities.
-
Click New (
 ) and select Star Community.
 -
Enter a name for the VPN Community.
-
In the Center Gateways area, click the + icon to add one or more Security Gateways (Clusters) to be in the center of the community.
-
In the Satellite Gateways area, click the + icon to add one or more Security Gateways (Clusters) to be around the center Security Gateways (Clusters).
-
Click OK.
The Community uses the default encryption and VPN Routing settings.
-
Optional: Edit more settings for the VPN Community in the community object.
In addition to the Security Gateway members, you can edit these settings for the VPN Community in the community object:
-
Encrypted Traffic - Select Accept all encrypted traffic to encrypt and decrypt all traffic between the Security Gateways. If this is not selected, create rules in the Security Policy
Collection of rules that control network traffic and enforce organization guidelines for data protection and access to resources with packet inspection. Rule Base All rules configured in a given Security Policy. Synonym: Rulebase. to allow encrypted traffic between community members -
Encryption - Select encryption settings that include the Encryption Method and Encryption Suite. See VPN Community Object - Encryption Settings.
-
Tunnel Management - Select settings VPN tunnels that include Permanent Tunnels and Tunnel Sharing. See Configuring Tunnel Features.
-
VPN Routing -For Star Communities, select how VPN traffic is routed between the center and satellite Security Gateways. By default this is always set to To center only. See Configuring VPN Routing in Domain Based VPN.
-
MEP (Multiple Entry Points) - For Star Communities, select how the entry Security Gateway for VPN traffic is chosen. This only applies when you have multiple center Security Gateways in the community. See Overview of MEP.
-
Excluded Services - Add services that are not to be encrypted, for example Check Point Control Connections. VPN tunnels are not created for the Services included here.
-
Shared Secret - Configure shared secret authentication to use for communication with external Security Gateways that are part of a VPN community. See Configuring a VPN with External Security Gateways Using Pre-Shared Secret.
-
Wire Mode - Select to define internal interfaces and communities as trusted and bypass the Security Gateway for some communication. See Configuring Wire Mode.
-
Advanced - Configure advanced settings related to IKE, IPsec, and NAT. You can also Reset All VPN Properties to revert all VPN Community settings to their default values. See Configuring Advanced IKE Properties.
The VPN Domain defines the networks and IP addresses that are included in the VPN community. It is also called the Encryption Domain![]() The networks that a Security Gateway protects and for which it encrypts and decrypts VPN traffic.. When you create a Check PointSecurity Gateway object, the VPN Domain is automatically defined as all IP Addresses behind the Security Gateway, based on the topology information.
The networks that a Security Gateway protects and for which it encrypts and decrypts VPN traffic.. When you create a Check PointSecurity Gateway object, the VPN Domain is automatically defined as all IP Addresses behind the Security Gateway, based on the topology information.
You can manually define the VPN domain to include one or more networks behind the Security Gateway. You must have a Network object or a Network Group object that represents the Domain.
-
In SmartConsole, from the Gateways & Servers view, open a Security Gateway object.
-
Open the Network Management > VPN Domain page.
-
Select Manually defined and:
-
Browse to the object list and select an object that represents the domain.
-
Browse to the object list and click New > Group or Network to define a new group of hosts or networks.
-
-
Click OK.
|
|
Important - This feature requires Security Gateways versions R80.40 and higher. |

By default a gateway's Encryption Domain is shared with all the communities it is a part of.
Access to different resources within the Encryption Domain is implemented using the Access Control Rule![]() Set of traffic parameters and other conditions in a Rule Base (Security Policy) that cause specified actions to be taken for a communication session. Base.
Set of traffic parameters and other conditions in a Rule Base (Security Policy) that cause specified actions to be taken for a communication session. Base.
In some cases you may need to configure the Encryption Domain in a granular way.
You can configure the VPN domain of a Security Gateway per community, which makes it safer and easier to control the VPN communities that are logically separated.

- Security Gateway A (Partner A) is part of Community-1.
-
Security Gateway B (Partner B) is part of Community-2.
-
Security Gateway C (Corporate Branch) is part of both Communities 1 and 2.
- The network behind Security Gateway C - 10.2.2.0 is split into 2 networks using the 255.255.255.128 subnet mask.
In this scenario, the administrator limits the access from Security Gateway A in community 1 to some of the resources behind Security Gateway C which is also part of community 1.
To allow access to the required resources from Security Gateway A to resources protected by Security Gateway C, the administrator configures an Encryption Domain per the specific community so although Security Gateway C is a part of another community (Community 2) which is configured differently.
The access is limited to the specific Encryption Domain: network 10.2.2.0/25.
-
Open the VPN community.
-
Double click the center Security Gateway that participates in more than one VPN community (Security Gateway C in this scenario).
The VPN domain configuration window opens.

-
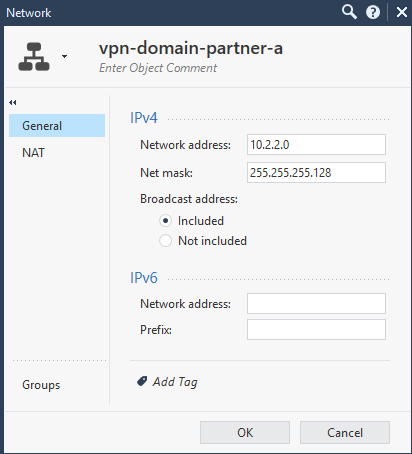
Select the User defined option.
Configure the Encryption Domain. In our example the encryption domain includes the network we allow partner B to access.
-
Click OK.

Using the same setup, you can use the Encryption Domain per Community configuration to allow access between host 1 and host 2 in both directions.
The configuration changes are applied to the Encryption Domain of Security Gateway-C per each relevant community, in this example Communities 1 and 2.
|
|
Note - In previous versions to get this functionality the |
Configuration:
|
Community |
Encryption Domain |
Install On |
|---|---|---|
|
Community-1 |
Network behind Security Gateway-C Host-2 |
Security Gateway-C Security Gateway-A |
|
Community-2 |
Network behind Security Gateway-C Host-1 |
Security Gateway-C Security Gateway-B |
-
Create a new host (Host-2 behind Security Gateway-B) to represent the Encryption Domain of Security Gateway-C to publish for Security Gateway-A.
-
Create a new host (Host-1 behind Security Gateway-A) to represent the Encryption Domain of Security Gateway-C to publish for Security Gateway-B.
-
Create a new Network group to include the current Encryption Domain of Security Gateway-C and the additional host (Host-2) for Community-1.
-
Create a new Network group to include the current Encryption Domain of Security Gateway-C and the additional host (Host-1) for Community-2.
-
For Community-1 change the Encryption Domain for Security Gateway-C, use the new group created in step 3.
-
For Community-2 change the Encryption Domain for Security Gateway-C, use the new group created in step 4.
In practice this type of configuration "tricks" the satellite gateways to think that the destination host is part of Security Gateway-C 's Encryption Domain and therefore encrypt the packets from the satellite gateways towards the center Security Gateway. When the encrypted packet gets to the center Security Gateway, it is decrypted and re-routed to its original destination thus it is encrypted again and sent to the other satellite gateway.
This is how it works:

If a Security Gateway participates in more than one VPN Community, you can configure a different VPN Domain for the Security Gateway for each VPN Community in which it participates. In SmartConsole, you can configure a specific VPN Domain for a Security Gateway in the Security Gateway object or in the VPN Community object.
To configure a specific VPN Domain in the Security Gateway Object:
-
Open the Network Management > VPN Domain page.
-
In the line Set Specific Domain for Gateway Communities, click Set.
-
Select the VPN Community for which it is necessary to override the VPN Domain and click Set.
-
Select the applicable option:
-
According to the gateway
This configuration option use the VPN Domain that is configured in the Network Management folder > VPN Domain page > VPN Domain section.
-
User defined
Select the applicable Network or Group object (or create a new object).
This configuration option overrides:
-
The VPN Domain that is configured in the Security Gateway object > Network Management folder > VPN Domain page > VPN Domain section.
-
The VPN Domain that is configured in the Meshed / Star VPN Community object > Gateways page.
-
The VPN Domain that is configured in the Remote Access VPN
An encrypted tunnel between remote access clients (such as Endpoint Security VPN) and a Security Gateway. Community object > Participating Gateways page.
-
-
-
Click OK to close the Set Specific VPN Domain for Gateway Communities window.
-
Click OK to close the Communities Specific VPN Domain window.
To configure a specific VPN Domain in the VPN Community Object:
-
In the Objects pane, click VPN Communities.
-
Click the applicable VPN Community.
The VPN Community configuration window opens.
-
In the Gateways pane, double-click the relevant Security Gateway object (or create a new object).
The VPN Domain configuration window opens.
-
Select the applicable option:
-
According to the gateway
This configuration option use the VPN Domain that is configured in the Network Management folder > VPN Domain page > VPN Domain section.
-
User defined
Select the applicable Network or Group object (or create a new object).
This configuration option overrides:
-
The VPN Domain that is configured in the Security Gateway object > Network Management folder > VPN Domain page > VPN Domain section.
-
The VPN Domain that is configured in the Meshed / Star VPN Community object > Gateways page.
-
The VPN Domain that is configured in the Remote Access VPN Community object > Participating Gateways page.
-
-
-
Click OK to close the VPN Domain configuration window.
-
Click OK to close the VPN Community configuration window.
The need for Granular Encryption - Many times organizations are required to connect a third party VPN Gateway to an existing VPN community, and for security reasons requires the use of a stronger encryption suite. With Granular Encryption you can add an Externally Managed Gateway that uses a different encryption suite to participate in an existing community without the need to change the encryption methods in use or split the VPN community.
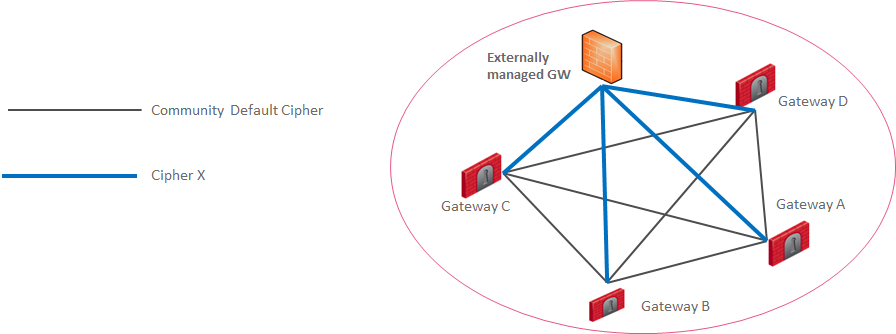
|
|
Note - Granular Encryption can be used only with Security Gateways that run R81 or higher. |
-
Open the VPN community.
-
Select the Encryption settings tab.
-
At the bottom of the settings window, beneath the Override Encryption for Externally Managed Gateways click the + button.
The Granular Encryption window opens.
Example:
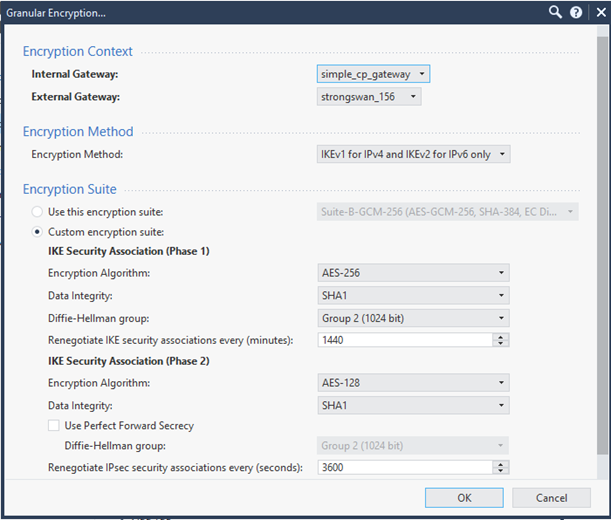
-
Select the Security Gateways that connects with the Externally Managed Gateway.
Granular Encryption settings are set in pairs, the Internal Security Gateway and the Externally Managed Security Gateway that corresponds, this is the Encryption Context.
The default value for the Internal Gateway is * Any. If this option is used, all the Internal Gateways participating in the VPN community use the same Encryption Suite to establish the VPN connection with the Externally Managed Gateway.

Note - If Granular Encryption is set for a specific Internal Gateway in addition to the use of * Any in a different Encryption Context, the Granular Encryption settings apply.
-
Select the Encryption Method and Encryption Suite to use for the VPN communication between the selected peers.
Make sure the VPN works with the routing configured in your network. If it does not work, change the routing configuring or change the Link Selection settings as necessary. See Link Selection Overview.
By default, IPsec VPN uses the main IPv4 Address, defined in the General Properties page of the Security Gateway object, for the VPN tunnel connection.
If you want to use this IP address for the VPN communication, and it is an external interface, you do not need additional routing.
If the main IP address is an internal interface, or if you want VPN communication on a different interface, make sure that:
-
The Link Selection settings for the Security Gateway are configured. Choose which Security Gateway links are used by VPN to route traffic correctly. See Link Selection Overview
-
VPN Routing is configured to allow the connections. For information how to configure routing in Gaia
Check Point security operating system that combines the strengths of both SecurePlatform and IPSO operating systems. OS, see the R81.10 Gaia Administration Guide - Chapter Network Management.
You must configure Access Control rules to allow traffic within VPN Communities.
Configure rules in SmartConsole > Security Policies view > Access Control.
All layers of the Access Control Policy can contain VPN rules.
To make a rule apply to a VPN Community, the VPN column of the Rule Base must contain one of these:
-
Any - The rules applies to all VPN Communities and to non-VPN related traffic. If you configure a new VPN Community after the rule was created, the rule also applies to the new VPN Community.
-
One or more specified VPN communities - For example, MyIntranet. Right-click in the VPN column of a rule and select Specific VPN Communities. The rule applies to the communities shown in the VPN column.
Examples:
-
This rule allows encrypted traffic between domains of member Security Gateways of "community_X."
Name
Source
Destination
VPN
Services & Applications
Allow traffic within community
* Any
*Any
 MyCommunity
* Any
-
This rule allows traffic from all VPN Communities to the internal network on all services.
Name
Source
Destination
VPN
Services & Applications
Allow all VPN
* Any
Internal_Network
* Any
* Any
-
This rule allows traffic between two VPN domains with all services.
Name
Source
Destination
VPN
Services & Applications
Site to Site VPN
Local_VPN_Domain
Peer_VPN_Domain
Local_VPN_Domain
Peer_VPN_Domain
Site2Site
* Any
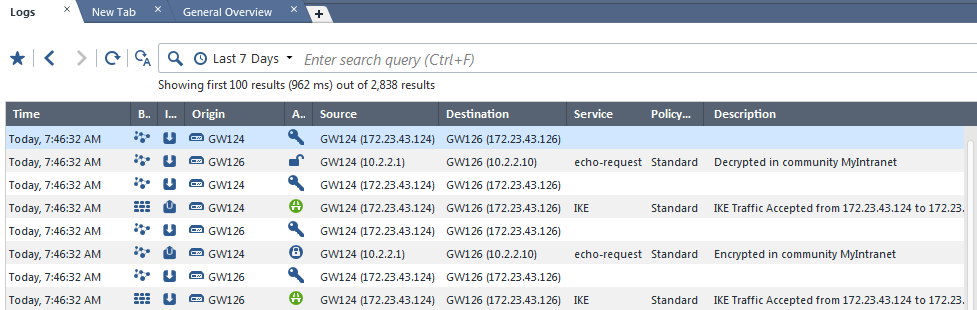
To make sure that a VPN tunnel works:
-
Locate the Access Control rule for the traffic that has to pass through the VPN tunnel.
In the Track column, select Log.
-
From the left navigation panel, click Logs & Monitor > Logs.
-
From the top, click New Tab.
-
From the bottom of the window, click Tunnel and User Monitoring.
Check Point SmartView Monitor opens.
-
Click the Security Gateway to see IPsec VPN traffic and tunnels opened.
A successful connection shows encrypt, decrypt and key install logs.
Alternatively:
-
In SmartConsole, from the left navigation panel, click Logs & Monitor.
-
On the Logs tab, search for VPN to see the applicable logs.
-
Example: